The CaptainCasa delivery comes with two add-on packages.
ecln_pbc.jar – This package contains a set of add-on components that are made available as page bean components. Page beans components hold all resources they require at runtime (layout definition, images, literals) within the .jar file – so the only thing you need to do is to integrate the ,jar file within your project.
ccaddsons.zip – This file contains a sophisticated Pivot processing. The processing was developed within a customer project at a point of time, when page bean components did not exist yet. As consequence the .zip file does contain both a .jar library file and contains resource files, which need to be part of your web content.
Both packages are completely independent from one another. If you require the page beans components only, then there is no need to install the Pivot processing – and vice versa.
After installation of CaptainCasa there is a /resources/addons directory:
<installdir>
/resources
/addons
eclnt_pbc.zip
ccaddons.zip
The eclnt_pbc.zip file contains:
The eclnt_pbc.jar file itself.
JavaDoc documentation
Sources
Add the eclnt_pbc.jar file to your project. If using the CaptainCasa project layout, then add the .jar file into the webcontent. Example:
<projectdir>
/webcontent
/WEB-INF
/lib
eclnt_pbc.jar
/webcontentbuild
/webcontencc
The .jar file will be copied into the runtime (e.g. tomcat) by a “reload” within the CaptainCasa toolset.
If using Maven you need to add the following dependency:
<repositories>
...
<repository>
<id>org.eclnt</id>
<url>https://www.captaincasademo.com/mavenrepository</url>
</repository>
...
</repositories>
<properties>
<cc.version>20191015</cc.version>
</properties>
...
<dependencies>
...
<dependency>
<groupId>org.eclnt</groupId>
<artifactId>eclntpbc</artifactId>
<version>${cc.version}</version>
</dependency>
...
</dependencies>
After adding the information to the pom.xml, rebuild the project and reload the project into the runtime (Tomcat installation).
The Pivot processing is made available as “ccaddons.zip”. The file has the following structure:
eclnt_ccaddons.zip
src_ccadons
org
eclnt
ccaddons
..
webcontent
ccaddons
images
*.jsp
eclntjsfserver
config
resources.ccaddons.xml
WEB-INF
lib
ccaddons.jar <== addons
Copy the whole content of the webcontent-directory into your CaptainCasa project's webcontent-directory.
All files and resources of the add-ons are strictly isolated from other parts of CaptainCasa or from other parts of your application:
All jsp and image resources are kept in the directory /ccaddons
All literal configuration is kept in resources.ccaddons.xml
All classes are kept in ccaddons.jar
The add-ons are not part of the normal CaptainCasa Enterprise Client license. The rules for using are:
CaptainCasa provides the add-ons without any type of warranty.
The usage of the add-ons as part of your application is for free – there is no cost associated, neither at design time nor at runtime.
You are allowed to view and update the sources. We strongly recommend not to update any of the original source files, but to copy the whole sources into a package of your own.
CaptainCasa may adapt or change these license issues any time.
The add-ons in general expect to be running on the most current CaptainCasa Enterprise Client version.
The “Data Object Framework” (DOF) is part of eclnt_pbc.jar. It provides the capability of creating default “CRUD-dialogs” for data objects.
Example: the following dialog...
...is created by the following Java code:
DOFJdbcUtil.initialize
(
"org.hsqldb.jdbcDriver", // driver class name
"jdbc:hsqldb:hsql://localhost:50100/PMS" // connection URL
);
m_listBean = DOFJdbcUtil.instance().createListEditor
(
"ROOMRESERVATION" // name of table
);
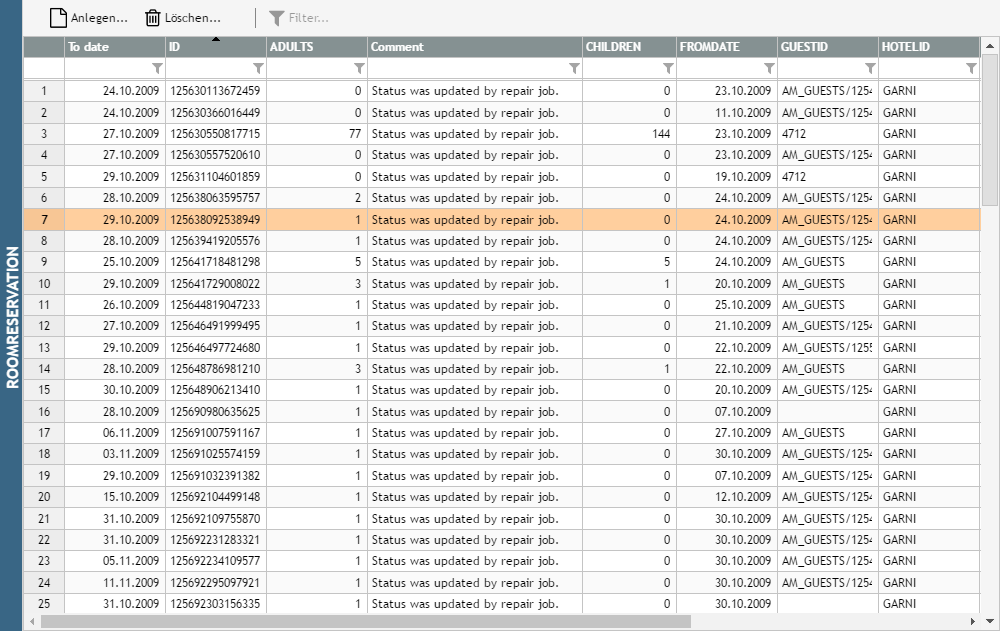
The dialog that was created just by passing the name of an SQL table already contains quite some number of functions:
There is a headline on top of the data. Here the user can filter the data:
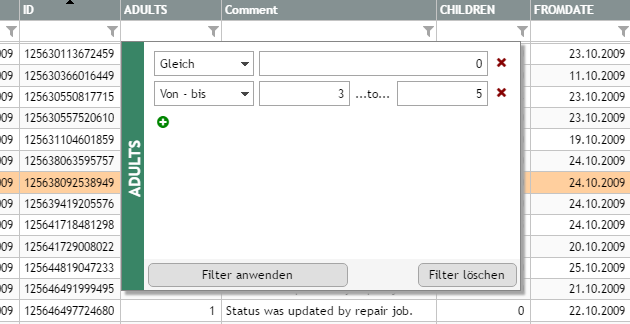
The user may define several filter conditions.
When double clicking an item then a dialog is shown:
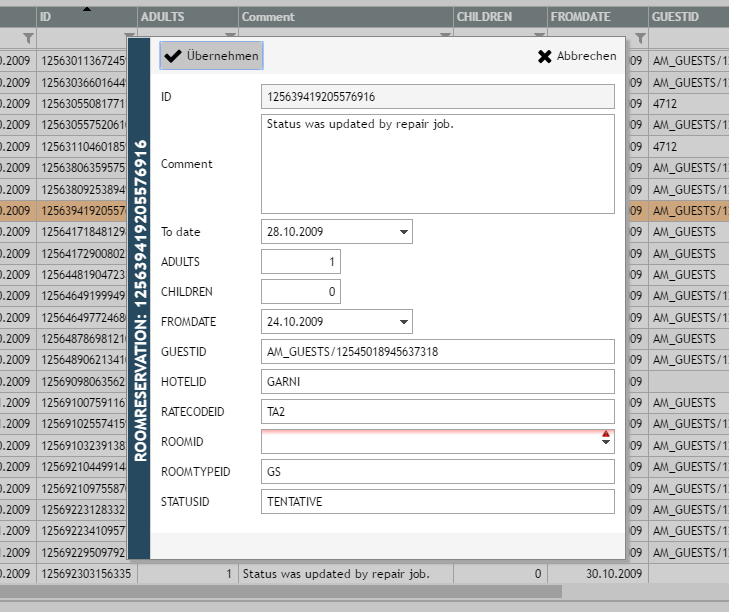
In the dialog the user may update the data item and save it.
The basic DOF-processing is independent from any persistence infrastructure. This means: the passing of the table name in the code above is only one option to go. It's simple to adapt DOF to any other persistence infrastructure.
Starting with a very basic “table view” (if using the JDBC binding) you can step by step enhance your dialogs by simply passing additional configuration data. This includes:
Define proper texts for the attributes / columns
Define proper controls (e.g. if the database columns is of type “biginteger” holding a date value)
Define key fields
Define mandatory fields
Define the optical order of fields in the list and in the detail view
Define valid values rules for certain attributes
etc.
The DOF processing is built to simply add functions by implementation if configuration is not sufficient. Maybe there are more sophisticated validation rules or maybe you want to update the whole dialog to your needs.
In this case you find some dedicated extension points for the Java code. And you may completely design the dialog on your own within the CaptainCasa Layout Editor.
DOFObject – instance of an object
Holds properties within some inner HashMap
Holds status information
Meta data
DOFObjectType => description of an object
DOFPropertyType => description of a property within an object
DOFRepository
keeps meta data
Each data item (e.g. a row of the list) is an object of class “DOFObject”. DOFObject itself holds a data map (java.util.Map). The key of the map is the String-based id of the corresponding value (column name in case of using JDBC) and the argument of the map is the data object.
The DOFObject also holds its current validation information – but this is described later on.
The DOFObject is described by an instance of class “DOFObjectType”. In this instance the meta data is kept. Part of the meta data is the data / property structure of the object: a “DOFObjectType” holds one ore more instances of “DOFPropertyType”.
The DOF Repository is the instance to know about the meta data.
Well, this may be obvious. But: the meta data information needs to be passed into the repository as first issue – before e.g. opening a corresponding DOF dialog.
The binding layers (e.g. JDBC binding or Bean Binding) will check if there is meta data available – and will create missing meta data automatically using the information that they have. Example: in case of the JDBC binding this information is based on the JDBC-ResultSetMetaData object which passes back the information about the column structure of a table. But this information can only be the starting point, because it is too rudimentary.
Example: the following table is to be accessed via DOF:
CREATE TABLE PERSON
(
PERSONID CHARACTER(20) PRIMARY KEY,
FIRSTNAME VARCHAR(255),
LASTNAME VARCHAR(255),
GENDER CHARACTER(1),
BIRTHDATE BIGINT,
BIRTHTOWN VARCHAR(255),
TITLE CHAR(20),
SALUATION CHAR(20),
PASSPORTNUMBER VARCHAR(255),
DRIVERLICENSENUMBER VARCHAR(255),
SOCIALSECURITYNUMBER VARCHAR(255)
);
You now may pass the meta data by using the DOF API:
private static void initializePERSON()
{
DOFObjectType ot = new DOFObjectType();
ot.setId("PERSON");
ot.setName("Person");
ot.setClassNamePersistor(DOFJdbcPersistor.class.getName());
{
DOFPropertyType pt = new DOFPropertyType();
pt.setId("PERSONID");
pt.setName("Person id");
pt.setDataClass(DOFENUMDataClass.STRING.name());
pt.setLength(20);
pt.setKey(true);
ot.getProperties().add(pt);
}
{
DOFPropertyType pt = new DOFPropertyType();
pt.setId("FIRSTNAME");
pt.setName("First name");
pt.setDataClass(DOFENUMDataClass.STRING.name());
pt.setLength(255);
pt.setMandatory(true);
ot.getProperties().add(pt);
}
{
DOFPropertyType pt = new DOFPropertyType();
pt.setId("LASTNAME");
pt.setName("Last name");
pt.setDataClass(DOFENUMDataClass.STRING.name());
pt.setLength(255);
pt.setMandatory(true);
ot.getProperties().add(pt);
}
{
DOFPropertyType pt = new DOFPropertyType();
pt.setId("TITLE");
pt.setName("Title");
pt.setDataClass(DOFENUMDataClass.STRING.name());
pt.setLength(20);
pt.setEditorClass(DOFPropertyComboFieldUI.class.getName());
pt.setValidValuesProviderId("org.eclnt.ccaddons.dof.util.DOFValidValuesProviderByJdbcQuery(SELECT * FROM TITLE)");
ot.getProperties().add(pt);
}
{
DOFPropertyType pt = new DOFPropertyType();
pt.setId("SALUATION");
pt.setName("Saluation");
pt.setDataClass(DOFENUMDataClass.STRING.name());
pt.setLength(20);
pt.setEditorClass(DOFPropertyComboFieldUI.class.getName());
pt.setValidValuesProviderId("org.eclnt.ccaddons.dof.util.DOFValidValuesProviderByJdbcQuery(SELECT * FROM SALUATION)");
ot.getProperties().add(pt);
}
{
DOFPropertyType pt = new DOFPropertyType();
pt.setId("BIRTHDATE");
pt.setName("Date of birth");
pt.setDataClass(DOFENUMDataClass.LONG.name());
pt.setFormat("date");
pt.setEditorClass(DOFPropertyCalendarFieldUI.class.getName());
ot.getProperties().add(pt);
}
ot.getProperties().add(createDefaultTextPropertyType("BIRTHTOWN","Town of birth"));
ot.getProperties().add(createDefaultTextPropertyType("PASSPORTNUMBER","Passport number"));
ot.getProperties().add(createDefaultTextPropertyType("DRIVERLICENSENUMBER","Driver license number"));
ot.getProperties().add(createDefaultTextPropertyType("SOCIALSECURITYNUMBER","Social security number"));
DOFRepository.instance().addObjectType(ot);
}
private static DOFPropertyType createDefaultTextPropertyType(String id, String name)
{
DOFPropertyType pt = new DOFPropertyType();
pt.setId(id);
pt.setName(name);
pt.setDataClass(DOFENUMDataClass.STRING.name());
pt.setLength(255);
return pt;
}
You see:
A DOFObjectType instance is created.
A number of DOFPropertyType instances are created – and added to the DOFObjectType instance.
The DOFObjectType instance is added into the DOFRepository.
DOFObjectType and DOFPropertyType are simple Java objects – that can be XML-serialized via JAXB. As consequence you may define the meta data as XML string as well – and pass this XML into the repository:
Example: table structure is:
CREATE TABLE TITLE
(
TITLEID CHARACTER(20) PRIMARY KEY,
NAME VARCHAR(255)
);
The XML is:
<?xml version="1.0" encoding="UTF-8" standalone="yes"?>
<dofObjectType>
<classNamePersistor>org.eclnt.ccaddons.dof.util.DOFJdbcPersistor</classNamePersistor>
<detailRendering/>
<id>TITLE</id>
<name>Title</name>
<properties>
<id>TITLEID</id>
<name>Title</name>
<dataClass>STRING</dataClass>
<key>true</key>
<length>20</length>
<mandatory>true</mandatory>
</properties>
<properties>
<dataClass>STRING</dataClass>
<id>NAME</id>
<name>Name</name>
<length>255</length>
<mandatory>true</mandatory>
</properties>
<screenHeight>200</screenHeight>
<screenWidth>500</screenWidth>
</dofObjectType>
The Java code is:
private static void initializeTITLE()
{
String xml = ...obtain the XML...;
DOFRepository.instance().addObjectType(xml);
}
The same XML can be passed implicitly by just making it accessible through the class loader. In other words: when an object type is accessed which is not yet known to the repository then the repository checks for the availability of the XML information within the class loader.
Example:
If the object type's id is “Abcde” then the repository will check for the XML file using the path “DOFObjectType.Abcde.xml”
If the object type's id is “abc.def.Fghij” then the repository will check for the XML file using the path “abc/def/DOFObjectType.Fghij.xml”
As consequence you may not explicitly fill the repository but may just provide corresponding XML information as part of your code.
The documentation of the properties of DOFObjectType and DOFPropertyType is part of the JavaDoc for the eclnt_pbc.jar package. Because the XML is just a direct representation of the Java objects, this JavaDoc documentation is valid both for the Java API and the XML based way of feeding the repository.
The DOFObjectListEditorUI is the list-component within the DOF framework. It accesses some persistent data (e.g. a table) and then shows the data items as list. - Internally, it is much more than a list, of course: when the user filters the list, then the persistent data is queried – so the whole data access management is part of the processing.
Represents a list of DOFObjects
Triggers creation/removal of objects
Opens up detail editor for single object instance on double click on item
JSP Page:
<t:rowbodypane id="g_2" padding="0">
<t:row id="g_7">
<t:pagebeancomponent id="g_5"
pagebeanbinding="#{d.TestDofQuery.listBean}" />
</t:row>
</t:rowbodypane>
<t:rowstatusbar id="g_1" />
Code:
package managedbeans;
import java.io.Serializable;
import java.sql.Connection;
import java.sql.Statement;
import javax.faces.event.ActionEvent;
import org.eclnt.ccaddons.dof.pbc.DOFObjectListEditorUI;
import org.eclnt.ccaddons.dof.util.DOFJdbcUtil;
import org.eclnt.editor.annotations.CCGenClass;
import org.eclnt.jsfserver.defaultscreens.Statusbar;
import org.eclnt.jsfserver.pagebean.PageBean;
import org.eclnt.util.log.CLog;
import org.eclnt.util.valuemgmt.ValueManager;
@CCGenClass (expressionBase="#{d.TestDofQuery}")
public class TestDofQuery
extends PageBean
implements Serializable
{
// ------------------------------------------------------------------------
// inner classes
// ------------------------------------------------------------------------
// ------------------------------------------------------------------------
// members
// ------------------------------------------------------------------------
DOFObjectListEditorUI m_listBean;
// ------------------------------------------------------------------------
// constructors & initialization
// ------------------------------------------------------------------------
public TestDofQuery()
{
initialize();
}
public String getPageName() { return "/testdofquery.jsp"; }
public String getRootExpressionUsedInPage() { return "#{d.TestDofQuery}"; }
// ------------------------------------------------------------------------
// public usage
// ------------------------------------------------------------------------
public DOFObjectListEditorUI getListBean() { return m_listBean; }
// ------------------------------------------------------------------------
// private usage
// ------------------------------------------------------------------------
private void initialize()
{
try
{
DOFJdbcUtil.initialize
(
"org.hsqldb.jdbcDriver", // driver class name
"jdbc:hsqldb:hsql://localhost:50100/PMS" // connection URL
);
m_listBean = DOFJdbcUtil.instance().createListEditor
(
"ADDRESSMANAGERITEM", // name of table
);
}
catch (Throwable t)
{
CLog.L.log(CLog.LL_ERR,"",t);
Statusbar.outputError(t.getMessage(),ValueManager.getStackstraceString(t));
}
}
}
When double clicking a DOF object within the list processing (DOFObjectListEditorUI) then the list processing opens up a dialog showing the detail of the corresponding DOF object.
This dialog shows a page bean component of class “DOFObjectEditorUI” - which itself is containing a page bean component of type “DOFObjectUI”:
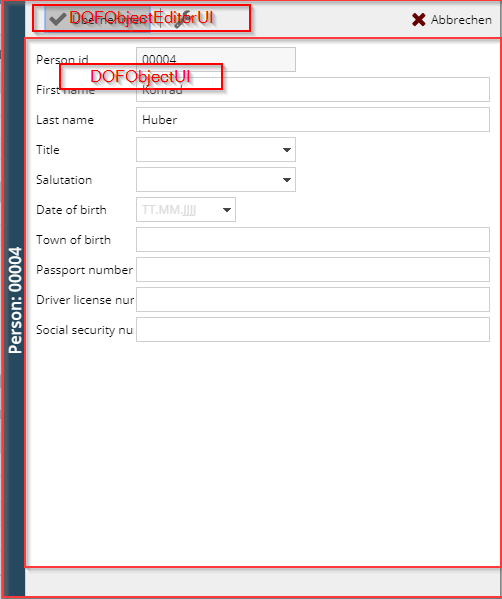
“DOFObectUI” is responsible for arranging the content and renders fields / check boxes / combo boxes according to the definitions of the corresponding object type. “DOFObjetEditorUI” is responsible for all the processing around – like saving the corresponding object.
The default “DOFObjectUI” implementation arranges the values of the object as simple linear list – one attribute below the other. You may define the sequence of the attributes as part of the meta data – but not more. You may simply write an own JSP-definition – also including own visual functions by defining an own JSP page and by extending the default “DOFObjectUI” implementation.
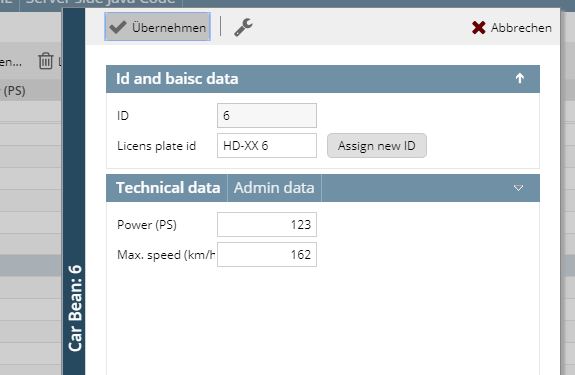
Example: the following screen is the default screen of a “CarBean” object:

We want to change it to look like this:
The first thing to do is pretty normal – you create some own layout definition in the Layout Editor. The layout definition needs to contain exactly one outest row, in which all the subsequent content is placed.
So create the following layout.
<t:row id="g_1">
</t:row>
Please follow this rule when further on editing the layout: it must contain exactly ONE OUTEST row...!
A page needs a page bean class – so now create one, and extend it from DOFObjectUI. In our example the code is:
public class DemoDOFCarBeanDetail
extends DOFObjectUI
implements Serializable
{
/*
* This constructor is only called in the layout editor.
*/
public DemoDOFCarBeanDetail()
{
}
/*
* This constructor is called during runtime.
*/
public DemoDOFCarBeanDetail(DOFObject instance,
IDOFObjectPersistor persistor)
{
super(instance, persistor);
}
public String getPageName() { return "/workplace/demodofcarbeandetail.jsp"; }
public String getRootExpressionUsedInPage()
{ return "#{d.DemoDOFCarBeanDetail}"; }
}
Of course the “getPageName()” and the “getRootExpressionUsedInPage()” method will return different values in your implementation.
<...this function has moved into the DOF tooling – which is part of the normal CaptainCasa toolset... - Docu need update here!>
There is a nice function to now copy the default layout of the DOFObjectUI -processing into your layout, so that you already have the default fields/etc. inside your layout and do not have to start from the scratch.
Open the default layout:
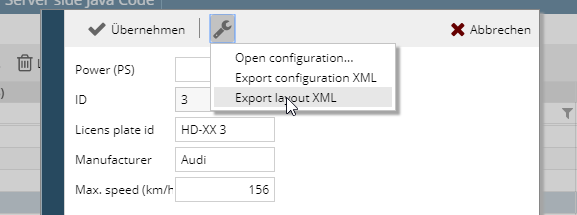
From the menu call “Export Layout XML”:
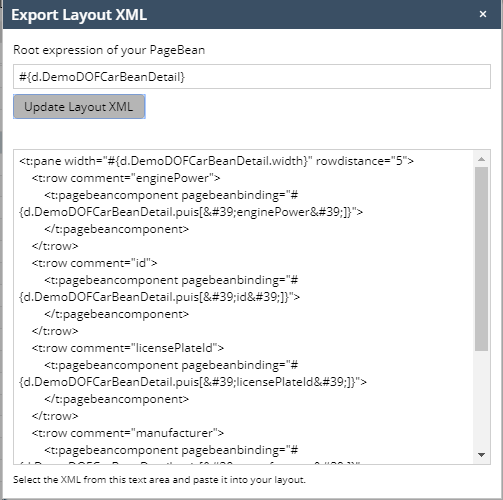
You see the layout XML definition. Specify the root expression of your page bean (in our case “#{d.DemoDOFCarBeanDetail}”) and press the “Update” button – the expressions in the layout XML will be updated accordingly.
Then copy the content of the XML definition (copy & paste) and add it into your JSP definition (using some text editor of your development environment).
...
<t:row id="g_1">
<t:pane width="#{d.DemoDOFCarBeanDetail.width}" rowdistance="5">
<t:row comment="enginePower">
<t:pagebeancomponent pagebeanbinding="#{d.DemoDOFCarBeanDetail.puis['enginePower']}">
</t:pagebeancomponent>
</t:row>
<t:row comment="id">
<t:pagebeancomponent pagebeanbinding="#{d.DemoDOFCarBeanDetail.puis['id']}">
</t:pagebeancomponent>
</t:row>
<t:row comment="licensePlateId">
<t:pagebeancomponent pagebeanbinding="#{d.DemoDOFCarBeanDetail.puis['licensePlateId']}">
</t:pagebeancomponent>
</t:row>
<t:row comment="manufacturer">
<t:pagebeancomponent pagebeanbinding="#{d.DemoDOFCarBeanDetail.puis['manufacturer']}">
</t:pagebeancomponent>
</t:row>
<t:row comment="maxSpeed">
<t:pagebeancomponent pagebeanbinding="#{d.DemoDOFCarBeanDetail.puis['maxSpeed']}">
</t:pagebeancomponent>
</t:row>
</t:pane>
</t:row>
...
Now your JSP page will look the same as the generated layout.
You see that per attribute of the DOF object one page bean component internally is created, which points in its expression to the corresponding attribute.
The DOF framework now has to know that you created some own page bean to take over the detail visualization. So you have to register.
Registration is done within the DOFObjectType for the object. The DOFObjectType provides a property “classNameDetailUI”. Here you have to set the full name of your page bean class.
So...
if you define the object type by API, then call DOFObjectType.setClassNameDetailUI()
if you define the object type by XML then define...
...
<?xml version="1.0" encoding="UTF-8" standalone="yes"?>
<dofObjectType>
<classNameDetailUI>workplace.DemoDOFCarBeanDetail</classNameDetailUI>
<id>workplace.dof.CarBean</id>
<name>Car Bean</name>
<properties>
<dataClass>INTEGER</dataClass>
<filterByDistinctValues>true</filterByDistinctValues>
…
Please note: the repository buffers its meta data. So you may need to reload your application within the Layout Editor after updating the meta data.
You may now add any further element into the page using normal editing functions of the CaptainCasa environment. And you may extend the page bean class by any other function. So you may re-arrange the content of the UI, you may add further buttons on JSP side – and add corresponding code on page bean side.
Development is much easier if you implement the empty constructor (i.e. the one without any parameters) and create a corresponding DOF object. Otherwise the page bean components for the attributes will not have any reference and will not be created when editing the layout in the Layout Editor.
Example:
public DemoDOFCarBeanDetail()
{
DOFObjectType ot = DOFRepository.instance().readObjectType(CarBean.class.getName(),true);
DOFObject o = new DOFObject(ot);
construct(o);
}
public DemoDOFCarBeanDetail(DOFObject instance, IDOFObjectPersistor persistor)
{
super(instance, persistor);
}
When creating the DOFObjectType reference you need to point to your object type id, of course.
There are some global definitions in the DOF framework that you may apply by adding some configuration data.
One of the most important decisions may be the central definition of a time zone which is always used if there is no definition on property type leve.
Add a file “DOFConfigData.default.xml” into your main source directory – so that it is available by class loader.
The file is some simple JAXB-serialization of the class “DOFConfigData”. Example:
<?xml version="1.0" encoding="UTF-8" standalone="yes"?>
<dofConfigData>
<colorBackgroundFromToDateBetween>#00800060</colorBackgroundFromToDateBetween>
<colorBackgroundFromToDateFirstLast>#00800030</colorBackgroundFromToDateFirstLast>
<defaultTimeZone>UTC</defaultTimeZone>
</dofConfigData>
Due to the JAXB-serialization the XML-element-structure exactly follow the property structure of class “DOFConfigData”. Please check the JavaDoc-documentation of this class for getting details on each element you may configure.
You do not have to configure all elements but only these ones which you want to change.
Every time you work with dates in Java you need to think about the timezone. A date (java.util.Date) is a time stamp which always requires a time zone to be converted into some “readable date”.
There are two ways of defining time zones in the DOF environment:
You may define the time zone as part of a property definition.
You may define the default time zone centrally by using the “defaultTimeZone” within the globak definitions:
<?xml version="1.0" encoding="UTF-8" standalone="yes"?>
<dofConfigData>
...
<defaultTimeZone>UTC</defaultTimeZone>
...
</dofConfigData>
The global definition does not override the definition on property type level! But it is used if there is no definition on property type level.
The “Diagram/Chart Editor” is part of eclnt_pbc.jar.
This add-on provides a full diagram editor, allowing to draw shapes by dragging/dropping from a pallet of shape types and to draw lines between the shapes.
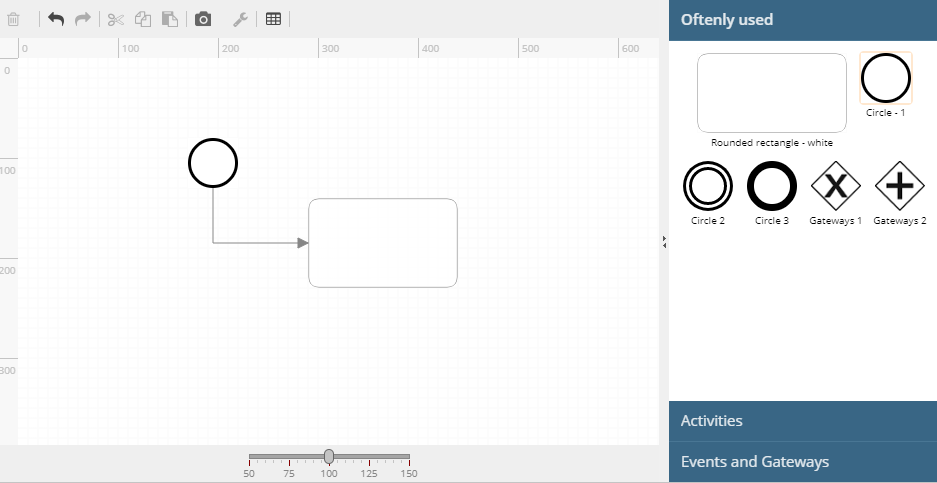
There are three page bean components within the package “org.eclnt.ccaddons.diagram.pbc”:
ChartEditorUI: this is the complete tool with a drawing area on the left and a pallet of shape types on the right.
ChartingAreaUI: this is the drawing area only
LibraryBrowserUI: this is the pallet of shapes types only
The most important configuration is the definition of the shape library. It can be done in two ways:
via Java API (class “ShapeLibrary”)
via XML
The XML way is just a JAXB-serialization of an instance of class “ShapeLibrary”. So the XML strcuture is 1:1 reflection of the class structure. This means: you may take a look into the JavaDoc API documentation of “ShapeLibrary” and read about the properties (in XML: elements) there.
There is a util-class “DiagramJaxb” which you can use for converting a ShypeLibrary instance into an XML string (“marshal”) and vice versa (“unmarshal”).
The shape library includes the definition of:
Shape types – the shapes that you want to drag and drop into the diagram
Line types – the lines that you want draw between shape instances
Categories – A grouping of shape types for the “LibraryBrowserUI”: each category is an own area, the shape types are arranged within the area. One shape type can be contained in multiple categories.
Shape groups – A grouping of shape types which defines at runtime, in which other shape type a concrete shape instance can be converted.
The following is a valid definition of a shape library using XML;
<?xml version="1.0" encoding="UTF-8" standalone="yes"?>
<shapeLibrary>
<!-- Categories: optical grouping of shape types -->
<category>
<categoryId>important</categoryId>
<text>Oftenly used</text>
<shapeTypeId>roundedrect_white</shapeTypeId>
<shapeTypeId>circle1</shapeTypeId>
<shapeTypeId>circle2</shapeTypeId>
<shapeTypeId>circle3</shapeTypeId>
<shapeTypeId>gateway1</shapeTypeId>
<shapeTypeId>gateway2</shapeTypeId>
</category>
<category>
<categoryId>activities</categoryId>
<text>Activities</text>
<shapeTypeId>rect_white</shapeTypeId>
<shapeTypeId>rect_red</shapeTypeId>
<shapeTypeId>rect_green</shapeTypeId>
<shapeTypeId>rect_blue</shapeTypeId>
<shapeTypeId>roundedrect_white</shapeTypeId>
<shapeTypeId>roundedrect_red</shapeTypeId>
<shapeTypeId>roundedrect_green</shapeTypeId>
<shapeTypeId>roundedrect_blue</shapeTypeId>
</category>
<category>
<categoryId>events</categoryId>
<text>Events and Gateways</text>
<shapeTypeId>circle1</shapeTypeId>
<shapeTypeId>circle2</shapeTypeId>
<shapeTypeId>circle3</shapeTypeId>
<shapeTypeId>gateway1</shapeTypeId>
<shapeTypeId>gateway2</shapeTypeId>
</category>
<!-- Shape Groups: define exchange-ability of shape types -->
<shapeType>
<shapeTypeId>rect_white</shapeTypeId><text>Rectangle - white</text>
<defaultHeight>90</defaultHeight><defaultWidth>150</defaultWidth>
<libraryIcon>/images/shapes/rect_white.png</libraryIcon>
<zIndex>201</zIndex>
<drawCommands>filledroundedrectangle(1,1,100%-2,100%-2,0,#FFFFFFC0,1,#808080)</drawCommands>
<resizeable>true</resizeable>
</shapeType>
<shapeType>
<shapeTypeId>rect_red</shapeTypeId><text>Rectangle - red</text>
<defaultHeight>90</defaultHeight><defaultWidth>150</defaultWidth>
<libraryIcon>/images/shapes/rect_red.png</libraryIcon>
<zIndex>201</zIndex>
<drawCommands>filledroundedrectangle(1,1,100%-2,100%-2,0,#FFE0E0C0,1,#808080)</drawCommands>
<resizeable>true</resizeable>
</shapeType>
<shapeType>
<shapeTypeId>rect_green</shapeTypeId><text>Rectangle - green</text>
<defaultHeight>90</defaultHeight><defaultWidth>150</defaultWidth>
<libraryIcon>/images/shapes/rect_green.png</libraryIcon>
<zIndex>201</zIndex>
<drawCommands>filledroundedrectangle(1,1,100%-2,100%-2,0,#E0FFE0C0,1,#808080)</drawCommands>
<resizeable>true</resizeable>
</shapeType>
<shapeType>
<shapeTypeId>rect_blue</shapeTypeId><text>Rectangle - blue</text>
<defaultHeight>90</defaultHeight><defaultWidth>150</defaultWidth>
<libraryIcon>/images/shapes/rect_blue.png</libraryIcon>
<zIndex>201</zIndex>
<drawCommands>filledroundedrectangle(1,1,100%-2,100%-2,0,#E0E0FFC0,1,#808080)</drawCommands>
<resizeable>true</resizeable>
</shapeType>
<shapeGroup>
<shapeGroupId>activities</shapeGroupId>
<shapeTypeId>rect_white</shapeTypeId>
<shapeTypeId>rect_red</shapeTypeId>
<shapeTypeId>rect_green</shapeTypeId>
<shapeTypeId>rect_blue</shapeTypeId>
<shapeTypeId>roundedrect_white</shapeTypeId>
<shapeTypeId>roundedrect_red</shapeTypeId>
<shapeTypeId>roundedrect_green</shapeTypeId>
<shapeTypeId>roundedrect_blue</shapeTypeId>
</shapeGroup>
<shapeGroup>
<shapeGroupId>events</shapeGroupId>
<shapeTypeId>circle1</shapeTypeId>
<shapeTypeId>circle2</shapeTypeId>
<shapeTypeId>circle3</shapeTypeId>
</shapeGroup>
<shapeGroup>
<shapeGroupId>gateways</shapeGroupId>
<shapeTypeId>gateway1</shapeTypeId>
<shapeTypeId>gateway2</shapeTypeId>
</shapeGroup>
<!-- Shape types -->
<shapeType>
<shapeTypeId>gateway1</shapeTypeId>
<text>Gateways 1</text>
<defaultHeight>50</defaultHeight>
<defaultWidth>50</defaultWidth>
<libraryIcon>/images/shapes/gateway1.png</libraryIcon>
<zIndex>201</zIndex>
<backgroundImage>/images/shapes/gateway1.png</backgroundImage>
<resizeable>false</resizeable>
</shapeType>
<shapeType>
<shapeTypeId>gateway2</shapeTypeId><text>Gateways 2</text>
<defaultHeight>50</defaultHeight><defaultWidth>50</defaultWidth>
<libraryIcon>/images/shapes/gateway2.png</libraryIcon>
<zIndex>201</zIndex>
<backgroundImage>/images/shapes/gateway2.png</backgroundImage>
<resizeable>false</resizeable>
</shapeType>
<shapeType>
<shapeTypeId>circle1</shapeTypeId><text>Circle - 1</text>
<defaultHeight>50</defaultHeight><defaultWidth>50</defaultWidth>
<libraryIcon>/images/shapes/circle1.png</libraryIcon>
<zIndex>201</zIndex>
<backgroundImage>/images/shapes/circle1.png</backgroundImage>
<resizeable>false</resizeable>
</shapeType>
<shapeType>
<shapeTypeId>circle2</shapeTypeId><text>Circle 2</text>
<defaultHeight>50</defaultHeight><defaultWidth>50</defaultWidth>
<libraryIcon>/images/shapes/circle2.png</libraryIcon>
<zIndex>201</zIndex>
<backgroundImage>/images/shapes/circle2.png</backgroundImage>
<resizeable>false</resizeable>
</shapeType>
<shapeType>
<shapeTypeId>circle3</shapeTypeId><text>Circle 3</text>
<defaultHeight>50</defaultHeight><defaultWidth>50</defaultWidth>
<libraryIcon>/images/shapes/circle3.png</libraryIcon>
<zIndex>201</zIndex>
<backgroundImage>/images/shapes/circle3.png</backgroundImage>
<resizeable>false</resizeable>
</shapeType>
<shapeType>
<shapeTypeId>roundedrect_white</shapeTypeId><text>Rounded rectangle - white</text>
<defaultHeight>90</defaultHeight><defaultWidth>150</defaultWidth>
<libraryIcon>/images/shapes/roundedrect_white.png</libraryIcon>
<zIndex>201</zIndex>
<drawCommands>filledroundedrectangle(1,1,100%-2,100%-2,10,#FFFFFFC0,1,#808080)</drawCommands>
<resizeable>true</resizeable>
</shapeType>
<shapeType>
<shapeTypeId>roundedrect_red</shapeTypeId><text>Rounded rectangle - red</text>
<defaultHeight>90</defaultHeight><defaultWidth>150</defaultWidth>
<libraryIcon>/images/shapes/roundedrect_red.png</libraryIcon>
<zIndex>201</zIndex>
<drawCommands>filledroundedrectangle(1,1,100%-2,100%-2,10,#FFE0E0C0,1,#808080)</drawCommands>
<resizeable>true</resizeable>
</shapeType>
<shapeType>
<shapeTypeId>roundedrect_green</shapeTypeId><text>Rounded rectangle - green</text>
<defaultHeight>90</defaultHeight><defaultWidth>150</defaultWidth>
<libraryIcon>/images/shapes/roundedrect_green.png</libraryIcon>
<zIndex>201</zIndex>
<drawCommands>filledroundedrectangle(1,1,100%-2,100%-2,10,#E0FFE0C0,1,#808080)</drawCommands>
<resizeable>true</resizeable>
</shapeType>
<shapeType>
<shapeTypeId>roundedrect_blue</shapeTypeId><text>Rounded rectangle - blue</text>
<defaultHeight>90</defaultHeight><defaultWidth>150</defaultWidth>
<libraryIcon>/images/shapes/roundedrect_blue.png</libraryIcon>
<zIndex>201</zIndex>
<drawCommands>filledroundedrectangle(1,1,100%-2,100%-2,10,#E0E0FFC0,1,#808080)</drawCommands>
<resizeable>true</resizeable>
</shapeType>
<!-- Line types -->
<lineType>
<lineTypeId>sequence</lineTypeId>
<text>Sequence</text>
<color>#808080</color>
<libraryIcon>/images/lines/default.png</libraryIcon>
<allowedFromArrows>NOARROW</allowedFromArrows>
<allowedToArrows>FILLEDARROW</allowedToArrows>
</lineType>
<lineType>
<lineTypeId>message</lineTypeId>
<text>Message</text>
<color>#808080</color>
<libraryIcon>/images/lines/messageflow.png</libraryIcon>
<allowedFromArrows>UNFILLEDCIRCLE</allowedFromArrows>
<allowedToArrows>UNFILLEDARROW</allowedToArrows>
<lineDash>4;4</lineDash>
</lineType>
<lineType>
<lineTypeId>data</lineTypeId>
<text>Data</text>
<color>#808080</color>
<libraryIcon>/images/lines/dataassociation.png</libraryIcon>
<allowedFromArrows>NOARROW</allowedFromArrows>
<allowedToArrows>LINEARROW</allowedToArrows>
<lineDash>4;4</lineDash>
</lineType>
</shapeLibrary>
The usage is simple. in your JSP page you have to include a PAGEBEANCOMPONENTINCLUDE which points via expression to an instance of ChartEditorUI.
<t:row id="g_8">
<t:pagebeancomponent id="g_9"
pagebeanbinding="#{d.DemoPBCCharting1.chartingEditor}" />
</t:row>
In the implementation you need to create an instance of ShapeLibrary and pass it into the Chart-processing:
public DemoPBCCharting1(IWorkpageDispatcher workpageDispatcher)
{
super(workpageDispatcher);
BufferedContentMgr.add(m_dl);
UploadContentMgr.add(m_ul);
m_chartingEditor = new ChartEditorUI();
String configXML = new ClassloaderReader(this.getClass().getClassLoader()).readUTF8File("workplace/DemoPBCCharting.xml",true);
ShapeLibrary lib = DiagramJaxb.unmarshalShapeLibrary(configXML);
m_rep = new ShapeRepository(lib);
m_chart = new Chart();
loadChart();
}
private void loadChart()
{
m_chartingEditor.prepare(m_rep,m_chart,new ChartEditorUI.IListener()
{
public void reactOnShapeSelected(ChartShapeInstance shapeInstance) {}
public void reactOnShapeRemoved(ChartShapeInstance shapeInstance) {}
public void reactOnShapeExecuted(ChartShapeInstance shapeInstance) {}
public void reactOnShapeCreated(ChartShapeInstance shapeInstance) {}
public void reactOnLineSelected(ChartLineInstance lineInstance) {}
public void reactOnDeSelected() {}
});
}
In the processing above the XML file is read from the class loader. Of course you may read it from any other resource of your choice... The XML is transferred into a ShapeLibrary instance, which then is passed into ShapeRepository-instance, which is finally passed into the prepare-method of the ChartEditorUI instance.
The “Chart”-object is the actual representation of the chart that is edited. It contains “ChartShapeInstance” and “ChartLineInstance” objects. A ChartShapeInstance is representing one drawn shape, i.e. it has a connection to its shape type, it knows its position (left, top, width, height), its text etc.
The “Chart”-object is a pure data-bean and does not contain any logic. You may also use the util-class “DiagramJaxb” to convert it to XML and to create it from XML. This means: you can easily develop scenarios in which you store the content of the graphics on your side as serialized XML string.
The pivot table is part of ccaddons.jar.
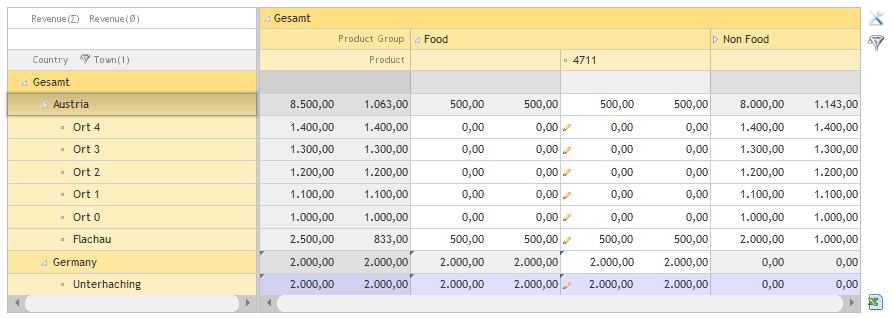
The add-on “Pivot-Table” provides a simple way to display data as interactive Piviot-Table. The data is passed as a list of flat data items, together with some meta data, describing its structure.
Based on this data the user can build up own pivot-table definitions:
The user can easily define which key attributes to show “on the left” and “on the top”.
The user can easily define which data to calculate in the body.
The user can open/close data levels both vertically and horizontally.
The core building block is a generic UI component “PivotPageBean”. This is a page bean that you can easily embed into your application.
The page beans receives an instance of a “PivotData” object. This object contains both the meta data description (which key attributes, which figure attributes) and the flat data items.
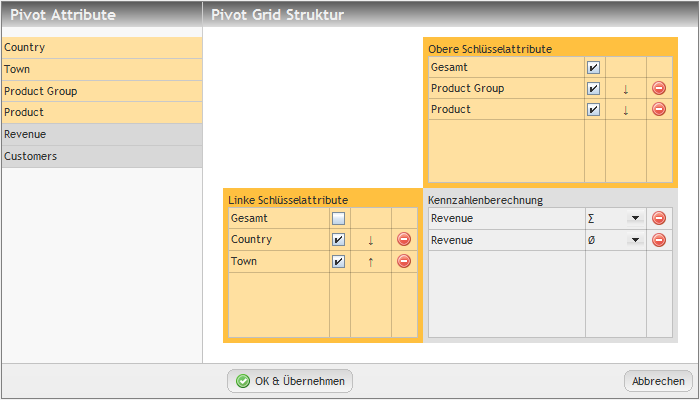
When the user presses the configuration icon on the right top the following dialog is shon:
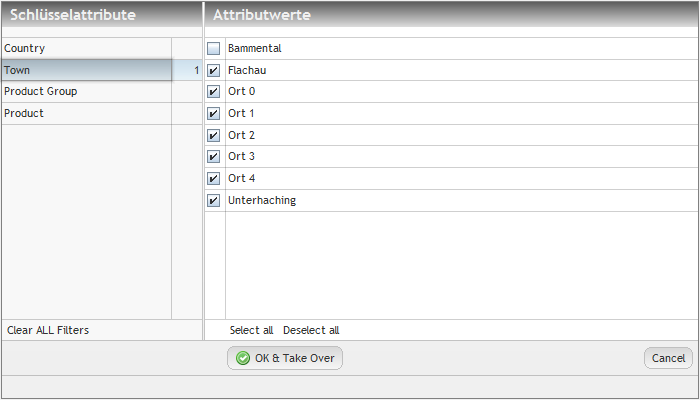
Data can be filtered by pressing the filter icon:
Data is passed as “PivotData” object. The following example program shows how to build up an object:
static PivotAttribute attributeCountry =
new PivotAttribute("COUNTRY","Country");
static PivotAttribute attributeTown =
new PivotAttribute("TOWN","Town");
static PivotAttribute attributeProductGroup =
new PivotAttribute("PRODUCTGROUP","Product Group");
static PivotAttribute attributeProduct =
new PivotAttribute("PRODUCT","Product");
static PivotAttribute attributeRevenue =
new PivotAttribute("REVENUE","Revenue");
static PivotAttribute attributeCustomers =
new PivotAttribute("CUSTOMERS","Customers");
static PivotIdText countryGermany = new PivotIdText("de","Germany");
static PivotIdText countryAustria = new PivotIdText("a","Austria");
static PivotIdText pgFood = new PivotIdText("1","Food");
static PivotIdText pgNonFood = new PivotIdText("2","Non Food");
public static PivotData buildPivotData()
{
PivotData pivotData = new PivotData();
// meta data
pivotData.addKeyAttribute(attributeCountry);
pivotData.addKeyAttribute(attributeTown);
pivotData.addKeyAttribute(attributeProductGroup);
pivotData.addKeyAttribute(attributeProduct);
pivotData.addFigureAttribute(attributeRevenue);
pivotData.addFigureAttribute(attributeCustomers);
// data items
{
PivotDataItem item = new PivotDataItem();
item.putKeyValue(attributeCountry,countryGermany);
item.putKeyValue(attributeTown,"Unterhaching");
item.putKeyValue(attributeProductGroup,pgFood);
item.putKeyValue(attributeProduct,"4711");
item.putFigureValue(attributeRevenue,new BigDecimal(2000));
item.putFigureValue(attributeCustomers,new BigDecimal(100));
item.setComment("This is a wonderful item!");
pivotData.addDataItem(item);
}
{
PivotDataItem item = new PivotDataItem();
item.putKeyValue(attributeCountry,countryGermany);
item.putKeyValue(attributeTown,"Bammental");
item.putKeyValue(attributeProductGroup,pgFood);
item.putKeyValue(attributeProduct,"4711");
item.putFigureValue(attributeRevenue,new BigDecimal(1000));
item.putFigureValue(attributeCustomers,new BigDecimal(100));
pivotData.addDataItem(item);
}
{
PivotDataItem item = new PivotDataItem();
item.putKeyValue(attributeCountry,countryAustria);
item.putKeyValue(attributeTown,"Flachau");
item.putKeyValue(attributeProductGroup,pgFood);
item.putKeyValue(attributeProduct,"4711");
item.putFigureValue(attributeRevenue,new BigDecimal(500));
item.putFigureValue(attributeCustomers,new BigDecimal(100));
pivotData.addDataItem(item);
}
{
PivotDataItem item = new PivotDataItem();
item.putKeyValue(attributeCountry,countryAustria);
item.putKeyValue(attributeTown,"Flachau");
item.putKeyValue(attributeProductGroup,pgNonFood);
item.putKeyValue(attributeProduct,"4712");
item.putFigureValue(attributeRevenue,new BigDecimal(1000));
item.putFigureValue(attributeCustomers,new BigDecimal(100));
pivotData.addDataItem(item);
}
{
PivotDataItem item = new PivotDataItem();
item.putKeyValue(attributeCountry,countryAustria);
item.putKeyValue(attributeTown,"Flachau");
item.putKeyValue(attributeProductGroup,pgNonFood);
item.putKeyValue(attributeProduct,"4713");
item.putFigureValue(attributeRevenue,new BigDecimal(1000));
item.putFigureValue(attributeCustomers,new BigDecimal(100));
pivotData.addDataItem(item);
}
for (int i=0; i<5; i++)
{
PivotDataItem item = new PivotDataItem();
item.putKeyValue(attributeCountry,countryAustria);
item.putKeyValue(attributeTown,"Ort " + i);
item.putKeyValue(attributeProductGroup,pgNonFood);
item.putKeyValue(attributeProduct,"4713");
item.putFigureValue(attributeRevenue,new BigDecimal(1000 + i*100));
item.putFigureValue(attributeCustomers,new BigDecimal(100));
item.setCellExtension(new TestPivotCellExtension());
// item.setStatus(1);
pivotData.addDataItem(item);
}
// display of keys
pivotData.addKeyAttributeLeft
(new PivotKey(attributeCountry,true));
pivotData.addKeyAttributeLeft
(new PivotKey(attributeTown,true,PivotData.SORT_DOWN));
pivotData.addKeyAttributeTop
(new PivotKey(attributeProductGroup,true));
pivotData.addKeyAttributeTop
(new PivotKey(attributeProduct,true));
// display of figures
pivotData.addFigure
(new PivotFigure(attributeRevenue,new PivotFigureCalculationSum()));
pivotData.addFigure(new PivotFigure
(attributeRevenue,new PivotFigureCalculationAverage()));
// apply "in memory filter"
pivotData.addFilterValue(attributeTown,"Bammental");
You see, that there are three sections:
First the meta data is described by calling addKeyAttribute(..) and addFigureAttribute(..). Each attribute is defined as “PivotAttribute”-object, itself containing an id and a text.
Then the data is filled by calling “addDataItem” - passing a “PivotDataItem” object. The “PivotDataItem” contains the attribute values. The rules for passing attribute values are:
Key values are either an instance of “PivotIdText” or an instance of “String”.
Figure values are an instance of “Number”, i.e. you can pass integers, decimals, floats, etc.
Finally – and this is optional – you may pass some initial configuration about how the pivot-table should be rendered. You may define which key attributes you want to see on the “left” and on the “top side”, and you may define which calculated figured you want to see within the body. And you may define to filter some data.
If no passing this configuration data then an empty grid will be shown – waiting for a configuration by the user.
The PivotData-instance is passed into a page bean of type “PivotPageBean”. This means:
Within your JSP page definition you have to add a ROWPAGEBEANINCLUDE component.
The attribute ROWPAGEBEANINCLUDE-PAGEBEANBINDING has to bind to an instance of “PivotPageBean”.
Example:
JSP-Page:
=========
<t:rowbodypane id="g_6" >
<t:rowpagebeaninclude id="g_7" pagebeanbinding="#{d.TestPivotUI.pivot}" />
</t:rowbodypane>
Implementation:
package managedbeans;
@CCGenClass (expressionBase="#{d.TestPivotUI}")
public class TestPivotUI
extends WorkpageDispatchedPageBean
implements Serializable
{
boolean m_withCellExtension = false;
PivotPageBean m_pivot;
String m_configXML = null;
public TestPivotUI(IWorkpageDispatcher dispatcher)
{
super(dispatcher);
m_pivot = new PivotPageBean(dispatcher);
PivotData pivotData = TestPivot.buildPivotData();
m_pivot.prepare(pivotData);
}
public String getPageName() { return "/testpivot.jsp"; }
public String getRootExpressionUsedInPage() { return "#{d.TestPivotUI}"; }
public PivotPageBean getPivot() { return m_pivot; }
}
There are certain types of interaction that you can react on. The most important ones are:
The user may select (double-click) a cell.
The user may mark (single-click) one or more cells (control-single-click).
The user may open a popup menu.
You can pass in implementation of interface “IPivotListener” into the PivotData object:
public interface IPivotListener
{
public void reactOnCellMarked(Map<PivotAttribute,Object> keyValues, PivotAttribute figure, BigDecimal cellValue, List<PivotDataItem> cellDataItems);
public void reactOnCellSelection(Map<PivotAttribute,Object> keyValues, PivotAttribute figure, BigDecimal cellValue, List<PivotDataItem> cellDataItems);
public void reactOnCellPopupMenu(Map<PivotAttribute,Object> keyValues, PivotAttribute figure, BigDecimal cellValue, List<PivotDataItem> cellDataItems, String command);
public void reactOnCellEdit(PivotKeyTupel cellTupel, PivotDataItem dataItem, boolean isNewDataItem, PivotAttribute figure);
public List<PivotDataItem> reactOnProxyDataItemResoultion(PivotDataItem proxyItem);
public void reactOnFilterUpdate();
public void reactOnConfigurationUpdate();
}
With each cell selection / cell marking you receive the complete data of the corresponding cell, i.e. the key values, the figure attribute, the value of the calculated figure and the list of flat data items which is behind the cell.
Please check the JavaDoc for the class PivorPageBean in addition to see how to obtain further information out of the currently displayed pivot-table.
The Pivot allows to display the current data as graphics:
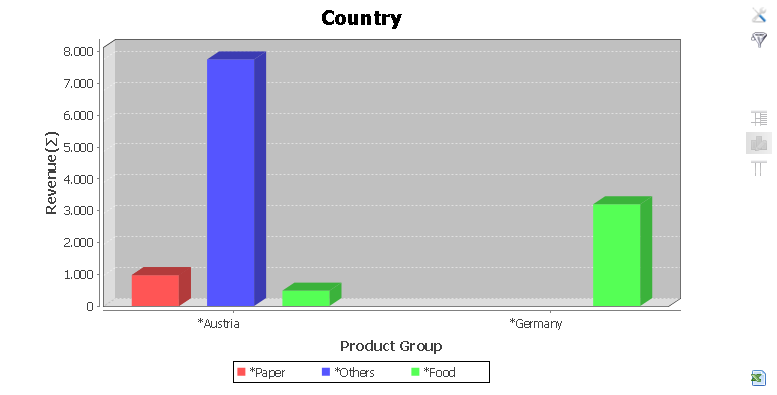
The graphics is interactive – this means:
You can dive into the pivot data cube by pressing on the labels that are marked with “*”. This is the normal pivot navigation that you normally do inside the pivot table, but now executed from the graphics.
By clicking onto the bars the same events are thrown that are normally thrown when working inside the pivot table.
Two types of graphics are provided – horizontal and vertical display – dependent on the figure attribute. The definition is done through the PivotData-object, by calling the methods PivotData.setGraphicTypeForFigure(...).
Please find details within the Javadoc-documentation.
The Graphics processing is done in a page bean on its own, which is created and managed by the PivotPageBean-object – which is the one managing the whole pivot processing.
You may override the default implementation by subclassing from class PivotGrapicsPageBean and add your own functions there. Reasons for overriding may be:
You want to introduce new types of graphics or you want to fine-control the way the graphics is created.
You want to add own rules for deciding if it makes sense to create a graphics at all.
After sub-classing you need to tell PivotPageBean that it now should create an object of your class when opening a graphics. To do so there is a certain factory mechanism:
Implement an own class that implements interface PivotPageBean.IGraphicsPageBeanCreator.
Pass an instance of your class into your PivotPageBean instance by calling PivotPageBean.setPivotGraphicsCreator.
The interface looks like:
public interface IGraphicsPageBeanCreator
{
public PivotGraphicsPageBean createPivotGraphicsPageBean
(PivotPageBean owner);
}
Every time the PivotPageBean requires to create a graphics-bean instance it will now use your implementation of IGraphicsPageBeanCreator – so you can create your PivotGraphicsPageBean-extension accordingly.
When the user switches into the graphics view then before the graphics is built a certain “hook” is processed. In this hook you can decide that it does not make sense at all to create the graphics – for any reason on your side.
The hook is done via some protected methods of PivotGraphicsPageBean – which you can override on your own. The methods are:
protected void checkIfGraphicsCanBeRendered()
throws ExceptionGraphicsCannotBeRendered
{
...
}
protected void checkIfGraphicsCanBeRebdered(PivotPageBean owner,
GridLine leftParent,
GridLine topParent,
List<List<Number>> numbers)
throws ExceptionGraphicsCannotBeRendered
{
...
}
By default the first method (without parameters) is called, collects certain data and then calls the second method. So, in typical cases you only override the second method.
In case you find out that a creation of a graphics is not possible for any reason, you just throw an exception of type ExceptionGraphicsCannotBeRendered. The text that you pass in the exception is the one that is displayed as alert message later on.
The item list view shows the “raw items” (instances of PivotDataItem) that are part of the PivotData that you display:
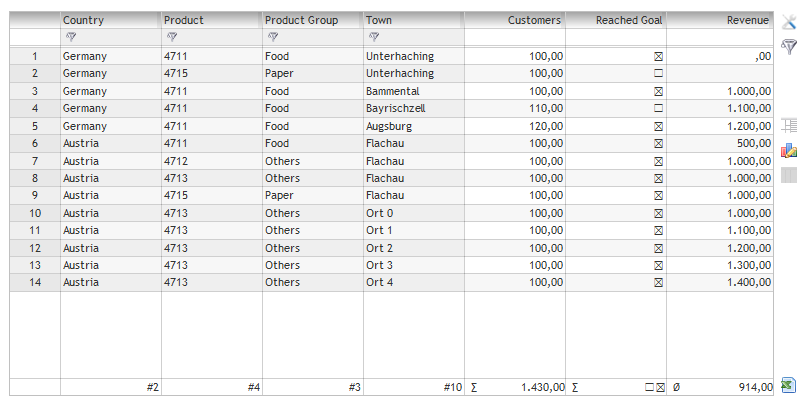
By pressing into the filter section of the column header you can call the normal filter dialog. In the footer line by default the number of different data items is shown in for key attributes, and the sum is shown for figure attributes.
You may define a special calculation for a figure attribute by calling methods PivotData.setFigureItemListCalculation(...).
E.g. in the example above the calculation for the revenue was set to be an average calculation:
...
PivotAttribute attributeRevenue = new PivotAttribute("REVENUE","Revenue");
...
...
PivotData pivotData = new PivotData();
...
pivotData.addFigureAttribute(attributeRevenue);
pivotData.setFigureItemListCalculation(attributeRevenue,
new PivotFigureCalculationAverage());
The item list view is a page bean on its own that may be managed by the pivot table processing – under the control of PivotPageBean.
But you may also use the bean as standalone bean – without the context of the PivotPageBean. In this case just create an instance of PivotItemListPageBean inside your page processing and call the prepare method:
PivotData pivotData = new PivotData();
...
PivotItemListPageBean pb = new PivotItemListPageBean(getOwningDispatcher());
pb.prepare(pivotData);
Include the page bean within your page juzst by using the normal page bean ROWPAGEBEANINCLUDE component.