The Cluster and Version Manager (in the following text: “Cluster Manager”) is a self-containing web application that runs inside some servlet engine as part of your production environment.
There are two functions that the Cluster Manager addresses:
Load distribution
Version management
In the Cluster Manager you define a list of cluster nodes each one of them providing the same web application. Each web application is running with some base-URL.
Example: your application “warehouse” is running on several nodes. In the cluster manager these nodes are registered in some XML file:
<application id="WAREHOUSE" name="Warehouse" ...>
<node baseURL="https://server1:8080/warehouse" .../>
<node baseURL="https://server1:9090/warehouse" .../>
<node baseURL="https://server2:8080/warehouse" .../>
</application>
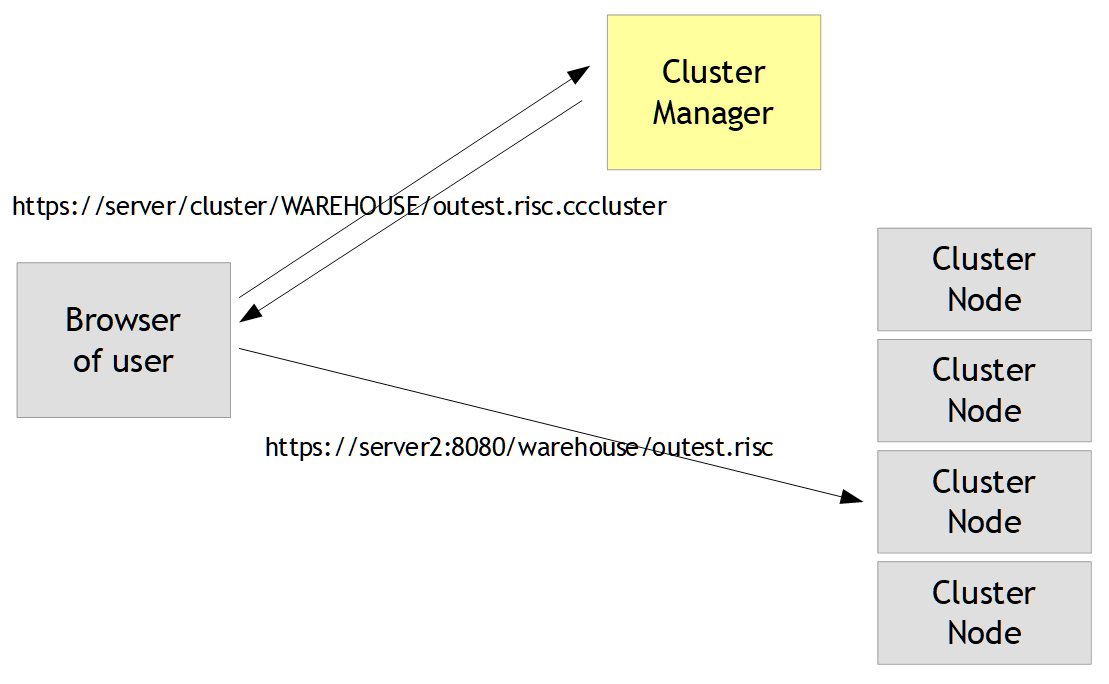
When a user logs on to the “WAREHOUSE” application, then the user opens up a URL against the cluster server. The URL is built in the following way:
https://<clusterServer>/cluster/WAREHOUSE/outest.risc.cccluster
The Cluster Manager automatically selects an appropriate node and will redirect the browser of the user to this node by sending back the node's URL:
https://server2:8080/warehouse/outest.risc
The response of the Cluster Manager is...
either an HTML-page containing the redirect – in this case the browser of the user shows the node's URL that is passed back
or an HTML-page that is completely filled by an iframe, opening the node's URL – in this case the URL of the browser is kept stable
From now on the browser of the user is directly operating with the cluster node – the Cluster Manager itself is not involved anymore. It is only required for establishing the initial connection between the user's browser and the actual node taking over the user's session.
Please compare the URL that is sent to the cluster server with the URL that the cluster server sends back to the browser as redirected URL:
URL to cluster server:
https://<clusterServer>/cluster/WAREHOUSE/outest.risc.cccluster
redirected URL:
https://server2:8080/warehouse/outest.risc
You see: the cluster server replaces the “left” part of the URL with the URL-address that is defined with a cluster node – and removes the “.cccluster” at the end.
This pattern is applied to any URL that is sent to the cluster server that is ending with “.cccluster”. In case you application starts with a page “start.html” then the scenario would be:
URL to cluster server:
https://<clusterServer>/cluster/WAREHOUSE/start.html.cccluster
redirected URL:
https://server2:8080/warehouse/start.html
You can also add parameters to the URL (“...?param1=value1¶m2=value2...”) - they will be taken over into the redirected URL.
The Cluster Manager supports
(weighted) round robin
sequential server selection with session limit
During runtime the Cluster Manager periodically checks the status of the cluster nodes – finding out if they are still active and checking how man sessions they currently run. This runtime data is taken into consideration during load distribution.
When during the node resolution a node is selected – then the Cluster Manager explicitly checks the availability of the corresponding node before responding the redirection-page to the requesting browser.
In the previous chapter “Load distribution” we saw that the user opens some “stable URL” of the Cluster Manager and then is redirected to the actual node. This redirection already is a first step of abstraction because the user's start-URL is independent from the actual node taking over later on.
The Cluster Manager adds one additional step before:
You can define so called “references”. A reference is nothing else than a definition in which an “id” points to an application-definition.
In the previous chapter there is the definition of application “WAREHOUSE”:
<application id="WAREHOUSE" name="Warehouse (production)" ...>
<node baseURL="https://server1:8080/warehouse" .../>
...
</application>
Let's assume this application is used by e.g. several customers (e.g. multi tenant scenarios). This customer is now the “reference” and you can define in an other XML file:
<reference id="CUST1" name="Customer 1" applicationId="WAREHOUSE"/>
Now the user can use ther URL...
https://clusterserver/elcnt_cluster/CUST1/outest.risc
The redirection will first check the application that is assigned to “CUST1” and then will select the proper node according to the load balancing defined with the application.
Well, this at first sounds like a nice way to present a nice URL to the end-user. But: it's much more...!
Let's now assume that you deliver your software in different versions. Each version is deployed as separate web application. Example:
<application id="WAREHOUSE_V1" name="Warehouse version 1" ...>
<node baseURL="https://server1:8080/warehouseV1" .../>
<node baseURL="https://server1:9090/warehouseV1" .../>
<node baseURL="https://server2:8080/warehouseV1" .../>
</application>
<application id="WAREHOUSE_V2" name="Warehouse version 2" ...>
<node baseURL="https://server1:8080/warehouseV2" .../>
<node baseURL="https://server3:8080/warehouseV2" .../>
</application>
Now you can assign different customers to the version they are using:
<reference id="CUST1" name="Customer 1" applicationId="WAREHOUSE_V1"/>
<reference id="CUST2" name="Customer 2" applicationId="WAREHOUSE_V2"/>
<reference id="CUST3" name="Customer 3" applicationId="WAREHOUSE_V1"/>
In this example customer “CUST1” and “CUST3” are still using the old version V1 – and “CUST2” is already using the new version of the software.
In the previous chapter we used the “reference” to be a representation for a “customer”. This was just an example! Basically the “reference” is just an id – the meaning behind is completely yours. The “Cluster Manager” connects the abstract “reference” to a “cluster node”.
Based on the Cluster Manager you now can set up a deployment strategy in which you can fulfill the requirement of seamlessly updating your application, so that...
users who are logged on are not “thrown out” – and keep on working with their “old” application version until they are finished
new users are logged on to the new version automatically
Let's take the example of the previous chapter:
Applications:
<application id="WAREHOUSE_V1" name="Warehouse version 1" ...>
<node baseURL="https://server1:8080/warehouseV1" .../>
<node baseURL="https://server1:9090/warehouseV1" .../>
<node baseURL="https://server2:8080/warehouseV1" .../>
</application>
application id="WAREHOUSE_V2" name="Warehouse version 2" ...>
<node baseURL="https://server1:8080/warehouseV2" .../>
<node baseURL="https://server3:8080/warehouseV2" .../>
</application>
References:
<reference id="CUST1" name="Customer 1" applicationId="WAREHOUSE_V1"/>
If now “CUST1” wants to switch to “WAREHOUSE_V2” then the only thing that has to be done is to update the reference-definition to:
<reference id="CUST1" name="Customer 1" applicationId="WAREHOUSE_V2"/>
Existing users that are currently working with the “WAREHOUSE_V1”-application are not affected because they keep on working with their application wihtout any interruption. New users are redirected to the new version because now the Cluster Manger will direct them to the nodes of “WAREHOUSE_V2”.
Of course you are aware of the fact, that there is much more than this aspect to ensure the seamless update from one version to the next. Just two examples out of many:
Compatibility of both versions in order to be able to work with two versions simultaneously must be guaranteed.
Batch processing needs to be stopped on the old version and invoked to the new version
Maybe a seamless update is really difficult if you talk about moving from one major version “V1” to the next major version “V2”.
But: for minor versions a seamless update typically is possible – e.g. moving from “V1.2.1” to “V1.2.2” in general does not come with the big problems of a major version.
The important idea behind is, that you – due to the Cluster Manager – have the freedom to install multiple version in parallel – cleanly separated as own web applications nodes.
You do not have one “warehouse”-application which you constantly deploy and update. But you have versioned “warehouse”-applications that you install in parallel.
Or in “Tomcat terms”: you do not upgrade your application by re-deploying the same application “warehouse.war” on top of an existing one – but you upgrade you application by deploying a new web-application “warehouseVxxx.war” in parallel to the existing one.
The Cluster Manager then will phase out the old version and bring in the new version.
The Cluster Manager is completely independent from any infrastructure you use for building up cluster nodes. The Cluster Manager only requires to know the base URL, under which a certain CaptainCasa web application is provided.
As consequence you can use any environment to run your web application.
Directly install Tomcat instances
Directly install Spring boot instances
Build up and run Docker images including your web application
...
Vice versa the Cluster Manager itself can be installed in any environment. The default delivery is as .war file to be installed in any servlet engine.
In the previous chapter you already got to know the important XML files in order to understand the structure of “refernce”, “application” and “node” definitions. Now this chapter will add detail information on the configuration.
The Cluster Manager is distributed as .war file with the name “cluster.war”.
The download address is:
https://www.CaptainCasa.com/download/cluster/cluster.war
Install into any servlet engine of your choice. When using Tomcat as servlet engine just copy the cluster.war into the tomcat/webapps/-directory.
We assume that the name of the web-application is “cluster” after deployment in the following text.
Start the URL “http://<yourServer>:<yourPort>/cluster”.
A logon dialog will show up. When first time using use the following logon data:
User “admin”
Password “admin”
The system will ask you to change the password immediately.
You then will see an application in which you can define the Cluster Manager settings:
References
Application and Nodes
In case your are the user “admin”: Users
“Id” - Unique identifier
“Name” - Text
“Application id” - Id of the Application that is used by this reference
“Comment” - Text
“Id” - Unique identifier.
“Name” - Text
“Node selection mode” - Strategy that is applied to find a proper application node depending on the current load. The load is measured by the number of sessions that are active within a node.
“Round robin” - The load will be distributed on all nodes according to weights that are defined for each node.
“Sequential” - The load will be distributed in a way so that the first node is “filled up” until reaching the maximum load. Then the next node is “filled up”.
“Redirection mode” - The type of the html page that is sent back from the Cluster Manager to the requesting browser and which contains the redirection to the selected node
“IFrame” - The redirected page is embedded into an HTML-iframe. Advantage: the user will not see any change in the browser's URL.
“Redirect” - The redirected page is containing a redirection command that makes the browser navigate to the node's URL. The browser's URL will be updated correspondingly – so the user sees the node's URL as consequence.
“Base URL” - This is the URL that is used as base for building the redirection URL. Typcially this is the base URL of the web application that runs on the corresponding node.
“Comment” - Text
“Roundrobin weight” - Percentage definition about the load that a node wants to receive when using round robin within the Application definition. A node with a weight of “50%” will only receive half of the load compared to a node with a weight of “100%”.
“Number of sessions” - Maximum number of sessions that a node wants to receive when using sequential node selection. When the number of sessions inside this node will be higher than this value then the node is treated as “filled up” and the next node is chosen. If no next node is available then the node selection will switch to round robin automatically.
There is one user “admin” - the one that is used for the first login and that is used for special administrative functions afterwards.
Only the user “admin” can create/delete other users by defining their user name and initial password.
All users, that are created by the “admin” user in the following, have the authority to configure references, applications and nodes.
The Cluster Manager directly connects the user's browser with the the URL of the node that is selected. It only selects the appropriate node – the follow on communication is manged directly between the browser and the node.
In many cases you do not want the user's browser to be directly connected to the node, but want to define a central proxy in front of all nodes through which all traffic is done. This central proxy then e.g. is the one to manage security and other issues.
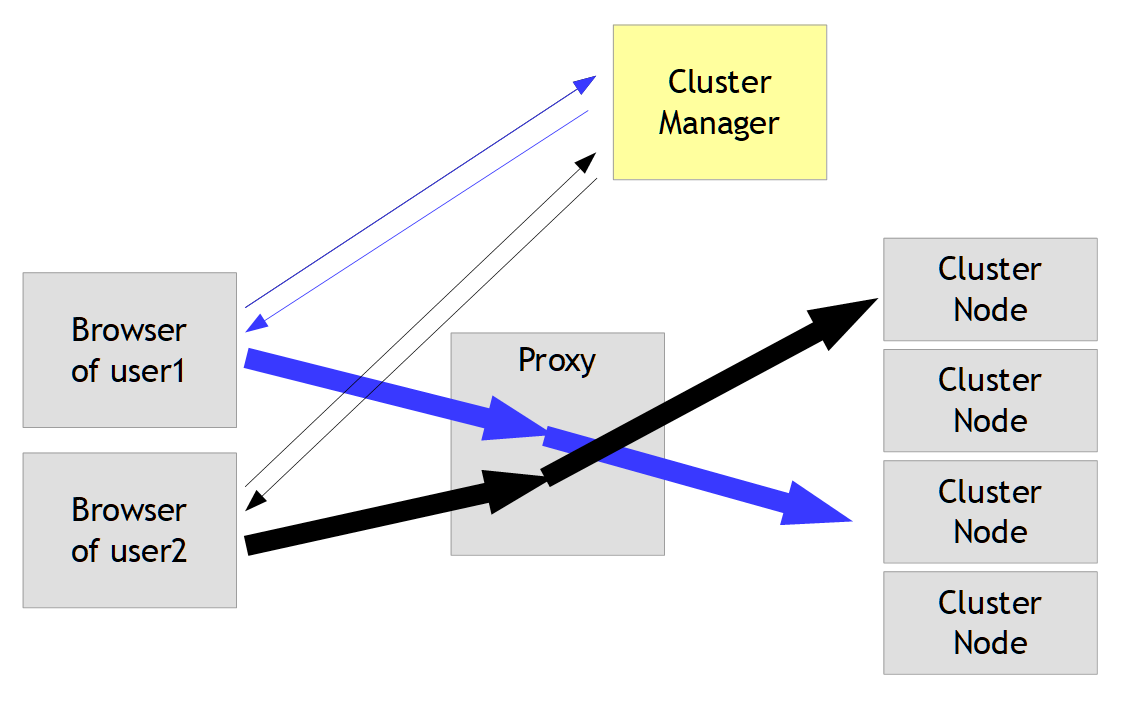
The Apache http-server can – of course... - be nicely configured to serve as proxy in front of internal nodes. This chapter describes one - out of many! - ways to do so.
The idea is that any server behind the Apache can be addressed in the following way:
https://apacheServer/TOS/clusterNodeServer/clusterNodePort/...
Example:
If there is a node which is accessed internally through the URL...
https://exampleServer1:8080/warehouse/start.html
...then the corresponding URL through the Apache server is:
https://apacheServer/TOS/exampleServer1/8080/warehouse/start.html
The Apache configuration is done in file “conf/httpd.conf”:
First make sure that the following modules are switched on:
...
LoadModule proxy_module modules/mod_proxy.so
...
LoadModule proxy_http_module modules/mod_proxy_http.so
LoadModule proxy_http2_module modules/mod_proxy_http2.so
...
LoadModule proxy_wstunnel_module modules/mod_proxy_wstunnel.so
...
LoadModule rewrite_module modules/mod_rewrite.so
...
Then add the following rules at the end of the file:
# -----------------------------------------------------------------------------
#
# rewrite rules
#
# -----------------------------------------------------------------------------
RewriteEngine On
RewriteCond %{HTTP:Upgrade} =websocket [NC]
RewriteRule "^/TOS/([A-Za-z0-9_\.]+)/([0-9]+)/([A-Za-z_]+)/(.*)$" "ws://$1:$2/$3/$4" [P,L]
RewriteCond %{HTTP:Upgrade} !=websocket [NC]
RewriteRule "^/TOS/([A-Za-z0-9_\.]+)/([0-9]+)/([A-Za-z_]+)/(.*)$" "http://$1:$2/$3/$4" [P,L]
# -----------------------------------------------------------------------------
There are two rule definitions in which you see the detection of parrs of the incomin URL via regular expressions - and in which you see the transformation into internal URLs that are then accessed by the Apache server.
The expressions are identical – the one definition is defined for web-service processing, the other one for normal http processing.
The Cluster Manager can of course easily embedded in such Apache-configuration.
Example: instead of defining...
<application id="WAREHOUSE" name="Warehouse" ...>
<node baseURL="https://server1:8080/warehouse" .../>
<node baseURL="https://server1:9090/warehouse" .../>
<node baseURL="https://server2:8080/warehouse" .../>
</application>
...you now define...
<application id="WAREHOUSE" name="Warehouse" ...>
<node baseURL="https://apacheServer/TOS/server1/8080/warehouse" .../>
<node baseURL="https://apacheServer/TOS/server1/9090/warehouse" .../>
<node baseURL="https://apacheServer/TOS/server2/8080/warehouse" .../>
</application>
...so that the redirected URL that is sent back to the requesting browser connects the browser via the Apache server to the executing node.
The nice thing: any internal server which is reachable from your Apache server now is reachable from outside through the Apache server! You can add/remove servers without having to reconfigure Apache.
The bad thing: the Apache server now connects the outside browser to potentially any inside server! Which may be a high security risk!
So you need to pay attention to set up your security configuration properly - or to modify the rewrite-rules, so that they are not defined in this generic way! The definition of rewrite rules that we introduced in this chapter must is meant as starting point of your thinking about setting up your concrete environment – and not as the definition to directly take over!