This document
Concepts
Different levels of individualization
Applications consist out of parts, that are “always the same” throughout different types of applications. Example:
-
The user has to logon.
-
The user hat to start a workplace to start functions from.
-
There is a set of entities within the database that you need to edit, export/import, transfer between systems. The user can edit these entities by corresponding forms, there are validations on the logic side to ensure the integrity of data.
And applications consist out of parts that are individual for a specific application.
Some of these specific parts are add-ons to the standard parts:
-
You want to add own, specific validation rules to your entities.
-
You want to add additional information into forms. You want to change the sequence of user interface interactions.
Other parts are completely decoupled from standards - and are individually designed. Example:
What you normally would do...
Assuming you have all resources available you typically would follow a strategy like this one:
-
For the standard parts you would use dedicated developers in order to build a flexible framework, that can be parameterized for the concrete application use case. The framework should provide corresponding tools to customize these use cases in a simple, fast way.
The framework should allow to be extended to a certain level - in order to bring in own processing or visualization rules.
For the decoupled, individual parts of the application you would not try to abuse the standard parts so that you force everything into it! You would allow to just “develop” - based on a solid, efficient environment.
The borders between what is standard level, what is extension level and what is individual level are not define-able in a fix way. So you would never follow a strategy to implement these levels in different technologies. - But you would prefer to have a consistent technology and architecture that is used for all of these levels - so that knowledge can be shared across the levels and so that deployment and runtime behavior remains consistent.
...and what CaptainCasa RapidApp is doing!
Well, this is exactly what CaptainCasa RapidApp is doing! Defining one consistent implementation infrastructure based on
-
Java as implementation language/environment
-
Relational databases for storing data
-
CaptainCasa Enterprise Client as Java-based Web-Frontend
-
Docker as base for runtime deployments
“No-code” for the standard parts!
There are a couple of default issues coming with any application project that you just can set up by definition, without any coding. What you get is:
-
You get a very quick start up phase of your application project “by one click” - including a setup of a design time environment and runtime environment. The runtime environment already contains “all you need” - from the user interface down to the database.
-
You get a very fast, no-code definition of entities - and all issues involved:
-
the automated creation and update of database, the scripts for SQL creation of tables
-
the REST APIs for exporting and importing data
-
The list and detail screens to edit the data - that can be individually created by dragging and dropping controls
-
The basic functions on view and logical level to add individual validations and processing
-
The protocol of changes of entity instances when users create, change of delete them
-
Entities can be simple entities (one data structure) or complex entities (hierarchically structured entities, e.g. header-item structure). Entities can reference one another, coming with automatically followed integrity rules on the logical side and corresponding controls (e.g. selection controls) on the view side.
-
You get a no-code workplace management for the users of your application that includes
-
Logon, user verification, password reset by mail
-
Setting of basic texts, colors, logos, images
-
Individual, role-based function collections for different types of users
-
You get a no-code authority management that controls access of users to entities and to workplace functions
“Low-code”-Java for enriching the default!
The default lets you define simple and complex entities which already cover many types of integrity rules for processing and validating entity objects. But you may add:
-
Specific consistency rules that are to be expressed by concrete procedural logic.
-
Specific interfaces that you may include when editing and saving data.
-
Specific add-ons in the user interface to integrate additional information and additional functions into the user dialog.
All this can be done by predefined, easy to follow extensions for enriching the default. The base classes to apply the extensions to are already created by the default processing - so you have clear entry points to add additional logic.
Extensions are created using “guided Java” as language. This includes:
-
Clear entrance points where to apply the extensions.
-
Super-simple, integrated SQL access to all entities.
-
Automatic integration into architectural concepts (e.g. separation of logic from view, transaction management, concurrency management, ...)
“Any”-Java for free-style development!
The “No-code” and “Low-code” parts address these issues which are “common standard”: User-management, workplace management, entity management, sophisticated form management on persistent data.
What's about the issues which are not standardized?
Examples:
Here you use “normal Java” together with the normal CaptainCasa Enterprise Client which directly binds user interface processing to Java without any client-side development.
Advantages
Structural/ architectural advantages
You application follows one architectural structure:
-
A pure Java-based architecture behind all layers
-
A easy, extendable user interface using the CaptainCasa Enterprise Client as core framework
-
Simple to use, integrated concepts for the defaults: database access, authorization management, REST services, ...
-
A simple runtime management of your application based on Docker-based deployment.
Project advantages
You project will jump-start because the skeleton of the application is visible immediately: the workplace, the entities, the forms to edit these entities.
Your project team does not have to burn development resources for “stupid issues” - e.g. lists of data, selection of an data item, open up detail dialog to edit and save the data... These issues come out of the box and can be customized without Java coding.
Your project team can directly focus on these things which matter: the individual issues, that make your application and that add value to your application.
Inside your project team you can split up resources according to the different individualization levels:
-
Forms and basic rules can be customized by non-Java-developers
-
Extensions can be added by Java-”newbies”
-
Individual implementations can be added by “real” Java-developers
Installation
Two installation steps
-
Logon to CaptainCasa download page
-
Download from the “Jakarta EE” section
-
(1) only contains environment components, such as
-
(2) contains the CaptainCasa demos and tools
-
Install the files one after the next
-
Please note
Creating your first RapidApp project
Video tutorials
Create project
-
From the CaptainCasa Tool Set start from the menu
-
In the dialog that shows up define...
-
The group id
-
The artifact id
-
The directory in which your project will be created as sub-directory
-
You may decide between different project types (e.g. with/without Spring Boot inclusion) - select the most basic one at the beginning, it's no problem to change afterwards.
-
Both group id and artifact id are “commonly used” ids in the area of Maven projects. The “group id” identifies the organization in which the project is created, the “artifact id” is actual the project name within this organization. The artifact id is also the one that defines the name of the project directory by default.
-
You may start with “test” as organization id but should switch to something more serious later on.
-
The group id may contain dots (“.”). So you may define “com.xxx.yyy” as organization. The group id then is transferred into corresponding Java package names.
db_url=jdbc:hsqldb:file:./data/...nameOfProject...
db_driver=org.hsqldb.jdbc.JDBCDriver
db_username=SA
db_password=
db_sqldialect=hsqldb
db_autotrim=true
db_withpooling=true
db_url=jdbc:postgresql://localhost:<yourPort>/<yourDB>
db_driver=org.postgresql.Driver
db_username=yourPostgresUser
db_password=yourPostgresPassword
db_sqldialect=postgres
db_autotrim=true
db_withpooling=true
Define your first content
-
Base of your application is a meta data definition holding
-
This meta data is kept in resource file “ccda_metadata.xml” of your project
-
The file can be edited manually but we strongly recommend to use the tool set of CaptainCasa for editing
Define the first entity “article”
<property id="id" text="Id" dataType="ccda_base.idString50" key="true"/>
<property id="description" text="Description" dataType="ccda_base.textLong500"/>
<property id="name" text="Name" dataType="ccda_base.textShort100" mandatory="true"/>
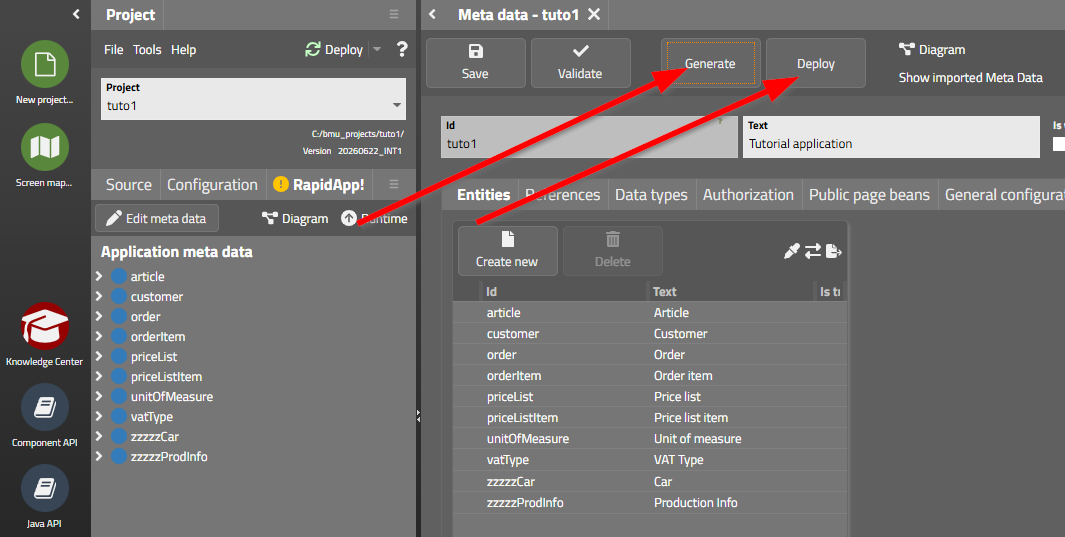
Generate and deploy
Build your list UI
-
The list UI is showing the entity instances that are stored in the database. From the list you can navigate (double click) into the detail editor of the entity.
-
Create the list UI in the following way:
-
In the “RapidApp!”-tree on the left open the popup menu on the entity “article” that you just created. Select ”Open list dialog”.
-
The layout editor will be opened in the center
-
From the tree “on the left” drag the properties that you want to include in the list and drop them into the control “tdap:beangridwitheditor”.
-
Press “Refresh preview” or “Save” to update the preview.
-
The preview is the live preview of your system - it's not a simulated preview!
-
Your application is deployed in the Tomcat which is started with “A_startserver.bat”. You may take a look into your installation's Tomcat directory:
<...installDir...>/server/tomcat/webapps/<...yourApplication...>
Build your detail UI
-
The detail UI is showing one instance of the entity. The dialog is used for creating, editing or viewing the instance.
-
Create the detail UI in the following way:
-
In the “RapidApp!”-tree on the left open popup menu for the entity “article” and now select “Open detail dialog”
-
Press “Refresh preview”
-
Click into the content area of the previewed dialog
-
Now drag the properties on the left (again using the images shown in the tree node) an drop them into the layout.
-
Press “Refresh preview” or “Save” to update the preview.
Test the whole scenario
Setting up “link” relations
-
“Link” relations are relations in which one property of the one entity points to another object (typically an other entity)
-
By following this relation...
-
During an object update the linked object is referenced but not part of the update process itself.
<entity id="unitOfMeasure" isPublic="true" text="Unit of measure">
<property dataType="idUnitOfMeasure" id="id" key="true" mandatory="false" text="Id"/>
<property dataType="ccda_base.textShort100" id="name" mandatory="true" text="Name"/>
</entity>
<reference id="refUnitOfMeasure" isPublic="true" refEntity="unitOfMeasure" refIdColumn="id" refTextColumn="name" text="Ref to unit of measure"/>
<entity id="article" isPublic="true" text="Article">
<property dataType="idUnitOfMeasure" id="unitOfMeasureId" mandatory="false" propertyReferenceId="refUnitOfMeasure" text="Base unit of measure" validateByValidValues="true"/>
</entity>
UI processing
Setting up “embedded” relations
-
“Embedded” relations are relations in which one object is the owner of either one other object or a list of other objects. The embedded object instance is exclusively owned by the embedding object instance.
-
On property level the embedding object provides one (or more) properties which are shared with the embedded object
order: orderId || ... | ... | ...
order item: orderId | itemNumber || ... | ...
-
-
-
The “person” has an “addressId” that is automatically generated (e.g. a UUID or a counted int) - which is the key of the “address” entity. The “address” entity is a generic definition of an address which can be embedded into multiple other entities (e.g. “person”, “customer”, “supplier”, “company”, ...)
person: personId || ... | ...| ...| addressId | ...
address: addressId || ... | ... | ...
-
Define the embedded entity in the “Embedded entities” tab of an entity
-
Select the embedded entity and define the type of embedding (“LIST” for 1:n/ “OBJECT” for 1:1)
-
By default select “Create if not exists” so that the sub-object is automatically created when creating the embedding object
-
Define the property mapping so that the runtime knows how to find the embedded object for an embedding object
-
Examples
-
Define if you want the embedded object to be part of the view that is used to show the list of embedded objects. Typically you do so for embedded objects with a 1:1 reltionship (“instance”).
-
In case of “list” relations you need to in addition define the value for the additional key properties so that the view will exactly select one object from the list of objects.
-
You can define the value of such property as “system parameter” (e.g. the current language of the user session) or as fix value.
UI layer
-
Embedded Object level
-
For each embedded object you define a “Detail dialog”
-
For “list”-embedded objects you define a “Grid editor dialog” - in this dialog the list of embedded objects is shown + the user can create/remove instances. When clicking an item of the list then the “Detail dialog” is shown below the list.
-
Embedding Object level
Entity
Data type
-
When defining a property for an entity you have to define the data type for the property. The data type consists out of:
-
The general type (“String”, “int”, ...)
-
Specific definitions that depend on the general type. Example:
-
By using data types, the definition of data fields is structured: instead of everyone defining e.g. own text fields with different maximum length, you define one central data type “description” and e.g. assign a length of 500 - which then is applied by all users of data type “description”.
Reference
Authorization
-
At certain places within the application processing the application may want to check if the currently logged on user is authorized to perform the corresponding activity
-
For this reason the application defines an authorization object type. The definition includes:
-
Example
-
RapidApp creates ab Authorization request class out of this definition:
package org.eclnt.dataapp.logic.authority;
import org.eclnt.dataapp.logic.authorization.*;
public class ARCCEntityRights
extends AuthorizationRequest
{
public static final String TYPE_ID = "eclnt_dataapp.CCEntityRights";
public static final String ASPECT_entity = "entity";
public static final String ASPECT_action = "action";
public ARCCEntityRights()
{
super(TYPE_ID);
}
public ARCCEntityRights setEntity(Object value) { addAspectValue(ASPECT_entity,value); return this; }
public ARCCEntityRights setAction(Object value) { addAspectValue(ASPECT_action,value); return this; }
}
ARCCEntityRights r = new ARCCEntityRights()
.setAction(ENUMEditMode.EDIT)
.setEntity(BCIRuntime.instance().getEntityIdByClass(selectedObject.getClass()));
boolean authorized = AuthorizationManager.instance().checkIfUserIsAuthorized(r);
Public page beans
-
A page bean is the class of a dialog
-
By adding a page bean class as public page bean, the corresponding dialog can be referenced e.g. when configuring the user workplace
Applying own logic
Importing the project
-
You may use any Java development environment
-
Eclipse, NetBeans, IntelliJ, VS Code, ...
-
The RapidApp project is a plain Maven project.
-
Use the IDE's import functions to import the RapdiApp project as Maven project correspondingly.
-
Example, Eclipse: Call “File > Import... > Maven > Existing Maven Projects”.
-
We strongly recommend to use UTF-8 as default character set that is used within the project.
Generation of artifacts
Why at all?
Separation between generated code and own code
Adding own validation logic
-
Validation logic is part of the controller class
-
Naming convention: for entity “person” the name of the class is “PersonController”
-
In this class the main methods to potentially override are
-
synchronize(...)
-
validate(...)
Adding own view elements / logic
-
You can freely update the dialogs (e.g. detail dialog) and add own logic
-
For each dialog there is a
-
XML layout definition (e.g. PersonDetail.xml) for entity “person”
-
Java class (e.g. PersonDetail.java) for entity “person”, which extends “PersonDetail_generated.java”
-
In the classes you can access the currently edited object(s)
-
Please check the JavaDoc for detailed information
-
Use just normal CaptainCasa development principles.
Detail UI - Details on Instance Adapter
-
For each bean that is opened within a detail dialog a so called “bean instance adapter” is created
-
The adapter is reachable from the normal detail UI classes by method “getInstanceAdapter()”
-
The creation is done through a factory which first looks for specific implementations before using the default implementation
Detail UI - Details on Property Adapters
-
Inside the adapter for each component (e.g. FIELD) that is bound to a value of an entity a so called property adapter is created.
-
The instance adapter creates the property adapter by its method “createPropertyAdapter” which calls the default creation:
-
The creation is done through a factory which first looks for specific implementations before using the default implementation
-
Example: sequence for accessing adapter for propeprty “unitOfMeasure” in entity “article”:
-
<viewPackage>.<entityId><PropertyName>BeanPropertyAdapter
-
<viewPackage>.<entityId>BeanPropertyAdapter
-
org.eclnt.dataapp.view.app.adapters.BeanPropertyADapter (default)
-
You may also override the method “createPropertyAdapter” and create own property adapters the way you require it
Data object and Data context
Setting up the user workplace
Basics
Opening the workplace
-
You may open the application workplace directly from the tool set
-
You may copy the URLs that are shown after opening the workplace from the browser and directly use them to start the workplace without going through the tool set
Defining the function tree
Functions trees
-
There are two types
-
Design time functions trees - these are the ones that are defined / pre-configured by the application. They are delivered as part of the application (resource file) and can be directly assigned to users.
-
Run time function trees - these are function trees that you can individually set up in the database. You may create a specific function tree which exactly represents the collection of start-able functions and the order of functions that you want.
Design time functions trees
-
These are the functions trees that come pre-configured with the application
-
Each application has one or several function trees in which all applications functions are listed
-
The definition is done by using the CaptainCasa toolset
-
Tools > Edit existing workplace function tree > default opens up a function tree editor. In the menu you may also create additional functions trees and edit them.
-
In the editor you defined the nodes of the tree. A node either is a folder node or is defined to include a definition of a dialog to be started.
-
You can open the application function tree from the tool set
Storing of design time functions trees
<?xml version="1.0" encoding="UTF-8" standalone="yes"?>
<workplaceFunctionTreeInfoNode>
<folderOpened>false</folderOpened>
<subNodes>
<text>My application</text>
<folderOpened>true</folderOpened>
<subNodes>
<text>Flexible analysis</text>
<folderOpened>true</folderOpened>
<subNodes>
<text>Prompting</text>
<folderOpened>false</folderOpened>
<workpageStartInfo>
<pageBeanName>org.eclnt.ccda_base.view.CCAppPrompting</pageBeanName>
<id>org.eclnt.ccda_base.view.CCAppPrompting</id>
<openMultipleInstances>true</openMultipleInstances>
<decorated>true</decorated>
<popupSupported>false</popupSupported>
<closeSupported>true</closeSupported>
<openAsPopupByDefault>false</openAsPopupByDefault>
<excludeFromSavePerspective>false</excludeFromSavePerspective>
<paramMap/>
<sortIndex>-1</sortIndex>
</workpageStartInfo>
</subNodes>
</subNodes>
<subNodes>
<text>Order Management</text>
<folderOpened>true</folderOpened>
<subNodes>
<text>#{rr.tuto1['VIEW.test.tuto1.view.dialogs.OrderList']}</text>
<folderOpened>false</folderOpened>
<workpageStartInfo>
<pageBeanName>OrderList</pageBeanName>
<id>OrderList</id>
<openMultipleInstances>false</openMultipleInstances>
<decorated>true</decorated>
<popupSupported>false</popupSupported>
<closeSupported>true</closeSupported>
<openAsPopupByDefault>false</openAsPopupByDefault>
<excludeFromSavePerspective>false</excludeFromSavePerspective>
<paramMap/>
<sortIndex>-1</sortIndex>
</workpageStartInfo>
</subNodes>
</subNodes>
<subNodes>
<text>Master data</text>
<folderOpened>true</folderOpened>
<subNodes>
<text>#{rr.tuto1['VIEW.test.tuto1.view.dialogs.ArticleList']}</text>
<folderOpened>false</folderOpened>
<workpageStartInfo>
<pageBeanName>ArticleList</pageBeanName>
<id>ArticleList</id>
<openMultipleInstances>false</openMultipleInstances>
<decorated>true</decorated>
<popupSupported>false</popupSupported>
<closeSupported>true</closeSupported>
<openAsPopupByDefault>false</openAsPopupByDefault>
<excludeFromSavePerspective>false</excludeFromSavePerspective>
<paramMap/>
<sortIndex>-1</sortIndex>
</workpageStartInfo>
</subNodes>
<subNodes>
<text>#{rr.tuto1['VIEW.test.tuto1.view.dialogs.PriceListList']}</text>
<folderOpened>false</folderOpened>
<workpageStartInfo>
<pageBeanName>PriceListList</pageBeanName>
<id>PriceListList</id>
<openMultipleInstances>false</openMultipleInstances>
<decorated>true</decorated>
<popupSupported>false</popupSupported>
<closeSupported>true</closeSupported>
<openAsPopupByDefault>false</openAsPopupByDefault>
<excludeFromSavePerspective>false</excludeFromSavePerspective>
<paramMap/>
<sortIndex>-1</sortIndex>
</workpageStartInfo>
</subNodes>
<subNodes>
<text>#{rr.tuto1['VIEW.test.tuto1.view.dialogs.CustomerList']}</text>
<folderOpened>false</folderOpened>
<workpageStartInfo>
<pageBeanName>CustomerList</pageBeanName>
<id>CustomerList</id>
<openMultipleInstances>false</openMultipleInstances>
<decorated>true</decorated>
<popupSupported>false</popupSupported>
<closeSupported>true</closeSupported>
<openAsPopupByDefault>false</openAsPopupByDefault>
<excludeFromSavePerspective>false</excludeFromSavePerspective>
<paramMap/>
<sortIndex>-1</sortIndex>
</workpageStartInfo>
</subNodes>
</subNodes>
</subNodes>
</workplaceFunctionTreeInfoNode>
Runtime function trees
Customization of logon screen and welcome screen
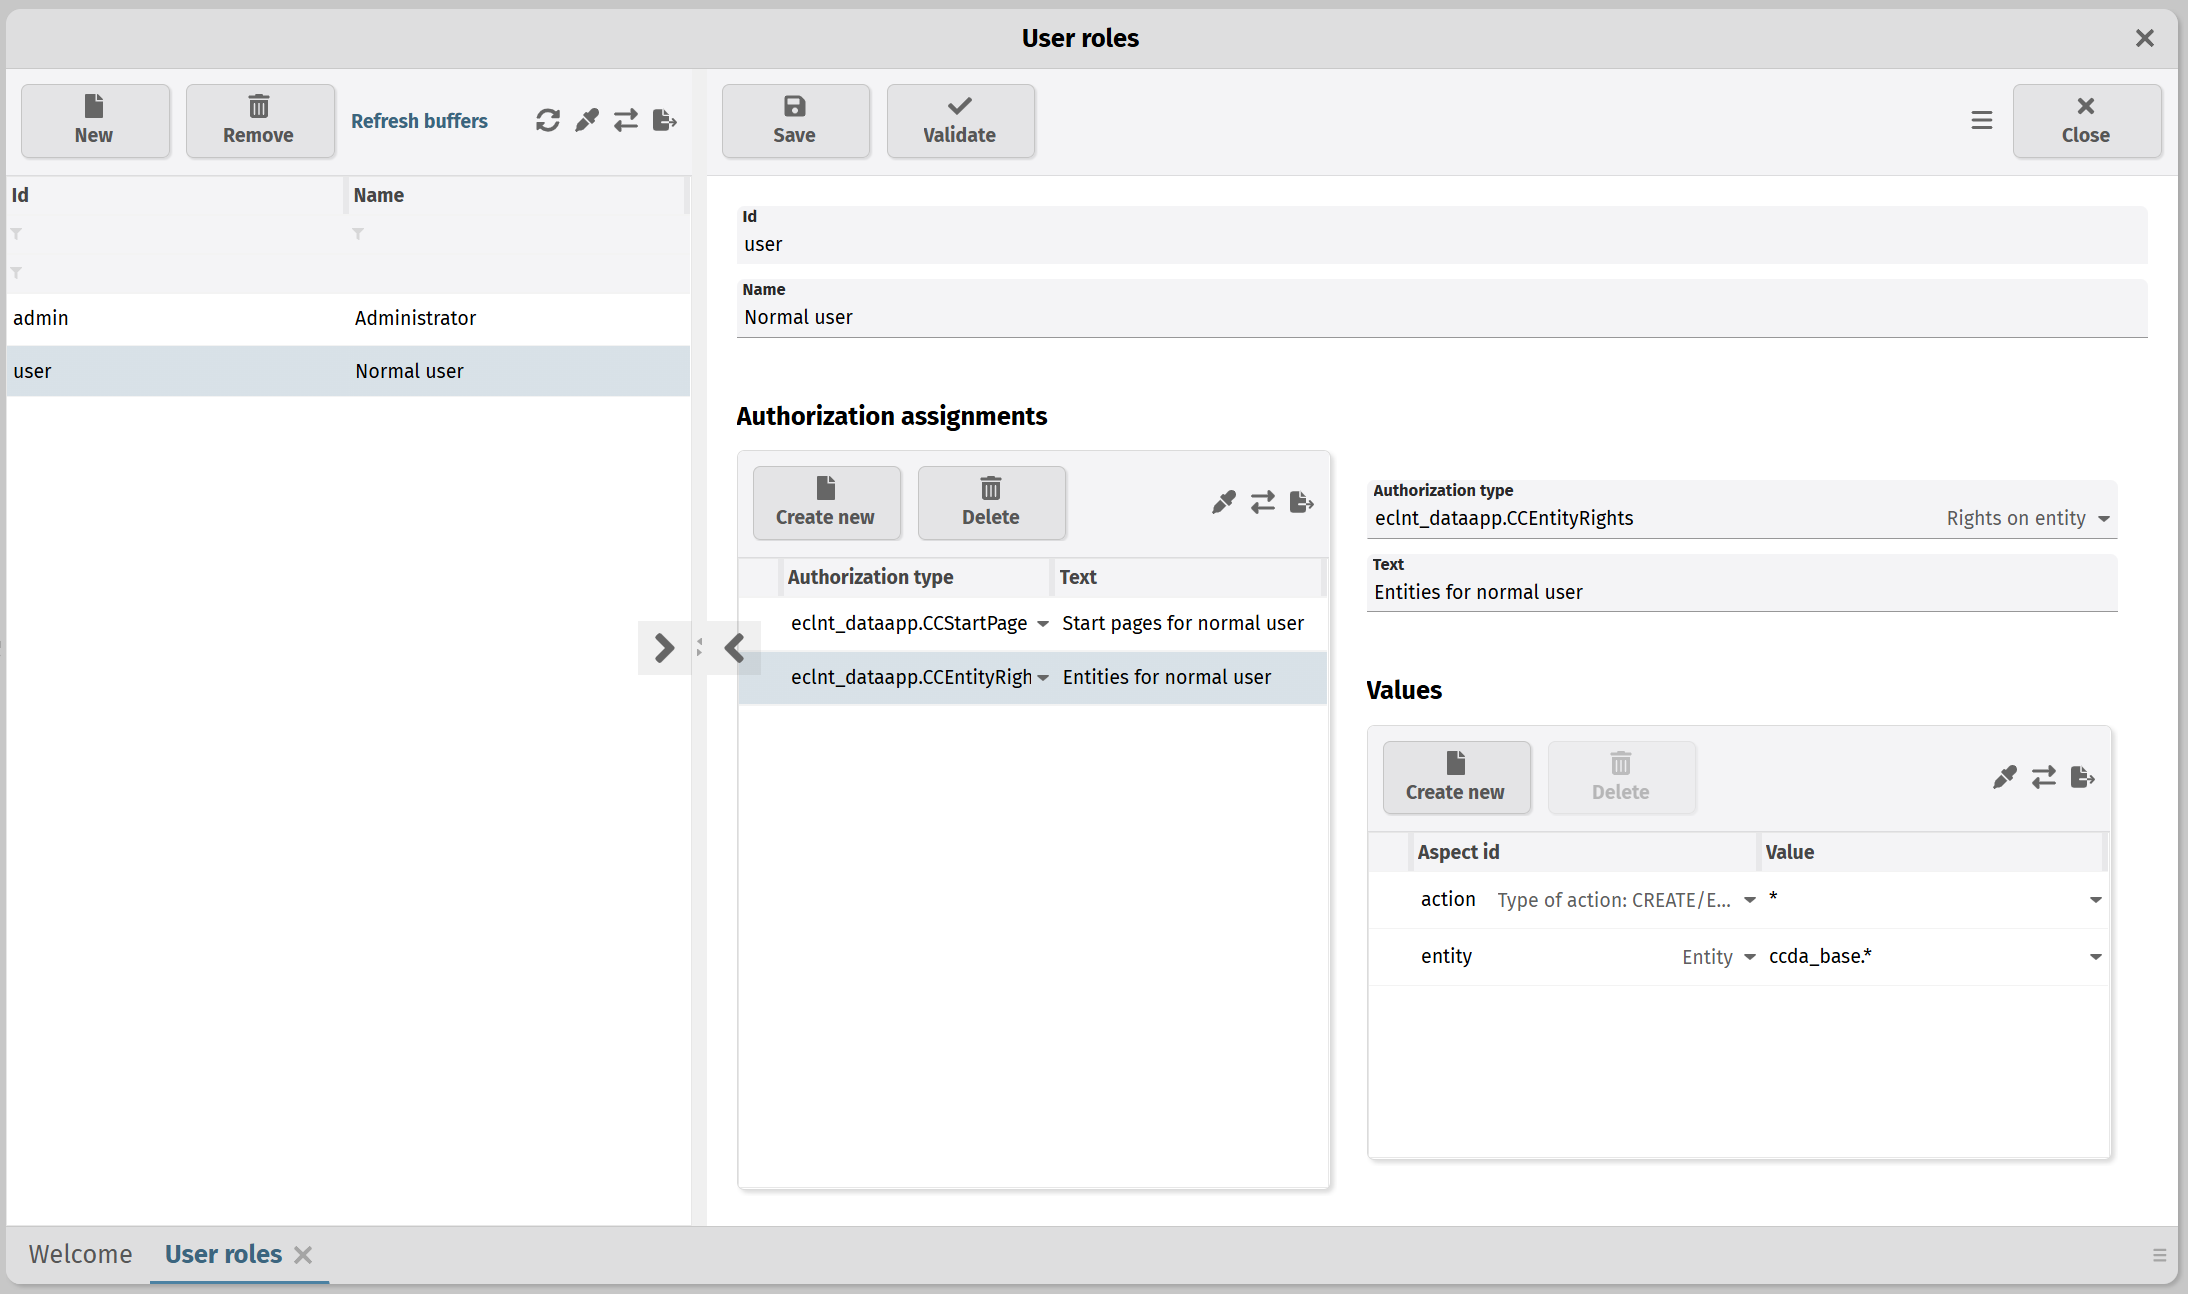
Authorization Management
Basics
-
RapidApp provides a simple to use and flexible authorization management.
-
As part of the application meta data you define “Authorization Object Types”. Each object type consists out of
-
Out of the meta data definition a concrete “AuthorizationRequest” class is generated.
-
At runtime, within the logic processing of the application, the application may create instances of this class, define the concrete aspect values and then check if the current user is authorized or not
Authorization Object Types
Example
<authorizationType id="CCEntityRights" text="Rights on entity">
<aspect id="entity" text="Entity" aspectReferenceId="refEntityId"/>
<aspect id="action" text="Type of action: CREATE/EDIT/DISPLAY" aspectReferenceId="refAuthAction"/>
</authorizationType>
Generated class
package org.eclnt.dataapp.logic.authority;
import org.eclnt.dataapp.logic.authorization.*;
public class ARCCEntityRights
extends AuthorizationRequest
{
public static final String TYPE_ID = "eclnt_dataapp.CCEntityRights";
public static final String ASPECT_entity = "entity";
public static final String ASPECT_action = "action";
public ARCCEntityRights()
{
super(TYPE_ID);
}
public ARCCEntityRights setEntity(Object value) { addAspectValue(ASPECT_entity,value); return this; }
public ARCCEntityRights setAction(Object value) { addAspectValue(ASPECT_action,value); return this; }
}
Usage in application processing
protected boolean checkAuthorizationForRemoving(BEANCLASS selectedObject)
{
ARCCEntityRights r = new ARCCEntityRights()
.setAction(ENUMEditMode.EDIT)
.setEntity(BCIRuntime.instance().
getEntityIdByClass(selectedObject.getClass()));
return AuthorizationManager.instance().checkIfUserIsAuthorized(r);
}
-
Each aspect that represents the current situation is defined using the corresponding “set”-methods
-
“set”-methods can be concatenated for simplified writing
-
An instance of interface IAuthorizationManager is picked and used for checking.
Interface IAuthorizationManager
Interface
package org.eclnt.dataapp.logic.authorization;
public interface IAuthorizationManager
{
public boolean checkLogon(String user, String password);
public boolean checkIfUserIsAuthorized(AuthorizationRequest request);
public void expectThatUserIsAuthorized(AuthorizationRequest request) throws MissingAuthorizationError;
}
Implementation
...
dataapp_authorizationmanagerclassname=org.eclnt.ccda_base.logic.authorization.CCDAAuthorizationManager
...
-
By default a RapidApp projects starts without the definition of a concrete authorization manager - which means: authoritzation management is swithced off.
-
RapidApp comes with a default implementation of the interface.
Default implementation of Authorization Manager
Dependencies
JEE/javax based projects:
<dependency>
<groupId>org.eclnt</groupId>
<artifactId>ccdabase</artifactId>
<version>${cc.version}</version>
</dependency>
Jakarta based projects:
<dependency>
<groupId>org.eclnt</groupId>
<artifactId>ccdabase_jakarta</artifactId>
<version>${cc.version}</version>
</dependency>
Usage
User and Authentication Management
Default User Management
Online Authentication
API Authentication
Upgrading the RapidApp version
Regular updates
Update of your application
<properties>
<!-- This is the CaptainCasa version to be used. -->
<cc.version>20260331</cc.version>
<project.build.sourceEncoding>UTF-8</project.build.sourceEncoding>
<project.reporting.outputEncoding>UTF-8</project.reporting.outputEncoding>
</properties>

Adding RapidPDF
RapidPDF is an additional framework by CaptainCasa which simplifies the creation of PDF documents for business objects.
By adding RapidPDF to RapidApp you can...
Extending the pom.xml
Open the pom.xml in the root directory of your project.
JEE projects (“Tomcat 9”)
Add the following dependency to your project dependencies:
<!-- Printing -->
<dependency>
<groupId>org.eclnt</groupId>
<artifactId>eclntsjrxml</artifactId>
<version>${cc.version}</version>
</dependency>
Jakarta EE Projects (“Tomcat 10/11/...”)
Add the following dependency to your project dependencies:
<!-- Printing -->
<dependency>
<groupId>org.eclnt</groupId>
<artifactId>eclntsjrxml_jakarta</artifactId>
<version>${cc.version}</version>
</dependency>
Rebuild and redeploy
After having done the changes:
Open the workplace of your project as administrator: in the “[Admin]” section there is the function tree for the “eclnt_sjrxml” project, that you embedded by having updated your pom.xml:
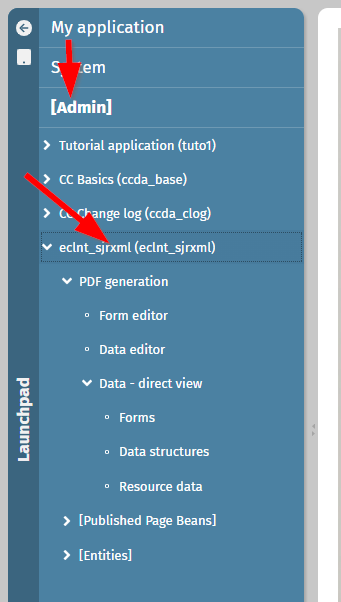
The most important function there is the “Form editor”.
Information on how to edit the form is available here:
-
overview documentation:
https://www.captaincasa.com/docu/eclnt_sjrxml/
-
Video: the playlist on “RapidApp” contains videos about configuration print forms inside RapidApp:
https://www.youtube.com/playlist?list=PLlEgDxNnKfBrwNU4onZdlf66B1jUNERju
Combining projects
Each project builds its “.jar” artifact
The build of a project is executed by the usage of Maven. Maven uses the “pom.xml” file of the project to execute all build steps. The steps by default include:
You may take a look into the “/target” folder of your project in order to view both files.
The “.jar” file is the one that is used for structuring projects. By simple Maven-dependency you can take over all information of one project into another project.
Example: CaptainCasa default projects “ccdabase” and “ccdaclog”
CaptainCasa uses exactly the “.jar”-structuring to by default provide two projects and add them to your project. The Maven-dependencies are:
<dependency>
<groupId>org.eclnt</groupId>
<artifactId>ccdabase_jakarta</artifactId>
<version>${cc.version}</version>
</dependency>
<dependency>
<groupId>org.eclnt</groupId>
<artifactId>ccdaclog_jakarta</artifactId>
<version>${cc.version}</version>
</dependency>
(For JEE projects: use names without “_jakarta”.)
-
“ccdabase” - this project comes with default implementations and default entity definitions
-
“ccdaclog” - this project contains a default implementation of the change log management, which logs any changes to entity instances in a detailed way.
We recommend to keep these dependencies. The id of all CaptainCasa entity types are starting with “CC” - which is treated as reserved name space.
Referencing entity types and other artifacts