This guide tells you how to develop own screens with CaptainCasa Enterprise Client RISC.
Please note that there are a couple of examples that are delivered with the Enterprise Client Installation. Open the “Demo Workplace” to view the examples. For every control there is at least one example showing how to use it. The demo web application contains all the Java source files (“workplacesrc” directory) and all the JSP files (“workplace” directory)
For this reason this guide will only summarize the principles of working with certain components – the details are contained in the examples.
Before reading this guide it is useful to read the “Tutorial - First Development Steps with CaptainCasa Enterprise Client”. The tutorial explains step by step how to create the first project and the first screens.
All intellectual property that is contained in CaptainCasa Enterprise Client belongs to CaptainCasa GmbH. You must not copy or decompile any part of CaptainCasa Enterprise Client without the explicit agreement of CaptainCasa GmbH. Certain CaptainCasa license types grant the “full access” to the sources – please contact info@CaptainCasa.com for more information.
A usage of CaptainCasa Enterprise Client in a productive environment and a redistribution is only allowed with obtaining an official license from CaptainCasa GmbH. Various types of licenses are available, including the so called “binary license” which allows the free usage and free redistribution as part of your application. Contact info@CaptainCasa.com for obtaining detailed license information.
The “binary license” of CaptainCasa Enterprise Client is provided WITHOUT WARRANTIES.
CaptainCasa Enterprise Client makes use of the following contained libraries / software products:
Dependent on installation:
Java Runtime Environment JRE 1.8 from Sun Microsystems. Copyright and license information is available in the directory <installdir>/server/jre.
License: Oracle Java SE License.
Java Runtime Environment JRE >= 11 from Open SDK by using the builds from https://adoptopenjdk.net/.
License: GPL.
When using the default installation:
Tomcat Engine by Apache Group. Copyright and license information is available in the directory <installdir>/server/tomcat.
License: Apache 2.0.
The library “esapi” (Enterprise security API) is used for managing encoding/decoding processes in a secure way. Details are available here: https://owasp.org/www-project-enterprise-security-api/
License: BSD New (aka BSD Revised License)
The library “gson” is used for encoding to/ decoding from JSON. Details: https://github.com/google/gson/
License: Apache 2.0
The library “jsoup” is optionally used for cleaning HTML content in order to prevent injection. Details: https://jsoup.org/
License: MIT license
The library “iText” is used for PDF generation (export of tables to PDF). We use the “old” iText-version (package com.lowagie.*).
License: Apache License Version 2.0
The font “Awesome Font” is used – both within some of the components and within the tooling – please check details here: http://fontawesome.io/.
License: SIL OFL 1.1.
Some PNG-icons are taken from the “Open Icon Library” - which is available here: https://sourceforge.net/projects/openiconlibrary/
License: GPL
We integrated the “Chart.js” library for rendering certain graphics and wrap the functions inside a corresponding component. Details: http://www.chartjs.org/.
License: MIT license.
We integrated the “RGraph” library for rendering certain graphics and wrap the functions inside a corresponding component. Details: https://www.rgraph.net/.
License: MIT license.
The demos are using the library JFreeChart, details on licensing are available here: http://www.jfree.org/jfreechart/.
Please read the documentation “Tutorial - First Development Steps with CaptainCasa Enterprise Client” in order to step by step create a CaptainCasa project and to learn how to execute first development steps.
Developing with CaptainCasa means that you set up projects in which you manage layout definitions, resources (images) and your server side code (Java). When creating a project within the CaptainCasa toolset there are various options – this chapter explains the structural aspects behind.
The server side of CaptainCasa Enterprise Client is based on the default JEE web application concept: somewhere you have a directory which represents the web content. The directory structure of this web content looks like this:
/<web application>
/...
/images
icon1.png
/META-INF
/WEB-INF
/lib
*.jar
/classes
Page1UI.class
Page2UI.class
web.xml
page1.xml (or page1.jsp)
page2.xml (or page2.jsp)
The structure is defined by the JEE-Servlet specification. It is used for building so called .war files, which are the ones to be deployed into various application server environments.
Inside the web application you provide the following artifacts:
Page definitions: these are .jsp or .xml files which themselves hold the definition of a layout as XML definition. Inside the XML definition, the arrangement and the attributes of components are defined.
Compiled Java code: pages access corresponding code, e.g. a button in a page is bound to some method (“action listener”) in a corresponding Java program. The compiled code is kept as .class or .jar file, typically within the WEB-INF-directory.
Java libraries: your code accesses Java libraries. For example the JSF libraries are required with CaptainCasa. Or: CaptainCasa itself provides a jar-library for the server side, e.g. containing the component implementation for all the graphical components that are provided.
Resources like images, texts, etc. which are contained in any directory folders
You see: the directory structure which is used at runtime by the servlet container (e.g. Tomcat) contains various files: some authored by you (your jsp-pages, your code), some coming from CaptainCasa and some coming from other parties.
The CaptainCasa toolset together with any development environment takes care of authoring your artifacts and deploying them into a directory structure that is the one shown above.
At the beginning (the CaptainCasa framework was started 2007) there was a closer binding of the CaptainCasa server-side processing to JSF than in the meantime. This is where the extension “.jsp” for layout definitions originates from. We updated to the extension “.xml” in the meantime, so now you can work with both extensions. The important issue: the XML-layout-content of both files are the same – it's just the name of the extension which differs.
The project directory structure on the one hand is somehow related to the deployment directory structure – but of course on the other hand differs. While the purpose of the deployment directory structure is to “melt everything together” in order to efficiently deploy, the purpose of the project directory structure is to clearly separate your own artifacts (the ones to check-in/out to/from a version control system), the compiled results of your artifacts and the artifacts from other parties.
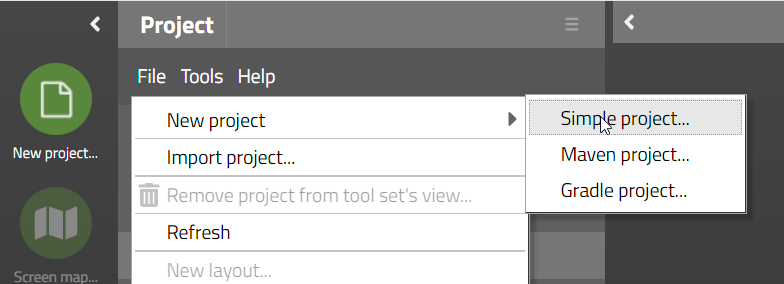
There are three types of projects that are provided by CaptainCasa:
Simple projects – This is a simple project structure in which all development activities are managed by the toolset of CaptainCasa (creating/editing layouts) and by your development environment (coding/compiling).
Maven projects – Here the project files are arranged in the typical Maven directory structure. Maven is used as build tool – from managing dependencies to creating the deployment artifacts.
Gradle projects – Here the project files are arranged in the typical Gradle directory structure (which is the same as the Maven directory structure). Now Gradle is used as build tool – again managing dependencies and creating deployment artifacts.
We in general recommend to use the type “Simple project” for your first project in which you want to get to know CaptainCasa's way of creating dialogs and binding them to server-side dialog processing. Knowing how to code in Java is the only prerequisite – so there is no additional complexity added on top. Especially if you are not familiar with Maven/Gradle: do not combine the learning of how to use CaptainCasa Enterprise Client with the learning of how to use Maven/Gradle.
As soon as you begin to embed CaptainCasa in a more complex application infrastructure then you should definitely use Maven or Gradle as build tool – and select the corresponding project style.
Projects are created by using the CaptainCasa toolset:
After choosing the project type a corresponding dialog will show up.
When creating a “Simple project” then the following dialog is shown:
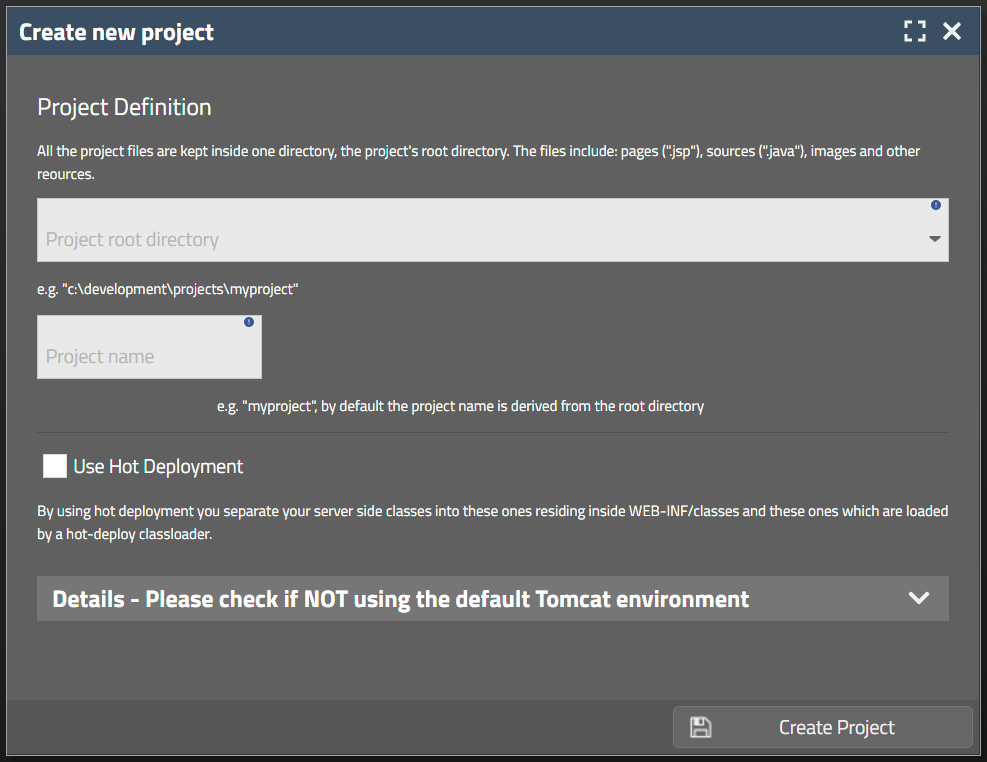
The important parameters are:
The root directory of the project
The name of the project
The name by default is the same as the directory of you project. You of course might assign a different name, but we in general recommend to keep name and directory in sync.
The information if to use “Hot Deployment” or not
We recommend to use hot deployment from the beginning on. Hot deployment significantly reduces deployment times during development.
The project structure looks as follows:
<project directory>
/src
/webcontent
/webcontentbuild
/wencontentcc
There are two directories which are the ones to be used during development by yourself:
/src contains the server side Java sources, which includes:
.java files
.properties files (e.g. for multi language text definitions)
any resource files:
.xml files to hold the screen layout definitions
.png/.gif/.jpg images
...
/webcontent contains resource files
.xml files to hold the screen layout definitions
.png/.gif/.jpg images
.xml configuration files (e.g. web.xml, faces-config.xml, CaptainCasa configuration files in sub directory eclntjsfserver/config)
...
The “/webcontent” directory internally is structured in the same way as the deployed web application is structured:
<project directory>
...
/webcontent
/images
xyz.png
/WEB-INF
web.xml
faces-config.xml
xyz.jsp
...
There is one directory which is storing the compiled classes: “/webcontentbuild”. When using Eclipse then automatically all Java code below “/src” is compiled into “/webcontentbuild/WEB-INF/classes”:
<project directory>
/src
XYZ.java ---- Compile ---+
... |
/webcontentbuild |
/WEB-INF |
/classes |
XYZ.class <---------------+
...
And there is one directory “/webcontentcc” which contains all these files which are added by CaptainCasa into the web content, so that it contains the JSF libraries, the CaptainCasa library, default dialogs (e.g. JSP pages for OK- and Yes-No-dialogs), etc.
<project directory>
...
/webcontentcc
/eclnt <== client side libraries
/eclntjsfserver <== server side default dialogs, styles, etc.
/WEB-INF
/lib
eclnt_jsfserver.jar <== CaptainCasa library
jsf-api.jar <== JSF
jsf-impl.jar <== JSF default implementation
...
Using this directory structure the deployment into the servlet container that is executed by the CaptainCasa toolset is quite simple:
All three directories that hold webcontent (webcontent, webcontentbuild, wencontentcc) are copied and merged into the deployment directory. In case of using Tomcat the scenarios looks as follows:
<project directory> <tomcat directory>
/src /webapps
/webcontent ----+--copy-----> <project webapp>
/webcontentbuild ----|
/webcontentcc --------|
Why all this effort? And why having three different webcontent-dirctories?
The answer: because now own artifacts that are properly separated into:
artifacts of your development
compiled artifacts
basic artifacts
There is no mix of files. When it comes to e.g. sharing the sources within a repository (e.g. subversion, CVS), the n the decision what to share and what not is quite simple:
<project directory>
/src <== Share!
/webcontent <== Share!
/webcontentbuild <== Do not share!
/wencontentcc <== Share? ...your choice!
Clearly, the “src” and the “webcontent” folders are the one that you must share. And clearly the “webcontentbuild” folder must not be shared, because it contains compiled files.
Within “/webcontentcc” the CaptainCasa environment is kept. This files are copied into this directory when creating the project and – later on – when updating the project to a new CaptainCasa version. When it comes to the question if to share these files within a repository, then there are two strategies:
You share “webcontentcc” so that the environment is part of your repository.
You do not share “webcontentcc” because these are artifacts which are also directly available within the CaptainCasa installation folders (<installdir>/resources/webappadons).
Every time you change Java sources in the project you need to transfer the compiled classes to the Tomcat instance in which you want to test. This on the one hand means that the corresponding classes need to be copied from your project into the Tomcat directory – and the other hand means that Tomcat must somehow restart in order to run the new classes.
Copying and restarting is managed by the CaptainCasa toolset: by default (we call it “reload”) a management-API of Tomcat is accessed that allows to restart a dedicated web-application inside Tomcat. But: this “reload” may still take some significant amount of time because restarting an application may come with a lot of time spent on initializing your application.
Hot deployment provides some efficient mechanism to overcome this. UI related classes typically are changed quite frequently during UI development – while logic-related classes are not changed as frequently. Hot deployment separated the UI classes into some own classloader which runs below the normal classloader of the web-application. As consequence this UI-classloader can be exchanged without restarting the whole web-application.
From Java project perspective there is no difference between a “normal” project and a “hot deployment” project. The hot deployment configuration is used within the CaptainCasa toolset when copying/deploying the project content into the Tomcat-run-time: certain classes are not copied into the WEB-INF/classes folder of the web application, but are copied into the eclnthotdeploy/classes folder – which is the directory accessed by the UI-classloader.
When switching on hot deployment during project creation then all classes that you develop are treated as “hot deployment classes”. You can define this more fine granular on a package base later on.
All the project structures that you have read about so far, are not implemented in a hardwired way within the CaptainCasa toolset. Per project there is an XML configuration file that explicitly defines where the toolset can find what information – in order to properly access files (e.g. JSP-pages) and in order to correctly deploy.
As consequence you can setup any project structure on your own and guide the CaptainCasa toolset what to do using the project configuration file.
The structure of this file is explained in the following text.
Maven or Gradle projects are created from the CaptainCasa toolset as well:
A dialog will show up:
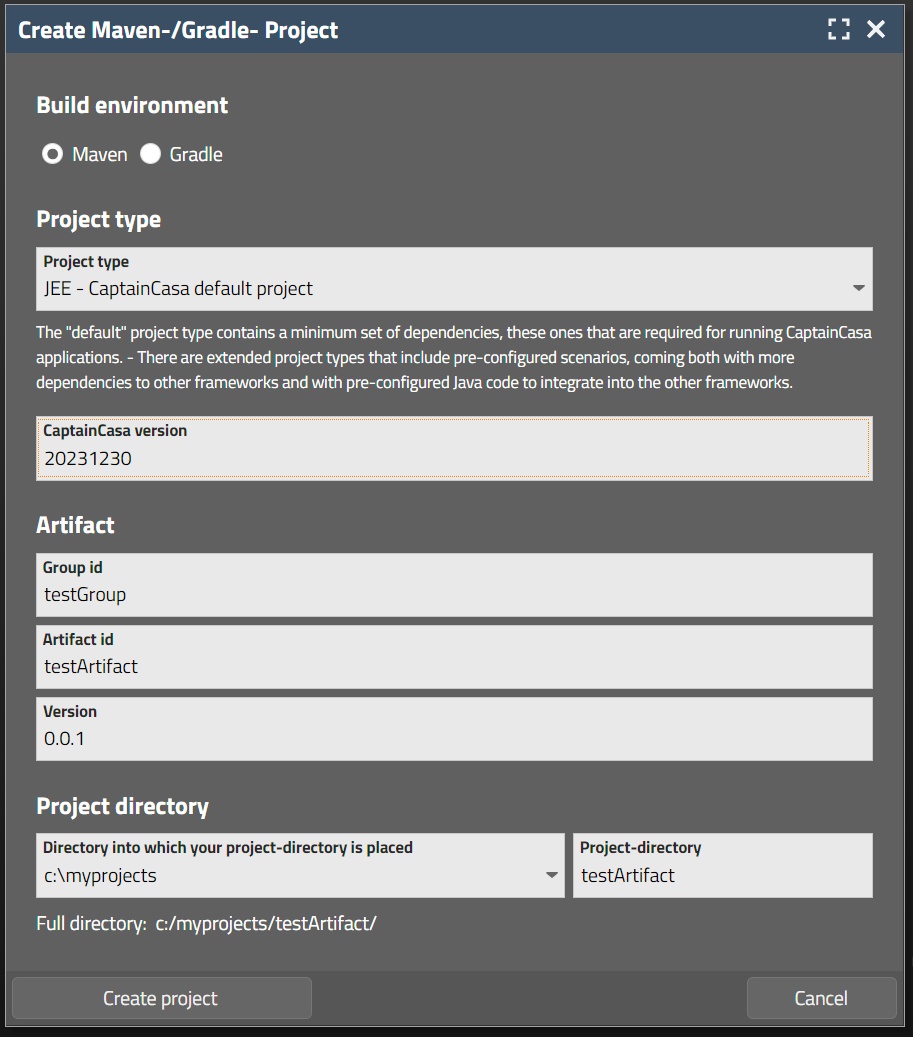
In the dialog you select:
The project type – from “default” to projects already containing dependencies for integrating with Spring and/or Spring Boot
The name of the artifact you want to create.
The root directory.
After the project is created a document will be shown which explicitly guides you through next steps. These are:
You need to build the project within Maven or Gradle.
You need to deploy it.
...that's it!
There is an own documentation that explains how to set up CaptainCasa projects that are managed using Maven / Gradle. Please read this documentation when using Maven / Gradle.
There is an own documentation that explains how to set up CaptainCasa projects that are managed using Maven and that are using Spring Boot as framework and runtime. CaptainCasa provides a corresponding Maven project type that makes the creation of this type of project very simple.
The project file is generated automatically when you create the project using the Enterprise Client toolset. It is stored as file “.ccproject” inside your project root directory.
Project file in project folder:
<projectdirectory>
.ccproject ==> contains project configuration
Link to project file in CaptainCasa toolset:
<CaptainCasa Install Directory>
/server
/tomcattools
/webapps
/editor
/config
...
<project>.xml ==> contains link to <projectdirectory>
...
“.ccproject” contains the significant parameters to let the CaptainCasa toolset know how to handle the project
“<project>.xml” is just a simple link from the editor's environment into the correct directory where the “.ccproject” file is located
Inside the project file, there are a couple of parameters for defining where the project files are located.
The “ccfirst” project that was created within the tutorial has the following content:
<project
projectdirectory ="c:\projects\ccfirst"
webcontentdirectory="${project}/webcontent"
javasourcedirectory="${project}/src"
javasourcewebinfdirectory="${project}/src_webinf"
javaclassdirectory="${project}/webcontentbuild/eclnthotdeploy/classes"
javaclasswebinfdirectory="${project}/webcontentbuild/WEB-INF/classes"
webappaddonsdirectory="${project}/webcontentcc"
webcontentdeploydirectory="C:/temp/cc20130909/server/tomcat/webapps/ccfirst"
webcontextroot ="ccfirst"
webhostport ="localhost:50000"
...
...
>
<deploycopyinfo fromdir="${project}/webcontentbuild"
todir="${projectdeploy}"/>
<deploycopyinfo fromdir="${project}/webcontentcc"
todir="${projectdeploy}"/>
</project>
You already see the most significant attributes:
“projectdirectory” - This is the main directory of your development project. (If using the option “Store project configuration in project directory” when creating the project, then the projectdirectory is not set – it automatically is the directory in which the project file “.ccproject” is stored).
“webcontentdirectory” - This is the directory in which you typically keep the “Web Content” of your development (typically a sub directory of “projectdirectory”). It is the directory in which the layout editor stores its layouts.
“javasourcedirectory” - This is the directory in which the sources of the UI related code are kept. It is referenced by the code generation tool, that is part of the Enterprise Client toolset.
“javasourcewebinfdirectory” - This is the directory where non-UI related sources are kept. It is only used when using hot deployment.
“javaclassdirectory” - This is the directory in which your UI-related code is compiled
“javaclasswebinfdirectory” - This is the directory in which your non-UI-related code is compiled
“webappaddondirectory” - This is the directory in which all that, what CaptainCasa adds to a web application, is kept. In the example this directory is a sub-directory of the project. If using “compact” projects this is some directory within your CaptainCasa installation (outside your project).
“webcontentdeploydirectory” - This is the directory that is used by the Enterprise Client toolset to deploy to. By default this a sub-directory of “<installdir>/server/tomcat/webapps”.
“webcontentdeployfromdirectory” - This is an optional parameter which allows to support scenarios, in which the project's webcontent directory (parameter “webcontentdirectory”) Is the one to store .jsp files, but is NOT the one to use as directory to be used as copy-source for deployment.
“webcontextroot” and “webhostport” - These are the URL details that are required to access the deployed application within your runtime environment.
There are many other attributes that you may use within the project file. A documentation of these attributes is automatically copied into the comment section of the XML file that is created for your project.
When using the deployment of the Enterprise Client toolset (“Reload server” or “Hot Deploy”) then all the relevant files are transferred from the project directory structure into the deployment directory:
The “webcontentdirectory” is always copied.
Additional directories are copied following the “deploycopyinfo” definitions. In the example you see that the compiled classed (“/webcontentbuild”) and the CaptainCasa addons (“/webcontentcc”) are copied as well.
After the file transfer has finished, the toolset triggers the servlet engine (default: Tomcat) to load the new information. In case of a “reload” this means that the web-application is re-started, in case of “hot deploy” this means that parts of the classes are reloaded without re-starting the whole web application.
Within the project configuration you may reference “special values”:
“${project}” is the value of attribute “projectdirectory”
“${projectdeploy}” is the value of attribute “webcontentdeploydirectory”
“${deploytomcatwebappsdir}” is the value of the default deployment-Tomcat within a default installation. This default installation assumes the following directory structure:
<install>
server
tomcat
webapps
<location of deployed projects>
tomcattools
webapps
editor
When NOT using the default directory structure then this variable must not be used!
“${env.xxx}” is the value of environment variable “xxx” (internally resolved by calling Java API System.getenv())
“${sys.xxx}” is the value of system property “xxx” (internally resolved by calling System.getProperty())
Especially when sharing projects via SVN/GIT/... make use of the variables in order to define project structures which are self-containing and which can be easily transferred from one location to the other.
When creating a new layout you pick a certain template as base for the .jsp file that is opened within the Layout Editor. By default there are a couple of templates predefined by CaptainCasa:

You can extend the list of templates by adding own ones through the project definition:
<project ... >
...
<template resource="/abc/def.jsp" image="/ghi/jkl.jpg"/>
...
<template ... />
<template ... />
</project>
Each template must provide a JSP file which is copied into the newly created page. And it must provide an image which is displayed within the template selection. Both files need to be located within your web application, so that they are accessible as resource.
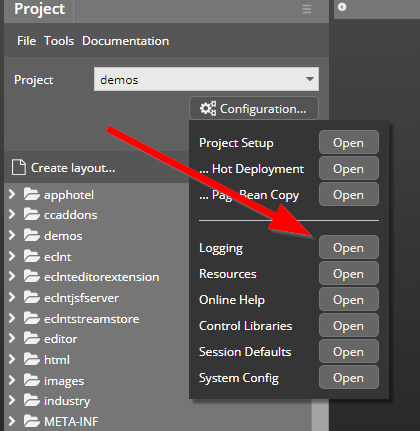
Inside your project there are a couple of configurations that you may apply during development.
Where and how are log files written and stored?
Which resource files are used for internationalization?
How is certain UI runtime information (e.g. sequence of columns of a grid) stored?
How it the UI related to the application's user and/or tenant management?
Which default style should be used with user sessions?
…
All these files can be accessed by using the CaptainCasa toolset by opening the tab “Configuration...”:
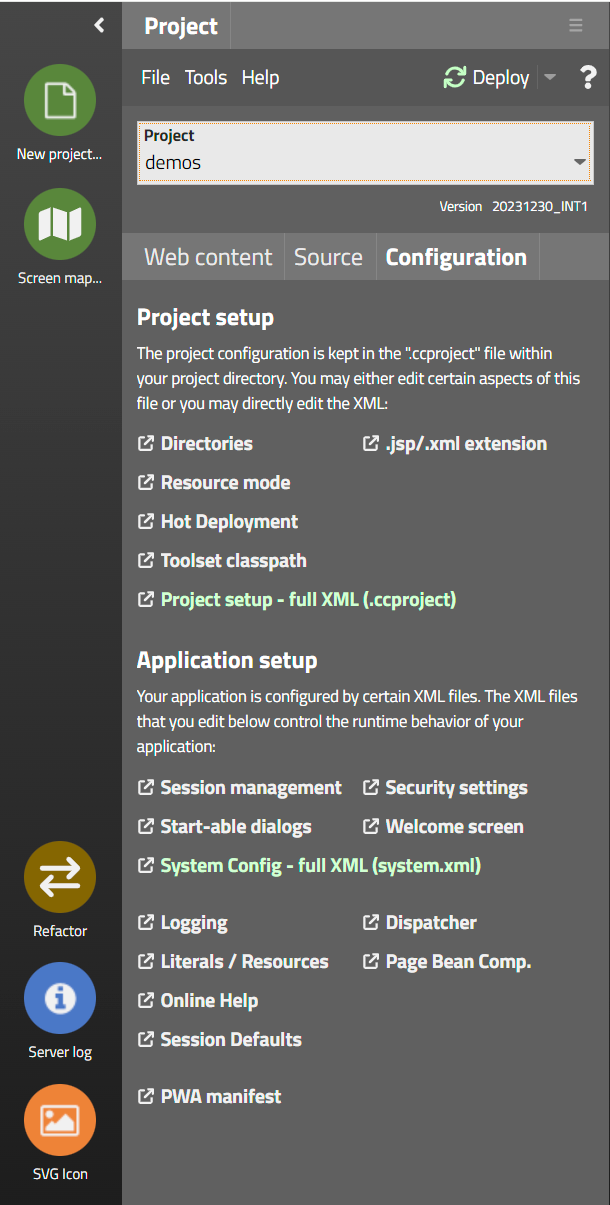
Here you can start diverse configuration dialogs. Some of the dialogs are explicitly managing one specific task, others are general XML editors in which you can edit the XML configuration file with some template that contains explanations.
The configuration files that are edited are stored within your project in the following location:
<project>
/webcontent
/eclntjsfserver
/config
logging.xml
system.xml
…
There are many types of resources that you may create and add to your project when building your application:
The .xml layout definitions.
Image files: .svg, .png, .gif, ...
PDF files, HTML files, ...
CaptainCasa provides two ways of storing resources – you should know both of them and then decide for one.
In a classic web application these resources are stored as part of the web content, so that the deployed application looks like:
/tomcat
/webapps
/<yourWebApp>
/layouts
layout1.xml
layout2.xml
/images
save.svg
/WEB-INF
/classes
*.class
/lib
*.jar
The compiled code is kept within the /WEB-INF/classes and /WEB-INF/lib directory. The resources are kept in parallel directories (here: “layouts” and “images”). The resources are addressed within the web application by e.g.:
<t:image image=”/images/save.svg”/>
Resources can also be kept as part of the code – so that they are read by Java class loader internally.
Example 1:
/tomcat
/webapps
/<yourWebApp>
/WEB-INF
/classes
*.class
/layouts
layout1.xml
layout2.xml
/images
save.svg
/lib
*.jar
Example 2:
/tomcat
/webapps
/<yourWebApp>
/WEB-INF
/classes
*.class
/lib
your.jar
Inside your.jar:
your.jar
*.class
/layouts
layout1.xml
layout2.xml
/images
save.svg
The resources are accessed the same way as within the web content scenario:
<t:image image=”/images/save.svg”/>
How are the two styles of storing resources reflected at design time?
In a “Maven style” project the directory structure looks as follows:
/<project>
/src
/main
/java
/resources <== style “sources”
/webapp <== style “web content”
...
The resource files below “resources” are the ones that are close to your Java code. During the build they area added to the library (.jar) artifact. - The resource files below “webapp” are the ones that are copied into the “.war” artifact.
When using the the “Simple style” project then the directory structure looks as follows:
/<project>
/src <== style “sources”
/webcontent <== style “webcontent”
...
You see: in the “Simple style” project resources and Java source code (.java) are kept together in one directory, whereas in Maven they are separated in a “java” and a “resources” directory.
Both styles of keeping resources are valid, there is also no difference when it comes to performance.
The core difference between both styles is: with the “sources” way you are able to deliver all artifacts of your web application as one, easily distribute-able “.jar” files. The “.jar” file is “self-containing” and includes all resource files it requires.
Imagine the following: you have a core of your project that you want to separate from the rest of the project. E.g. default dialogs for logging on, for defining users etc. - Using the “sources” way you can distribute this core part as one .jar-file in all your other projects. - Using the “web content” way, you always have to distribute the logic (“.jar” library) but then also have to distribute all the required web content in addition. Sharing projects as result is much more complex.
So, our general recommendation is: use the “source” way!
Is is possible to switch from one style to the other later on? - Yes, no problem at all. You just need to copy the corresponding resources, e.g. from the web content directory of your project to the sources part (and: vice versa).
In the project configuration you can enforces the toolset to use either the one or the other style or both styles:
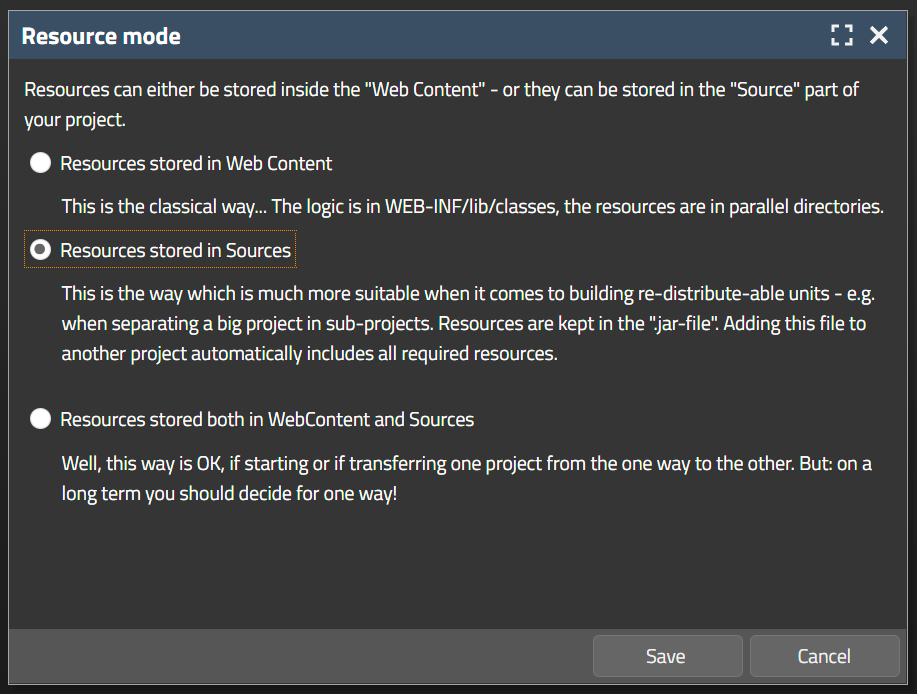
All storing and selecting of files as result will react correspondingly. E.g. when selecting an image, then only these image files will be shown that correspond to the resource mode.
The server side of CaptainCasa logs its internal processing using the default Java logging. The default logging is done into the work directory of the servlet container. For Tomcat this is the “tomcat/work/Catalina/localhost/<yourWebApp>” directory.
Example:
/tomcat
/webapps
/yourWebApp
/work
/Catalina
/localhost
/yourWebApp
log_eclntjsfserver.txt.0
log_performance.txt.0
There are two type of log files:
log_eclntjsfserver.txt.* - this is the normal logging of activities
log_performance.txt.* - this is a special logging of performance data
By default the logging is switched to INFO level, this means every request's processing is logged. We recommend to use the INFO level during development and then when deploying to production scenarios switch to WARNING level.
By default the log is output and stored to 5 files (that's the reason for the numbering behind the “.txt” in the file name), each one having a maximum size of 100MB. If 5 files are written and the last one exceeds a size of 100MB then the oldest file will be overwritten with new log content. (You may update this configuration of course.)
You may configure the logging by defining file “<project>/webcontent/eclntjsfserver/config/logging.xml”. There is a template file “logging.xml_template” in the webcontentcc-part of the project.
You either may edit the file directly or you may open the file from the toolset:
The most important information to configure is:
The log level (SEVERE, WARNING, INFO, FINE, ALL)
The configuration if to output the log to console or not
A typical configuration is:
<logging level="INFO"
console="true">
</logging>
The output to the console is quite useful during development. It's much easier to detect stack traces if they are output to the console than if they are output to some log file...
Other logging parameters are described in the “logging.xml_template” file. Please also view the chapter “Appendix - Log Configuration” for more details on how to set up the logging.
CaptainCasa is using server side standard Java libraries that are part of the Java Enterprise API definitions. Example: the server-side is based on the Servlet-API.
Unfortunately there was a drastic change inside these standard libraries in the year 2020, which was caused by the responsibility for Java Enterprise moving from Oracle into the Eclipse foundation: all package names were renamed from “javax.*” to “jakarta.*”. Example: the class name for the base class for all servlet classes changed in the following way:
Java EE : javax.servlet.HttpServlet
Jakarta EE: jakarta.servlet.HttpServlet
This change is a drastic one: in your code you typically have quite some dependencies to classes from the Java Enterprise standard libraries. So moving from the “Java EE” environment into the “Jakarta EE” environment means, you have to update the dependencies correspondingly and you need to change your import-references in your source code.
CaptainCasa delivers two versions of its framework:
The “Java EE” version – in which all references are going to the “javax.*” libraries
The “Jakarta EE” version – in which all references are going to the “jakarata.*” libraries
Both versions are available with each update and can be downloaded from our download page. It's you to select the right version – dependent on your selection, if you want to stay on the “Java EE” line or if you want to use the “Jakarta EE” line.
This document assumes you are working on the “Java EE” line. If you work on the “Jakarta EE” line then some package names are different. Please check the chapter “Appendix – Using Jakarta EE” for more details about these differences.
Please consider that the change from “Java EE” to “Jakarta EE” was done within the Tomcat servlet container with its release 10.
This means: deploying a “Java EE” based web application (.war file) into a Tomcat 10 environment will fail: when the application is started you will the “ClassNotFoundException” messages – because classes within the .war file try to access “javax.*” packages, which are not available anymore.
In the tutorial “First Development Steps” you already got to know the basic aspects and artifacts when developing with Enterprise Client:
You define a page definition which assembles graphical components to form some nice layout. The page definition is kept as .jsp/.xml file.
Within the page definition, you define the attributes of components. An attribute value may be defined “hard wired” or may be defined “dynamically”. The dynamic definition is pointing to a bean using expressions.
A bean is an object that resides on server side and that is the data and method counterpart of the page that is running inside the client. The bean is sometimes referred to as “managed bean”.
The managed bean provides properties and methods which are referenced from the page components.
Let's take a closer look into the internal structures. As example we continue to use the address-page that is created within the tutorial:
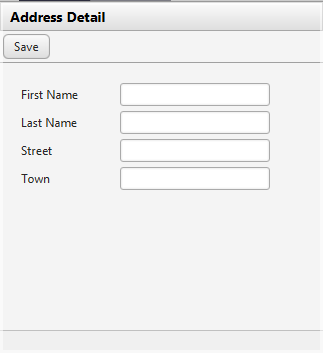
The layout of the page above is:
<t:rowtitlebar id="g_1" text="Address Detail" />
<t:rowheader id="g_2">
<t:button id="g_3"
actionListener="#{d.AddressDetailUI.onSaveAction}" text="Save" />
</t:rowheader>
<t:rowbodypane id="g_4" rowdistance="5">
<t:row id="g_5">
<t:label id="g_6" text="First Name" width="100" />
<t:field id="g_7" text="#{d.AddressDetailUI.firstName}" width="150" />
</t:row>
<t:row id="g_8">
<t:label id="g_9" text="Last Name" width="100" />
<t:field id="g_10" text="#{d.AddressDetailUI.lastName}" width="150" />
</t:row>
<t:row id="g_11">
<t:label id="g_12" text="Street" width="100" />
<t:field id="g_13" text="#{d.AddressDetailUI.street}" width="150" />
</t:row>
<t:row id="g_14">
<t:label id="g_15" text="Town" width="100" />
<t:field id="g_16" text="#{d.AddressDetailUI.town}" width="150" />
</t:row>
</t:rowbodypane>
<t:rowstatusbar id="g_17" />
Let's pick some elements to demonstrate what's going on:
<t:field id="g_10" text="#{d.AddressDetailUI.lastName}" width="150" />
This is the first field definition. The width of the field is “hard-wired”. The text is referencing to a managed bean, meaning: the value is taken from the bean and it is written back into the bean when the user makes changes.
<t:button id="g_3"
actionListener="#{d.AddressDetailUI.onSaveAction}" text="Save" />
This is the button calling an “onSaveAction” method within the bean.
The managed bean is a normal bean definition that is the logical counterpart of the page. By default the bean is derived from the “PageBean” class – which is the base class that you should use for any managed bean implementations. - Of course you can add own general bean implementations below this base class and then use theses ones to extend from.
In this example the code is:
package managedbeans;
import java.io.Serializable;
import org.eclnt.editor.annotations.CCGenClass;
import org.eclnt.jsfserver.defaultscreens.Statusbar;
import org.eclnt.jsfserver.pagebean.PageBean;
import org.eclnt.jsfserver.base.faces..event.ActionEvent;
@CCGenClass (expressionBase="#{d.AddressDetailUI}")
public class AddressDetailUI
extends PageBean
implements Serializable
{
// ------------------------------------------------------------------------
// members
// ------------------------------------------------------------------------
String m_town;
String m_street;
String m_lastName;
String m_firstName;
// ------------------------------------------------------------------------
// constructors & initialization
// ------------------------------------------------------------------------
public AddressDetailUI()
{
}
public String getPageName() { return "/addressdetail.jsp"; }
public String getRootExpressionUsedInPage()
{ return "#{d.AddressDetailUI}"; }
// ------------------------------------------------------------------------
// public usage
// ------------------------------------------------------------------------
public String getTown() { return m_town; }
public void setTown(String value) { this.m_town = value; }
public String getStreet() { return m_street; }
public void setStreet(String value) { this.m_street = value; }
public String getLastName() { return m_lastName; }
public void setLastName(String value) { this.m_lastName = value; }
public String getFirstName() { return m_firstName; }
public void setFirstName(String value) { this.m_firstName = value; }
public void onSaveAction(ActionEvent event)
{
if (m_firstName == null || m_lastName == null)
{
Statusbar.outputError("Please define all name fields.");
return;
}
m_town = m_firstName + "/" + m_lastName;
}
}
You see:
The class provides the properties that are referenced. Remember that a property in Java is a set/get-implementation and that the inner member variable that may keep the property's value is some private implementation detail!
The class provides the method that is referenced by the button. The method needs to provide one parameter to pass on – the “ActionEvent”. Pay close attention during development: it's the “faces-ActionEvent” that you need to use as parameter, NOT the “AWT-Event”. Do not use code-complete functions too fast...!
The class is derived from the base class “PageBean”. Using the PageBean-framework significantly simplifies the modularization of your user interface: page beans are designed to be re-usable – for example as sub-part of another page, or as dialog that you want to pop up. Please read further information within the chapter “Page Bean Modularization”.
By default there is one instance of the bean available at runtime – per session! So you do not have to pay attention to the fact that several users are accessing your application simultaneously. (Of course you may want to check if there is some conflict if users work in parallel on the same data – but this is some different issue, where you have to think optimistic or pessimistic locking etc.)
You will later on see, that if the page is re-used, there might be several instances according to your coding: e.g. you might render within one screen a “supplier address” on the left and a “vendor address” on the right. both using the “AddressDetailUI”. In this case you have two separate instances – which are fully under your control.
Let's get into a bit more detail about how an instance of “AddressDetailUI” is created on server side.
When the page is requested by the client then a request is sent to the server, the XML of the page (.jsp/.xml file) is read and interpreted. During interpretation the expressions within the page are resolved in order to pick the dynamic data which is bound to certain attributes.
An expression contains several fragments – separated by a dot “.”. During resolution the fragments are processed from the left to the right.
Let's take as example the expression “#{d.AddressDetailUI.firstName}”.
The first part of the expression is the “d”. And this part is resolved by the just normal JSF mechanism: JSF takes a look into the faces-config.xml file and finds out what class representation is behind the “d”. JSF creates and registers a new instance of this class – typically using a constructor without any parameters.
The faces-config.xml of your project was created during the project creation and contains the following content:
<managed-bean>
<managed-bean-name>d</managed-bean-name>
<managed-bean-class>managedbeans.Dispatcher</managed-bean-class>
<managed-bean-scope>session</managed-bean-scope>
</managed-bean>
JSF sees that the scope of the bean is a “session”-scope. This means that the bean will be kept in the session – and will not be removed once the current request is processed.
The Dispatcher class that is referenced also was added to your project when creating the project. Of course you can update the faces-config.xml to your needs, e.g. by moving the Dispatcher-class into a different package then the one proposed!
The Dispatcher is a simple object factory – providing the interface “java.util.Map”.
Whereas the normal resolution of a “.” within an expression follows the corresponding “set/get”-methods of a bean, the resolution of a “.” with a map is calling the “Map.get(..)” and “Map.put(..)” methods.
The dispatcher as consequence is called with “get(“AddressDetailUI”)”. It first checks if an object for this name is already available in its map. If not it creates an instance of AddressDetailUI and add the instance to its map.
The following default assumptions are made:
The dispatcher assumes the “AddressDetailUI” class to reside in the same package as itself.
The dispatcher assumes the “AddressDetailUI” class to have one of the following constructors:
either: public AddressDetail() { ... }
or : public AddressDetailUI(IDispatcher dispatcher) { ... }
Well, now it's easy: the instance of the class AddressDetailUI is checked for the “getFirstName()” method – and finally the value returned by this object is the one that is passed into the corresponding attribute.
What was described before now is executed every time the client sends a request to the server.
Within the request processing changes of the data on client side (due to user input) are transferred into corresponding expressions (thus: object-properties) on server side.
Then actions are invoked.
Then the collection of data is started as described and data changes are sent back to the client side.
Pay attention not to add any intensive operations into the get-methods that are referenced during expression resolution as consequence. The expression resolution must be something very fast because it is repeated with every request!
You can directly start your page from the Layout Editor:
The page will be opened in a new browser window/tab.
The URL of the page that is shown is built in the following way:
http://<host>:<port>/<project>/<nameofpage>.risc?ccstyle=defaultrisc
Example: pageName = test.jsp
URL : http://localhost:50000/textproject/test.risc?ccstyle=defaultrisc
If the page is defined in sub-directory of “webcontent” then the URL is built in the following way:
http://<host>:<port>/<project>/<subdir>.<nameofpage>.risc
Example: pageName = /pages/test.jsp
URL : http://localhost:50000/textproject/pages.test.risc?ccstyle=defaultrisc
So, in case of subdirectories do not use a slash “/” as separator but use a dot “.”.
You already got to know the “#{d.”-dispatcher in the text before. The dispatcher serves as factory to find beans, typically using their class name. By default the dispatcher tries to find the bean class in the same package that the dispatcher itself is positioned.
When creating a project then a default dispatcher is automatically generated into the project, being located in package “managedbeans”. Of course you can changes this any time – please do not forget to update the faces-config.xml accordingly.
If an expression “#{d.AddressDetailUI. ...} is to be resolved then the default class arrangement is:
managedbeans <== Package
Dispatcher
AddressDetailUI
Of course there are situations in which your project grows and you do not want to arrange all UI classes within one package. In this case you may use a “ccdispatcherinfo.xml” file and tell the dispatcher where to search for classes. The “ccdispatcherinfo.xml” must be positioned in the main package of your application.
ccdispatcherinfo.xml <== main package (“no” package)
managedbeans <== Package containing Dispatcher/ page beans
Dispatcher
AddressDetailUI
The content of the file is some XML configuration:
<dispatcherinfo>
...
<managedpackage name=”other.package1”/>
<managedpackage name=”other.package2”/>
...
<managedbean name=”ArticleMaster” class=”com.appl.log.ArticleMasterBean”/>
<managedbean name=”CustomerMaster” class=”com.appl.sales.CustomerMasterBean”/>
...
</dispatcherinfo>
You can configure...
“mandagedpackes” definitions: these are packages in which the dispatcher looks for class names to fit to the class name it currently has to resolve
“managedbean” definitions: these are single naming hints for explicitly telling the dispatcher how to resolve a certain name
The sequence in which the dispatcher operates when resolving a name is:
The dispatcher looks for “managedbean” definitions.
The dispatcher looks into its own package
The dispatcher processes the “managedpackage” packages
If combining several .jar files containing managed beans at runtime, then all “ccdispatcherinfo.xml” instances are combined automatically. The loader reads all occurrences of the file within the loaded environment and will internally built up one “virtual”, big ccdispatcherinfo.xml file which is then used.
In previous versions of CaptainCasa a file “dispatcherinfo.xml” had to be placed into the dispatcher's package – having exactly the same content as the “ccdispatcherinfo.xml” file that is described above. This is, of course, still supported. - The disadvantage of this concept was/is, that due to the project-dependent package definition, it was not possible for the CaptainCasa runtime to read all “dispatcher-info” files automatically, so you had to always include all project's “dispatcherinfo.xml” contents into one central “dispatcherinfo.xml”. - Now using the “ccdispatcherinfo.xml” file which is always located at the same position (main package), the runtime can automatically combine all occurrences as described.
This chapter is only relevant for readers who are experienced with Tomcat configuration issues.
The installation of Enterprise Client comes with a Tomcat server on its own. The purpose is:
Having a Tomcat platform for running the tools (Layout Editor)
Having a Tomcat platform for “ad hoc” starting with development projects
In order to “nicely” support the continuous development as described in the previous chapter (“refresh” button in Layout Editor reloads web application) the following configuration items automatically come with the Tomcat installation:
The “manager” web application (tomcat/webapps/manager) is configured to run without security – corresponding information is commented out in its web.xml file. - Background: when refreshing your project by using the “refresh” button then the toolset will, after having finished copying, send a message to the manager application, which tells the Tomcat manager to reload the project's web application. Normally this message requires am administrator logon to the manager application – by having switched off the security this is not required anymore.
The tomcat/conf/context.xml file was updated so that Tomcat will NOT reload a web application when the web.xml file is changed. Background: the reloading of the web application is explicitly done through the “refresh” button of the toolkit. There is no need to observe further files.
<!-- Default set of monitored resources -->
<!--
<WatchedResource>WEBINF/web.xml</WatchedResource>
-->
The Tomcat that is part of the Enterprise Client installation is not usable for productive usage – it is optimized for pure development usage!
Components are the essential graphical elements that you use in order to define layouts. A whole page definition consists of an assembly of components, starting with some basic ones (e.g. “t:rowbodypane”) and ending with some specific ones (“t:field”).
The typical arrangement of components is to build up component hierarchies that consist out of container components holding rows and rows having components themselves.
Container components are areas in which you can place row components.
A row component can hold column components.
All typical “end controls” like field, check box, button, etc. are column components. You put these components inside a row. Each column component has attributes like width and height, and as a result occupies a certain amount of space in the row.
Container components themselves are column components as well. This means: inside a row you put a container as control, and inside the container you start again putting rows.
You see: containers contain rows, rows contain columns, columns may be containers as well.
All this, together with the possibility to define widths and heights either in a “pixel mode” or in a “percentage mode”, allows you to build very flexible layouts, that correspond to the size of the screen they are called in.
For better knowing the role of a component there are some naming conventions:
Row components have the prefix “row”. Example: “t:row”.
Container components have the suffix “pane”. Example: “t:pane”.
Column components do not have a specific prefix or suffix. Example: “t:button”
Let's look at the name “t:rowbodypane”: it is a row component, i.e. you may put it into an container. On the other side it is a container component as well, this means it itself can contain row components.
It may sometimes help to compare container components with HTML tables (“table”), row components with HTML rows (“tr”) and column components with HTML columns (“td”). The same way you can nest HTML tables into HTML tables you can nest containers into containers with Enterprise Client. ...but, be careful: this is a comparison only.

<t:box id="g_4" rowdistance="5" width="100%">
<t:row id="g_5">
<t:label id="g_6" text="Street & Number" width="120" />
<t:field id="g_7" width="100%" />
<t:coldistance id="g_8" width="5" />
<t:field id="g_9" width="50" />
</t:row>
<t:row id="g_10">
<t:label id="g_11" text="City" width="120" />
<t:field id="g_12" width="100" />
<t:coldistance id="g_13" width="5" />
<t:field id="g_14" width="100%" />
</t:row>
</t:box>
The container in this case is a “t:box” which comes with some light background and some padding to its content. Inside the box there are two rows, each one individually filled with components. The content of each row is sized by itself, there are no dependencies between the sizing of the first and the second row.
<t:box id="g_16" width="100%">
<t:row id="g_17" coldistance="20">
<t:pane id="g_18" rowalignmenty="top" rowdistance="5"
width="100%">
<t:row id="g_19">
<t:label id="g_20" text="First name" width="100" />
<t:field id="g_21" width="100%;100" />
</t:row>
<t:row id="g_22">
<t:label id="g_23" text="Last name" width="100" />
<t:field id="g_24" width="100%;100" />
</t:row>
<t:row id="g_25">
<t:label id="g_26" text="Street" width="100" />
<t:field id="g_27" width="100%;100" />
</t:row>
<t:row id="g_28">
<t:label id="g_29" text="City" width="100" />
<t:field id="g_30" width="100%;100" />
</t:row>
</t:pane>
<t:pane id="g_31" rowdistance="5">
<t:row id="g_32">
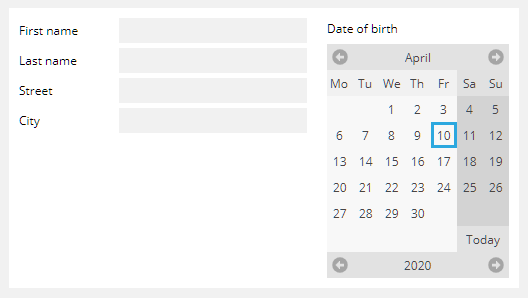
<t:label id="g_33" text="Date of birth" />
</t:row>
<t:row id="g_34">
<t:calendar id="g_35" />
</t:row>
</t:pane>
</t:row>
</t:box>
The “t:box” component opens up a “t:row” which itself holds two “t:pane” container components, each one of them individually filled with some content.
While the container-row-column arrangement of components is the most typical one for arranging components within one optical layer, there are other components for dedicated purposes:
The “t:overlayarea” component arranges components on different z-layers, so that one component can be positioned on top of another component.
There are various components in the area of adaptive screen design. E.g. the component “t:rowflexline” arranges content in one or several rows – dependent on the available screen space.
There are some components which do not have any visual representation. These components are arranged in the layout within the component “t:beanprocessing”. Examples are:
Component for asynchronous processing (“t:timer”, “t:websocketpolling”, …)
Component for triggering server side methods/properties (“t:beanmethodinvoker” , …)
File upload/download components
The sizing of a component is determined by its WIDTH and its HEIGHT attribute.
There are certain sizing modes which can be used simultaneously:
No sizing at all: if you do not pass a specific size, the component will try to size itself. E.g. a button will occupy the width it requires to place the text inside.
Pixel sizing, e.g. “100”: you may define width/height as “pixel values”. Well, pixel is not completely true because there is a multiplication factor in the client, by which pixel values are multiplied. This factor is “1” by default, but can be increased in order to change this sizing, e.g. in order to make everything a bit bigger. This is a useful function in the area of accessibility support.
Percentage sizing, e.g. “100%”: you may define sizes as percentage value. You need to be aware of the paradigm that the percentage sizing is based on the space, that a component receives from its components above. This is a kind of outside-in sizing approach – the top layer tells what space it grants, and the inside layers tell (by percentage definition) what they take from the granted space.
In addition there are special sizing instructions:
Pixel sizing, defining the minimum size only, e.g. “100+”: in this case the size is 100 “pixels” in any case, but the size is automatically increased if the content requires more space. - Example: when defining a button with WIDTH “100+” on the one hand assures that the button has some recognize-able width, on the other hand the size will be increased automatically id the text of the button requires so.
Percentage sizing with minimum size, e.g. “100%;200”: if defining percentage sizes, then the percentage-part is always taken from the remaining available space. If there is only little space which is available, then the size as consequence is small. By appending a pixel value with a semicolon, the minimum size of the component is set, so that it always has a granted size.
All container components provide a ROWDISATNCE attribute which defines the pixel distance between its contained rows. (As always “pixel” is a synonym for some fix size which depends on scaling of the browser.)
In addition there is a “t:rowdistance” component which you can place as row into the container, which just created some empty space with some defined height.
All row components provide a COLDISTANCE attribute which defines the pixel distance between its contained column components. And there is a “t:coldistance” component which you can place as column in order to create some empty space between column controls.

<t:box id="g_37" width="100%">
<t:row id="g_38" coldistance="5">
<t:button id="g_39" text="Left 1" width="100+" />
<t:button id="g_40" text="Left 2" width="100+" />
<t:coldistance id="g_41" width="100%" />
<t:button id="g_42" text="Right" width="100+" />
</t:row>
</t:box>
Most components provide an “actionListener” attribute. This refers to a method implementation within a managed bean. All the events that are associated with one component are sent to the server through this one action listener method.
Each event for a component is associated with a certain command, which is a string value. The command is the name of the specific event, sometimes the command also comes with parameters. The format of the type string is comparable with a method call, examples are: “flush()”, “drop(value)”.
On server side the action listener is represented by a method, providing an “ActionEvent” as parameter. All events that are triggered by Enterprise Client passing a sub-class of ActionEvent – with the name “BaseActionEvent”. This class has a “getCommand()” method that allows you to get the command string value, and it has a “getParams()” method which allows you to get the parameters, if any passed.
All default commands that are used by Enterprise Client are collected in the interface “IBbaseActionEvent”:
Example: a button has an event “invoke()” when the user presses the button and has an event “drop(value)” when the user drags and drops information onto the button. A proper implementation of the server-side action listener looks like this:
public class XYZ
implements IBaseActionEvent
{
public void onButtonEvent(ActionEvent ae)
{
BaseActionEvent bae = (BaseActionEvent)ae;
if (bae.getCommand().
equals(EVTYPE_INVOKE))
{
...
...
}
else if (bae.getCommand().
equals(EVTYPE_DROP))
{
...
...
}
}
}
Please note: the command and parameter values are string values. You need to compare using “.equals”, you may not use “==”!
All input components (e.g. field, check box, radio button, etc.) manipulate a piece of data which is typically referenced to a managed bean property.
The default behavior of the client processing is that data changes are kept in the client and wait for the next significant event to be transferred to the server. A significant event may for example be a button event.
All input components provide for the property “flush”. If this is set to “true” then the data change is treated as a significant event and causes a roundtrip in which all data changed is transferred to the server. In addition, each component may provide an action listener which receives a “flush()”-event.
By using the flush mechanism you can build layouts in which parts of the layout directly respond to the user changing data.
With the FIELD component there is an attribute FLUSHTIMER in addition. By default, when setting the FLUSH attribute of a field to “true”, data changes are flushed to the server when the user leaves the field (“focusLost” event). By setting the FLUSHTIMER you can define that after a certain duration on inactivity changes are flushed to the server automatically.
In general: pay attention to correctly setting the FLUSH attribute! Be aware of cost of round trips in your and your customers' environment.
In addition to the FLUSH definition on component level there is a flush management on container level. On any container/row level you can define the attribute “FLUSHAREA” to true or false. If setting the attribute to “true” then a roundtrip is triggered to the server side if ...
... data was changed within this area by the user
... and the user leaves this area (e.g. by putting the focus out of the area)
All of the container components and some of the column components provide the possibility to define the background coloring of the component in a quite sophisticated way.
The most plain way is to use the BACKGROUND color attribute. You can specify the background color in one of two ways:
#RRGGBB – this is the direct way, defining the color with red,green, blue values
#RRGGBBTT – with “TT” you assign a transparency value. This means you can define the transparency factor, with “FF” being the highest value, and “00” being the lowest value. Example: if you want the background of a component to be a “light shading on top of the existing background” then use the color “#00000020” - a black with little transparency.
Then there is the BGPAINT attribute: via BGPAINT you can execute a series of paint commands, each one being a command like “bgimage(center,/images/test.png)”, concatenated by semicolons.
The commands available area:
bgbackground(color): draws a straight background color
bgbackground(color1,color2,direction): draws a background with some gradient from the first to the second color into a certain direction. The values you can define for “direction” are: “horizontal”, “vertical”.
bgimage(position,image): draws an image at the defined position. The position may be defined as “left”, “top”, “right”, “bottom”, “center”.
bgwrite(position,text) or bgwrite(position,text,color,fontSize): renders a text at the defined position. The position can be defined as “left”, “top”, “right”, “bottom”, “center”. The fontSize is definedas simple integer value (the default being 12).
Color values in the BGPAINT command can be either defined using #RRGGBB or #RRGGBBTT, as described above.
When using a sequence of commands with BGPAINT then the paint commands are executed in exactly the sequence that you define.
Examples:
Singular BGPAINT definition:
bgimage(center,/images/test.png)
Concatenated BGPAINT definition:
background(#00000020,#00000010,vertical);bgimage(center,/images/test.png)
CaptainCasa Enterprise Client provides an explicit control over setting the keyboard focus to a dedicated component.
All input elements provide the attribute REQUESTFOCUS. You need to set this attribute for those components that you want to explicitly assign the keyboard focus to.
The most simple way of usage is to define a component's REQUESTFOCUS attribute to be the fix value “creation”:
...
<field ... requestfocus=”creation” ...>
In this case the keyboard focus of a page that is rendered within the client is automatically moved to this component. After being rendered the attribute will not have any further consequences – from now on the focus is following the user's navigation.
You also can control the focus from server side within a “live page”. For this reason you need to bind the REQUESTFOCUS attribute to a managed bean's property. The property must return a long-value. Every time you want a component to gain the focus, you need to update the value. For updating you use a utility Class “RequestFocusManager”.
Have a look onto the following scenario:
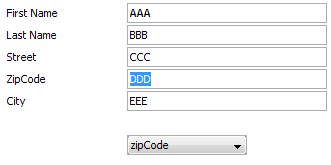
By using the combo box, a field is selected that then gains the focus.
In the layout definition each FIELD component is bound to a different property for controlling the requesting of the focus:
<t:rowdemobodypane id="g_3" objectbinding="demoRequestfocus" rowdistance="2" >
<t:row id="g_4" >
<t:label id="g_5" text="First Name" width="120" />
<t:field id="g_6" requestfocus="#{d.demoRequestfocus.firstNameRF}" text="#{d.demoRequestfocus.firstName}" width="200" />
</t:row>
<t:row id="g_7" >
<t:label id="g_8" text="Last Name" width="120" />
<t:field id="g_9" requestfocus="#{d.demoRequestfocus.lastNameRF}" text="#{d.demoRequestfocus.lastName}" width="200" />
</t:row>
<t:row id="g_10" >
<t:label id="g_11" text="Street" width="120" />
<t:field id="g_12" requestfocus="#{d.demoRequestfocus.streetRF}" text="#{d.demoRequestfocus.street}" width="200" />
</t:row>
<t:row id="g_13" >
<t:label id="g_14" text="ZipCode" width="120" />
<t:field id="g_15" requestfocus="#{d.demoRequestfocus.zipCodeRF}" text="#{d.demoRequestfocus.zipCode}" width="200" />
</t:row>
<t:row id="g_16" >
<t:label id="g_17" text="City" width="120" />
<t:field id="g_18" requestfocus="#{d.demoRequestfocus.cityRF}" text="#{d.demoRequestfocus.city}" width="200" />
</t:row>
<t:rowdistance id="g_19" height="20" />
<t:row id="g_20" >
<t:coldistance id="g_21" width="120" />
<t:combobox id="g_22" actionListener="#{d.demoRequestfocus.onFocussedFieldAction}" flush="true" value="#{d.demoRequestfocus.focussedField}" width="120" >
<t:comboboxitem id="g_23" text="firstName" value="firstName" />
<t:comboboxitem id="g_24" text="lastName" value="lastName" />
<t:comboboxitem id="g_25" text="street" value="street" />
<t:comboboxitem id="g_26" text="zipCode" value="zipCode" />
<t:comboboxitem id="g_27" text="city" value="city" />
</t:combobox>
</t:row>
</t:rowdemobodypane>
When the user selects the combo box then a corresponding method is invoked on server side:
package workplace;
...
import org.eclnt.jsfserver.session.RequestFocusManager;
public class DemoRequestfocus extends DemoBase
{
protected long m_firstNameRF;
protected long m_lastNameRF = RequestFocusManager.getCreationRequestFocusCounter();
protected long m_streetRF;
protected long m_cityRF;
protected long m_zipCodeRF;
public long getFirstNameRF() { return m_firstNameRF; }
public long getLastNameRF() { return m_lastNameRF; }
public long getStreetRF() { return m_streetRF; }
public long getCityRF() { return m_cityRF; }
public long getZipCodeRF() { return m_zipCodeRF; }
protected String m_firstName;
protected String m_lastName;
protected String m_street;
protected String m_zipCode;
protected String m_city;
public void setFirstName(String value) { m_firstName = value; }
public String getFirstName() { return m_firstName; }
public void setLastName(String value) { m_lastName = value; }
public String getLastName() { return m_lastName; }
public String getStreet() { return m_street; }
public void setStreet(String value) { m_street = value; }
public String getZipCode() { return m_zipCode; }
public void setZipCode(String value) { m_zipCode = value; }
public String getCity() { return m_city; }
public void setCity(String value) { m_city = value; }
protected String m_focussedField;
public String getFocussedField() { return m_focussedField; }
public void setFocussedField(String value) { m_focussedField = value; }
public void onFocussedFieldAction(ActionEvent event)
{
if (m_focussedField == null)
return;
else if (m_focussedField.equals("firstName"))
m_firstNameRF = RequestFocusManager.getNewRequestFocusCounter();
else if (m_focussedField.equals("lastName"))
m_lastNameRF = RequestFocusManager.getNewRequestFocusCounter();
else if (m_focussedField.equals("street"))
m_streetRF = RequestFocusManager.getNewRequestFocusCounter();
else if (m_focussedField.equals("zipCode"))
m_zipCodeRF = RequestFocusManager.getNewRequestFocusCounter();
else if (m_focussedField.equals("city"))
m_cityRF = RequestFocusManager.getNewRequestFocusCounter();
}
}
The value for the properties that control the focus management is taken from the class RequestFocusManager. This class provides two methods:
getNewRequestFocusCounter() - you receive a counter that indicates that the corresponding component receives the focus one time – when the response is processed on client side
getCreationRequestFocusCounter() - this is the same as setting the attribute's value to “creation”
Please note: when working with grids there is an additional function. You may set the focus to a certain grid row, by using the function FIXGRIDBinding.selectAndFocus(item).
Some components provide a property containing the name “trigger”. These components provide some client side function that you need to invoke from server side.
Example: the PAINTAREA component provides an attribute TRIGGER: if the trigger is invoked then a certain animation is done on client side. Or: the JRPRINTER (Jasper Reports printer) component can be invoked using its attribute TRIGGERPRINT in order to print out some reports on client side.
Triggers in general are treated in the following way:
The client side functions is changed every time the trigger is updated, i.e. when the trigger changes its value.
If the trigger's value is null, then no client side function is executed.
There is a class “org.eclnt.jsfserver.elements.util.Trigger” which you should directly use as property value, that you bind via expression. Have a look onto the following example, printing out a Jasper report on request:
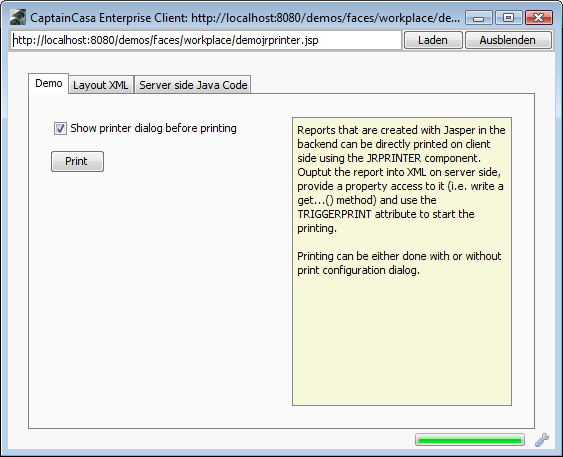
Layout:
<f:view>
<h:form>
<f:subview id="workplace_demojrprinterg_21">
<t:beanprocessing id="g_1" >
<t:jrprinter id="g_2" jasperxml="#{d.DemoJrprinter.jasperXml}" triggerprint="#{d.DemoJrprinter.triggerPrint}" withprintdialog="#{d.DemoJrprinter.withDialog}" />
</t:beanprocessing>
<t:rowdemobodypane id="g_3" objectbinding="#{d.DemoJrprinter}">
<t:row id="g_4" >
<t:checkbox id="g_5" selected="#{d.DemoJrprinter.withDialog}" text="Show printer dialog before printing" />
</t:row>
<t:rowdistance id="g_6" height="10" />
<t:row id="g_7" >
<t:button id="g_8" actionListener="#{d.DemoJrprinter.onPrint}" text="Print" />
</t:row>
</t:rowdemobodypane>
<t:pageaddons id="g_pa"/>
</f:subview>
</h:form>
</f:view>
Code:
package workplace;
import java.io.Serializable;
import org.eclnt.jsfserver.base.faces.event.ActionEvent;
import org.eclnt.editor.annotations.CCGenClass;
import org.eclnt.jsfserver.elements.util.Trigger;
import org.eclnt.jsfserver.managedbean.IDispatcher;
import org.eclnt.util.file.ClassloaderReader;
import org.eclnt.util.file.FileManager;
@CCGenClass (expressionBase="#{d.DemoJrprinter}")
public class DemoJrprinter
extends DemoBase
implements Serializable
{
public DemoJrprinter(IDispatcher dispatcher)
{
super(dispatcher);
}
protected boolean m_withDialog = true;
public boolean getWithDialog() { return m_withDialog; }
public void setWithDialog(boolean value) { m_withDialog = value; }
protected Trigger m_triggerPrint = new Trigger();
public Trigger getTriggerPrint() { return m_triggerPrint; }
public void setTriggerPrint(Trigger value) { m_triggerPrint = value; }
protected String m_jasperXml;
public String getJasperXml() { return m_jasperXml; }
public void setJasperXml(String value) { m_jasperXml = value; }
public void onPrint(ActionEvent event)
{
String s = (new ClassloaderReader()).readUTF8File("workplace/resources/jasperxmlexport.xml",true);
m_jasperXml = s;
m_triggerPrint.trigger();
}
}
The component structure “container – row – component” that was introduced at the beginning of this chapter is the general structure that is used for defining the layout of pages.
In addition there are some additional components which are arranging contained components in a slightly different way.
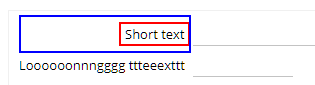
The GRIDLAYOUTPANE arranges its content in a matrix that is defined by its content.
Example: the following layout...

...is defined in the following way:
<t:gridlayoutpane id="g_30" border="#00000010" coldistance="5"
padding="10" rowdistance="5">
<t:gridlayoutrow id="g_31">
<t:label id="g_32" text="Short text" />
<t:field id="g_33" width="200" />
<t:button id="g_34" text="Button 1" />
</t:gridlayoutrow>
<t:gridlayoutrow id="g_35">
<t:label id="g_36" text="Loooooonnngggg ttteeexttt" />
<t:field id="g_37" width="100" />
<t:button id="g_38" text="OK" />
</t:gridlayoutrow>
</t:gridlayoutpane>
Different to the default Container/Row-arrangement of controls, the GRIDLAYOUTPANE container arranges its content, so that columns are synchronized over all its contained rows.
Internally the positioning is done via matrix coordinates, but for simplicity reason this is hidden by arranging components in GRIDLAYOUTROW sub-components. For sizing you may use “just as normal” both percentage sizes or pixel sizes - or no size at all, which means that the component is rendered with its minimum size.
You may define a spanning for components – both in horizontal and vertical direction:

The layout definition now is:
<t:gridlayoutpane id="g_66" border="#00000010" coldistance="5"
padding="10" rowdistance="5" width="100%">
<t:gridlayoutrow id="g_67">
<t:label id="g_68" colalignmentx="right" text="Short text" />
<t:field id="g_69" width="100%;200" />
<t:button id="g_70" text="Button 1" />
<t:label id="g_71" align="center" background="#C0FFC0"
height="100%" rowspan="3" text="Side label" width="100" />
</t:gridlayoutrow>
<t:gridlayoutrow id="g_72">
<t:label id="g_73" colalignmentx="right"
text="Loooooonnngggg ttteeexttt" />
<t:field id="g_74" width="100" />
<t:button id="g_75" text="OK" />
</t:gridlayoutrow>
<t:gridlayoutrow id="g_76">
<t:label id="g_77" align="center" background="#C0FFC0"
colspan="3" height="50" text="Bottom label" width="100%" />
</t:gridlayoutrow>
</t:gridlayoutpane>
If a matrix cell exceeds the size of a contained component then you can define the position of the component by using the attributes:
COLALIGNMENTX (“left”, “center”, “right”) for horizontal positioning and
ROWALIGNMENTY (“top”, “center”, “bottom”) for vertical positioning.
Example: the text of the one label component is much shorter than the text of the label component. Due to the synchronized column sizing the short label by default positions on the left side of the available matrix cell. But: you can override...
... by setting the COLALIGNMNETX accordingly:
<t:gridlayoutpane id="g_66" border="#00000010" coldistance="5"
padding="10" rowdistance="5" width="100%">
<t:gridlayoutrow id="g_67">
<t:label id="g_68" colalignmentx="right" text="Short text" />
...
</t:gridlayoutrow>
<t:gridlayoutrow id="g_72">
<t:label id="g_73" colalignmentx="right"
text="Loooooonnngggg ttteeexttt" />
...
(The COLSYNCHEDPANE/ROW layout management is part of the more generic GRIDLAYOUTPANE. Please use the GIRDLAYOUTPANE. This chapter still is part of the documentation for users for the COLSYNCHEDPANE container.)
The COLSYNCHEDPANE component is a container, in which its contained rows (of type COLSYNCHEDPANEROW) are not rendered independent from another, but are rendered in a “connected” way.
Take a look onto the following screen shot:
The layout definition is:
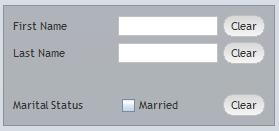
<t:colsynchedpane id="g_5" background="#00000030"
border="#00000030" coldistance="5" padding="10" rowdistance="5">
<t:colsynchedrow id="g_6">
<t:label id="g_7" text="First Name" width="100" />
<t:field id="g_8" width="100" />
<t:button id="g_9" text="Clear" />
</t:colsynchedrow>
<t:colsynchedrow id="g_10">
<t:label id="g_11" text="Last Name" width="100" />
<t:field id="g_12" width="100" />
<t:button id="g_13" text="Clear" />
</t:colsynchedrow>
<t:colsynchedrowdistance id="g_14" height="20" />
<t:colsynchedrow id="g_15">
<t:label id="g_16" text="Marital Status" width="100" />
<t:checkbox id="g_17" text="Married" />
<t:button id="g_18" text="Clear" />
</t:colsynchedrow>
</t:colsynchedpane>
Each row consists out of three components. You see that the components are arranged in a common column structured: the button of the third row is not directly positioned behind the check box (as it would have happened in a normal ROW component) – but is aligned to the column structure of the columns above.
You may use a COLSPAN attribute that is available in each component to identify that one component overlaps several other components of other rows.
This COLSYNCHEDPANE reminds a bit to the HTML-Table (<table>...</table>) definition – with all its positive and negative consequences: when adding a control into one row of the table then you have to update all other rows and e.g. adjust the COLSPAN definitions.
In some cases you want to position components one on top of the other. This is the purpose of the OVERLAYAREA – which opens up some area, in which OVERLAYREAITEM instances are arranged. Each OVERLAYAREAITEM has some coordinates (x,y,width,height) and some z-position, on order to define which component is on top of which other component.
Example: in a grid you want to show the user that not all data which is potentially available really is loaded (e.g. for performance reason):
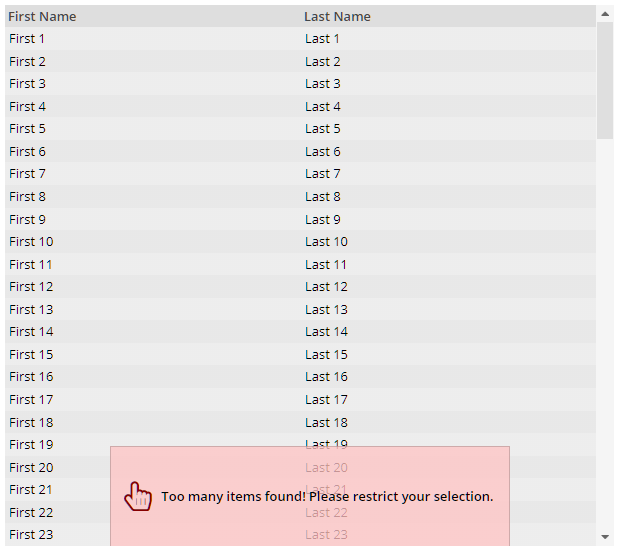
You want to overlay this information on top of the grid so that no additional vertical screen space is required – and so that the message is clearly visible to the user.
The layout definition is:
<t:row id="g_5">
<t:overlayarea id="g_6" background="#f0f0f0" height="100%"
width="100%">
<t:overlayareaitem id="g_7"
height="100%"
width="100%"
x="0"
y="0"
zindex="1">
<t:fixgrid id="g_8" height="100%"
objectbinding="#{d.DemoPaintAreaUsage.grid}"
sbvisibleamount="35" width="100%">
...
...
</t:fixgrid>
</t:overlayareaitem>
<t:overlayareaitem id="g_13" background="#FFC0C0C0"
border="left:1;right:1;top:1;bottom:0;color:#00000030"
boundsanchor="centerbottom"
height="#{d.DemoPaintAreaUsage.messaageAraeHeight}"
width="#{d.DemoPaintAreaUsage.messageAreaWidth}"
x="50%"
y="100%"
zindex="2">
<t:pane id="g_14" padding="left:10;right:10;top:0;bottom:0">
<t:row id="g_15">
...
<t:label id="g_17" align="center"
font="weight:bold"
height="100%"
text="Too many items found! Please
restrict your selection."
width="100%" />
</t:row>
</t:pane>
</t:overlayareaitem>
</t:overlayarea>
</t:row>
The width/height of the message area is bound to properties of a program. At runtime the values are either “0/0” if no message should occur or e.g. “400/100” if the message should occur.
The positioning of the OVERLAYAREAITEM is quite flexible:
If you do not specify WIDTH or HEIGHT then the values are automatically derived using the component's minimum content sized.
For X,Y,WIDTH,HEIGHT you may use both percentage and pixel sizes
The attribute BOUNDSANCHOR defines at which side of the component the reference for the X,Y position is located.
OVERLAYAREA and OVERLAYAREAITEM are used both for “big layouting issues” (such as the example: a message area in front of a grid area) – and for “small layouting issues” (such as the number of messages on top of an icon component).
The FXIGRID component is the component for building grids. Grids include:
Lists
Table with various input cells
Trees
The FIXGRID arranges any type of component in a grid of fixed columns, that's where the name comes from. The type of components is up to you, i.e. you can arrange labels, fields, combo boxes, buttons, etc.
The FIXGRID can hold any number of rows - on the server side. On client side only those rows are loaded and presented that the user currently sees. When scrolling through the grid the grid automatically updates its items from the server. We call this “server side scrolling”.
A FIXGRID component is structured in the following way:
FIXGRID
* GRIDCOL
<column component>
* GRIDHEADER
<header cell component>
* GRIDFOOTER
<footer cell component>
Each grid has a series of columns, per column you define one GRIDCOL component defines the initial width and the text of the column.
Inside the GRIDCOL component you define exactly one content component, i.e. you define if the column's cells should be a FIELD or a LABLE or whatever control. It is possible to define a PANE as content component – and inside the PANE to open up any content. So any content can be placed inside the GRIDCOL components, but there must only exist one component within the GRIDCOL definition itself which represents the cell content.
Examples:
GRIDCOL <== valid
LABEL
GRIDCOL <== valid
FIELD
GRIDCOL <== valid
PANE
ROW
LABEL
LABEL
The grid may have header rows and footer rows. Per row you define a corresponding GRIDHEADER or GRIDFOOTER component.
Have a look at the example “demominispread.jsp”:
The JSP layout definition is:
<t:fixgrid id="g_5" background="#C0C0C0" borderheight="1" borderwidth="1"
height="100%" objectbinding="#{d.demoMinispeadsheet.sheet}"
sbvisibleamount="20" width="100%" >
<t:gridcol id="g_6" background="#E0E0E0" text="Region" width="100" >
<t:field id="g_7" background="#FFFFFF" text=".{region}" />
</t:gridcol>
<t:gridcol id="g_8" background="#E0FFE0" text="Revenue" width="34%" >
<t:formattedfield id="g_9" background="#FFFFFF" format="double"
value=".{revenue}" />
</t:gridcol>
<t:gridcol id="g_10" background="#FFE0E0" text="Cost" width="33%" >
<t:formattedfield id="g_11" format="double" value=".{cost}" />
</t:gridcol>
<t:gridcol id="g_12" background="#E0E0E0" text="Profit" width="33%" >
<t:formattedfield id="g_13" background=".{profitColor}" enabled="false"
format="double" value=".{profit}" />
</t:gridcol>
<t:gridfooter id="g_14" >
<t:coldistance id="g_15" />
<t:formattedfield id="g_16" background="#E0FFE0" enabled="false"
format="double" value="#{d.demoMinispeadsheet.revenueAll}" />
<t:formattedfield id="g_17" background="#FFE0E0" enabled="false"
format="double" value="#{d.demoMinispeadsheet.costAll}" />
<t:formattedfield id="g_18"
background="#{d.demoMinispeadsheet.profitAllColor}"
enabled="false" format="double"
value="#{d.demoMinispeadsheet.profitAll}" />
</t:gridfooter>
</t:fixgrid>
The FIXGRID component defines the grid itself: it defines the sizing (WIDTH/HEIGHT) it defines the number of lines in the client (SBVISIBLEAMOUNT) and it defines the binding to the server side representation of the grid (OBJECTBINDING).
The grid contains 4 GRIDCOL column definitions, the content of the columns either is a FIELD or a FORMATTEDFIELD component.
The grid contains one GRIDFOOTER definition, containing the components which are shown as footer row.
A grid is reflected by a collection of objects on the server side. Each object represents a row of the grid.
The “entrance” into the grid processing is done by an instance of class FIXGRIDListBinding (for lists) and FIXGRIDTreeBinding (for trees).
This FIXGRID-object on server side is referenced by the OBJECTBINDING attribute of the FIXGRID.
Let's focus on list processing first, trees will follow later on:
The FIXGRIDListBinding supports a method getItems() which passes back a java.util.List interface in which you now can add your data rows.
Note: adding data rows on server side does not mean that all the data is transferred to the client. If adding 1000 rows on server side, and only 10 rows are displayed on client side, then as consequence also only 10 rows will be loaded into the client. The FIXGRIDListBinding unburdens you from the task of scrolling through the rows.
Each data object that you now put into a FIXGRIDListBinding collection needs to provide the properties that are referenced by the controls inside the GRIDCOL definitions.
You may already have noted that inside the property definitions of FIELD and FORMATTEDFIELD components that are located below GRIDCOL components, the expression “.{<property>}” is used. This expression indicates that the property value is taken from the object that represents the row.
Have a look at the implementation which belongs to the “demominispread.jsp” demo mentioned above:
public class MyRow extends FIXGRIDItem
{
String m_region;
double m_revenue;
double m_cost;
public void setRegion(String value) { m_region = value; }
public String getRegion() { return m_region; }
public double getRevenue() { return m_revenue; }
public void setRevenue(double value) { m_revenue = value; }
public double getCost() { return m_cost; }
public void setCost(double value) { m_cost = value; }
public double getProfit() { return m_revenue - m_cost; }
public String getProfitColor() { if (getProfit()<0) return "#FFE0E0"; else return "#E0FFE0"; }
}
FIXGRIDListBinding<MyRow> m_sheet = new FIXGRIDListBinding<MyRow>();
public DemoMinispread()
{
MyRow r;
r = new MyRow(); r.m_region = "North"; m_sheet.getItems().add(r);
r = new MyRow(); r.m_region = "East"; m_sheet.getItems().add(r);
r = new MyRow(); r.m_region = "South"; m_sheet.getItems().add(r);
r = new MyRow(); r.m_region = "West"; m_sheet.getItems().add(r);
}
public FIXGRIDListBinding<MyRow> getSheet() { return m_sheet; }
public void onCreateRow(ActionEvent event)
{
MyRow r = new MyRow();
r.m_region = "new";
m_sheet.getItems().add(r);
}
There is the “sheet” property of type FIXGRIDListBinding. It is filled with objects of type “MyRow”, that internally provides the properties “region”, “revenue”, etc. These are exactly the properties that are referenced by the FIELD and FORMATTEDFIELD definitions of the layout.
You can also see how objects are added into the grid: MyRow objects are created and simply added to the “sheet” property.
Consequence: on server side, the grid is managed as just normal collection.
There are two special events that you get notified on server side:
“Selection of row” - this is either invoked when the user clicks onto a row or when the user navigates via keyboard into a row
“Execution of row” - this is either invoked when the user double clicks onto a row or when the user presses the “enter key” inside a row.
The events are represented by the protected methods:
“onRowSelect”
“onRowExecute”
Both methods are part of the FIXGRIDItem class which is used as base class for the row object.
The FIXGRID component provides a number of attributes to control the rendering. There are some aspects to be aware of:
HEIGHT/ SBVISIBLEAMOUNT: the SBVISIBLEAMOUNT defines the number of lines that are shown in the client. This is NOT the maximum number of grid lines, but just the number of lines presented to the user! - If defining SBVISIBLEAMOUNT without defining a HEIGHT, then the visible grid will contain the number of lines as defined by SBVISIBLEAMOUNT. If defining SBVISIBLEAMOUNT and also defining a HEIGHT (e.g. “100%”), then the client may optically reduce the number of visible items, if they do not fit into the area defined by the height. In this case the SBVISIBLEAMOUNT value represents the maximum number of rows transferred to the client.
BORDERHEIGHT, BORDERWIDTH, BORDERCOLOR: this is the definition of the grid lines that are painted between the grid components.
BORDER: this is the normal border definition that is taken for the whole grid. If you do not want the grid to be surrounded by a one pixel border, define the value “left:0;right:0;bottom:0;top:0”.
ROWHEIGHT: this is the minimum height (pixel value) of a grid line. Grid lines may be rendered with a greater height (e.g. if there is too much space, in this case the row height is equally stretched to fill the gird), but never with a lower height.
The WIDTH attribute of the GRIDCOL by default is responsible for sizing the corresponding column. You can define the following types of values:
“100” - in this case the column is sized with a width of 100 pixels (in case the client zoom factor is 100%).
“50%” - in this case the columns receives 50% of the un-occupied width of the whole grid.
“50%;200” - in this case the column receives 50% of the un-occupied width, but 200 pixels in any case. This definition is very useful: the un-occupied width is the width of the whole grid minus the width that is taken by columns with pixel sizing.
By default the sizing of the grid columns only depends on the WIDTH definition, as shown. If the components within the grid column cells do not fit in, then they are cut accordingly.
But, there is also the possibility to derive the width of a column from its content cells. This is the purpose of the attribute GRIDCOL-DYNAMICWIDTHSIZING. While rendering the grid on client side, the client will measure the size of each cell within a certain column – and the whole column will be sized according to the widest cell.
When using GRIDCOL-DYNAMICWIDTHSIZING you can in addition still maintain the WIDTH attribute. The interpretation is as follows:
dynamicwidthsizing=”true” width=”50”: the column will be sized according to its content, but will receive 50 pixels as minimum in any case
dynamicwithsizing=”true” width=”100%”: the column wiil be sized according to its content, but will receive 100% of the width in any case.
Please pay attention when using dynamic width sizing;
The client only knows these data items that are currently loaded on client side. As result it will execute the sizing based on its current content. In case the user scrolls through the items it may happened that the columns, that are defined to support dynamic width sizing, will change their widths.
You can skip this chapter when first time using grids ...or you can immediately read and get some deeper understanding of how the grid internally operates:
The FIXGRID component is able to handle grids with a large amount of items. The simple reason for this: only these items are sent to the client and as consequence are potentially rendered in the client, that are currently relevant in the client.
This means: the grid processing on server side may handle a grid with 10.000 items – but actually only a few of them are sent to the client. This ensures a scalability both from network volume and from rendering performance perspective. - Of course there is some “side-effect”: when the client only knows few of the items, then it has to talk to the server during scroll operations in order to update.
There is one important attribute, ruling all this – which is the attribute FIXGRID-SBVISIBLEAMOUNT. The server will always send the number of items to the client that is defined with SBVISIBLEAMOUNT. So, if SBVISIBLEAMOUNT is defined as “10” and the grid is newly rendered then by default the items with the index 0, 1, 2, 3, 4, 5, 6, 7, 8, 9 are transferred to the client side – only if they are available at all.
The property FIXGRDIBinding-sbvalue is relevant for telling the grid, where the current “area of interest” is. So, at the beginning it is by default “0”, when the user scrolls to a certain position it is updated accordingly. You may also set sbvalue from your server side program in case you want to scroll to a certain item of the grid.
“Sbvalue” is representing the index of the first top content item of the grid. You may set the property during runtime – if the value is a valid index of your item list.
Now let's take a look onto the rendering. There are two cases:
If there is NO height defined with the grid, then the grid's size is automatically driven by SBVISIBLEAMOUNT. If SBVISBLEAMOUND is defined to be “10” then the grid will have 10 content lines.
If there IS a height defined with the grid (typically some percentage height, e.g. “100%”) then there is a bit more logic involved on client side. Remember: the grid always receives from the server side a number of items defined by SBVISIBLEAMOUNT. So there are three situations:
1. The number of items sent from the server exactly fit into the grid's content area... bingo! No problem at all...
2. The content area of the grid is too small to fit the items from the server side. In this case only these items are rendered in the grid, that really fit. So the server may send 10 items, but the client decides to only present 5 of them due to missing optical space on the screen. - There's nothing to worry about, because the user just can scroll to the next items. This scrolling is a “normal”, server side scrolling again.
3. The content area of the grid is too big. So the grid offers optical space for a lot of items, but the server only comes with 10 items. In this case the grid distributed the 10 items into its available content area, this means that 10 rows are rendered, each row getting its corresponding height, so that all 10 fit the content area. In other words: the row height of each line is “stretched” to fit.
You see: when explicitly defining a HEIGHT with a grid, you need to think a bit about how to set SBVISBLEAMOUNT:
If your grid typically receives a small screen area to fit in, then SBVISIBLEMOUNT should be defined low as well (e.g. “10”). Imagine your grid receiving a height of e.g. 150 pixels only (due to other controls occupying space) and you having defined SBVISBLEAMOUNT as 100: in this case always 100 items are sent from the server to the client, just to let the client find out that e.g. 94 of them never fit into the grid... So there is a waste of data transferred and there is some useless processing on client side, which you can avoid by properly setting SBVISISBLEAMOUNT.
A typical maximum number for SBVISIBLEAMOUNT is in the area of “50”. Which grid will really have more than 50 optical lines, even if the screen is maximized? Of course you might have special situations to also go beyond “50”, but then you should do so with some good reason. ;-)
By the way: the SBVISBLEAMOUNT of the grid can not be changed once a grid is rendered! You must set it correctly from the beginning on.
A tree is a normal FIXGRID implementation with three special things:
Inside the FIXGRIDCOL components you specify a TREENODE component.
On server side you use FIXGRIDTreeBinding as collection class (instead of FIXGRIDListBinding), and the row class is derived from FIXGRIDTreeItem (instead of FIXGRIDItem).
Inside the row object you have an additional event “onToggle” that indicated that the user opens/closes a corresponding tree row.
All the other things stay the same: you build the tree on server side, the transfer of the visible rows to the client is automatically done.
Have a look onto the following example:
The tree is a FIXGRID component containing two GRIDCOL columns: one with a TREENODE component inside, the other one with a FORMATTEDFIELD component:
<t:rowdemobodypane id="g_3" objectbinding="demoTree" >
<t:row id="g_4" >
<t:fixgrid id="g_5" avoidroundtrips="true" bordercolor="#D0D0D0"
borderheight="0" borderwidth="1" height="100%"
objectbinding="#{d.demoTree.tree}" rowheight="16"
sbvisibleamount="25" width="100%" >
<t:gridcol id="g_6" text="Country / Town" width="100%" >
<t:treenode id="g_7" />
</t:gridcol>
<t:gridcol id="g_8" text="Inhabitants" width="100" >
<t:formattedfield id="g_9" align="right" format="int"
value=".{inhabitants}" />
</t:gridcol>
</t:fixgrid>
</t:row>
<t:row id="g_10" >
<t:button id="g_11" actionListener="#{d.demoTree.onOpenAllNodes}"
text="Open all" />
<t:button id="g_12" actionListener="#{d.demoTree.onCloseAllNodes}"
text="Close all" />
</t:row>
</t:rowdemobodypane>
The server side program shows that the grid processing is very similar to the normal grid processing:
package workplace;
import java.util.List;
import org.eclnt.jsfserver.base.faces.event.ActionEvent;
import org.eclnt.jsfserver.defaultscreens.Statusbar;
import org.eclnt.jsfserver.elements.impl.FIXGRIDTreeBinding;
import org.eclnt.jsfserver.elements.impl.FIXGRIDTreeItem;
public class DemoTree extends DemoBase
{
// ------------------------------------------------------------------------
// inner classes
// ------------------------------------------------------------------------
public class MyRow extends FIXGRIDTreeItem
{
int i_inhabitants;
public MyRow(FIXGRIDTreeItem parent, String text, int inhabitants, boolean isEndNode)
{
super(parent);
setText(text);
i_inhabitants = inhabitants;
if (isEndNode)
setStatus(STATUS_ENDNODE);
}
public void setInhabitants(int value) { i_inhabitants = value; }
public int getInhabitants() { return i_inhabitants; }
public void onToggle()
{
Statusbar.outputMessage("TOGGLE on " + getText());
}
public void onRowExecute()
{
if (getStatusInt() == STATUS_CLOSED) setStatus(STATUS_OPENED);
else if (getStatusInt() == STATUS_OPENED) setStatus(STATUS_CLOSED);
}
public void onRowSelect()
{
Statusbar.outputMessage("SELECT on " + getText());
}
}
// ------------------------------------------------------------------------
// members
// ------------------------------------------------------------------------
FIXGRIDTreeBinding<MyRow> m_tree = new FIXGRIDTreeBinding<MyRow>();
// ------------------------------------------------------------------------
// constructors
// ------------------------------------------------------------------------
public DemoTree()
{
// fill the tree
MyRow country;
MyRow town;
country = new MyRow(m_tree.getRootNode(),"Germany",80000000,false);
town = new MyRow(country,"Bammental",6800,true);
town = new MyRow(country,"Berlin",3000000,true);
town = new MyRow(country,"Munich",1000000,true);
town = new MyRow(country,"Hamburg",1200000,true);
country = new MyRow(m_tree.getRootNode(),"Liechtenstein",20000,false);
town = new MyRow(country,"Vaduz",20000,true);
country = new MyRow(m_tree.getRootNode(),"United Kingdom",60000000,false);
town = new MyRow(country,"London",6000000,true);
town = new MyRow(country,"Manchester",500000,true);
country = new MyRow(m_tree.getRootNode(),"United States",280000000,false);
town = new MyRow(country,"Los Angeles",5000000,true);
town = new MyRow(country,"New York",9000000,true);
town = new MyRow(country,"San Francisco",1000000,true);
}
// ------------------------------------------------------------------------
// public usage
// ------------------------------------------------------------------------
public FIXGRIDTreeBinding<MyRow> getTree() { return m_tree; }
public void onOpenAllNodes(ActionEvent ae)
{
setStatusInFolderNodes(m_tree.getRootNode(),FIXGRIDTreeItem.STATUS_OPENED);
}
public void onCloseAllNodes(ActionEvent ae)
{
setStatusInFolderNodes(m_tree.getRootNode(),FIXGRIDTreeItem.STATUS_CLOSED);
}
// ------------------------------------------------------------------------
// private usage
// ------------------------------------------------------------------------
private void setStatusInFolderNodes(FIXGRIDTreeItem node, int status)
{
List<FIXGRIDTreeItem> nodes = node.getChildNodes();
for (int i=0; i<nodes.size(); i++)
{
FIXGRIDTreeItem childNode = nodes.get(i);
if (childNode.getStatusInt() != childNode.STATUS_ENDNODE)
{
childNode.setStatus(status);
setStatusInFolderNodes(childNode,status);
}
}
}
}
Some aspects to put focus on:
While in the normal grid implementation items are filled into a list by using a corresponding “getItems().add(...)” method, grid items are created by specifiying the parent node as parameter of the constructor: “new FIXGRIDItem(parentNode)”.
Eacht tree has a root node that is not visible. It is the “0-level” root of the tree. The “FIXGRIDTreeBinding”-object already provides a root node, but you can also pass an own instance through the constructor of “FIXGRDTreeBinding”. The first visible level of nodes is the level below the root node.
Each node item has two special properties:
The “set/getText()” sets the node's text.
The “set/getStatus()” tells about the type of node:
STATUS_OPEND is a folder node that is currently opened
STATUS_CLOSED is a folder node that is currently closed
STATUS_ENDNODE is a leaf node of the tree
Each item has three important methods that you can override for reacting on tree actions:
“onToggle()” - this method is called when the user opens/closes a folder node. The status is set correspondingly. You can use this event in order to read a tree step by step: when the user opens a certain area you read the data below the area.
“onRowSelect()” and “onRowExecute()” - this is the same as with normal grid processing. The functions are called when the user clicks or double-clicks a certain tree node.
Please have a look into the JavaDoc documentation and into the examples of the demo workplace in order to find more information about implementing trees.
This is something for a bit more advanced programmers, but not too complex as well: influencing the sequence of columns in a grid, and influencing the widths of the columns.
By default a user can rearrange the columns of a grid on his/her own by dragging and dropping the headers of a column onto one another.
If the user does so, a property will automatically be populated inside the server side FIXGRIDBinding object. The property “columnsequence” then contains a semicolon-separated value which indicates the new sequence of columns.
FIXGRIDBinding
getColumnsequence
setColumnsequence
Example: if a grid has 4 columns, and the user arranges the last column to be the first one, then the value of the property will be:
3;0;1;2
This means: the first visible column is the original column 3; the second column is the original column 0, etc.
The same property can also be used for setting the column sequence. Thus, you can override the column sequence that is given by the layout definition.
Consequence: if you want to provide personalizable grids to your user, in which the sequence of columns is kept with the user profile, you can do so!
The original columns widths are taken out of the GRIDCOL definitions that are part of the layout definition.
Something similar, compared to the column sequence management, happens within the column width management: when the user starts to change the columns widths, a property will be populated on server side. The property's name is “modcolumnwidths”:
FIXGRIDBinding
getModcolumnwidths
setModcolumnwidths
Now the property contains the widths of the columns, as modified by the user. The property might look like:
132;50%;100;50%
Note: the sequence of widths is representing the original sequence of columns as defined within the layout definition. The sequence is not dependent on the visible sequence of columns.
When setting the property from your server side program the widths will be applied to the current grid.
There is a pre-thought persistence management available – in which the column sequence and column sizes are persisted. The persistence management is invoked when defining a PERSISTID with your FIXGRID. The PERSISTID is the unique used for identifying the corresponding grid and the column data that is stored for this grid.
Please check the interface “IFIXGRIDPersisetence2” and the default implementation “DefaultFIXGRIDPersistence” for more information.
The FIXGRID component implicitly provides powerful sorting – without having to explicitly add own coding. The functions for sorting include:
By clicking onto the column header the grid is sorted correspondingly.
By keeping the control- or shift-key pressed while clicking column headers you can sort by multiple columns.
The sorting is indicated by corresponding icons that are rendered inside the column header.
In most cases you place “end-controls” - like FIELD, LABEL, CHECKBOX, etc. - into the grid cells:
<t:fixgrid ...>
<t:gridcol ...>
<t:field ... text=”.{firstName}” .../>
</t:gridcol>
</t:fixgrid>
In this case the default sorting knows, which reference to use when the user invokes the sorting. If there is a FIELD pointing to property “firstName”, then the grid will be sorted using this property.
In cases in which you define complex column layouts, the grid does not know this information and requires some explicit definition of the reference to use for sorting:
<t:fixgrid ...>
<t:gridcol ...>
<t:field ... text=”.{firstName}” .../>
</t:gridcol>
<t:gridcol ...>
<t:pane ... sortreference=”.{address}”>
<t:row ... >
<t:label ... text=”.{zipCode}” .../>
<t:label ... text=”.{town}” .../>
</t:row>
</t:pane>
</t:gridcol>
</t:fixgrid>
In code of grid item:
public String getZipCode() { ... }
public String getTown() { ... }
public String getAddress() { return getZipCCode + “, “ + getTown(); }
You can pass this information by setting the SORTREFERENCE attribute of the FIXGRID. The information can be either passed as releative expression (“.{address}”) or as direct property bane (“address”).
At runtime you can access the current sort status of the grid by using method “getSortInfoForReference(...)”. The returned object of type “FIXGRIDSortInfo” contains information about the sort status and the sequence in case of sorting by multiple columns.
public interface IFIXGRIDBinding<itemClass extends FIXGRIDItem>
{
static final int SORT_UNSORTED = 0;
static final int SORT_ASCENDING = 1;
static final int SORT_DESCENDING = 2;
/**
* Sort information that is kept per sortable column.
*/
public static class FIXGRIDSortInfo
{
int i_sortStatus = SORT_UNSORTED;
public String getSortStatus() { ... }
public void setSortStatus(int sortStatus) { ... }
...
}
...
...
public FIXGRIDSortInfo getSortInfoForReference(String sortReference);
}
Please pay attention: setting/updaing the sort status using FIXGRIDSortInfo will not implicitly sort the grid! After having updated ths sort status you need to explicitly call the “resort()” method of the grid.
Example:
FIXGRIDListBinding<GridItem> m_grid = ...;
private void sortGridByLastNameFirstName()
{
m_grid.getSortInfo().clear();
FIXGRIDSortInfo fsi;
fsi = m_grid.getSortInfoForReference("lastName");
fsi.setSortSequence(0);
fsi.setSortStatus(FIXGRIDListBinding.SORT_ASCENDING);
fsi = m_grid.getSortInfoForReference("firstName");
fsi.setSortSequence(1);
fsi.setSortStatus(FIXGRIDListBinding.SORT_ASCENDING);
m_grid.resort();
}
For simple sorting by one column there is a convenience function “sort(...)”:
private void sortGridByLastName()
{
m_grid.sort("lastName",true);
}
The default sorting scans the values of certain grid column and then compares them using the Java sorting that is part of “java.util.Collections”. For comparing the values it checks the data type of the values and chooses a corresponding comparator. Example: if the values are of type “Integer”, then a numeric comparator is chosen – if the values are of type “String” then a lexical Comparator is used.
You can explicitly define the comparator to be used during sorting by overriding the grid's method “FIXGRIDBinding.findSortComparatorForColumnValue(...)”:
protected Comparator findSortComparatorForColumnValue(String sortReference)
{
...
// select your own Comparator for the corresponding sortReference
// or passe super.findSortComparatorForColumnValue(sortReference) for
// using the default comparator
...
}
Example for using this method: the data type of column values for a certain reason (e.g. accessing the database in a simple way) is “String”, but the contained data actually is of type integer. The default sorting would use a lexical comparator, while you tell to use a numeric one.
In some cases you may want to implement your own algorithm for sorting. Maybe you do not want to sort the grid within memory but want to re-read the grid from the database, passing new sort commands with the SQL.
In this case you need to be aware of what internally happens when the user clicked with the mouse onto a sortable column:
The client sends a request to the server processing.
Within the server an ActionEvent of type BaseActionEventGridSort is created.
The event is passed on to the action listener of the grid collection. This is the method FIXGRIDBinding.onGridAction() (FIXGRIDBinding is the parent of FIXGRIDListBinding and FIXGRIDTreeBinding).
The method sortGrid() is called.
protected abstract void sortGrid(String sortReference,
String objectBindingString,
boolean ascending);
The method receives the following information:
The sortReference itself.
The OBJECTBINDING string that is defined in the FIXGRID component's OBJECTBINDING attribute.
The information if the sorting needs to be done in an ascending or descending order.
You can override the sortGrid() method within an own sub-class of FIXGRIDListBinding (or FIXGRIDTreeBinding) and implement your own sort algorithm. Within this sort algorithm you can perform any grid operation you like: you can remove grid items, add new ones, etc.
In addition to the sorting by one column there is the so called multiple column sorting. The user invokes this sorting by holding down the ctrl-key when clicking onto the coulmn headers of the grid. The sequence in which the user clicks the header defines the priority of sorting.
The number of sort icons that is shown in the column header gives a visual feed back of the sort sequence:
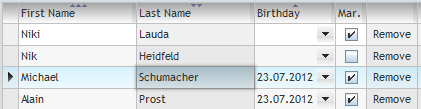
In the example the first sort priority is the birthday, the second priority is the last name – followed by the first name.
The multiple column sorting is managed on top of the normal column sorting.
The class FIXGRIDSortInfo that was introduced in the previous chapter holds a property “sortSequence” - with “0” being the first priority, “1” the seconds priority, etc.
The actual sorting is done by the method FIXGRIDBinding.processMultipleSort(). So this is the one to override when implementing own algorithms for multiple sorting.
The default implementation of the processMultipleSort() method internally calls the single column sorting (i.e. method FIXGRIDBinding.sortGrid(...)) multiple times – starting with the lowest sort priority first and then going back to the highest priority. The expectation behind is that the single column sorting algorithm is a stable sort. As consequence the result of processing one sort after the next is the correct multi-column sorting that you expect.
(Of course the default column sorting provided by CaptainCasa is a stable one, so there is no need to adapt anything!)
You can directly sort the content of the grid by calling the following methods of FXIGRID(List/Tree)Binding:
getSortInfo().clear();
FIXGRIDSortInfo fsi;
fsi = getSortInfoForReference("lastName");
fsi.setSortSequence(0);
fsi.setSortStatus(SORT_ASCENDING);
fsi = getSortInfoForReference("firstName");
fsi.setSortSequence(1);
fsi.setSortStatus(SORT_ASCENDING);
resort();
The steps are:
You first clear all sort status information that is currently available. (If there is a fresh grid you do not need to do this step.)
Then you define the sort information per column. For each definition you have to define the access string (expression without any leading or closing brackets), the sort status and the sort sequence (0 for first rank, 1 for seconds, ...).
By calling resort() the sorting is applied to the current grid.
When initially sorting a grid then you need to pay attention to, that the grid must be bound to its component (FIXGRID) – otherwise the sorting will not work. The binding to the component with a fresh grid is done when the grid is processed in the JSF render phase the first time (this is when the page's XML is processed).
As consequence you need to shift the sort code into the initialize() method which is called when the component binds to the FIXGRIDBinding object. You need to override your FIXGRIDList/TreeBinding, e.g. in the following way:
public class MyFIXGRIDListBinding extends FIXGRIDListBinding<MyRow>
{
public void initialize()
{
super.initialize();
// this is how to sort by one column
// {
// sort("firstName",true);
// }
// this shows how to sroty by multiple columns
{
getSortInfo().clear();
FIXGRIDSortInfo fsi;
fsi = getSortInfoForReference("lastName");
fsi.setSortSequence(0);
fsi.setSortStatus(SORT_ASCENDING);
fsi = getSortInfoForReference("firstName");
fsi.setSortSequence(1);
fsi.setSortStatus(SORT_ASCENDING);
resort();
}
}
}
In cases in which you want to switch off multi column sorting, just set the attribute FIXGRID-MULTICOLUMNSORT to “false” - then only single column sorting will be active.
The typical way of setting the client keyboard focus to a certain component is by using the component attribute REQUESTFOCUS. The mechanism described in chapter “Rules that apply to all Components – Focus Management” is of course applicable for all components that you insert into grid rows as well.
There is an additional simplification function available in order to move the client focus into the first cell of a grid row. You simply need to call the function “FIXGRDBinding.selectAndFocus(FIXGRIDItem)”.
Please take a look at the following example:
public class DemoGrid extends DemoBase
{
// ------------------------------------------------------------------------
// inner classes
// ------------------------------------------------------------------------
public class MyRow extends FIXGRIDItem
{
String i_firstName;
String i_lastName;
boolean i_married;
// --------------------------------------------------------------------
public void setFirstName(String value) { i_firstName = value; }
public String getFirstName() { return i_firstName; }
public void setLastName(String value) { i_lastName = value; }
public String getLastName() { return i_lastName; }
public void setMarried(boolean value) { i_married = value; }
public boolean getMarried() { return i_married; }
// --------------------------------------------------------------------
public void onRemove(ActionEvent ae)
{
m_rows.getItems().remove(this);
}
}
// ------------------------------------------------------------------------
// members
// ------------------------------------------------------------------------
FIXGRIDListBinding<MyRow> m_rows = new FIXGRIDListBinding<MyRow>(true);
// ------------------------------------------------------------------------
// constructors
// ------------------------------------------------------------------------
public DemoGrid()
{
}
// ------------------------------------------------------------------------
// public usage
// ------------------------------------------------------------------------
public FIXGRIDListBinding<MyRow> getRows() { return m_rows; }
public void onAddRow(ActionEvent ae)
{
// add the item
MyRow row = new MyRow();
row.setFirstName("new");
row.setLastName("new");
m_rows.getItems().add(row);
// select the item
m_rows.deselectCurrentSelection();
m_rows.selectAndFocusItem(row);
}
}
You see that in the method “onAddRow” a new item is added to the grid. After adding the item first the current selection of the grid is removed. Then the method “selectAndFocusItem” is called. This method performs 3 steps:
It selects the item so that it is marked with a certain background.
It ensures that the item is visible within the grid – this means, that the grid e.g. is scrolled if the item is currently within a grid area that is not visible on client side.
And it moves the focus into the grid row.
By default lines of a grid are selected by the user in the following ways:
A. The user clicks with the mouse into a line.
B. The user presses a key within a line.
C. The user somehow focuses a component within the line.
In certain constellations option C. is not adequate for line selection. E.g. when opening a popup dialog from a grid line and when changing the selection of the grid in the dialog, then the default behavior of the popup dialog when being close is to focus the component it was started from. If this is the grid – with some changed line selection – then the focus change will automatically select the line which was focused before opening the popup dialog.
You can switch off the option C. as consequence. Use attribute FIXGRID-SELECTONROWFOCUS and set value “false”.
You may open a default dialog in which the user can explicitly define the sequence of columns and the visibility of columns.
The easiest way to include the columns sequence popup into your screen is by simply adding an invoker component (e.g. button, link) and referencing via expression to the “onOpenGridDetails”-method, that is directly available with all FIXGRIDBinding implementations on server side.
Example:
<t:row id="g_2">
...
...
<t:link id="g_8"
actionListener="#{d.DemoMinispread.sheet.onEditColumnDetails}"
text="Columns..." />
...
...
</t:row>
<t:row id="g_9">
<t:fixgrid id="g_10" avoidroundtrips="true" background="#FFFFFF80"
bordercolor="#D0D0D0" borderheight="1" borderwidth="1"
cellselection="true" drawoddevenrows="true" emptycolor="#F0F0F0"
height="100%" multiselect="true"
objectbinding="#{d.demoMinispread.sheet}" sbvisibleamount="20"
width="100%">
...
...
You see: the grid (in t:fixgrid) is bound by using expression “#{d.demoMinispread.sheet}” - referencing on server side to FIXGRIDListBinding object. The method “onEditColumnsDetails” is directly available within this object.
As result the following popup dialog will be opened:
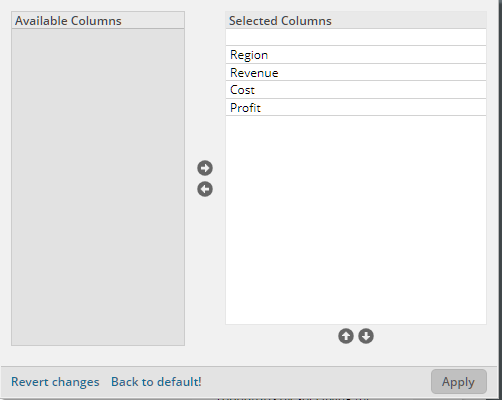
The server side grid management provides a couple of useful functions:
Search of text within grid data
Export of grid data into various formats
The easiest way to include these functions is to embed the method “FIXGRIDBinding.onOpenGridFunctions(ActionEvent event)” into your screen, e.g. by providing a correpsonding LINK or BUTTON component.
Example: in the mini-budget demo of the demo workplace, the function is added as LINK component:
<t:row id="g_2">
<t:coldistance id="g_3" width="100%" />
<t:link id="g_4"
actionListener="#{d.DemoMinispread.sheet.onOpenGridFunctions}"
text="Grid..." />
</t:row>
<t:row id="g_5">
<t:fixgrid id="g_6" avoidroundtrips="true" background="#FFFFFF80"
bordercolor="#D0D0D0" borderheight="1" borderwidth="1"
cellselection="true" emptycolor="#F0F0F0" height="100%"
multiselect="true" objectbinding="#{d.demoMinispread.sheet}"
sbvisibleamount="20" width="100%">
...
...
...
Result: a popup dialog will be opened once the user presses the LINK component:
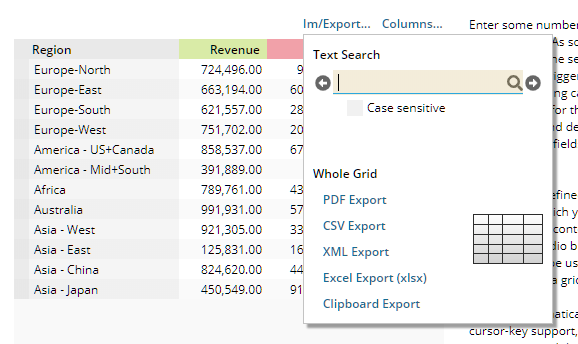
The extended functions are provided within the popup.
There are a couple of server side Java APIs that are provided by the FIXGRIDBinding class, which is the base for all server side grid implementations. Please check the JavaDoc documentation in the following areas:
FIXGRIDBinding.getTextSearcher()
FIXGRIDBinding.getExporter()
All the functions that are provided in the default popup are available by an internal API as well.
In case you do not like the default dialogs that are opened for defining the grid column sequence and/or the search & export dialog: here are some “internals”:
The code in FIXGRIDBinding for open the popup dialogs is:
public void onEditColumnDetails(ActionEvent ae)
{
final DefaultScreens ds = DefaultScreens.getSessionAccess().getOwner();
final GridDetails gd = DefaultScreens.getSessionAccess().getGridDetails();
IGridDetailsListener gl = new IGridDetailsListener()
{
public void reactOnApplied()
{
ds.closePopup(gd);
}
public void reactOnClose()
{
ds.closePopup(gd);
}
};
gd.prepare(this,gl,true,GridDetails.PAGENAME_COLUMNSDETAILS);
ModelessPopup popup = ds.openModelessPopup(gd,"",400,400,new IModelessPopupListener()
{
public void reactOnPopupClosedByUser()
{
ds.closePopup(gd);
}
});
popup.setUndecorated(true);
popup.setCloseonclickoutside(true);
popup.setStartfromrootwindow(false);
}
A page bean “DefaultScreens” is picked and opened as modeless dialog. The page bean is initialized using its “prepare(...)” method. The last parameter that is passed into the prepare method is the name of the .jsp/.xml-page that is to be used.
There are two static variables that are used:
GridDetails.PAGENAME_COLUMNDETAILS (default “”)
(default “/eclntjsfserver/popups/griddetails.jsp”)
GridDetails.PAGENAME_FUNCTIONS
(default “/eclntjsfserver/popups/gridfunctions.jsp”)
In case you want to use other, own pages there are two ways:
You may simply set the two static members of GridDetails, so that they contain new default values.
You may override the FXIGRIDBinding class that you are using and implement own “onXyz”-methods that you call.
In case you may use own dialogs and not only applying optical changes to the default dialogs, but also adding new functions – you also need to somehow influence the way that the page bean for the dialogs is picked.
You do so by calling the static method “DefaultScreens.Factory.initClassGridDetails(..)”. Include the calling of this method into the start up process of your application.
The grid management provides a nice function: it is able to render the currently selected item into a popup window. All the item data is available as vertical list within this window – using exactly the same components as are used inside the grid row:
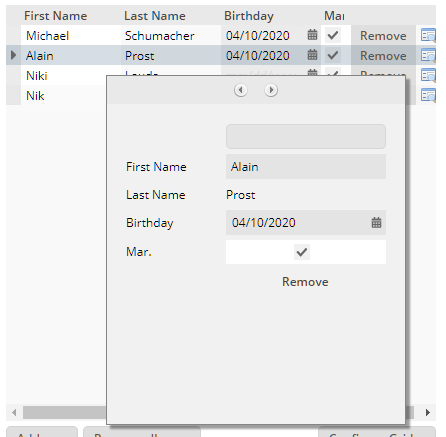
Opening this popup is very simple: you just need to call...
FIXGRIDBinding.getRowDataUI().onOpenRowDataPopup() - in order to list all the columns that are currently visible. Columns that the user does not want to see are not taken over.
or FIXGRIDBinding.getRowDataUI().onOpenRowDataPopupAllColumns() - in order to list all columns that are defined in the layout definition
Again you can call the popup via an API and add own functions: FIXGRIDBinding.getRowDataUI().openPopup(...) will pass you back the popup window, so that you e.g. can update its size or position according to your requirements.
The grid's popup menu processing (“right mouse click menu”) is based on the default popup menu processing of CaptainCasa Enterprise Client: you need to define a POPUPMENU with a certain id within your page. This POPUPENU then is referenced by the grid components.
There are three possibilities to define a popup menu within a grid definition:
You of course can assign a POPUPMENU component to just normal grid cell components – just using the normal attribute POPUPMENU. In this case the actionListener of the corresponding component will receive a corresponding event of type BaseActionEventPopupMenuItem when the user selected a popup menu item. Example:
FIXGRID ...
GRIDCOL text=”...” ...
FIELD text=”...” popupenu=”...” actionListener=”.{...}” ...
If you want to have on POPUPMENU processing for a whole line then you can define this in the following way:
FIXGRID ... rowpopupmenu=”...”
The corresponding popup menu will be shown when the user presses the right mouse button on any cell of a line. As reaction on server side you need to override the method FIXGRIDItem.onPopupMenuItem(...) within your item-class.
...and finally you may define the popup menu for the whole grid by specifying:
FIXGRID ... popupmenu=”...”
A typical usage scenario for a grid is to use FIXGRID-ROWPOPUPMENU and FIXGRID-POPUPMENU in parallel:
If the user clicks on an item then the popup menu assigned via ROWPOPUPMENU will be shown.
If the user clicks on some empty space within the grid then the popup menu assigned via POPUPMENU will be shown.
Typically the ROWPOPUPMENU definition (i.e. contained menu items) includes the POPUPMENU definition: if the grid is fully occupied with line items, there is no empty space left, and as consequence there is no way for the user to reach the POPUPMENU items if not defined in the ROWPOPUPMENU definition as well.
During runtime a user may update the grid in various ways:
he/she may re-arrange the columns
he/she may resize columns
he/she may sort the grid
A common function that is required is to save this information and to restore it if the user revisits the grid.
Of course you can implement such function straight on your own by just using the grid's API. But there is a shortcut to simplify the default scenarios – which is activated by assigning a PERSISTID to the corresponding grid:
In the FIXGRIDBinding there are two protected methods:
protected void storePersistentDataImplicitly()
{
storePersistentData();
}
protected void storePersistentData()
{
...
}
Every time a grid's structure is updated, the method “storePersistentDataImplicitly” is called. This method by default directly calls the method “storePersistentData” - which takes the current grid configuration and stores it. This means every time the user e.g. re-arranges the columns of a grid the grid structure Is immediately stored.
If you do not want the storing to be implicitly done, then just override “storepersistentDataImplicitly” and do ...nothing! (Maybe you want to maintain a change indicator or do something else...).
The method “storePersitentData()” internally finds an instance of an implementation of the interface IFXRIDPersistence2.
public interface IFIXGRIDPersistence2
{
public PersistentInfo readPersistentInfo(FacesContext context,
FIXGRIDBinding gridBinding,
String pageName,
String persistId);
public void updatePersistentInfo(FacesContext context,
FIXGRIDBinding gridBinding,
String pageName,
String persistId,
PersistentInfo persistentInfo);
}
The finding is done through the system.xml configuration file:
<fixgrid
persistence=
"org.eclnt.jsfserver.util.fixgridpersistence.DefaultFIXGRIDPersistence"
...
/>
The default class to handle the persistence is “DefaultFIXGRIDPersistence”. This class transforms the current grid configuration into an XML string and stores it within the streamstore.
In many scenarios you just want to use the default persistence and manage the actual persisting of the XML on your own. In this case the only thing you need to do is to override two methods:
protected String readSerializedPersistentInfo(FacesContext context,
FIXGRIDBinding gridBinding,
String pageName,
String persistId)
{
String xml = ....read the XML...
return xml;
}
protected void saveSerializedPersistentInfo(FacesContext context,
FIXGRIDBinding gridBinding,
String pageName,
String persistId,
PersistentInfo persistentInfo,
String xml)
{
...store XML...
}
In general you do not have to worry about grid performance – both client and server-side. But, there may come up situations in which you should, such as:
Grids with many columns (many meaning > 30)
Several grids with many columns displayed at the same point of time
Before getting into details about how to optimize, first have a look at the performance aspects of grid processing.
The FIXGRID – GRIDCOL – etc. component combination, that forms a grid actually is multiplied out at runtime: for each row of the grid there is a corresponding row, each row containing exactly these components that are defined below the GRIDCOL definition.
While multiplying out the expressions of all components are concatenated correspondingly.
Example: in the FIXGRID definition there is an expression defined in the attribute OBJECTBINDING, e.g. “#{abc.grid}”. This expression points to the FIXGRIDBinding object on server side. Below the GRIDCOL definition there might be a FIELD definition, the TEXT attribute of FIELD pointing to “.{firstName}”. For each row, a FIELD component will be multiplied out, the expressions of the components will be:
<fixgrid objectbinding=”#{abc.grid}”>
</fixgrid>
Row 1: #{abc.grid.rows[0].firstName}
Row 2: #{abc.grid.rows[1].firstName}
Row 3: #{abc.grid.rows[2].firstName}
etc.
During JSF request processing all expressions that are referenced within the current component tree are processed. Now imagine a grid with a SBVISIBLEVALUE of “30” and a column count of “50”: in this case 1500 expressions are evaluated on server side with every request.
Remember: only those rows are processed which are actually visible on client side, i.e. not all rows of the grid are processed, but still this is quite a lot to do.
The optimization is quite simple: each grid row explicitly tells if it has changed during a request processing or not. In case it has not changed, the components of the grid row are not processed at all. This means also the corresponding resolution of expressions is not done.
You see: the application on server side now has to “help” the surrounding component framework, by telling that certain components do not need to be processed.
There are two things you need to do in order to optimize the grid processing:
(1) You need to declare the fact that a grid is optimized
(2) You need to tell about changes in grid items.
The first part is simple. Just use the constructor of FIXGRIDListBinding or FIXGRIDTreeBinding, that allow to pass along the boolean flag “changeIndexIsSupported”. E.g. for FIXGRIDListBinding call the constructor in the following way:
FIXGRIDListBinding<MyRow> m_grid = new FIXGRIDListBinding(true);
The second aspect is something you really need to pay attention to: every time a grid row's content is updated you need to tell the grid line about it. If you do not tell, the component processing will assume that nothing has changed within the data of the grid line. You tell the change of data in the following way:
FIXGRIDItem row = ...;
row.getChangeIndex().indicateChange();
Please note: you just have to call the indicateChange() method in case that an existing item was updated. You do not need to notify about:
Moving one item within the grid to a new position
Adding items, removing items
Clearing the grid and filling it with new data
Selecting / de-selecting grid lines
All this is recognized as change internally. (BTW: Calling the “indicateChange()” method too often will never cause an error on server side...)
Optimization is never a problem in some simple scenarios:
Read-only grids – if no data is changeable in the grid, then you just can define the grid to be optimized, that's it.
Grids in which the only change of data is caused by the user interface. This means: no data inside the grid is calculated out of user input data. In this case no active changing of data is done. Again, you just need to define the grid to be optimized, that's it.
If your grid has a lot of columns (e.g. > 100 columns) then the following optimization makes sense for all read-only values:
On Grid Item level you provide a so called “data bag” - which is a String-serialized map, containing all the read only values of one item in the format “name1;value1;name2:value”;...”
The grid cell controls refer to the “data bag” by referencing the corresponding name in the following way “@cc_db:<name>@”
Consequence: all the data is picked from the item in one chunk – and transferred to the client in one chunk. The distribution of the data from “data bag” into the corresponding cell components is done on client side.
Example + How to implement:
In the grid item class of your grid you need to implement the interface “IDatabagProvider”:
...
public class GridItem extends FIXGRIDItem implements IDatabagProcider
{
String i_firstName;
String i_lastName;
String i_databag;
public String getDatabag()
{
if (i_databag == null)
{
Map<String,String> m = new HashMap<String,String>();
m.put(“firstName”,i_firstName);
m.put(“lastName”,i_lastName);
i_databag = ValueManager.encodeComplexValue(m);
}
return i_databag;
}
public String getFirstName() { ... } // required for sorting!
public String getLastName() { ... } // required for sorting!
}
You see: the databag collects all the information in one string which is normally picked from individual properties.
In the FIXGRID definition you define the grid in the following way:
...
FIXGRID ...
GRIDCOL SORTREFERENCE=”.{firstName}” ...
LABEL TEXT=”@cc_db:firstName@” ...
GRIDCOL SORTREFERENCE=”.{lastName}”...
LABEL TEXT=”@cc_db:lastName@” ...
...
So, instead of binding attributes to expressions you need to bind them to names of the “data bag”.
That's it!
Typically the “data bag” optimization is used in grids which are generated using (ROW)DYNAMICCONTENTBINDING. There is a corresponding example in the demo workplace (search for text “Grid Performance”) in which the “data bag” generation is demonstrated.
Please pay attention:
The “data bag” is usabled for read-only attributes only. E.g. you must not bind a FIELD's TEXT-attribute to a “data bag” name!
If not showing some columns of a grid (e.g. due to user selection of visible columns) then the corresponding data of the column is not transferred to the client at all. With the “data bag” you need to take special care about this! By default the whole “data bag” is transferred to the client side – regardless if the contained pieces of information are referenced by a component or not.
When using “data bag” then you need to explicitly define the GRIDCOL-SORTREFERENCE so that sorting still works on server side.
In the previous chapter you got to know the FIXGRID component as one way of rendering information, in which you have a collection of items to be presented to the user.
The advantage of the FIXGRID component: it allows a powerful and flexible handling of cell-oriented grids. The disadvantage: if you want to present the item information to the user in some more heterogeneous way, then things are a bit more difficult. - In the FIXGRID component cells are primarily sized by the grid processing (“outside-in sizing”). And in the FIXGRID you think in homogeneous cells.
As consequence there is an alternative: the REPEAT component. This component allows a flexible way of presenting collection items to the user, by just repeating a defined sequence of components for each item of the collection.
The usage of the REPEAT component is very simple. Take a look onto the following page:
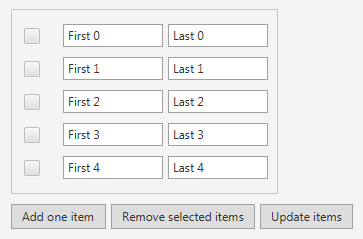
When selecting the first 2 items and pressing “Remove selected items” the screen looks like:
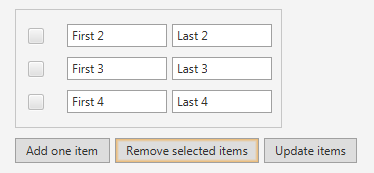
The layout definition is:
<t:row id="g_2">
<t:pane id="g_3" border="#00000030" padding="10">
<t:repeat id="g_4" listbinding="#{d.DemoRepeat.items}">
<t:rowdistance id="g_5" height="5" />
<t:row id="g_6" coldistance="5">
<t:checkbox id="g_7" selected=".{selected}" />
<t:coldistance id="g_8" width="5" />
<t:field id="g_9" text=".{firstName}" width="100" />
<t:field id="g_10" text=".{lastName}" width="100" />
</t:row>
<t:rowdistance id="g_11" height="5" />
</t:repeat>
</t:pane>
</t:row>
<t:rowdistance id="g_12" height="10" />
<t:row id="g_13" coldistance="5">
<t:button id="g_14"
actionListener="#{d.DemoRepeat.onAddItemAction}"
text="Add one item" />
<t:button id="g_15"
actionListener="#{d.DemoRepeat.onRemoveItemsAction}"
text="Remove selected items" />
<t:button id="g_16"
actionListener="#{d.DemoRepeat.onUpdateItemsAction}"
text="Update items" />
</t:row>
You see:
In the layout definition there is a REPEAT component that binds to a “#{d.DemoRepeat.items}” expression.
Within the REPEAT' component's content there are just normal controls (e.g. FIELD). The controls bind to server side properties using the “.{...}” expression notation.
This means the content of the REPEAT component is repeated for each single item of the list that is bound via the attribute REPEAT-LISTBINDING. Inside the REPEAT the properties of the items are reference by “.{...}” expressions.
The server-side Java code is:
package workplace;
import java.io.Serializable;
import java.util.ArrayList;
import java.util.List;
import org.eclnt.editor.annotations.CCGenClass;
import org.eclnt.jsfserver.pagebean.PageBean;
import org.eclnt.workplace.IWorkpageDispatcher;
import org.eclnt.jsfserver.base.faces.event.ActionEvent;
@CCGenClass (expressionBase="#{d.DemoRepeat}")
public class DemoRepeat
extends DemoBasePageBean
implements Serializable
{
// ------------------------------------------------------------------------
// inner classes
// ------------------------------------------------------------------------
public class Item
{
boolean m_selected = false;
String i_firstName;
String i_lastName;
public String getFirstName() { return i_firstName; }
public void setFirstName(String firstName) { i_firstName = firstName; }
public String getLastName() { return i_lastName; }
public void setLastName(String lastName) { i_lastName = lastName; }
public boolean getSelected() { return m_selected; }
public void setSelected(boolean value) { this.m_selected = value; }
}
// ------------------------------------------------------------------------
// members
// ------------------------------------------------------------------------
List<Item> m_items = new ArrayList<Item>();
// ------------------------------------------------------------------------
// constructors & initialization
// ------------------------------------------------------------------------
public DemoRepeat(IWorkpageDispatcher dispatcher)
{
super(dispatcher);
for (int i=0; i<5; i++)
{
Item it = new Item();
it.i_firstName = "First " + i;
it.i_lastName = "Last " + i;
m_items.add(it);
}
}
public String getPageName() { return "/workplace/demorepeat.jsp"; }
public String getRootExpressionUsedInPage() { return "#{d.DemoRepeat}"; }
// ------------------------------------------------------------------------
// public usage
// ------------------------------------------------------------------------
public List<Item> getItems() { return m_items; }
public void onAddItemAction(ActionEvent event)
{
Item it = new Item();
it.i_firstName = "New item";
it.i_lastName = "New item";
m_items.add(it);
}
public void onRemoveItemsAction(ActionEvent event)
{
for (int i=m_items.size()-1; i>=0; i--)
{
Item item = m_items.get(i);
if (item.getSelected() == true)
{
m_items.remove(i);
}
}
}
public void onUpdateItemsAction(ActionEvent event)
{
for (Item item: m_items)
{
item.i_firstName += "#";
item.i_lastName += "#";
}
}
// ------------------------------------------------------------------------
// private usage
// ------------------------------------------------------------------------
}
The list of items (m_items) that is used for the REPEAT processing is just a normal instance of java.util.List – here it is an ArrayList. The items' class is an inner class in the example – but may be a “normal” class as well, of course.
By updating the items – either the number of items or the content of the items – the REPEAT component automatically follows and adapts the rendering accordingly.
It is possible to nest one REPEAT component inside an other. Please check the corresponding example within the Demo Workplace:
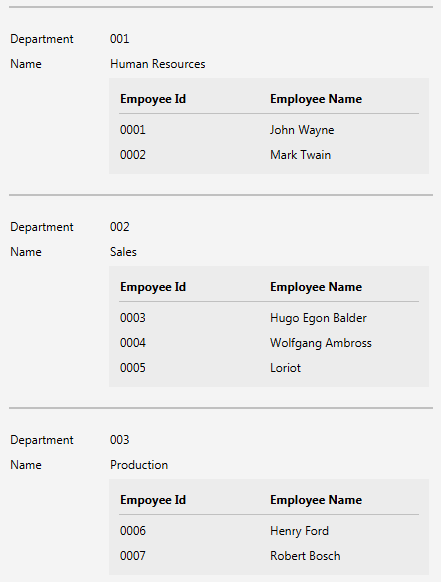
The principle behind is simple:
The outer REPEAT binds to a certain list (in this case the list of departments).
Each department item itself provides a list of employees – which is bound by an innner REPEAT component.
In principal there is no limit of nesting.
The REPEAT component binds to a list and renders the content of the list by repeating its content correspondingly. Of course this means that the component has a certain performance impact if it comes to lists with a lot of items:
The amount of data that is transferred from the server to the client increases.
The effort for building up the user interface within the client increases.
As consequence you should take care to not send too big lists into the REPEAT component processing. It's difficult to exactly define some limit, but in general you should think about performance aspects if the list has more than 50 items.
The solution what to do with long lists is that you need to split the whole list into partitions and allow the user to navigate between. - You need some indirection between the original, long list and the list that is presented to the user.
This is exactly what the class “ServerSideScrollList” does. Please take a look at the example that is part of the Demo Workplace:

From Layout Definition point of view the REPEAT part looks “just normal”:
<t:pane id="g_3" border="#00000030" padding="10">
<t:row id="g_4">
<t:label id="g_5" font="weight:bold" text="First Name"
width="100" />
<t:label id="g_6" font="weight:bold" text="Last Name" width="100" />
</t:row>
<t:rowdistance id="g_7" height="10" />
<t:repeat id="g_8"
listbinding="#{d.DemoRepeatServerSideScrolling.items}">
<t:row id="g_9">
<t:label id="g_10" text=".{firstName}" width="100" />
<t:label id="g_11" text=".{lastName}" width="100" />
</t:row>
<t:rowdistance id="g_12" height="3" />
<t:rowline id="g_13" />
</t:repeat>
</t:pane>
The REPEAT binds to some “items” list on the server side.
But looking into the code you will see that instead of using a plain List-implementation a special class “ServerSideScrollList” is used:
public class Item
{
String m_firstName;
String m_lastName;
public String getFirstName() { return m_firstName; }
public void setFirstName(String firstName) { m_firstName = firstName; }
public String getLastName() { return m_lastName; }
public void setLastName(String lastName) { m_lastName = lastName; }
}
// ------------------------------------------------------------------------
// members
// ------------------------------------------------------------------------
ServerSideScrollList<Item> m_items = new ServerSideScrollList<Item>();
// ------------------------------------------------------------------------
// constructors & initialization
// ------------------------------------------------------------------------
public DemoRepeatServerSideScrolling(IWorkpageDispatcher dispatcher)
{
super(dispatcher);
for (int i=0; i<50; i++)
{
Item it = new Item();
it.setFirstName("First " + i);
it.setLastName("Last " + i);
m_items.getItems().add(it);
}
}
public String getPageName() { return "/workplace/demorepeatserversidescrolling.jsp"; }
public String getRootExpressionUsedInPage() { return "#{d.DemoRepeatServerSideScrolling}"; }
// ------------------------------------------------------------------------
// public usage
// ------------------------------------------------------------------------
public ServerSideScrollList<Item> getItems() { return m_items; }
The items are not directly accessed in “m_items”, but are accessed by calling the method “getItems()”.
From the screenshot above you see that not 50 items are rendered within the client – but only 10. This is due to the default behavior of the ServerSideScrollList – separating all the items in partitions of 10 items.
The class ServerSideScrollList allows you to:
pass an own list in the constructor
define the number of items that are sent to the client side
define the top index of the item that is shown
navigate within all the items by providing corresponding methods
Please check the JavaDoc API documentation of this class.
In the example, next to the PANE holding the REPEAT processing there is the definition of a SCROLLBAR component:
<t:row id="g_2">
<t:pane id="g_3" border="#00000030" padding="10">
...
<t:repeat id="g_8"
listbinding="#{d.DemoRepeatServerSideScrolling.items}">
...
</t:repeat>
...
</t:pane>
<t:scrollbar id="g_14" flush="true" height="-1000"
sbmaxvalue="#{d.DemoRepeatServerSideScrolling.items.maxIndex}"
sbminvalue="0"
sbsize="#{d.DemoRepeatServerSideScrolling.items.numberOfItems}"
value="#{d.DemoRepeatServerSideScrolling.items.topIndex}" />
</t:row>
This SCROLLBAR component binds to the properties that are provided by the ServerSideScrollList. When moving the scroll bar then the corresponding top index of the ServerSideScrollList instance is set – and the REPEAT content is scrolled correspondingly.
CaptainCasa Enterprise Client provides the following possibilities of navigation:
Nesting of Pages
Popup Dialogs
modal
modeless
Of course all possibilities can be mixes with one another.
This chapter covers the basic aspects of page navigation and page modularization. Please also check the chapter “Page Bean Modularization” - which is a very useful concept built on top.
You may already know something about JSF navigation concepts: these are based on so called “action” definitions, which then refer to definitions inside faces-config.xml. Being a quite nice way to define page sequences, the JSF navigation concepts are not able to manage complex (but typical!) scenarios of typical rich client user interfaces, including:
For these reasons we do not internally use and support the JSF navigation concepts.
CaptainCasa Enterprise Client offers two ways of managing navigation:
Nesting of pages: one page contains one or several other pages
Dialogs: one page opens one or more modal or modeless dialogs
...what's about page sequences? Well, page sequences are just a special usage type for nesting pages – in which the outer page updates the inner page following certain application rules.
We need to take a look back into the chronology of Enterprise Client. ...Sorry!
The first possibility of including one page within another page was the “page inclusion” (component ROWINCLUDE). The outer page (e.g. “outer.jsp”) directly defines an area, in which an inner page (e.g. “inner.jsp”) is running.
++++++++++++++++++++++++++++++++++++++
+ outer.jsp +
+ +
+ ...#{d.OuterUI.xxx} +
+ +
+ +
+ ++++++++++++++++++++++++++ +
+ + inner.jsp + +
+ + + +
+ + ...#{d.InnerUI.xxx}... + +
+ ++++++++++++++++++++++++++ +
+
++++++++++++++++++++++++++++++++++++++
Well, this concept is very simple on the one hand – because the result is something like a (virtual) big XML-file – merged out of the outer and the inner page's xml. So, where are the difficulties?
The difficulties are that within the page definition there are expressions. E.g. the inner page contains an expression “#{d.InnerUI.firstName}”. The expressions are taken over when the inner page is nested by the outer page. So the virtual big page consists out of expressions addressing the outer page (e.g. #{d.OuterUI.user}”) and addressing the inner page (“#{d.InnerUI.firstName}”). On server side this means that two instances of beans are addressed through the “d”-Dispatcher, which are not linked in any way – other than sharing the same dispatcher instance.
Let's add one more level of complexity: now the outer page not only wants to show one inner page, but it wants to show the inner page twice – e.g. on the left and on the right side. Of course filled with different data!
++++++++++++++++++++++++++++++++++++++++++++++++++++++++++++++++
+ outer.jsp +
+ +
+ ...#{d.OuterUI.xxx} +
+ +
+ +
+ ++++++++++++++++++++++++++ ++++++++++++++++++++++++++ +
+ + inner.jsp + + inner.jsp + +
+ + + + + +
+ + ...#{d.InnerUI.xxx}... + + ...#{d.InnerUI.xxx}... + +
+ ++++++++++++++++++++++++++ ++++++++++++++++++++++++++ +
+
++++++++++++++++++++++++++++++++++++++++++++++++++++++++++++++++
And now, the static taking over of expressions while building the virtual big page does not work anymore. The left inner page and the right inner page are referencing the same expression – and this means they are referencing the same object instance on server side!
Consequence: you can by using “page inclusion” embed one page twice (or more), but the data shown in the page is always the same.
This is the reason why an alternative to page inclusion was added to the Enterprise Client: the “Page Bean Inclusion”.
When thinking in Page Beans then basically you think in UI objects – and not in jsp-layouts anymore. The UI objects are called “page beans”. Page beans are just normal server side objects, which are derived from the abstract class “PageBean”. When following the tutorial you already created page bean classes – so there is nothing special about.
Let's immediately check the complex example from above and show how it is built using page beans:
++++++++++++++++++++++++++++++++++++++++++++++++++++++++++++++++
+ OuterUI instance +
+ ...using: outer.jsp +
+ +
+ +
+ OuterUI.getLeft() OuterUI.getRight() +
+ ++++++++++++++++++++++++++ ++++++++++++++++++++++++++ +
+ + InnerUI instance + + InnerUI instance + +
+ + ...using: inner.jsp + + ...using: inner.jsp + +
+ + ...#{d.InnerUI.xxx}... + + ...#{d.InnerUI.xxx}... + +
+ ++++++++++++++++++++++++++ ++++++++++++++++++++++++++ +
+
++++++++++++++++++++++++++++++++++++++++++++++++++++++++++++++++
Now there is an outer instance of “OuterUI” which internally holds two instances of “InnerUI”. The instances are available through the properties “left” and “right”. The pseudo code of the OuterUI class is:
public class OuterUI
{
InnerUI m_left = new InnerUI();
InnerUI m_right = new InnerUI();
public InnerUI getLeft() { return m_left; }
public InnerUI getRight() { return m_right; }
}
You already see:
The class OuterUI directly holds and influences the contained instances “right” and “left”. It is responsible for providing the inner objects to be shown on the left and on the right side.
And: basically you do not have to care about expressions at all anymore. The component that is used for including inner page beans into outer page beans (ROWPAGEBEANINCLUDE) is automatically handling all expression issues.
In the meantime we definitely recommend to only use the page bean way for any type of navigation. It's just much simpler to use and it's covering any complexity when it comes to nesting pages into one another.
Of course the page inclusion still is available, but: only use it if you have a real reason. The default strategy of your navigation implementation should always be page bean based.
This means:
Use ROWPAGEBEANINCLUDE for nesting pages (and not ROWINCLUDE)
Use the page bean's inherited methods (openModalPopup()...) for creating dialogs (and not static methods on ModalPopup)
This is the screenshot of the example:
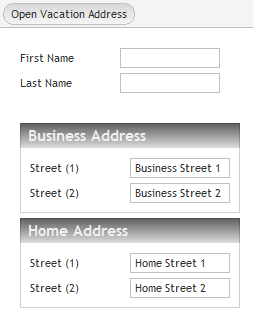
There is an “outside” page containing two “inside” pages, both sharing the same jsp-page, but containing different instance data. When pressing the “Open Vacation Address” button then a third instance of the address is shown in a popup window.
Let's take a look onto the code of the outside page first:
package workplace;
...
public class DemoPageBeanUI
extends WorkpageDispatchedPageBean
implements Serializable
{
// ------------------------------------------------------------------------
// members
// ------------------------------------------------------------------------
protected String m_lastName;
protected String m_firstName;
DemoPageBeanAddressUI m_homeAddress = new DemoPageBeanAddressUI();
DemoPageBeanAddressUI m_businessAddress = new DemoPageBeanAddressUI();
DemoPageBeanAddressUI m_vacationAddress = new DemoPageBeanAddressUI();
ModalPopup m_popup;
// ------------------------------------------------------------------------
// constructors
// ------------------------------------------------------------------------
public DemoPageBeanUI(IWorkpageDispatcher dispatcher)
{
super(dispatcher);
initPageBeans();
}
public String getPageName() { return "/workplace/demopagebean.jsp"; }
public String getRootExpressionUsedInPage() { return "#{d.DemoPageBeanUI}"; }
// ------------------------------------------------------------------------
// public usage
// ------------------------------------------------------------------------
public DemoPageBeanAddressUI getHomeAddress() { return m_homeAddress; }
public DemoPageBeanAddressUI getBusinessAddress() { return m_businessAddress; }
public String getLastName() { return m_lastName; }
public void setLastName(String value) { m_lastName = value; }
public String getFirstName() { return m_firstName; }
public void setFirstName(String value) { m_firstName = value; }
public void onOpenVacationAddress(ActionEvent event)
{
openModelessPopup(m_vacationAddress,"Vacation Address",0,0,new ModelessPopup.IModelessPopupListener()
{
public void reactOnPopupClosedByUser()
{
closePopup(m_vacationAddress);
}
});
}
// ------------------------------------------------------------------------
// private usage
// ------------------------------------------------------------------------
private void initPageBeans()
{
m_homeAddress.setTitle("Home Address");
m_homeAddress.setStreet1("Home Street 1");
m_homeAddress.setStreet2("Home Street 2");
m_businessAddress.setTitle("Business Address");
m_businessAddress.setStreet1("Business Street 1");
m_businessAddress.setStreet2("Business Street 2");
m_vacationAddress.setTitle("Vacation Address");
m_vacationAddress.setStreet1("Vacation Street 1");
m_vacationAddress.setStreet2("Vacation Street 2");
}
}
Each contained page is represented by a corresponding page instance (m_homeAddress, m_businessAddress and m_vacationAddress), with corresponding get-methods for accessing the instances. The sub-pages are members / properties of the outside page.
In addition you see that there are two special methods “getPageName()” and “getRootExpressionUsedInPage()” that are implemented.
The code of the contained instances is:
package workplace;
...
public class DemoPageBeanAddressUI
extends PageBean
implements Serializable
{
// ------------------------------------------------------------------------
// members
// ------------------------------------------------------------------------
protected String m_title = "<Title>";
protected String m_street1 = "<Street1>";
protected String m_street2 = "<Street2>";
// ------------------------------------------------------------------------
// public usage
// ------------------------------------------------------------------------
public String getPageName() { return "/workplace/demopagebeanaddress.jsp"; }
public String getRootExpressionUsedInPage() { return "#{d.DemoPageBeanAddressUI}"; }
public String getStreet1() { return m_street1; }
public void setStreet1(String value) { m_street1 = value; }
public String getStreet2() { return m_street2; }
public void setStreet2(String value) { m_street2 = value; }
public String getTitle() { return m_title; }
public void setTitle(String value) { m_title = value; }
}
Again the code contains an implementation of the “getPageName()” and “getRootExpressionUsedInPage()”.
Now, let's take a look onto the outside jsp page definition:
/workplace/demopagebean.jsp:
<t:rowheader id="g_1">
<t:button id="g_2"
actionListener="#{d.DemoPageBeanUI.onOpenVacationAddress}"
text="Open Vacation Address" />
</t:rowheader>
<t:rowbodypane id="g_3" rowdistance="5">
<t:row id="g_4">
<t:label id="g_5" text="First Name" width="100" />
<t:field id="g_6" text="#{d.DemoPageBeanUI.firstName}" width="100" />
</t:row>
<t:row id="g_7">
<t:label id="g_8" text="Last Name" width="100" />
<t:field id="g_9" text="#{d.DemoPageBeanUI.lastName}" width="100" />
</t:row>
<t:rowdistance id="g_10" height="20" />
<t:rowpagebeaninclude id="g_11"
pagebeanbinding="#{d.DemoPageBeanUI.businessAddress}" />
<t:rowpagebeaninclude id="g_12"
pagebeanbinding="#{d.DemoPageBeanUI.homeAddress}" />
</t:rowbodypane>
<t:rowstatusbar id="g_13" />
The integration of the two address pages into the outside page is not done by using the ROWINCLUDE – but by using the ROWPAGEBEANINCLUDE component.
The jsp page definition of the address page is a “very normal” one:
/workplace/demopagebeanaddress.jsp:
<t:row id="g_1">
<t:pane id="g_2" border="#00000030" padding="0" rowdistance="0">
<t:rowtitlebar id="g_3" text="#{d.DemoPageBeanAddressUI.title}" />
<t:row id="g_4">
<t:pane id="g_5" padding="10" rowdistance="5">
<t:row id="g_6">
<t:label id="g_7" text="Street (1)" width="100" />
<t:field id="g_8" text="#{d.DemoPageBeanAddressUI.street1}"
width="100" />
</t:row>
<t:row id="g_9">
<t:label id="g_10" text="Street (2)" width="100" />
<t:field id="g_11" text="#{d.DemoPageBeanAddressUI.street2}"
width="100" />
</t:row>
</t:pane>
</t:row>
</t:pane>
</t:row>
The concepts are based on the paradigm that for one page there is one bean serving the page:
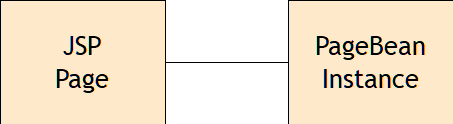
Example: the “demopagebeanaddress.jsp” is related to the “DemoPageBeanAddressUI” class – all its content is managed by the class.
A bean covering all the aspects of one page is called “PageBean” - and implements the interface “IPageBean”, typically be deriving from the “PageBean” class.
A page bean has to implement an interface that allows the modularization framework to integrate it into other JSP pages – executed by the ROWPAGEBEANINCLUDE component. The two methods that need to be provided are:
getPageName() - this method needs to return the page name of the page that is to be used for the bean. Typically this is one page, but it's also possible to return a page name that fits best to the application's situation – if you have multiple JSP-pages that use the same page bean.
getRootExpressionUsedInPage() - this method needs to tell the expression that is used inside the .jsp/.xml definition for accessing the page bean object. This sounds complex but it isn't: in the example above, within the page “demopagebeanaddress.jsp” the page bean is addressed by the expression “#{d.DemoPageBeanAddressUI}” - so that's the root expression that is used within the page definition!
This is the component to embed a page bean into a page.
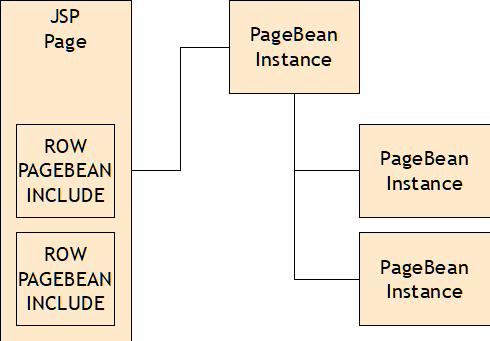
Embedding covers two aspects:
1. - The jsp page of the page bean is included.
2. - The expressions in the page that is included are updated so that they fit to the current scenario and so that the page's content is really pointing to the correct page bean instance.
Result: there is no additional effort for integrating page bean instances within a page. The page beans instances are normal members / properties of other page beans instances. While the normal ROWINCLUDE component just optically includes a page into another pages, the ROWPAGEBEANINCLUDE component includes a page bean object and internally “rules” all the binding issues between the JSP-page definition and the page bean instance.
Inside the management of the ROWPAGEBEANINCLUDE component there is an automated update of the expressions of an included page.
Let's assume the following scenario:
The outside page is accessed through expression: “#{d.d_1.DemoPageBeanUI}”.
It includes an inside page bean (as in the example above) that is made available through the property “businessAddress”. Consequence: the expression for accessing the inside page's root object is “#{d.d_1.DemoPageBeanUI.businessAddress}”.
The inside page is defined within a JSP page that points to its root object via “#{d.DemoPageBeanAddressUI}”. Result: the expression replacement is defined, so that all references within the inside page are updated from “#{d.DemoPageBeanAddresUI.*}” to “#{d.d:1.DemoPageBeanUI.businessAddress.*}”.
...this is the typical question: “How do I switch from one page bean to the next?”.
The answer is: pages and page beans are independent objects and can not themselves switch to the next page. As consequence, navigation needs to be done through an outside page, that holds an inside page – and that exchanges the inside page.
This may sound complex, but indeed is not. Let's take a look onto the following example:

When pressing the “Next Page” button then the screen changes to:
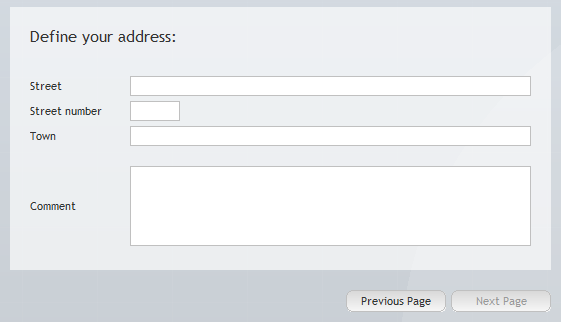
The outside page is defined in the following way:
...
...
<t:row id="g_2">
<t:pane id="g_3" height="100%" width="100%">
<t:rowpagebeaninclude id="g_4"
pagebeanbinding="#{d.DemoPageBeanNavOutside.currentStep}" />
</t:pane>
</t:row>
<t:row id="g_5">
<t:coldistance id="g_6" width="100%" />
<t:button id="g_7"
actionListener="#{d.DemoPageBeanNavOutside.onPrevious}"
enabled="#{d.DemoPageBeanNavOutside.previousEnabled}"
text="Previous Page" width="100" />
<t:coldistance id="g_8" width="5" />
<t:button id="g_9"
actionListener="#{d.DemoPageBeanNavOutside.onNext}"
enabled="#{d.DemoPageBeanNavOutside.nextEnabled}"
text="Next Page" width="100" />
</t:row>
...
There is a ROWPAGEBEANINCLUDE definition, pointing via its expression to the “currentStep” property of the Java program:
public class DemoPageBeanNavOutside
extends DemoBase
implements Serializable
{
int m_currentStepIndex = 0;
List<IPageBean> m_steps = new ArrayList<IPageBean>();
public DemoPageBeanNavOutside(IWorkpageDispatcher workpageDispatcher)
{
super(workpageDispatcher);
m_steps.add(new DemoPageBeanNavStep1());
m_steps.add(new DemoPageBeanNavStep2());
}
public String getPageName() { return "/workplace/demopagebeannavoutside.jsp"; }
public String getRootExpressionUsedInPage() { return "#{d.DemoPageBeanNavOutside}"; }
public IPageBean getCurrentStep() { return m_steps.get(m_currentStepIndex); }
public boolean isPreviousEnabled() { return m_currentStepIndex > 0 ? true: false; }
public boolean isNextEnabled() { return m_currentStepIndex < (m_steps.size()-1) ? true: false; }
public void onPrevious(ActionEvent event)
{
if (m_currentStepIndex > 0)
m_currentStepIndex--;
}
public void onNext(ActionEvent event)
{
if (m_currentStepIndex < (m_steps.size()-1))
m_currentStepIndex++;
}
}
The “currentStep” property passes back a page bean instance, that is selected dependent from an index, that is updated when the user presses the “Next” or the “Previous” button.
The contained page beans are straight and simple page bean implementations, e.g. the first step's bean and layout is:
<t:rowbodypane id="g_1" rowdistance="5">
<t:row id="g_2">
<t:label id="g_3" font="size:16" text="Define your name:" />
</t:row>
<t:rowdistance id="g_4" height="20" />
<t:row id="g_5">
<t:label id="g_6" text="First name" width="100" />
<t:field id="g_7" text="#{d.DemoPageBeanNavStep1.firstName}"
width="200" />
</t:row>
<t:row id="g_8">
<t:label id="g_9" text="Last name" width="100" />
<t:field id="g_10" text="#{d.DemoPageBeanNavStep1.lastName}"
width="200" />
</t:row>
</t:rowbodypane>
public class DemoPageBeanNavStep1
extends PageBean
implements Serializable
{
protected String m_firstName;
protected String m_lastName;
public DemoPageBeanNavStep1()
{
}
public String getPageName() { return "/workplace/demopagebeannavstep1.jsp"; }
public String getRootExpressionUsedInPage() { return "#{d.DemoPageBeanNavStep1}"; }
public String getFirstName() { return m_firstName; }
public void setFirstName(String value) { m_firstName = value; }
public String getLastName() { return m_lastName; }
public void setLastName(String value) { m_lastName = value; }
}
In the example the navigation is done through the outside page – by pressing corresponding buttons. Of course the navigation could also be triggered from the inside page – in this case you can just set up any interface relation (in means of simple Java-API) between the outside page and the inside page(s).
Each page bean instance inherits the following methods for opening and closing popup windows:
openModalPopup(IPageBean pageBean, ...)
openModelessPopup(IPageBean pageBean, ...)
closePopup(IPageBean pageBean)
The open-methods return back an instance of ModalPopup / ModelessPopup.
The following example shows a page bean, opening up an other page bean:
The page bean that is called as popup is exactly the same one as used in the previous example, explaining navigation concepts. So, let's focus onto the page that opens up the popup.
The layout and code are:
<t:row id="g_2">
<t:button id="g_3"
actionListener="#{d.DemoPageBeanPopupCaller.onOpenPageBeanInPopup}"
text="Open Page Bean in Popup" />
</t:row>
public class DemoPageBeanPopupCaller
extends WorkpageDispatchedPageBean
implements Serializable
{
public DemoPageBeanPopupCaller(IWorkpageDispatcher workpageDispatcher)
{
super(workpageDispatcher);
}
public String getPageName() { return "/workplace/demopagebeanpopupcaller.jsp"; }
public String getRootExpressionUsedInPage() { return "#{d.DemoPageBeanPopupCaller}"; }
public void onOpenPageBeanInPopup(ActionEvent event)
{
// create page to be opened in popup
final DemoPageBeanAddress address = new DemoPageBeanAddress();
address.setTitle("nice title");
address.setStreet1("nice street 1");
address.setStreet2("nice street 2");
// open popup (width & height are set to 0, so that popup is sized
// by its content
final ModalPopup mp = openModalPopup(address,
"Title of popup",0,0,null);
mp.setPopupListener(new ModalPopup.IModalPopupListener()
{
// This method is called when the user explicitly
// closes the popup by alt-F4 or by clicking
// onto the right-top close-icon
public void reactOnPopupClosedByUser()
{
closePopup(address);
Statusbar.outputMessage("Modal popup was closed!");
}
});
}
}
Things are quite simple: the page bean is created and configured. It is passed into the openModalPopup-methods – that internally is inherited from the page-bean-related base classes.
Please pay attention: when opening a popup dialog, then opening is always the “easy part”. But you always have to keep in mind, that all navigation is controlled by your server side program – including the closing of a popup. A popup does not close itself, e.g. if the user presses alt-F4 or when the user clicks the close-icon of the popup. This only internally creates a close-request that is delegated to a listener, which then decides to actually close the popup.
Consequence: implementing the popup listeners is very important, otherwise popups are not close-able!
Please note that there is a documentation “Page Bean Patterns” available within the documentation site http://captaincasa.org/documentation. In this documentation you find practical examples, showing how to organize the communication between page beans efficiently.
When creating a layout definition within the CaptainCasa toolset using the following popup...
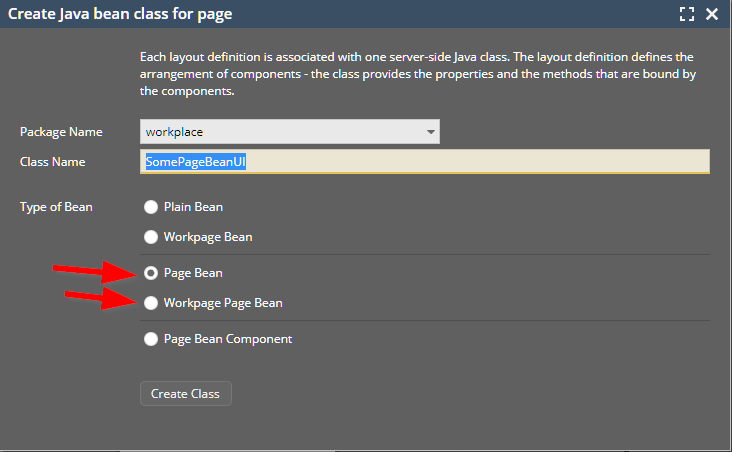
...then some default code is generated that is useful when working with page beans.
package workplace;
import java.io.Serializable;
import org.eclnt.editor.annotations.CCGenClass;
import org.eclnt.jsfserver.pagebean.PageBean;
import org.eclnt.jsfserver.base.faces.event.ActionEvent;
@CCGenClass (expressionBase="#{d.SomePageBeanUI}")
public class SomePageBeanUI
extends PageBean
implements Serializable
{
// ------------------------------------------------------------------------
// inner classes
// ------------------------------------------------------------------------
/* Listener to the user of the page bean. */
public interface IListener
{
}
// ------------------------------------------------------------------------
// members
// ------------------------------------------------------------------------
private IListener m_listener;
// ------------------------------------------------------------------------
// constructors & initialization
// ------------------------------------------------------------------------
public SomePageBeanUI()
{
}
public String getPageName()
{
return "/workplace/demoactivextest.jsp";
}
public String getRootExpressionUsedInPage()
{
return "#{d.SomePageBeanUI}";
}
// ------------------------------------------------------------------------
// public usage
// ------------------------------------------------------------------------
/* Initialization of the bean. Add any parameter that is required within
your scenario. */
public void prepare(IListener listener)
{
m_listener = listener;
}
// ------------------------------------------------------------------------
// private usage
// ------------------------------------------------------------------------
}
A page bean is some class (at runtime: object) which is the 1:1 counter part of a visible page/area. Page beans should be defined as autarc modules which are easily embed-able into other page beans.
For this reason the following code is generated:
Each page bean has a constructor which is typically defined without parameters. (Exception: if the page bean is aware of the CaptainCasa workplace framework, then the workpage dispatcher is passed within the constructor).
Each page bean has some method which allows to pass parameters from outside. In our case the name of this method is “prepare”. (Of course you can name it “initialize”, “init” or whatever...!).
Each page bean defines a listener interface. This interface is a call-back interface by which the page bean can report about things going on inside. The call-back interface reports back inner events of the page bean to the caller of the page-bean.
Inside the “prepare” method, the instance of the call-back implementation is passed.
In short words: the page bean is an object in which there is a defined way to pass parameters in (“prepare”) and in which there is a defined way of reporting inner events back to the caller (“IListener”).
Let's assume we require a page bean to select an “id” from a list of “id/text” items:
The page bean should be usable e.g. within a popup dialog in a generic way.
The layout is a simple grid with two buttons below:
<t:rowbodypane id="g_1" padding="0" stylevariant="cc_directcontent">
<t:row id="g_2">
<t:fixgrid id="g_3" height="100%"
objectbinding="#{d.DemoPagebeanObjectSelection.grid}"
sbvisibleamount="40" width="100%">
<t:gridcol id="g_4" text="Id" width="100">
<t:label id="g_5" text=".{id}" />
</t:gridcol>
<t:gridcol id="g_6" text="Text" width="100%">
<t:label id="g_7" text=".{text}" />
</t:gridcol>
</t:fixgrid>
</t:row>
</t:rowbodypane>
<t:rowheader id="g_8">
<t:button id="g_9"
actionListener="#{d.DemoPagebeanObjectSelection.onSelectAction}"
text="Select" width="100+" />
<t:coldistance id="g_10" width="100%" />
<t:button id="g_11"
actionListener="#{d.DemoPagebeanObjectSelection.onCancelAction}"
text="Cancel" width="100+" />
</t:rowheader>
The code is:
package workplace;
import java.io.Serializable;
import org.eclnt.editor.annotations.CCGenClass;
import org.eclnt.jsfserver.elements.impl.FIXGRIDItem;
import org.eclnt.jsfserver.elements.impl.FIXGRIDListBinding;
import org.eclnt.jsfserver.pagebean.PageBean;
@CCGenClass (expressionBase="#{d.DemoPagebeanObjectSelection}")
public class DemoPagebeanObjectSelection
extends PageBean
implements Serializable
{
// ------------------------------------------------------------------------
// inner classes
// ------------------------------------------------------------------------
public interface IListener
{
void reactOnSelection(String id);
void reactOnCancel();
}
public class GridItem extends FIXGRIDItem implements java.io.Serializable
{
String i_id;
String i_text;
private GridItem(String id, String text)
{
i_id = id;
i_text = text;
}
public String getText() { return i_text; }
public String getId() { return i_id; }
public void onRowExecute()
{
if (m_listener != null) m_listener.reactOnSelection(i_id);
}
}
// ------------------------------------------------------------------------
// members
// ------------------------------------------------------------------------
private IListener m_listener;
FIXGRIDListBinding<GridItem> m_grid = new FIXGRIDListBinding<GridItem>();
// ------------------------------------------------------------------------
// constructors & initialization
// ------------------------------------------------------------------------
public DemoPagebeanObjectSelection()
{
}
public String getPageName()
{
return "/workplace/demopagebeanobjectselection.jsp";
}
public String getRootExpressionUsedInPage()
{
return "#{d.DemoPagebeanObjectSelection}";
}
// ------------------------------------------------------------------------
// public usage
// ------------------------------------------------------------------------
public void prepare(String[] ids, String[] texts,
IListener listener)
{
m_listener = listener;
// fill grid
m_grid.getItems().clear();
for (int i=0; i<ids.length; i++)
m_grid.getItems().add(new GridItem(ids[i],texts[i]));
}
public FIXGRIDListBinding<GridItem> getGrid() { return m_grid; }
public void onCancelAction(org.eclnt.jsfserver.base.faces.event.ActionEvent event)
{
if (m_listener != null) m_listener.reactOnCancel();
}
public void onSelectAction(org.eclnt.jsfserver.base.faces.event.ActionEvent event)
{
GridItem gi = m_grid.getSelectedItem();
if (gi != null)
{
if (m_listener != null) m_listener.reactOnSelection(gi.i_id);
}
}
}
The highlighted code areas show:
Inside the prepare method the bean receives...
an array of ids
an array of texts
an implementation of the IListener-call-back interface
...and fills the grid accordingly
The listener interface contains two methods:
reactOnSelection()
reactOnCancel()
At the appropriate places in the code the listener call-back is done
Inside the onRowExecute() method of the grid (double click)
Inside the processing of the methods that are bound to the “Select” and “Cancel” button.
Now let's embed this generic bean into some concrete popup navigation of an outside bean:
The caller's layout definition is simple:
<t:rowtitlebar id="g_2" text="Outisde page bean" />
<t:rowbodypane id="g_3">
<t:row id="g_4">
<t:box id="g_5" width="100%">
<t:row id="g_6">
<t:label id="g_7" text="Department" width="100+" />
<t:field id="g_8" placeholder="Department Id"
text="#{d.DemoPageBeanOutside.department}"
width="200" />
<t:coldistance id="g_9" width="100%;10" />
<t:button id="g_10"
actionListener="#{d.DemoPageBeanOutside.onDepartmentSelectAction}"
text="Select..." />
</t:row>
</t:box>
</t:row>
</t:rowbodypane>
<t:rowstatusbar id="g_11" />
When ther user presses the “Select...”-button, the outside bean creates the page bean that is popped up, prepares it and defines the reaction on the page bean's call-backs/events:
package workplace;
import java.io.Serializable;
import org.eclnt.editor.annotations.CCGenClass;
import org.eclnt.jsfserver.elements.util.DefaultModalPopupListener;
import org.eclnt.jsfserver.pagebean.PageBean;
@CCGenClass (expressionBase="#{d.DemoPageBeanOutside}")
public class DemoPageBeanOutside
extends PageBean
implements Serializable
{
// ------------------------------------------------------------------------
// members
// ------------------------------------------------------------------------
String m_department;
// ------------------------------------------------------------------------
// constructors & initialization
// ------------------------------------------------------------------------
public DemoPageBeanOutside()
{
}
public String getPageName() { return "/workplace/demopagebeanoutside.jsp"; }
public String getRootExpressionUsedInPage() { return "#{d.DemoPageBeanOutside}"; }
// ------------------------------------------------------------------------
// public usage
// ------------------------------------------------------------------------
public String getDepartment() { return m_department; }
public void setDepartment(String value) { this.m_department = value; }
public void onDepartmentSelectAction(org.eclnt.jsfserver.base.faces.event.ActionEvent event)
{
final DemoPagebeanObjectSelection os =
new DemoPagebeanObjectSelection();
String[] ids = new String[] {"0001","0002","0003"};
String[] texts = new String[] {"Sales","Production","Management"};
os.prepare(ids,texts,new DemoPagebeanObjectSelection.IListener()
{
@Override
public void reactOnSelection(String id)
{
m_department = id;
closePopup(os);
}
@Override
public void reactOnCancel()
{
closePopup(os);
}
});
openModalPopup(os,"Department selection",400,600,
new DefaultModalPopupListener(this,os));
}
}
The implementation of the call-back methods is done using inner classes. You could of course also use explicit classes.
The page bean for managing the list is generically usable. It is not bound to a selection of departments or any other specific entity – but is selecting one id out of several ids which are passed. The page bean does not know if it is called as part of a screen (via ROWPAGEBEANINCLUDE) or if is called within a popup-dialog.
As consequence the page bean is not depending on any outside dependencies – and is generically usable as consequence.
The interface between the outside bean and the inside bean is a pure Java-API (prepare(...), IListener...). We propose to define the API in the way described in the previous text – but you may design your own API of course!
Example: in out proposal there is only one listener instance within a page bean to the caller:
IListener m_listener;
public void prepare(...., IListener listener)
{
....
}
Maybe in your environment you may require multiple listeners:
Set<IListener> m_listeners = new HashSet<IListener>();
public void addListener(IListener listener) { .. }
public void removeListener(IListener listener) { .. }
You may define your own base class extending PageBean, which you use for your page beans:
public class XYZBasePageBean extennds PageBean
{
Set<IListener> m_listeners = new HashSet<IListener>();
public void addListener(IListener listener) { .. }
public void removeListener(IListener listener) { .. }
}
public class MyPageBean extends XYZPageBean
{
...
}
In other words: feel free to use your Java knowledge on server side – there are no restrictions from CaptainCasa point of view.
So far a page bean was described as a dialog definition that can be easily embedded into a page and/or opened as a popup dialog. In case of using the page bean in a page you e.g. use the ROWPAGEBEANINCLUDE component to include the page bean dialog into the current dialog:
...
<t:pane ...>
<t:rowpagebeaninclude beanbinding=”...” .../>
</t:pane>
...
The page bean is – in this case – the leaf node of the XML layout definition.
There are cases in which you want to define the page bean not as “end level” of your layout definition – but you want to define it as “interim level” - so that the page bean takes over some “standardized framing functions” for some content – without the content being explicit part of the page bean.
The following scenario consists out of a page bean that is used to open up and manage a scale-able area. The content of the area is up to the user of the page bean:
The layout definition of the complete scenario is:
<t:rowdemobodypane id="g_2" objectbinding="#{d.DemoPBWithExitUser}">
<t:rowpagebeaninclude id="g_3"
pagebeanbinding="#{d.DemoPBWithExitUser.content}"
shownullcontent="true">
<t:contentpane id="g_4" padding="0" exitid=”BODY”>
<t:rowheader id="g_5">
<t:button id="g_6"
actionListener="#{d.DemoPBWithExitUser.onAction}"
text="Update names" />
</t:rowheader>
<t:row id="g_7">
<t:foldablepane id="g_8" text="Inner pane" width="100%">
<t:row id="g_9">
<t:field id="g_10" labeltext="Vorname"
text="#{d.DemoPBWithExitUser.firstName}" width="100%" />
</t:row>
<t:row id="g_11">
<t:field id="g_12" labeltext="Nachname"
text="#{d.DemoPBWithExitUser.lastName}" width="100%" />
</t:row>
</t:foldablepane>
</t:row>
</t:pane>
</t:rowpagebeaninclude>
</t:rowdemobodypane>
You see the layout definition does not end with the ROWPAGEBEANINCLUDE definition but continues with a CONTENTPANE that is placed below. The content of the PANE is exactly the one that is the inner part of the scale-able area.
Let's continue with the example: where does the included page bean know from where to put the content of the using dialog?
The layout definition of the page bean is:
<t:row id="g_2">
<t:pane id="g_3" border="#00000030" height="100%" padding="1"
width="100%">
<t:rowheader id="g_4">
<t:coldistance id="g_5" width="100%" />
<t:slider id="g_6"
actionListener="#{d.DemoPBWithExit.onScale100Flush}" flush="true"
flushtimer="500" majortickspacing="50" maxvalue="200"
minortickspacing="10" minvalue="50"
value="#{d.DemoPBWithExit.scale100}" width="300" />
<t:coldistance id="g_7" width="100%" />
</t:rowheader>
<t:row id="g_8">
<t:scrollpane id="g_9" background="#FFFFFF" height="100%"
width="100%">
<t:rowline id="g_10" />
<t:row id="g_11">
<t:scalepane id="g_12" flush="true" height="100%"
scale="#{d.DemoPBWithExit.scale1}" width="100%"
withuserscaling="true">
<t:parentexit id="g_13" exitid=”BODY”/>
</t:scalepane>
</t:row>
</t:scrollpane>
</t:row>
</t:pane>
</t:row>
Inside the layout definition of the page bean you see a special component: the PARENTEXIT component. This is the place where the page bean opens up a content area in which the layout content of the using page is embedded.
It's important to point out that the layout content of the using page still runs in the context of the using dialog – despite now optically running within the layout of the page bean.
When using the CONTENTPANE component, then the outside page defines an own pane that is embedded into the included layout. This is the reflection of the typical scenario: the included pages opens up some area, which is filled by the outside page.
Sometimes you want to decouple the management of embedding “outside” content from this pane-management. Example: you define a toolbar in some ROWFLEXLINE, so that this comes with an adaptive arrangement of contained components:
Outside layout:
...
<t:rowpagebeaninclude ...>
<t:content exitid=”TOOLBAR” ...>
<t:button .../>
<t:button .../>
<t:button .../>
</t:contentpane>
</t:rowpagebeaninclude>
...
Layout of included page bean:
...
<t:rowflexline ...>
<t:button ...>
<t:parentexit id=”TOOLBAR”/>
<t:icon ...>
</t:row>
...
Result:
<t:rowflexline ...>
<t:button ...>
<t:button .../>
<t:button .../>
<t:button .../>
<t:icon ...>
</t:row>
In this case the outside page bean uses a CONTENT component (not CONTENTPANE), which means that all its content components (here: the buttons) are directly embedded into the PARENTEXIT position of the included page bean.
In the example above the page bean opened up one area to place parent content by defining a PARENTEXIT component.
A page bean can also open up multiple area by just defining several PARENTEXIT components inside. Each PARENTEXIT definition must define an own EXITID value, which needs to be unique within the page definition.
On the other side the user of the page bean must explicitly define the EXITID of the component which is to be placed into the corresponding area.
The default usage of PARENTEXIT is:
Outside layout:
...
<t:rowpagebeaninclude ...>
<t:contentpane exitid=”BODY” ...>
<!-- here definition of the content that is placed into the exit -->
<t:row ...>
...
</t:row>
<t:row ...>
...
</t:row>
</t:contentpane>
</t:rowpagebeaninclude>
...
Layout of included page bean:
...
<t:parentexit id=”BODY”/>
...
This means: in the outside component you always have to define some explicit CONTENTPANE in which you place the content.
There is one special EXITID “allChildren” which is treated a bit differently in order to simplify scenarios in which you can skip the extra definition of the CONTENTPANE:
Outside layout:
...
<t:rowpagebeaninclude ...>
<!-- here definition of the content that is placed into the exit -->
<t:row ...>
...
</t:row>
<t:row ...>
...
</t:row>
</t:rowpagebeaninclude>
...
Layout of included page bean:
...
<t:parentexit id=”allChildren”/>
...
Now the content can be directly defined inside ROWPAGEBEANINCLUDE and is directly inserted into the PARENTEXIT area that is opened by the included page bean. You do not need to explicitly define a CONTENTPANE component inside the outside layout anymore.
And to be 100% precise: in cases you have multiple PARENTEXIT definitions the “allChildren” mechanism is working as well:
Outside layout:
...
<t:rowpagebeaninclude ...>
<!-- here definition of the content that is placed into the exit -->
<t:row ...>
...
</t:row>
<t:row ...>
...
</t:row>
<!-- other exit definitions -->
<t:contentpane exitid=”HEADER” ...>
...
</t:contentpane>
<t:contentpane exitid=”FOOTER” ...>
...
</t:contentpane>
</t:rowpagebeaninclude>
...
In the example above the page bean that used the PARENTEXIT defined a corresponding PANE in which the content of the PARENTEXIT-area was directly defined:
<t:rowdemobodypane id="g_2" objectbinding="#{d.DemoPBWithExitUser}">
<t:rowpagebeaninclude ...>
<t:pane ... exitid=”BODY”>
...
There are cases in which this page bean does not want to use the PARENTEXIT-area by itself but it wants to allow its own user to define the content. In this case you use the component PARENTEXITDELEGATE:
<t:rowdemobodypane id="g_2" objectbinding="#{d.DemoPBWithExitUser}">
<t:rowpagebeaninclude ...>
<t:parentexitdelegate ... exitid=”BODY” exitiddeleate=”INNERBODY”>
...
There are two parameters:
“exitid” - this is the EXITID of the PARENTEXIT-area of the included component
“exitiddelegate” - this is the EXITID that will is the one that is “published” by the page bean itself
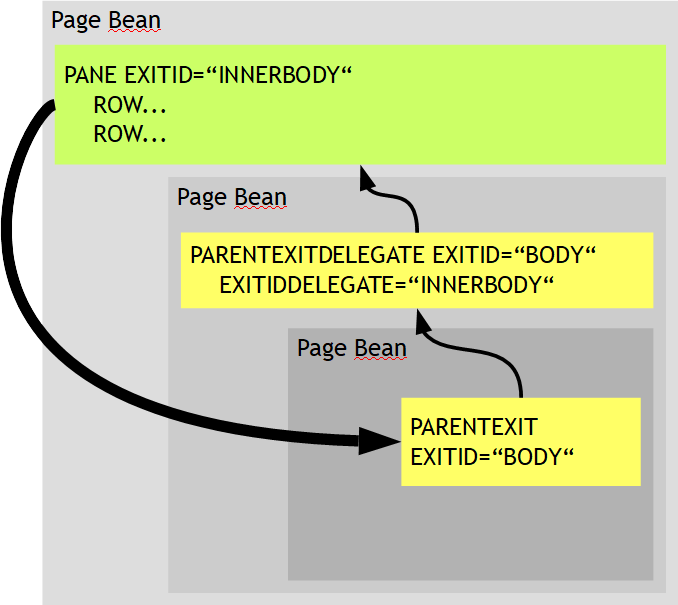
You either might define both parameters in a direct way – as shown in the example (“BODY” is delegated as “INNERBODY”). Or you may use some morge generic definition by using one (or more) wildcard characters for the EXITID:
<t:rowdemobodypane id="g_2" objectbinding="#{d.DemoPBWithExitUser}">
<t:rowpagebeaninclude ...>
<t:parentexitdelegate ... exitid=”*” exitiddeleate=”INNER”>
...
Now, any PARENTEXIT-area of the included component are published to the next level using “INNER”. The prefix is prepended with a “.”. As result the value of the exitid for the next level is “INNER.BODY”.
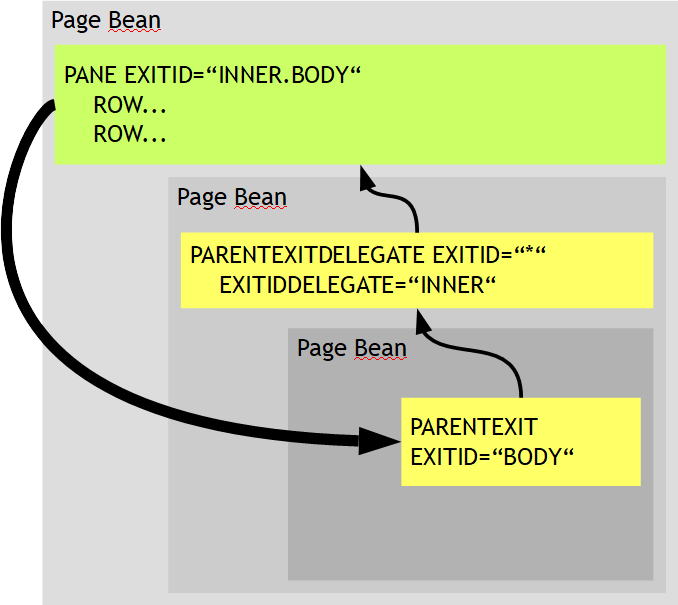
The delegation component PARENTEXITDELEGATE can be used across any number of levels. In case of using wildcards “*” then each level appends its prefix together with a “.”.
You may also use any combination of PANE and PARENTEXITDELEGATE definitions in parallel. Example:
<t:rowdemobodypane id="g_2" objectbinding="#{d.DemoPBWithExitUser}">
<t:rowpagebeaninclude ...>
<t:pane ... exitid=”EXIT1”>
...
</t:pane>
<t:parentexitdelegate ... exitid=”EXIT2” exitiddeleate=”INNER2”>
<t:parentexitdelegate ... exitid=”EX*” exitiddeleate=”INNEREX”>
<t:parentexitdelegate ... exitid=”*” exitiddeleate=”INNER”>
...
The system will always first try to find the definition which is exactly matching the EXITID-value from the contained page bean. Then it will process the wildcard components in the sequence of their definition – and will delegated to the next component level (if it exists) on match.
When creating a page bean class extending another page bean class there are two aspects of extensions:
Extending the Java code
Extending the layout definition that is used by a page bean
There is no specific issue when extending the Java code – page bean classes are normal Java classes, which you can inherit from one another.
Let's take a closer look onto the layouting level of a page bean: this layouting level is defined by the methods...:
public String getPageName() { return ...; }
public String getRootExpressionUsedInPage() { return ...; }
The method “getPageName()” returns the layout definition that is used to render the page bean. The method “getRootExpressionUsedInPage()” returns the expression that is used in this layout definition to identify the page bean instance.
For modifying the layout there are two options:
defining new layout definition for the extension
updating the parent's layout definition
This is technically the simple way... - you create an own layout definition, which you might copy from the parent bean. You might update the contained expressions to your own expression pattern.
But: of course your own layout is now decoupled from the parent's layout. If the author of the parent layout adds or updates components, you will have to repeat this within your own layout.
There is a specific modification concept by which you can update the layout that is defined within the parent page bean.
The base of the concept is the interface “IPageModifier” which is a part of each page bean:
public interface IPageBean
{
...
public IPageModifier getPageModifier();
...
}
public interface IPageModifier
{
...
public void updateParsedNode(ParsedNode node);
....
}
When reading a layout for a page bean then the page bean is checked if it provides a IPageModifier-instance via the method “getPageModifier()”. If an instance is provided then the layout that is parsed for the page bean can be updated.
Please pay attention: the method getPageModifier() must return the same instance per bean-class! It is not possible to pass back different page modifiers for different page bean instances of the same class.
There is a default implementation of IPageModifier that is automatically part of any page bean that extends from “PageBean”:
The implementation looks for a “<pageBeanClassName>.mod.xml” file, that resides in the same package as the page bean class.
com
abc
def
XYPageBean.java
XYPageBean.mod.xml
The format of this file is:
<?xml version="1.0" encoding="UTF-8" standalone="yes"?>
<modification>
<control id="...">
<attribute name="..." value=”...”/>
<attribute name="..." value="..."/>
</control>
<control id="...">
<attribute name="..." value=”...”/>
<attribute name="..." value="..."/>
</control>
</modification>
In this file you can defined updates on components that are part of the layout definition that is coming from the parent component. You just need to reference the id of the component in the parent layout and then can define additional attributes – or modify existing attributes.
By default a page bean is a component that is embedded into some layout and runs in this layout independently. The page bean does not know about its concrete position and the page bean should not know about the usage scenario.
There are - seldom! - cases in which the page bean want to see more details about the layout definition in which it is defined. To be able to see these details there are certain methods that you might use:
At runtime the following method is called when a layout is transferred into the server side component tree:
interface IPageBean:
passComponent(BaseComponent component);
The component is an instance of ROWPAGEBEANINCLUDEComponent (or an extension).
From the component the page bean processing can access child components and by this adapt its behavior.
Example: the page bean CCDataGridView2 can be accessed by a component DATAGRIDVIEW2 and can have multiple sub components. A layout may look like:
t:row
t:ccdatagridview2 ... <== this is the page bean-level
t:ccdatagridview2column ... <== configuration of the columns as sub-components
t:ccdatagridview2column ...
t:field ...
t:ccdatagridview2column ...
t:ccdatagridview2column ...
The processing of CCDataGridView2 accesses this information at runtime in order to render its grid accordingly.
Due to the fact that a page bean knows its position within a concrete layout scenario it also can access the bean that is including the page bean within its own layout. A page bean implementation that extends the base class “PageBean” (which is the default) can access two methods:
public IPageBean findIncludingPageBean() {..}
public IPageBean findParentPageBean() {..}
“findParentPageBean” just walks up the component hierarchy and returns the next page bean instance on top of a page bean.
“findIncludingPageBean” returns the page bean in which the page bean actually is defined as part of the layout.
In most cases “findParentPageBean” and “findIncludingPageBean” return the same result: the page bean that defines the layout to include another page bean is automatically the page bean that is the parent page bean.
But...: when using PARENTEXIT scenarios the situation is different. Take a look into the following layout definition of a page bean:
... <== including
<t:rowpagebeaninclude ...>
<t:contentpane exitid=”BODY” ...> <== parent
<t:row ...>
<t:rowpagebeaninclude ...> <== inner page bean
...
The outest page bean is including a page bean (first ROWINCLUDE). This page bean opens up a PARENTEXIT area “BODY” - in which the outest page bean places itself a ROWPAGEBEANINCLUDE for another inner page bean. For this inner page bean the parent page bean and the including page bean are different.
Recommendation: from an inner page bean point of view you are typcially interested in the “including” page bean: “Who is the one that defines and configures me?” - So use method “findIncludingPageBean” by default!
The connection between a layout and a page bean is established in the first render phase in which the page bean is accessed and processed! It is not available e.g. after creating an instance of the page bean!
If a part of your page bean's processing depends on information about the layout then you have to move this part of code at the right lcoation:
public class YourPageBean extends PageBean
{
public void passComponent(BaseComponent component)
{
// now you receive the component
}
public void onBeforeRendering()
{
// this code is called every time when the rendering phase
// is executed on the page bean: here you can access the layout
// information!
}
}
The (ROW)PAGEBEANINCLUDE component provides two attributes that you may use for performance optimization on server side: UPDATEISOLATION and UPDATEONINNEREVENTONLY.
Performance optimization on server side may be an issue in scenarios, in which you see multiple content pages (page beans) in parallel that do not directly depend from one another.
The demo workplace of CaptainCasa is a good example: if starting a demo via the function tree, then typically all events within the demo do not affect the surrounding workplace functions:
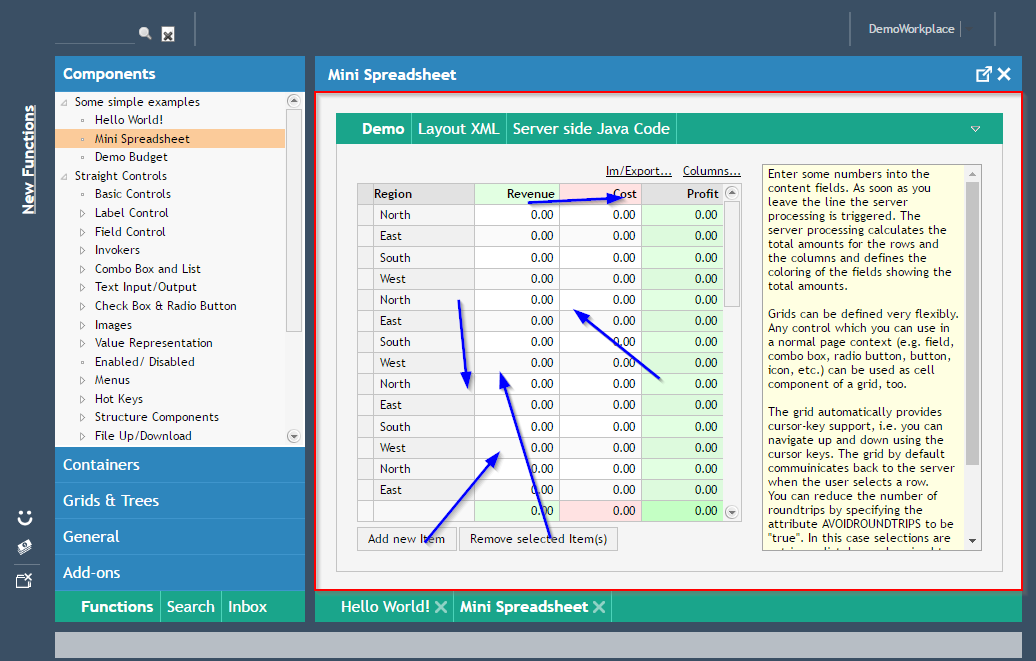
The default request-response processing scans the whole screen for updates with each request. So when pressing the “Add item” button in the demo will mean that within the corresponding roundtrip the whole screen will be processed – including the function tree area at the left, which in principal has nothing to do with the demo on the right.
Using the two attributes you can control, that for a certain area (ROWPAGEBEANINCLUDE) an optimized rendering management is processed:
UPDATEONINNEREVENTONLY: if you set this to “true” then the corresponding area will not be processed if an event is thrown outside the area. E.g. if the user navigates within the function tree on the left, then the content area will not be processed, assuming that there was no change.
UPDATEISOLATION: if you set this to “true” then events within the corresponding area will not cause a processing of the whole screen – but only this isolated area will be rendered/processed.
So the one attribute (UPDATEONINNEREVENTONLY) protects the area from being rendered on outside events – the other attribute (UPDATEISOLATION) protects outside areas from being rendered on inner events.
You may set both attributes to “true” in parallel – and then fully encapsulate your area.
But... - pay attention: By defining one of the attributes you step back from the principle that the whole screen always is automatically updated during a request-response processing!
By calling function “ThreadData.getInstance().registerChangeUpdatingAllAreas()” you can on server side override all optimization and isolation. You need to do this call if you know that a certain updated within your isolated area will also affect data that is rendered in other parts of the screen.
Please note: the two attributes are not really required in typical scenarios. They should be applied in “bigger” scenarios only – and should not be used “just because they exist”...
The layout and processing of a popup is completely up to you – any page can be called as popup.
CaptainCasa Enterprise Client comes with some default popups in order to support the most common popup scenarios:
OK-Popup
Yes/No-Popup
Value Selection Popup
The opening and closing of the popups is wrapped by a corresponding Java interface.
The “OK-Popup” allows to output a text message to the user. The user can confirm the message by clicking an OK button:
The Java code to open the popup on server side is:
public void onOpenOKPopup(ActionEvent ae)
{
OKPopup.createInstance
("Please read",
"This is the content of the popup.
Please confirm by pressing OK.");
}
The Yes/No popup is similar to the OK popup – but allows the user to decide “Yes” or “No”.
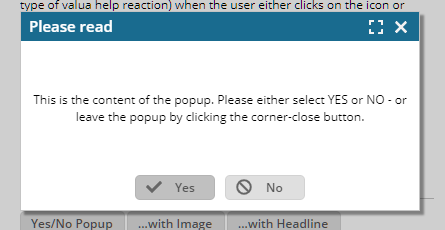
The popup is called by passing an implementation of interface “IyesNoListener”:
public void onOpenYESNOPopup(ActionEvent ae)
{
YESNOPopup.createInstance
(
"Please read",
"This is the content ... ",
new IYesNoListener()
{
public void reactOnNo()
{
Statusbar.outputMessage("No”);
}
public void reactOnYes()
{
Statusbar.outputMessage("Yes”);
}
});
}
There is a special field component that is designed to be linked with value help popups: the COMBOFIELD component.
The component supports all properties of the normal FIELD component. It is rendered in a similar way to a combo box – so that the user immediately sees that value help is provided for this field:
![]()
There are three ways to activate value help within the component:
The user clicks onto the arrow-icon.
The user presses “F4” inside the component.
The user presses “ctrl-Space” inside the component.
In all cases a value help request is sent to the action listener of the component. The event that is passed into the server side action listener method is an event of data type “BaseActionEventValueHelp”.
It's now the server side processing that decides how to support the user. The typical option is to open up a popup window and present the user a list of valid values, or to present a popup allowing the user to search for values.
When opening a popup then there are two types of popups that make sense:
You may open a modal popup – in this case the user must explicitly close the popup before continuing with the field input.
You may open a modeless popup that is closed automatically if the user clicks outside.
For presenting values within a list of valid values there is a preconfigured management including preconfigured popups. Please check the demo workplace for examples and coding details.
A special type of usage is the”type ahead” usage. In this case the user input some text into the field. After the field recognizing that no further input was done for a certain while a value help request is sent to the server. The server side logic now provides a list of reasonable values, the list being already filtered against the user's current input.
The type ahead management is based on the FLUSH, FLUSHTIMER and KEEPFOCUS attribute of the COMBOFIELD component.
By setting FLUSH to “true” the component will send data changes to the server. Normally these data changes are sent at this point of time when the user steps out of the field into another component.
By in addition setting the FLUSHTIMER to a certain millisecond-value the FLUSH will be executed when the user stopped with typing in new data.
By setting the KEEPFOCUS to true the keyboard focus will be kept within the field and will not move into the popup that is opened.
A flush event is processed within the action listener. The event is of type “BaseActionEventFlush”. The event provides a method by that you can determine if the flush was caused by a timer: “getFlushWasTriggeredByTimer”.
Result: in your implementation you get notified in two ways when the user wants to get some value help:
You receive a normal value-help-event because the user did explicitly press “F4” or “ctrl-space”.
You receive a flush-event because the user stopped with data input. In this case you need to double check that the flush event was triggered by the timer, and not by stepping out of the component.
Please check the demo workplace for coding details.
CaptainCasa Enterprise Client supports two different types of menus:
menu bar: typically located in the header area of a screen
popup menus: opening up when pressing with the right mouse button on a certain control
Both types of menus work with the same type of components: MENU and MENUITEM, but used in a slightly different way.
Please check the “demopopupmenu.jsp” example for details on JSP layout definition and code.
The menubar is quite simple: it may contain MENU components, and the MENU components themselves contain MENUITEM components. MENUTIEM components are the ones which the user selects in order to invoke a certain server side function.
You can nest multiple MENU items below one MENUBAR so that the menu itself has several hierarchical layers.
Each MENU compopnent has a text (obligatory) and an image (optional).
Each MENUITEM in addition has an ACTIONLISTENER attribute – which is the one called when the user invokes the MENUITEM.
The menu bar can either be statically built inside the layout, i.e. you arrange all the subcomponents as part of the layout definition. Or you dynamically add components using the COMPONENTBINDING attribute.
The principles of POPUPMENU management are simple as well:
POPUPMENU definitions include the POPUPMENU instance itself and a list of MENUITEM instances that form the popup menu. Each POPUPMENU needs to get assigned a unique id. - This something “unusual”: normally you do not care about the id of components, they are generated by the Layout Editor autoamtically. Now, with POPUPMENU instances, you do – pay attention to define the ID values properly!
Within the MENUITEM you can define an ACTIONLISTENER that is executed (event type: BaseActionEventSelect) when the user selects a menu item.
And there is a COMMAND attribute in which you can specify a string value that identifies the MENUITEM instance. Background: the ACTIONLISTNER of the component, which references the POPUPMENU is called as well (event type: BaseActionEventPopupMenutItem). Part of the event information is the command string.
From components that use the POPUPMENU instance, it is referenced by specifying the ID within the attribute POPUPMENU of the component.
Example:
<t:rowdemobodypane id="g_3" actionListener="#{d.demoPopupMenu.onBodyAction}" objectbinding="demoPopupMenu" popupmenu="POPUPMENU3" >
<t:row id="g_4" >
<t:foldablepane id="g_5" actionListener="#{d.demoPopupMenu.onFoldablePaneAction}" popupmenu="POPUPMENU4" text="Foldable Pane" width="100%" >
<t:row id="g_6" >
<t:label id="g_7" actionListener="#{d.demoPopupMenu.onLabel1Action}" popupmenu="POPUPMENU1" text="Label 1" width="120" />
<t:field id="g_8" actionListener="#{d.demoPopupMenu.onField1Action}" popupmenu="POPUPMENU1" width="200" />
</t:row>
<t:rowdistance id="g_9" />
<t:row id="g_10" >
<t:label id="g_11" actionListener="#{d.demoPopupMenu.onLabel2Action}" popupmenu="POPUPMENU2" text="Label 2" width="120" />
<t:field id="g_12" actionListener="#{d.demoPopupMenu.onField2Action}" popupmenu="POPUPMENU2" width="200" />
</t:row>
</t:foldablepane>
</t:row>
<t:rowdistance id="g_13" height="20" />
<t:row id="g_14" actionListener="#{d.demoPopupMenu.onRowAction}" popupmenu="POPUPMENU3" >
<t:textpane id="g_15" text="Some content in this row. The popup menu is defined on row level." width="100%" />
</t:row>
</t:rowdemobodypane>
<t:popupmenu id="POPUPMENU1" >
<t:menuitem id="g_16" command="OPTION1" text="Option 1" />
<t:menuitem id="g_17" command="OPTION2" text="Option 2" />
<t:menuitem id="g_18" command="OPTION3" text="Option 3" />
</t:popupmenu>
<t:popupmenu id="POPUPMENU2" >
<t:menuitem id="g_19" command="OPTION4" text="Option 4" />
<t:menuitem id="g_20" command="OPTION5" text="Option 5" />
<t:menuitem id="g_21" command="OPTION6" text="Option 6" />
</t:popupmenu>
<t:popupmenu id="POPUPMENU3" >
<t:menuitem id="g_22" command="OPTION7" text="Option 7" />
<t:menuitem id="g_23" command="OPTION8" text="Option 8" />
<t:menuitem id="g_24" command="OPTION9" text="Option 9" />
</t:popupmenu>
<t:popupmenu id="POPUPMENU4" >
<t:menuitem id="g_25" command="OPTION10" text="Option 10" />
<t:menuitem id="g_26" command="OPTION11" text="Option 11" />
<t:menuitem id="g_27" command="OPTION12" text="Option 12" />
</t:popupmenu>
In the example you see 4 popup menus, that are referenced from diverse components. You can reference the popup menus from various levels of components. In the example they are referenced from “small components” like LABEL and FIELD, as wells as from “big components” such as the ROWBODYPANE.
The event reaction of the user selecting a popup menu item either is done in the action listener of the MENUITEM or it is done in the action listener of the component referencing the POPUPMENU.
Have a look onto the following page definition:

There are two fields defined, each field being assigned to the same popup menu “FIELD”, that provides two menu items.
The user now can open the same popup menu on both fields. When selecting a menu item on one of the fields the following happens:

On server side two actionListeners are triggered that allow to react on the event:
“MENUITEM level”: the actionListener that is defined with the menu item is called
“Component level”: the actionListener that is defined with the FIELD component is called
You may implement and assign both actionListeners or you may implement one of the actionListeners.
The first option is “just normal”:
<t:popupmenu id="FIELD" >
<t:menuitem id="g_25" text="Clear" actionListener=”#{xxx.onClear}” command=”CLEAR”/>
<t:menuitem id="g_26" text="Help" actionListener=”#{xxx.onHelp}” command=”HELP”/>
</t:popupmenu>
The action listener “#{xxx.onClear}” is called, the event that is passed is of type “BaseActionEventInvoke”.
In this scenario you do not get any information about the component on which the popup menu was opened. Remember: there may be several components referencing the same POPUPMENU instance.
Use this type of event reaction if the reaction of the user selecting the menu item is always the same for all referencing elements and if the reaction does not depend on the component on which the menu item was selected.
The action listener of the component that references the POPUPMENU is called as well. The event type is “BaseActionEventPopupMenuItem”. Part of the information that is available with the event is the COMMAND string of the MENUITEM instance that was selected by the user.
As consequence you can have multiple components using the same POPUPMENU instance but having a different processing of the menu selection.
On server side you typically have code that looks as follows:
...
...
public void onField1Action(ActionEvent event)
{
if (event instanceof BaseActionEventPopupMenuItem)
{
BaseActionEventPopupMenuItem e = (BaseActionEventPopupMenuItem)event;
String command = e.getCommand();
if (“CLEAR”.equals(command))
{
...
}
else if (“HELP”.equals(command))
{
...
}
}
}
Inside a page definition you reference POPUPMENU components by using the attribute POPUPMENU within a component (e.g. a field or a pane). You now can define different popup menus for different areas of the page – e.g. you may want to have a general popup menu that is valid for the whole page (e.g. defined on ROWBODYPANE level) and you may want to have a special popup menu for a certain area (e.g. defined on PANE level).
The client will always select the popup menu, that is adequate. Starting with the component in which the right mouse button was clicked, it steps up the component hierarchy until it finds a POPUPMENU attribute definition. The first definition it finds is the one which is used for building the popup menu.
The POPUPMENU component offers a second very important feature. It allows to bind a menu item to a key. Pressing the key has the same meaning than opening the popup menu and selecting the menu item with the mouse button.
It may first sound strange that hotkey definitions are made as part of the popup menu definition, but makes sense... for two reasons:
Every time you define hotkeys for a screen, you need to make sure that these hotkeys are reachable without keyboard as well. Now, this is exactly true with popup menu definitions: commands are reachable by right mouse button, and – optionally – by keyboard.
The assignment of POPUPMENU instances to components rules that one POPUPMENU instance is only valid within a certain area of the screen. E.g. a POPUPMENU defined for a certain PANE is only valid for the PANE and its included components. - This is the same for the hot keys as well: they are only valid when the focus is within the area referencing the POPUPMENU. As a result, an “Enter-Hotkey” may have a different reaction if the user is in the one field than if the user is in an other field.
The hotkey definition is done by assigning the so called event keycode to the MENUITEM component's attribute HOTKEY. Open the value help within the layout editor in order to get a list of common keycodes. - In front of the keycode you can write the prefixes “ctrl-”, “alt-”, “shift-” in order to combine the keycode with one (or more) of these special keys.
You define HOTKEY definitions as mentioned if you do not have any “invoker component” that you can attach the hot key to.
You can also directly define hotkey definitions in the HOTKEY attribute of BUTTON, ICON, LINK and other components.
The MENU/POPUPMENU definitions, that you saw in this chapter so far, are all statically defined popup menus: the popup menu is defined as part of the layout definition.
Of course you can build dynamic popup menus by using the just normal DYNAMICCONTENT component at any position within the MENU/POPUPMENU definition.
There are some cases in which you want to build the POPUPMENU at this point of time when the user presses with the right mouse button into a certain component.
There is the attribute POPUPMENULOADROUNTRIP which you can define within the component that binds to the POPUPMENU definition. When setting the attribute to “true”, then a roundtrip to the server is triggered when the user presses the right mouse button. The actionListener of the component is called, receiving the event type “BaseActionEventPopupMenuLoad”. Together with the usage of a DYNAMICCONTENT you can now build up the popup menu.
Example: the following screen consists of two “big” labels, both of them with right mouse button support:
The layout definition is:
<t:row id="g_2">
<t:label id="g_3"
actionListener="#{d.DemoPopupMenuLoadRoundtrip.onLabelTopAction}"
font="size:16" popupmenu="CENTRALPOPUP"
popupmenuloadroundtrip="true"
text="Right Click onto this top label" />
</t:row>
<t:row id="g_4">
<t:label id="g_5" text="or" />
</t:row>
<t:row id="g_6">
<t:label id="g_7"
actionListener="#{d.DemoPopupMenuLoadRoundtrip.onLabelBottomAction}"
font="size:16" popupmenu="CENTRALPOPUP"
popupmenuloadroundtrip="true"
text="Right Click onto this bottom label" />
</t:row>
<t:popupmenu id="CENTRALPOPUP">
<t:dynamiccontent id="g_8"
contentbinding="#{d.DemoPopupMenuLoadRoundtrip.dynMenuContent}" />
</t:popupmenu>
In the layout there is only one popup menu definition “CENTRALPOPUP”, internally only holding a DYNAMICCONTENT component. The popup menu is referenced from both “big” of the big labels.
Because with both labels the attribute POPUPMENULOADROUNDTRIP is defined as “true” the corresponding actionListener of each label is called, which then builds up the dynamic menu content:
public void onLabelTopAction(ActionEvent event)
{
if (event instanceof BaseActionEventPopupMenuLoad)
{
List<ComponentNode> nodes = new ArrayList<ComponentNode>();
{
ComponentNode node = new ComponentNode("t:menuitem");
node.addAttribute("text","First of top");
node.addAttribute("command","TOP1");
nodes.add(node);
}
{
ComponentNode node = new ComponentNode("t:menuitem");
node.addAttribute("text","Second of top");
node.addAttribute("command","TOP2");
nodes.add(node);
}
m_dynMenuContent.setContentNodes(nodes);
}
else if (event instanceof BaseActionEventPopupMenuItem)
{
BaseActionEventPopupMenuItem e = (BaseActionEventPopupMenuItem)event;
Statusbar.outputSuccess("Command of popup menu item: " + e.getCommand());
}
}
public void onLabelBottomAction(ActionEvent event)
{
if (event instanceof BaseActionEventPopupMenuLoad)
{
List<ComponentNode> nodes = new ArrayList<ComponentNode>();
{
ComponentNode node = new ComponentNode("t:menuitem");
node.addAttribute("text","First of bottom");
node.addAttribute("command","BOT1");
nodes.add(node);
}
{
ComponentNode node = new ComponentNode("t:menuitem");
node.addAttribute("text","Second of bottom");
node.addAttribute("command","BOT2");
nodes.add(node);
}
{
ComponentNode node = new ComponentNode("t:menuitem");
node.addAttribute("text","Third of bottom");
node.addAttribute("command","BOT3");
nodes.add(node);
}
m_dynMenuContent.setContentNodes(nodes);
}
else if (event instanceof BaseActionEventPopupMenuItem)
{
BaseActionEventPopupMenuItem e = (BaseActionEventPopupMenuItem)event;
Statusbar.outputSuccess("Command of popup menu item: " + e.getCommand());
}
}
Implementing Drag&Drop is easy! ;-)
Drag&Drop is supported with nearly all components. Currently “internal drag & drop is supported” i.e. You can drag & drop data from one component to the other – you currently cannot drag & drop information from outside (e.g. from Microsoft Excel).
Drag & drop covers two aspects:
Each component can define which types of drag information it supports.
Each component can define what information can be dragged from it. The definition contains both the definition of a drag-type and the definition of a drag-content.
When dragging and dropping the cursor changes automatically from “can drop” into “cannot drop” corresponding to if the drag information of the drag sender fits to the drop type definition of the drop receiver.
Dependent from if the user presses the ctrl-key on the keyboard either a “drop” operation or a “copy” operation is executed.
Please check details on JSP layout and code within the example “demodragdrop.jsp”.
Each component that supports drag&drop supports the attribute DRAGSEND. This attribute contains a string that represents the content of the component.
The string is built in the following way: <dragtype>:<draginfo>, e.g. a string might be “article:4711”.
The DRAGSEND information is carried from one component to the next during a drag & drop operation.
Each component that supports drag & drop supports the attribute DROPRECEIVE. This attribute contains a semicolon separated list of all drag-types that can be dropped onto the component.
E.g. a component defines DROPRECEIVE to be “article;customer;file”.
By defining the DROPRECEIVE attribute a component specifies which types of drag data can be dropped onto the component.
At the point of time when the user drops information onto a component, the component that receives the drop event calls its ACTIONLISTENER.
In the action listener there are two event types that represent the drag & drop operation:
“BaseActionEventDrop” - this is the event that is passed when the user does a normal drag & drop
“BaseActionEventDropCopy” - this is the event that is passed when the user holds down the ctrl-key while performing the drag & drop
The “BaseActionEventDropCopy” inherits from “BaseActionEventDrop”. The main method both events provides is the getDragInfo() method. This returns the information behind the DRAGSEND attribute of the component where the drag & drop was started from.
Please take a look into the Java documentation of the drop event (class BaseActionEventDrop). There is quite important information associated with the event:
of course the information that comes with the drag&drop operation (i.e. the string “<dragtype>:<draginfo>”), so that you know what type of information was dropped
the x,y position of the drop operation – here you can use multiple ways for receiving the information about the drop position
...as pixel value
...as percentage value
By default, when the user drags a certain information from one component to others, the user interface behaved in the following way:
A component, that is able to process the drag & drop (i.e. DRAGSEND information of the sender matches DROPRECEIVE information of the receiver) will be highlighted when the user moves with the mouse over the component.
The highlighting by default is some yellow shading that covers the whole component.
You can choose other types of highlighting as well, by building up the DROPRECEIVE information in the following way: “<dragtype>:<dropZoneInfo>”. The following “drop zone info” definitions are available:
“horizontalsplit”
“verticalsplit”
“edges”
“sides”
“sidesandcenter”
“grid(<raster>)” e.g. “grid(25)”
Example: instead of defining DROPRECEIVE as “article” you can define DROPRECEIVE as “article:horizontalsplit”.
As result of explicitly assigning a drop zone information, the highlighting when moving the mouse over the component will be updated according to the definition, e.g. in case of using “horizontalsplit” only the left or the right area of the component will be highlighted during a drag & drop operation.
Please note: the definition of a “<dropZoneInfo>” is a pure optical advice, that the client uses for highlighting purposes. In case of dropping information you still need to figure out the drop zone on your own, by accessing the drop position that is associated with the drop event.
The following graphics illustrates the “sensitive” areas when using diverse dropzones:
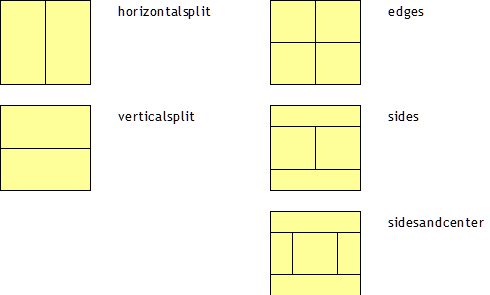
The lines in the graphics are at the position 0, 25%, 50%, 75%.
CaptainCasa Enterprise Client provides a simple but efficient way to create shape graphics:

The features that are provided are:
Flexible definition of shapes
Diverse painting commands
Shapes can be selected (mouse click / double click)
Shapes can be associated with a popup menu (right mouse click)
Shapes can be dragged and dropped
Shapes can consist out of complete panes, that themselves may include just normal components, such as FIELD and BUTTON components
Definition of lines between shapes
Lines may have multiple begin / end arrow styles
Lines can be selected (mouse click / double click)
Lines can be associated with a popup menu (right mouse click)
Animated movement of shapes
When changing the position of a shape then the shape is moved to its new position with a certain animation.
There are only a few components which you need to know about:
PAINTAREA – this is the painting area on which shapes are placed. A painting area holds a certain size (width/height) and has a certain background coloring. If the shapes that are added to the PAINTAREA exceed the size of the PAINTAREA definition then scrollbars are shown automatically.
PAINTAREAITEM – this is the typical shape component. It is an area in which you place drawing commands using the BGPAINT command set.
PAINTAREAPANEITEM – this is a shape component that internally opens up a normal PANE components, so that you can place normal CaptainCasa components inside.
PAINTAREALINEITEM – this is a connection between two points.
Have a look onto the following page:
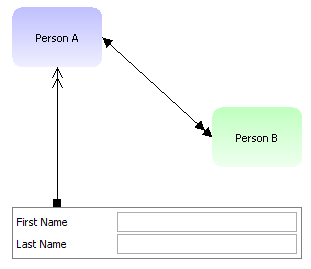
The corresponding layout definition is rather simple:
<t:rowdemobodypane id="g_1" objectbinding="#{d.DemoPaintAreaSimple}">
<t:row id="g_2">
<t:paintarea id="g_3" background="#FFFFFF" height="100%" width="100%">
<t:paintareaitem id="g_4" bgpaint="roundedrectangle(0,0,100%,100%,20,20,#C0C0FF,#F0F0FF,vertical);write(50%,50%,Person A,centermiddle)" bounds="50;50;90;60" />
<t:paintareaitem id="g_5" bgpaint="roundedrectangle(0,0,100%,100%,20,20,#C0FFC0,#F0FFF0,vertical);write(50%,50%,Person B,centermiddle)" bounds="250;150;90;60" />
<t:paintarealineitem id="g_6" arrowfrom="1" arrowto="2" bounds="140;80;110;100" />
<t:paintareapaneitem id="g_7" bgpaint="#C0C0C0" border="#808080"
bounds="50;250;290;52" padding="5" rowdistance="2">
<t:row id="g_8">
<t:label id="g_9" text="First Name" width="100" />
<t:field id="g_10" width="100%" />
</t:row>
<t:row id="g_11">
<t:label id="g_12" text="Last Name" width="100" />
<t:field id="g_13" width="100%" />
</t:row>
</t:paintareapaneitem>
<t:paintarealineitem id="g_14" arrowfrom="4" arrowto="6" bounds="95;110;0;140" />
</t:paintarea>
</t:row>
</t:rowdemobodypane>
You see:
The position of shapes and lines is done using a BOUNDS property. This property is a semicolon separated definition of “left;top;width;height”.
In the PAINTAREAITEM component the rounded rectangle and text is drawn using a corresponding BGPAINT attribute definition.
The PAINTAREAPANEITEM component is defined very similarly to the PAINAREAITEM component but allows to put “normal” components inside.
The step from “simple” to “complex” is not too far:
You may define the shape components with expression bindings instead of using static attributes. E.g. the BOUNDS property may be derived from a server side bean using just normal “#{...}” syntax.
You may define the shape components dynamically using the COMPONENTBINDING attribute of PAINTAREA. In this case the jsp layout definition is not statically defined but is defined dynamically by your program. Read the information contained in the chapter “Dynamic Page Layout” for more details.
You may use drag & drop features: PAINRAREAITEM and PAINTAREAPANEITEM provide a DRAGSEND property, PAINTAREA provides a DROPRECEIVE property. The drop event processing passes the exact pixel drop position to the server side processing so that you can update your shape arrangement correspondingly.
Check the examples within the demo workplace for more information.
This chapter tells you about referencing properties of managed beans from user interface components. And it tells you about useful ways to add certain application functions into the server side request processing.
Attributes of a user interface component (e.g. the TEXT attribute of a LABEL component) can be either defined in a static way (“First Name”) or in a dynamic way (“#{xxx.yyy}”). - Well, there are two exceptions of this rule – the attribute STYLEVARIANT and ATTRIBUTEMACRO can only be set in a static way, but this is the only exception.
A managed bean is a Java Bean object (at runtime) that is created and managed by the Java Server Faces environment.
A managed bean is declared in the faces-config.xml configuration file, telling the JSF environment about...:
the class name
the life cycle of an instance
the logical name that is used inside referencing expressions
A valid faces-config.xml definition may look like:
<?xml version="1.0" encoding="UTF-8"?>
<faces-config
xmlns="http://java.sun.com/xml/ns/javaee"
xmlns:xsi="http://www.w3.org/2001/XMLSchema-instance"
xsi:schemaLocation="http://java.sun.com/xml/ns/javaee http://java.sun.com/xml/ns/javaee/web-facesconfig_1_2.xsd"
version="1.2">
<managed-bean>
<managed-bean-name>demoHelloWorld
</managed-bean-name>
<managed-bean-class>test.DemoHelloWorld
</managed-bean-class>
<managed-bean-scope>session
</managed-bean-scope>
</managed-bean>
</faces-config>
A managed bean provides:
properties and
methods (action listeners)
that can be referenced from page definitions.
The expression language that is used for referencing managed bean properties allows to gently work with Maps (java.util.Map-instances).
Assume the bean “aaaaa” of the previous example is implemented in the following way:
public class AaaaaBean ...
{
HashMap m_values = new HashMap();
public Map getValues()
{
return m_values;
}
...somewhere...
{
m_values.put(“firstName”,”....”);
m_values.put(“lastName”,”....”);
}
}
In this case you can reference the map's items in the following straight way:
#{d.Aaaaa.values.firstName}
#{d.aaaaa.values.lastName}
You see: properties can be either hard-coded by providing a corresponding set/get implementation or can be soft-coded by using maps.
In the same way as described with maps you may define lists (implementations of java.util.List) or object arrays and reference them with expressions:
public class AaaaaBean ...
{
List m_persons = new ArrayList<Person>();
public List getPersons()
{
return m_persons;
}
}
The expression to reference a certain item of the list look like:
#{d.aaaaa.persons[0].firstName}
#{d.aaaaa.persons[3].lastName}
When using dynamic properties then you may also want to reflect dynamic properties within the Bean Browser – the tool on the right of the Layout Editor, from which you can drag & drop expressions from the bean hierarchy into the component attributes.
There is a certain mechanism that allows to dynamically provide the property information for the bean browser. Please check the corresponding appendix of this documentation.
With “fix-coded” properties, that provide a set/get method, things are simple: the data type that is used within the set/get-method definition is the one which is transferred into the object once the user updates the value on client side.
The CaptainCasa runtime on server side converts the value flexibly.
Example: the page bean implementation provides (for what reason ever...) a String-implementation of the property “size”:
public XyzUI ...
{
String m_size;
public String getSize() { return m_size; }
public void setSize(String value) { m_size = value; }
}
In a layout definition the “size” is referenced by a formatted field:
<t:formattedfield ...value=”#{d.XyzUI.size}” format=”int” .../>
In the formatted field the “int”-format defines that the user is only allowed to input proper integer values – but this is a pure formatting advice and is independent from the data type management within the bean.
So after some user input the runtime converts the integer-formatted value coming from the control into a corresponding String object which is then passed into the “setSize(...)” method.
Please do not misunderstand...: we do not want to encourage you to use String-types for integer values! We just wanted to show that CaptainCasa tries to convert the value coming from the component into a proper value that is passed into the set/get property implementation.
With dynamic attributes (e.g. by using Maps) things are a bit more complex. Let's check the following example:
public XyzUI ...
{
Map<String,Object> m_data = new HashMap<String,Object>();
public Map<String,Object> getData() { return m_data; }
}
An expression into the property data for example is:
<t:formattedfield ... value=”#{d.XyzUI.data.size}” ... format=”int”/>
What data type should CaptainCasa now select for calling the “put(...)” of the data-Map when a value changed due to user input? An “int”, an “Integer”, a “BigInteger”, a “String”, ...?
The rules are as follows:
If there is already a property value available within the map or list, then a value that was input on client side, is transferred with the same data type as the one of the already existing object.
Example: if the “size” is already part of the “data”-Map and if the “size”-value is an “Integer”, then CaptainCasa will use exactly the same type that is already used. - This also means: if the “size” value was passed into the Map as “String” object, then CaptainCasa will also use “String” to pass values into the Map.
If there is no property value available within the map or list, e.g. the map does not contain a value yet, then CaptainCasa requires some more guidance. CaptainCasa first checks if the Map implements interface “IPropertyTypeResolver”:
package org.eclnt.jsfserver.util;
public interface IPropertyTypeResolver
{
public Class resolveType(String propertyName);
}
If yes, then the interface is called with the property name (key of the Map) and the result is used accordingly. An example of an implementation would be:
public XyzUI ...
{
public class MyMap extends HashMap<String,Object>
implements IPropertyTypeResolver
{
...
public Class resolveType(String propertyName)
{
if (“size”.equals(propertyName))
return Integer.class;
else if ...
...;
return null; // default “don't know”
}
...
}
Map<String,Object> m_data = new HashMap<String,Object>();
public Map<String,Object> getData() { return m_data; }
}
If there is no property value available an if the data-Map does not implement the interface “IPropertyTypeResolver” then the control itself takes over the responsibility for selecting the property data type:
Every component has some default property type it uses. If the component is a CALENDAR component then a Date-value is passed. If the component is a FORMATTEDFIELD component with FORMAT “int” then and Integer-value is passed. If the component does not imply any specific data type then by default “String” is used.
Most input components allow to define this default property type in addition by the attribute DATATYPEINFO. Example:
<t:formattedfield ... value=”#{d.XyzUI.data.size}” ... format=”int” ...
datatypeinfo=”java.math.BigInteger” ... />
There is a default implementation of a HashMap that implements IPropertyTypeResolver:
import org.eclnt.jsfserver.util.typeresolution.HashMapWithTypeInfo;
...
Map<String,Object> m_data = new HashMapWithTypeInfo()
.defineType("married",Boolean.class)
.defineType("size",BigInteger.class)
.defineType("birthday",LocalDate.class);
...
Within the grid processing (i.e. list and tree processing using FIXGRID component), there are the following binding rules:
The grid itself binds to a property of type “FIXGRIDBinding” - either by using “FIXGRIDListBinding” or by using “FIXGRIDTreeBinding”. This binding definition is just a normal expression of type “#{aaa.bbb.grid}”.
All elements inside grid rows (i.e. components that are located below the GRIDCOL control) are referenced with the special expression (.{xxx}). When using the “.{}” expression then the root for accessing the property is the corresponding row object of the grid.
All rules that apply for normal expressions (e.g. dynamic properties), apply to the “.{}” as well.
When not using dynamic property binding, i.e. when not using maps or arrays, then the resolution of properties is done via normal Java introspection. For each property that is referred to within an expression there is a corresponding getter-/setter-method that is accessed correspondingly.
Example: if the expression is “#{d.TestUI.firstName}”, then the bean behind “TestUI” has a corresponding pair of methods:
public class TestUI
{
public void setFirstName(String value) { ... }
public String getFirstName() { ... }
}
The introspection of properties and their setter-/getter-methods is powerful on the one hand, but from performance of view is much slower than a direct access to the set/get method.
That's the reason why a special interface can accelerate the resolution of data:
package org.eclnt.jsfserver.util;
public interface IAcceleratedPropertyAccess
{
public final static Object NOT_AVAILABLE = new Object();
public Object getPropertyValue(String property);
}
If a managed bean implements this interface then the property resolution will first try to load the property via the interface. If the interface passes back a value that is not the NOT_AVAILABLE object, then this value will be used – otherwise the normal introspection will be done.
The class “TestUI” could as consequence be accelerated in the following way:
public class TestUI implements IAcceleratedPropertyAccess
{
public Object getPropertyValue(String property)
{
if (“firstName”.equals(property))
return getFirstName();
return NOT_AVAILABLE;
}
public void setFirstName(String value) { ... }
public String getFirstName() { ... }
}
The interface is only available for the getting of values – because this is executed much more often than the setting of values.
You typically should think about using the interface every time you have one and the same type of object being accessed a lot of times (e.g. accessed in grids).
The same rules that are used for referencing properties are used for referencing methods. A method expression (“#{d.aaaa.onXyz}”) must have a counter part method within the referenced bean. The method needs to have the following signature:
public class AaaaaBean ...
{
...
...
public void onXyz(ActionEvent event)
{
...
...
}
...
...
}
All components of CaptainCasa Enterprise Client pass an event of type “BaseActionEvent”, which is a subclass of ActionEvent:
public void onXyz(ActionEvent event)
{
BaseActionEvent bae = (BaseActionEvent)event;
...
}
The base action event refers to the actual client event that triggered the request processing. It provides the functions:
getCommand() ==> Client command
getParams() ==> parameters, that are associated with the command
Please note: one component can be associated with different commands. Example: a FIELD component has one actionListener-method in which the following events can be passed:
flush ==> user input of data, only comes when FIELD-FLUSH=”true”
drop, dropcopy ==> drop event, only comes when FIELD-DROPRECEIVE is configured
popupmenu-command ==> only comes when POPUPMENU management is used
All events for these three commands are passed to one and the same method, that is the action listener method for this component. In order to better separate events from one another there is a sub-class of BaseActionEvent for each command:
BaseActionEvent
...
BaseActionEventDrop
BaseActionEventDropCopy
BaseActionEventFlush
...
Then name of the sub-class always is “BaseActionEvent+Command”. Each subclass provides – if required – straight access methods to the parameters that are associated with an event.
An event may be associated with additional data that is sent as event parameters. You can either access the parameters by the getParams() method of BaseActionEvent or you may use concrete accessor methods of the corresponding subclass of BaseActionEvent.
The typical structure of the method that acts as action listener looks like:
public void onXyz(ActionEvent event)
{
if (ae instanceof ActionEventFlush)
{
...
}
else if (ae Instanceof ActionEventDrop)
{
...
}
else if (ae Instanceof ActionEventDropCopy)
{
...
}
}
When maintaining component attributes within the Layout Editor then you will see a list of all commands that are available with a component:
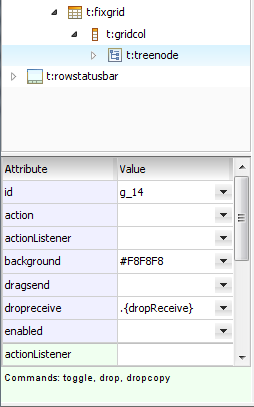
The list of commands will look different, depending from the value of attributes.
Since CaptainCasa Enterprise Client Release 3.0 there is a special type of binding available, the so called “adapter binding”.
A component, e.g. a field, provides a quite high number of attributes to define the way it looks and the way it behaves. In many cases the attribute values are defined by expressions, so that at runtime the attribute value is taken from server side bean property values.
Example: in case of a field the definition may look like:
<t:field ...
text=”#{d.xyz.name}”
enabled=”#{d.xyz.nameEnabled}”
rendered=”#{d.xyz.nameRendered}”
bgpaint=”#{d.xyz.nameBgpaint}”
.../>
There is a quite high effort for defining the server side structures and for defining the expressions for each attribute. To reduce this effort CaptainCasa provides two possibilities that you can select from:
You can use Macros in order to automatically generate the expressions (see “Working with Macros”)
or...: you can use the adapter binding defined in this chapter.
The basic idea is very simple: a component (e.g. the field) is bound to a so called adapter object. The adapter object is a “mini object” directly providing certain attributes for the component – so that the component delegates value requests directly to the adapter object. The adapter object is some kind of “counter part” for the component.
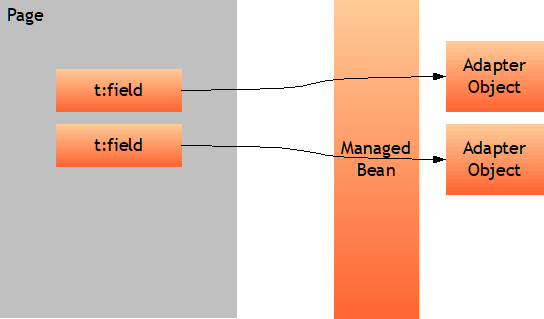
The components that support the usage of adapter objects provide an attribute ADAPTERBINDING, that needs to point to an stable instance of adapter object.
Adapter objects implement the following interface:
public interface IComponentAdapterBinding
{
public Set<String> getFixAttributeNames();
public Set<String> getDynamicAttributeNames();
public Class getAttibuteType(String attributeName);
public void setAttributeValue(String attributeName, Object value);
public Object getAttributeValue(String attributeName);
public void onAction(ActionEvent event);
}
The adapter tells the component which attributes it takes responsibility for, and then provides the corresponding set/get-access methods.
In case the component supports an action listener, the adapter's “onAction” method is called.
At runtime the component (e.g. within the render phase of the request processing) gathers all its attribute values in order to check if updated information needs to be sent to the client side. The corresponding attribute values are requested from the adapter object – if the component is created new then all (both the fix and dynamic attributes) are requested, if the component is already existing then only the dynamic attributes are requested.
If the component is able to updated a certain attribute (e.g. a FIELD component updates its TEXT attribute), then the update is done through the corresponding “setAttributeValue” method – in the case of update objects you also need to implement the “getAttributeType” method for the update-attribute.
The following example shows how to use the adapter binding for simple scenarios – in order to then cover more and more complex scenarios.
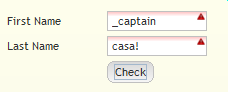
There are two fields, depending on the input a certain background painting is shown.
The jsp layout definition is:
<t:row id="g_2">
<t:label id="g_3" text="First Name" width="100" />
<t:field id="g_4"
adapterbinding="#{d.DemoAdapterBindingSimple.firstName}"
width="100" />
</t:row>
<t:row id="g_5">
<t:label id="g_6" text="Last Name" width="100" />
<t:field id="g_7"
adapterbinding="#{d.DemoAdapterBindingSimple.lastName}"
width="100" />
</t:row>
<t:row id="g_8">
<t:coldistance id="g_9" width="100" />
<t:button id="g_10"
actionListener="#{d.DemoAdapterBindingSimple.onCheck}"
text="Check" />
</t:row>
You see that both field components are bound via adapter binding.
The code is:
public class DemoAdapterBindingSimple
implements Serializable
{
// ------------------------------------------------------------------------
// inner classes
// ------------------------------------------------------------------------
static Set<String> MYFIELDADAPTER_FIXATTRIBUTES;
static Set<String> MYFIELDADAPTER_DYNATTRIBUTES;
static
{
MYFIELDADAPTER_FIXATTRIBUTES = new HashSet<String>();
MYFIELDADAPTER_DYNATTRIBUTES = new HashSet<String>();
MYFIELDADAPTER_DYNATTRIBUTES.add("text");
MYFIELDADAPTER_DYNATTRIBUTES.add("enabled");
MYFIELDADAPTER_DYNATTRIBUTES.add("bgpaint");
}
public class MyFieldAdapter implements IComponentAdapterBinding
{
boolean i_containsError = false;
String i_text = "";
boolean i_enabled = true;
public Set<String> getFixAttributeNames()
{ return MYFIELDADAPTER_FIXATTRIBUTES; }
public Set<String> getDynamicAttributeNames()
{ return MYFIELDADAPTER_DYNATTRIBUTES; }
public Class getAttibuteType(String attributeName)
{
if ("text".equals(attributeName))
return String.class;
else
throw new Error("The attribute " + attributeName +
" is not supported!");
}
public Object getAttributeValue(String attributeName)
{
if ("text".equals(attributeName))
return i_text;
else if ("enabled".equals(attributeName))
return i_enabled;
else if ("bgpaint".equals(attributeName))
{
if (i_containsError == true)
return "error()";
else
return null;
}
else
throw new Error("The attribute " + attributeName +
" is not supported!");
}
public void setAttributeValue(String attributeName, Object value)
{
if ("text".equals(attributeName))
i_text = (String)value;
else
throw new Error("The attribute " + attributeName +
" is not supported!");
}
public void onAction(ActionEvent event) {}
}
// ------------------------------------------------------------------------
// members
// ------------------------------------------------------------------------
MyFieldAdapter m_firstName = new MyFieldAdapter();
MyFieldAdapter m_lastName = new MyFieldAdapter();
// ------------------------------------------------------------------------
// constructors
// ------------------------------------------------------------------------
// ------------------------------------------------------------------------
// public usage
// ------------------------------------------------------------------------
public MyFieldAdapter getFirstName() { return m_firstName; }
public MyFieldAdapter getLastName() { return m_lastName; }
public void onCheck(ActionEvent event)
{
m_firstName.i_containsError = false;
m_lastName.i_containsError = false;
// some "checks"
if (m_firstName.i_text.startsWith("_"))
m_firstName.i_containsError = true;
if (m_lastName.i_text.endsWith("!"))
m_lastName.i_containsError = true;
}
// ------------------------------------------------------------------------
// private usage
// ------------------------------------------------------------------------
}
The class “MyFieldAdapter” is defined as inner class. It takes over responsibility for the attributes “text”, “bgpaint”, “enabled”. Please not that all properties are defined within the set of dynamic properteis. And, please note: even though there is no fix attribute that is provided by “MyFieldAdapter” you need to return an empty set.
The value of “bgpaint” is derived from a flag indicating if the adapter binding contains an error or not (“i_containsError”).
If an attribute that is provided by an adapter binding is explicitly defined within the .jsp/.xml layout definition, then (of course...) the explicitly defined value overrides the value coming from the adapter binding.
There are some helper classes implementing IComponentAdapterBinding: “ComponentAdapterBindingBase” and “ComponentAdapterBindingMap”. Please check the JavaDoc if these helper classes are useful for you.
Please check the chapter “Working with Macros” as well, which provides a – in some parts similar way – of simplifying the working with “rich sets of dynamic attributes per component”.
Based on the adapter binding that is described in the previous chapter there are nice implementations of the IComponentAdapterBinding interface which take use of annotations so that the implementation of adapter classes is simplified significantly.
Take a look onto the following implementation:
public class FieldAdapter extends ComponentAdapterByAnnotation
{
String m_label;
String m_value;
boolean i_containsError;
String i_errorText;
public FieldAdapter(String label)
{
m_label = label;
}
@ComponentAttribute(type=ComponentAttributeType.FIX,attribute="labeltext")
public String getLabel() { return m_label; }
@ComponentAttribute(attribute="text")
public String getValue() { return m_value; }
public void setValue(String value) { m_value = value; }
@ComponentAttribute
public String getBgpaint()
{
if (i_containsError)
return "error()";
else
return null;
}
@ComponentAttribute
public String getTooltip()
{
if (i_containsError == true)
return i_errorText;
else
return null;
}
public void indicateError(String text)
{
i_containsError = true;
i_errorText = text;
}
public void resetError()
{
i_containsError = false;
i_errorText = null;
}
}
By using the annotation “@ComponentAttribute” you directly can bind property implementations to component attributes. There are two parameters that you may pass with an annotation:
The component's attribute name that is bound by the property. If not defined then the property name itself is used as attribute name.
The type in order to differentiate between properties with fix content and dynamic content. If not defined then the property is assumed to hold dynamic content.
All the methods that are part of interface “IComponentAdapterBinding” now are automatically resolved from the annotation definitions.
Please take a look into the demo workplace, section “Adapter Binding” to see an example of using this class in the context of a complete page bean.
In many cases the “core data” that is shown/updated by a component is a property of an existing bean (e.g. Pojo-object).
Example: from the database you read an entity “Person” and receive a “Person” instance:
public class Person implements Cloneable
{
public final static String PROP_FIRSTNAME = "firstName";
public final static String PROP_LASTNAME = "lastName";
public final static String PROP_TITLE = "title";
public final static String PROP_DEPARTMENT = "department";
public final static String PROP_COMMENT = "comment";
public final static String PROP_GENDER = "gender";
String m_id = UniqueIdCreator.createUUID();
int m_gender = 0; // 0=male, 1=female, 2=diverse
String m_firstName;
String m_lastName;
String m_title;
String m_department;
String m_comment;
public String getId() { return m_id; }
public void setId(String id) { m_id = id; }
public String getFirstName() { return m_firstName; }
public void setFirstName(String firstName) { m_firstName = firstName; }
public String getLastName() { return m_lastName; }
public void setLastName(String lastName) { m_lastName = lastName; }
public String getTitle() { return m_title; }
public void setTitle(String title) { m_title = title; }
public String getDepartment() { return m_department; }
public void setDepartment(String department) { m_department = department; }
public int getGender() { return m_gender; }
public void setGender(int gender) { m_gender = gender; }
public String getComment() { return m_comment; }
public void setComment(String comment) { m_comment = comment; }
}
In a FIELD-component you then want to bind the field edit content directly to some property of the Person-instance.
This is exactly the purpose of the class “ComponentAdapterByAnnotationForBeanProperty”. It takes over the concept of binding component attributes via annotation – but adds in addition the ability that the core content is bound to a bean-property.
Example:
public class PropertyAdapter
extends ComponentAdapterByAnnotationForBeanProperty<Person>
{
String i_label;
boolean i_containsError;
String i_errorText;
boolean i_mandatory = false;
public PropertyAdapter(String componentAttribute,
IBeanAccess<Person> beanAccess,
String property,
String label)
{
super(componentAttribute, beanAccess, property);
i_label = label;
}
@ComponentAttribute(type=ComponentAttributeType.FIX,attribute="labeltext")
public String getLabel() { return i_label; }
@ComponentAttribute
public String getBgpaint()
{
if (i_containsError)
return "error()";
else if (i_mandatory)
return "mandatory()";
else
return null;
}
@ComponentAttribute
public String getTooltip()
{
if (i_containsError == true)
return i_errorText;
else
return null;
}
public void indicateError(String text)
{
i_containsError = true;
i_errorText = text;
}
public void resetError()
{
i_containsError = false;
i_errorText = null;
}
public void setMandatory(boolean value) { i_mandatory = value; }
}
In the constructor of “ComponentAdapterByAnnotationForBeanProperty” you pass:
The component attribute that is bound by the bean-property (e.g. in case of a FIELD this would be “text”)
The bean or an interface to access the bean
The property of the bean that is bound
All the rest is the same as with “ComponentAdapterByAnnotation”.
Please take a look into the demo workplace, section “Adapter Binding” to see an example of using this class in the context of a complete page bean.
Since update 20210310 there is an extended version “IComponentAdapterBinding2”. This version provides a method...
public void initComponent(IBaseComponent component);
...that you can implement. The method passes the component into the adapter binding that actually is referring via expression to the adapter binding. As result you can influence the inner functions of your implementation to specific requirements of the using component.
Please pay attention: the component is passed during the render-phase of the request processing!
In dynamic scenarios it is useful to store component adapter instances within a page bean inside a Map-instance. Example:
public class XyzUI extends PagebBean
{
public class MyAdapter extends ComponentAdapterByAnnotation
{
...
}
Map<String,MyAdapter> m_adapters = new HashMap<String,MyAdapter>();
public XyzUI()
{
m_adapters.put(“firstName”, new MyAdapter(...));
m_adapters.put(“lastName”, new MyAdapter(...));
}
...
public Map<String,MyAdapter> getAdapters() { return m_adapters; }
}
In this case the layout definition's components refer to this map in the following way:
...
<t:field adapterbinding=”#{d.XyzUI.adapters.firstName}” .../>
...
<t:field adapterbinding=”#{d.XyzUI.adapters.lastName}” .../>
...
The page bean class has to provide for the proper instances of the adapter and has to register this instance in the adapters-map.
This scenario can be simplified by using Map-implementations with a lazy loading concept. This means: the get()-method of the Map-implementation checks if the object already is available – and if not requests the creation of the object.
CaptainCasa provides the Map-implementation “LazyLoadingMap” which exactly does this:
public class LazyLoadingMap<VALUECLASS extends Object> extends
HashMap<String,VALUECLASS>
{
public interface ILazyLoader<BEANCLASS>
{
public BEANCLASS lazyLoad(String key);
}
public LazyLoadingMap() { ... }
public LazyLoadingMap(ILazyLoader<VALUECLASS> loader) { ... }
public void setLoader(ILazyLoader<VALUECLASS> loader) {...}
...
}
In case the object is not yet loaded, the map calls the interface ILazyLoader in order to request a correspond instance.
A control binds an attribute to a property of a server-side bean processing. E.g. a CALENDARFIELD binds its CALENDARFIELD-VALUE attribute to the property “#{d.PersonUI.birthDay}”. The user input of the field now needs to be converted into the data type that is behind the “birthDay”-property.
By default there are couple of data types that are supported by CaptainCasa:
java.lang.String
java.lang.Character
java.lang.Boolean
java.lang.Byte
java.lang.Integer
java.lang.Long
java.lang.Float
java.lang.Double
java.math.BigDecimal
java.math.BigInteger
java.util.Date
java.time.LocalDate
java.time.LocalDateTime
java.time.LocalTime
java.sql.Date
java.sql.Time
java.sql.Timestamp
java.util.UUID
This means: the input of a date is internally transferred by the control on client side into a long value (milliseconds from 1970 on). This long value is sent to the server side – and now meets the data type behind the “birthDay” property – which may be of type String, Date, LocalDate, Long, Float, etc.
What happens if your birthDay-property now is not providing a data type which is on the list of simple data types of CaptainCasa?
Example: you may have defined some own date-class “MilitaryDate” in which the date is kept as “YYYYMMDD” String:
public class PersonUI
...
{
public MilitaryDate getBirthDay() { ... }
public void setBirdhDay(MiltaryDate value) { ... }
}
To be able to directly bind e.g. a CALENDARFIELD to this property you need to extend the simple data types that are known to CaptainCasa. You do so by:
implementing a class extending interface “ISimpleDataTypeExtension”
registering the class in “system.xml” configuration file
The interface itself is quite simple:
public interface ISimpleDataTypeExtension
{
/**
* There may be several implementations of this interface which are used
* in parallel - so your implementation is asked if it is responsible for
* a certain data type.
*/
public boolean checkIfClassIsSimpleDataType(Class c);
/**
* The string value coming from the client side needs to be transfered
* into the corresponding simple data type object.
*/
public Object convertStringIntoSimpleDataTypeObject(String value, Class c);
/**
* The simple data type object needs to be transferred into a String value
* that is sent to the client side.
*/
public String convertSimpleDataTypeObjectIntoString(Object o);
}
In case of the example (“MilitaryDate”) your implementation might look as follows:
public class MilitaryDateExtension implements ISimpleDataTypeExtensionDOFW
{
@Override
public boolean checkIfClassIsSimpleDataType(Class c)
{
if (c == MilitaryDate.class)
return true;
return false;
}
@Override
public Object convertStringIntoSimpleDataTypeObject(String value, Class c)
{
if (c == MilitaryDate.class)
{
long l = ValueManager.decodeLong(value,0);
Calendar cal = Calendar.getInstance(TimeZone.getTimeZone("UTC"));
cal.setTimeInMillis(l);
return new MilitaryDate(cal.get(Calendar.YEAR),cal.get(Calendar.MONTH)+1,cal.get(Calendar.DAY_OF_MONTH));
}
return null;
}
@Override
public String convertSimpleDataTypeObjectIntoString(Object o)
{
if (o.getClass() == MilitaryDate.class)
{
Calendar cal = Calendar.getInstance(TimeZone.getTimeZone("UTC"));
cal.clear();
cal.set(Calendar.YEAR,((MilitaryDate)o).getYear());
cal.set(Calendar.MONTH,((MilitaryDate)o).getMonth()-1);
cal.set(Calendar.DAY_OF_MONTH,((MilitaryDate)o).getDay());
return "" + cal.getTimeInMillis();
}
return null;
}
}
The class that you implemented to support “ISimpleDataTypeExtension” needs to be register in the “system.xml” configuration file (eclntjsfserver/config/system.xml):
<system>
...
<simpledatatypeextension classname="demo.util.MilitaryDateExtension"/>
...
</system>
You can register several classes – each one being responsible for some dedicated data types.
You also can directly register your implementation by calling a corresponding API of the class “ValueManager”:
ValueManager.initializeAddSimpleDataTypeExtension(new MilitaryDateExtension());
The direct registration is e.g. useful when using the simple data type mapping as part of JUnit-test scenarios.
...then please check the CCEE documentation: the interface can be extended so that you can also map the data type directly into the database processing.
The normal exception management within the JSF processing is not specified too much – but leaves the exception processing to the servlet container. In order to provide some more “nicer” exception management, the CaptainCasa sever side framework provides some additional functions on top of JSF.
During a server side request life cycle there are three important phases of an application processing:
Data Transfer Phase – this is the phase when values from the user interface client are passed into the server side managed beans (“set-ter methods are called”)
Invoke Phase – this is the phase when action listeners are called
Render Phase – this is the phase when the page is rendered, i.e. when expressions against managed beans are resolved (“get-ter methods are called”).
(Yes, there are some more phases defined in JSF but these are left out here for simplification purpose.)
From consistency point of view the data transfer phase and the invoke phase are most critical:
An exception in the set-phase may result in inconsistency of data because a value that was transferred from the client side could not be transferred into the application.
An exception in the invoke phase may result in inconsistency of data because while updating information within your application processing the processing might have been interrupted by the exception.
The render phase is not as critical because no data is changed within this phase – but data is just being picked.
By default an exception that is thrown by your application processing during the data transfer and the invoke phase leads to an abort of the current processing. The user received an error screen in which the exception information is shown. This error screen can be customized – you find more information about how to define the error screen in one of the following chapters.
By default an exception that is thrown by your application processing during the render phase is ignored – there are some information messages that are registered within the log, that's it.
During the data transfer (“set”) and the invoke (“actionListener”) phase there are the following additional functions:
If an exception occurs within the “set”-method or the “actionListener”-method then the method “onApplicationErrorDuringSet(...)” or “onApplicationError(...)” are called exactly on this object level, on which the “set”-method or “actionListener”-method was called.
If the corresponding method exists and if this method itself does not throw an exception, then the request processing continues. If not then the next upper level of the expression is called with exactly the same methods.
Uuuh, this sounds complex, but indeed isn't. Example:
A button is bound to “#{d.aaa.bbb.onXyz}”. Let's check what happens...:
#{d.aaa.bbb.onXyz} ==> onXyz is called!
!!! onXyz processing throws exception/error
#{d.aaa.bbb.onApplicationError} is called, if available
#{d.aaa.onApplicationError} is called, if available
ä{d.onApplicationError] is called, if available
Please note: the “Walking up the expression stack” is interrupted after the first “onApplicationError” method was processed without throwing an exception/error itself.
The same happens when during the data transfer phase a property is set:
#{d.aaa.bbb.firstName} ==> setFirstName(...) is called
!!!setFirstName processing throws exception/error
#{d.aaa.bbb.onApplicationErrorDuringSet} is called, if available
#{d.aaa.onApplicationErrorDuringSet} is called, if available
ä{d.onApplicationErrorDuringSet] is called, if available
A normal impementation, without using the additional error management may look like:
public void onXyz(ActionEvent event)
{
try
{
...
...
}
catch (RuntimeException r)
{
Statusbar.outputAlert(...);
}
catch (Error e)
{
Statusbar.outputAlert(...);
}
}
With using the optional exception management your code now looks the following way:
public void onXyz(ActionEvent event)
{
...
...
}
public void onApplicationError(ApplicationErrorInfo aei)
{
Statusbar.outputAlert(...);
}
This means: in case a method (“onXyz”) causes an error, automatically a method “onApplicationError()” is called. This method then can then handle the error management, i.e. It may do some output to the status bar.
All information about the original error is passed via the “ApplicationErrorInfo” object.
You may use the interface “IErrorAware” in order to implement the “onApplicationError*” methods on the corresponding object level. (The calling of the methods does not depend on the extension of this interface, so the interface is “just” a helper for implementation purposes.)
package org.eclnt.jsfserver.util;
import org.eclnt.jsfserver.elements.ApplicationErrorInfo;
import org.eclnt.jsfserver.elements.ApplicationErrorInfoDuringSet;
public interface IErrorAware
{
/**
* This method is called in case of an error when a method expression
* is executed during the INVOKE-phase of the JSF processing.
* <br><br>
* In case this method throws an error/ runtime exception itself
* then this error is delegated correspondingly.
*/
public void onApplicationError(ApplicationErrorInfo aei);
/**
* This method is called in case of an error when a set-value-expression
* is executed during the SET-phase of the JSF processing.
* <br><br>
* In case this method throws an error/ runtime exception itself
* then this error is delegated correspondingly.
*/
public void onApplicationErrorDuringSet(ApplicationErrorInfoDuringSet aeids);
}
The default screen that comes up if an error was not caught by the application processing is:

The name of the corresponding page is “/eclntjsfserver/includes/showservererror.jsp”.
You may define your own error screen layout (e.g. copy the original page and modify it). The name of the updated page needs to be passed as client parameter “errorscreen”.
There are certain checks that you may want to do in general, with every request. E.g. check if your application is connected to the database, if a user is logged on, etc. In this case you may define your “out-most” page in the following way:
<t:rowinclude page=”/rescuepage.jsp” rendered=”#{d.appNotOK}”/>
<t:rowinclude page=”/normalpagef” rendered=”#{d.appOK}”/>
“appOK/appNotOK” are booleans that check the health-status of the application. If the application is not healthy anymore then the rescuepage is shown, otherwise the normal application is shown.
There are a couple of interfaces that are considered when a property value is set into a managed bean. The interfaces are executed (if available) during the JSF phase, in that all client side value changes are transferred into the corresponding managed beans (“update phase”).
Who is calling the interfaces? It's the CaptainCasa/JSF environment. JSF allows to bring in own processing in various parts of the normal request processing. E.g. for transferring a value that was changed within the user interface client, there is a so called “property resolver”. CaptainCasa provides own resolvers that provide the additional functions to check for the interfaces that are described within the following text.
Please also check the JavaDoc documentation that is available for the interfaces.
A bean that is updated by the user interface request processing may optionally implement the interface “IPropertyResolverAware”:
package org.eclnt.jsfserver.util;
public interface IPropertyResolverAware
{
public void reactOnSetValue(Object property, Object value);
public void reactOnSetValue(int index, Object value);
}
The interface is used by the so called property resolver: the property resolver is an object within the CaptainCasa JSF processing that is responsible for passing values coming from the user interface client into corresponding beans that are bound by expressions (e.g. “#{d.address.street”). The interface is called after the corresponding value was set.
In case the property resolver updates the property of a bean, it will check if the bean implements the IPropertyResolverAware-interface. If yes, then the corresponding method of the interface is called.
Example: if the value “#{d.address.street}” is set, then the bean behin “#{d.address}” will be checked for the implementation of IPropertyResolverAware.
This interface is similar to IPropertyResolverAware, but not only tells about direct value changes to the current object, but also tells about value changes within a sub-object of the current object.
public interface IPropertyResolverAware2
{
public void reactOnSetValue(String completeExpression,
String propertyName,
Object value);
public void reactOnSetValue(String completeExpression,
int index,
Object value);
public void reactOnSetValueInSubObject(String completeExpression,
Object value);
}
In special situations it is required to change objects coming from the user interface before transferring them into the corresponding object-property. This is when you may use the interface IPropertyValueConverter:
public interface IPropertyValueConverter
{
public Object convertObject(Object property, Object value);
public Object convertObject(int index, Object value);
}
The interface is called before the value is set into the corresponding property. You may update the value within your interface implementation.
While the interfaces IPropertyResolverAware and IPropertyValueConverter operate on the last bean level, the one where the property is set, the interface IValueBindingListener is a more general one. It gets notified whenever a value binding is executed within the JSF phase when values are transferred into the managed beans.
package org.eclnt.jsfserver.util;
public interface IValueBindingListener
{
public void reactoOnValueBindingSet(ValueBinding valueBinding,
Object value);
}
For using the interface, you need to...:
(1) implement a class, that implements the interface
(2) register an instance of the class within the session context
An example is:
// implementation if IValueBindingListener
public class MyValueBindingListener implements IValueBindingListener
{
String m_log = “”;
public void reactoOnValueBindingSet(ValueBinding valueBinding,
Object value)
{
m_log += "IValueBindingListener, Property change: " +
ValueBindingUtil.getOriginalExpressionString
(valueBinding) +
" / " + value + "\n";
}
}
// somewhere in the initialization part of your code:
HttpSessionAccess.setValueBindingListener
(new MyValueBindingListener());
There is an implementation of IValueBindingListener that comes with the CaptainCasa standard delivery: CascadingValueBindingListener. This implementation notifies each object level of an expression that is just set, so that the corresponding level can react.
Example: if a value is passed into “#{d.d_1.PersonUI.firstName}”, then all object levels of the expression are notified:
#{d.d_1.PersonUI}
#{d.d_1}
#{d}
As consequence you can e.g. set flags, in which you keep the information that something has changed within the corresponding object. The notification is done by checking if each object supports interface ICascadingValueBindingListener – the interface is an inner class definition within CascadingValueBindingListener.
In the following example on grid item level this change information is managed by using CascadingValueBindingListener:
package workplace;
import java.io.Serializable;
import org.eclnt.jsfserver.base.faces.el.ValueBinding;
import org.eclnt.jsfserver.base.faces.event.ActionEvent;
import org.eclnt.editor.annotations.CCGenClass;
import org.eclnt.jsfserver.elements.impl.FIXGRIDItem;
import org.eclnt.jsfserver.elements.impl.FIXGRIDListBinding;
import org.eclnt.jsfserver.util.CascadingValueBindingListener;
import org.eclnt.jsfserver.util.HttpSessionAccess;
import org.eclnt.jsfserver.util.CascadingValueBindingListener.ICascadingValueBindingListener;
import org.eclnt.workplace.IWorkpageDispatcher;
@CCGenClass (expressionBase="#{d.DemoCascadingValueBinding}")
public class DemoCascadingValueBinding
extends DemoBase
implements Serializable
{
// ---------------------------------------------------------------
// inner classes
// ---------------------------------------------------------------
public class GridItem
extends FIXGRIDItem
implements java.io.Serializable, ICascadingValueBindingListener
{
boolean m_changed = false;
protected String m_carId;
public String getCarId() { return m_carId; }
public void setCarId(String value) { m_carId = value; }
protected String m_carType;
public String getCarType() { return m_carType; }
public void setCarType(String value) { m_carType = value; }
public boolean getChanged() { return m_changed; }
public void reactOnSetValue(ValueBinding arg0,
ValueBinding arg1,
Object arg2)
{
m_changed = true;
}
}
// ---------------------------------------------------------------
// members
// ---------------------------------------------------------------
protected FIXGRIDListBinding<GridItem> m_grid = new FIXGRIDListBinding<GridItem>();
protected String m_street;
protected String m_lastName;
protected String m_firstName;
// ---------------------------------------------------------------
// constructors
// ---------------------------------------------------------------
public DemoCascadingValueBinding(IWorkpageDispatcher dispatcher)
{
super(dispatcher);
HttpSessionAccess.setValueBindingListener
(new CascadingValueBindingListener());
for (int i=0; i<10; i++)
{
GridItem gi = new GridItem();
gi.setCarType("Volkswagen");
gi.setCarId("HD - BM 666"+i);
m_grid.getItems().add(gi);
}
}
// ---------------------------------------------------------------
// public usage
// ---------------------------------------------------------------
// ---------------------------------------------------------------
// private usage
// ---------------------------------------------------------------
public FIXGRIDListBinding<GridItem> getGrid() { return m_grid; }
}
During a server side request processing the following activities are executed:
Data is decoded from the client request – this is something which is transparent for the business application, i.e. this is done by the JSF components implicitly-
Data is transferred into managed beans (update phase)
“setXyz(...)”
Methods are invoked within beans (invoke phase)
“onXyz(ActionEvent event)”
The page response is rendered (render phase) and sent back to the client. Within this process the components ask the managed beans for their current values.
“getXyz()”
JSF knows some additional phases which are currently not relevant when using CaptainCasa Enterprise Client.
In some cases it makes sense that managed beans are aware of certain JSF phases, that are processed during a request processing. The most important JSF phases that are relevant for CaptainCasa Enterprise Client processing are:
decode phase (request values are applied to JSF component tree)
update phase (data changes are transferred to the managed beans)
invoke phase (actionListeners are invoked)
render phase (the XML for the client is rendered, the JSF component tree is encoded)
Example: values are passed into a status bar in order to be output on client side. But: the values should be automatically set back to initial values, in order to not show the same message again and again.
The base for listening to JSF phases is provided by JSF itself: there is the possibility to register phase listeners within the faces-config.xml file. These phase listeners are called during request processing and can communicate to the application by using the JSF context (FacesContext). Please read more details about this within the JSF documentation.
CaptainCasa Enterprise Client provides a simple mechanism which is based on the JSF phase listener concept that allows to simply attach “Runnables” to the beginning or the ending of certain phases. The interface is pretty simple:
public class PhaseManager
{
...
public static void runAfterRenderResponsePhase(Runnable run) {...}
public static void runBeforeRenderResponsePhase(Runnable run) {...}
...
}
The runnable object is executed at the point of time represented by the method name. Currently the PhaseManager supports “Runnables” that are executed before or after the “render response phase”.
Let's assume you want to output an error information only one time to the client. The coding might look the following way:
public class XYZBean implements Serializable
{
public static class OutputTextClearer implements Runnable, Serializable
{
public void run()
{
m_outputText = “”;
}
}
...
...
public void onSave(ActionEvent event)
{
...
m_outputText = “Error occurred when saving”;
PhaseManager.runAfterRenderResponsePhase(new OutputTextClearer());
...
}
...
...
}
The method “onSave” is called in the invoke phase. After the invoke phase the render phase is processed, in which the XML is built that is sent to the client. At the end of the phase the runnable is called, setting back the outputText-value.
After executing the runnables of one phase, the runnables are removed. Runnables are processed only one time.
In addition to adding “Runnables” by program (previous chapter) you also can add “Runnables” by declaration. There is a component BEANPROCESSING and a component BEANMETHODINVOKER to do so.
Have a look onto the following example:
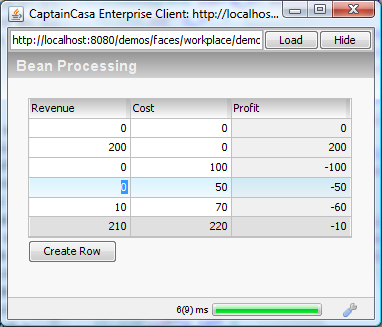
The user can input numbers into the grid. Every time a request is processed on server side, the profit and the aggregated number in the footer line will be updated.
Have a look into the layout definition:
<t:beanprocessing id="g_2" >
<t:beanmethodinvoker id="g_3"
actionListener="#{d.demoBeanprocessing.onUpdateGrid}"
jsfphase="invokeEnd" />
</t:beanprocessing>
<t:rowtitlebar id="g_4" text="Bean Processing" /><t:rowbodypane id="g_5" rowdistance="2" >
<t:row id="g_6" >
<t:fixgrid id="g_7" bordercolor="#C0C0C0" borderheight="1" borderwidth="1"
objectbinding="#{d.demoBeanprocessing.rows}"
rowheight="16" sbvisibleamount="5" >
<t:gridcol id="g_8" text="Revenue" width="100" >
<t:formattedfield id="g_9" align="right" format="int" value=".{revenue}" />
</t:gridcol>
<t:gridcol id="g_10" text="Cost" width="100" >
<t:formattedfield id="g_11" align="right" format="int" value=".{cost}" />
</t:gridcol>
<t:gridcol id="g_12" text="Profit" width="100" >
<t:formattedfield id="g_13" align="right" background="#F0F0F0" enabled="false"
format="int" value=".{profit}" />
</t:gridcol>
<t:gridfooter id="g_14" >
<t:formattedfield id="g_15" align="right" background="#E0E0E0" enabled="false"
format="int" value="#{d.demoBeanprocessing.totalRevenue}" />
<t:formattedfield id="g_16" align="right" background="#E0E0E0" enabled="false"
format="int" value="#{d.demoBeanprocessing.totalCost}" />
<t:formattedfield id="g_17" align="right" background="#E0E0E0" enabled="false"
format="int" value="#{d.demoBeanprocessing.totalProfit}" />
</t:gridfooter>
</t:fixgrid>
</t:row>
<t:row id="g_18" >
<t:button id="g_19" actionListener="#{d.demoBeanprocessing.onCreateRow}"
text="Create Row" />
</t:row>
</t:rowbodypane>
The interesting part is the highlighted one: there is the definition that the method “#{d.demoBeanprocessing.onUpdateGrid}” is executed at the end of the invoke phase. This means: whatever happens in the update or in the invoke phase, this method is processed at the end of the invoke phase.
Have a look into the code of the managed bean:
package workplace;
import org.eclnt.jsfserver.base.faces.event.ActionEvent;
import org.eclnt.editor.annotations.CCGenClass;
import org.eclnt.jsfserver.elements.impl.FIXGRIDItem;
import org.eclnt.jsfserver.elements.impl.FIXGRIDListBinding;
@CCGenClass (expressionBase="#{d.demoBeanprocessing}")
public class DemoBeanProcessing extends DemoBase
{
static int MAX_ROWS = 5;
public DemoBeanProcessing()
{
for (int i=0; i<MAX_ROWS; i++)
{
MyRow r = new MyRow();
m_rows.getItems().add(r);
}
}
public class MyRow extends FIXGRIDItem implements java.io.Serializable
{
protected int m_profit;
public int getProfit() { return m_profit; }
public void setProfit(int value) { m_profit = value; }
protected int m_cost;
public int getCost() { return m_cost; }
public void setCost(int value) { m_cost = value; }
protected int m_revenue;
public int getRevenue() { return m_revenue; }
public void setRevenue(int value) { m_revenue = value; }
}
protected FIXGRIDListBinding<MyRow> m_rows = new FIXGRIDListBinding<MyRow>();
public FIXGRIDListBinding<MyRow> getRows() { return m_rows; }
protected int m_totalProfit;
public int getTotalProfit() { return m_totalProfit; }
protected int m_totalCost;
public int getTotalCost() { return m_totalCost; }
protected int m_totalRevenue;
public int getTotalRevenue() { return m_totalRevenue; }
public void onUpdateGrid(ActionEvent event)
{
m_totalRevenue = 0;
m_totalCost = 0;
m_totalProfit = 0;
for (int i=0; i<MAX_ROWS; i++)
{
MyRow r = m_rows.getItems().get(i);
r.m_profit = r.m_revenue - r.m_cost;
m_totalRevenue += r.m_revenue;
m_totalCost += r.m_cost;
m_totalProfit += r.m_profit;
}
}
public void onCreateRow(ActionEvent event)
{
MyRow r = new MyRow();
m_rows.getItems().add(r);
}
}
In the method all the calculated numbers are re-calculated.
You see: by using the BEANMETHODINVOKER component you can make sure that a certain processing that is relevant for the user interface processing is always called with a certain request processing phase.
This makes programming in many cases much easier and structured. In the example the calling of the “onUpdateGrid()” method makes sure that the calculated numbers are correct – there is no necessity to make sure in a fine-granular way, that every update of numbers needs to also update the calculated numbers.
The CaptainCasa server runtime is based on Java Server Faces (JSF). The expression management (e.g. “#{d.xyz.abc}”) that is part of CaptainCasa is delegated to the expression management of JSF.
In this documentation we only refer to simple expressions:
“#{d.abc.def}” for direct property binding (the property might be a static one with set/get – or might be a map-based one...)
“#{d.abc.list[4]}” for binding to list/array structures
“#{d.abc.map['harry']}” for binding to map
“#{d.abc.map['harry'].list[3].firstName}” - ...all combinations of simple expressions
In general we (strongly) recommend to keep with simple expressions – and at least to be very careful when using more complex expressions, that are provided by the JSF expression management as well.
Exanples for complex expressions are:
“#{d.abc.def] is nice.”
“#{d.abc.def == true}”
“#{d.abc.def + 5}”
“#{d.ab.def + d.abc.ghi}”
There are three reasons:
Structural: first it is nice to keep any type of logic in one place (in the code) and not to have logic distributed over several instances... If a LABEL shows some wrong value, you have to check or debug the code – and do not have to analyze complex expressions that are executed in front of the code. Of course this may have the consequence that you have to create some more properties within your code – but again: you know where to go to if things are not working...
Performance: CaptainCasa comes with an own expression resolver which is optimized for simple expressions. This resolver is much faster than the default expression resolver. If you only have “some” properties to be resolved, than you will not run into trouble. But if you e.g. have a grid with 20 rows and 50 columns, then the number of resolutions per roundtrip is high – and then the difference will become feel-able.
Problems with expression replacements: CaptainCasa uses expression replacement in certain areas:
in the grid/repeat processing
in the workplace processing
in the managed bean processing.
Expression replacements update the original expression that is defined in the JSP-XML definition and adapt the original expression to the concrete situation. If complex expressions are not defined in an adequate way, the expression replacement might fail and the binding between page components and server side objects will fail.
Let's take a look into expression replacements in order to check, what type of complex expressions are possible (though not recommended...!).
In the grid area, a grid binds to some FIXGRIDBinding instance via its attribute OBJECTBINDING (e.g. “#{d.abc.grid}”). Inside the grid columns the expression typically starts with a dot-notation (e.g. “.{firstName}”. At runtime the grid iterates through the visible grid items and replaces the leading “.{“ of the column expression with the corresponding row of the grid-expression. The result for example is: “#{d.abd.grid.rows[0].firstName}”.
If the expression of the grid column is “.{firstName} xxx” then the result will be “#{d.abd.grid.rows[0].firstName} xxx”, which is fine.
If the grid column expression does NOT start with “.{“ (e.g. “xxx .{firstName}”) then the replacement will not succeed and the concatenated expression is not correct. The same happens if having multiple expressions inside the grid column expression (e.g. “.{revenue – cost}”)
In the workplace area the leading “#{d.” of the expressions is replaced by the corresponding sub-dispatcher that a workpage belongs to. Example: “#{d.abc.def}” is changed to “#{d.d_1.abc.def}”. The effect here: all the beans running in the scope of a dispatcher are automatically running in the scope of an isolated sub-dispatcher. - Similarly to the grid management, only expressions that really start with “#{d.” are updated – expressions consisting out of several property references are not correctly updated (e.g. “#{d.abc.revenue – d.abc.cost}”).
In the managed bean processing the root expression of a page is the one that is replaced by the current bean's expression. Example: in a managed bean there is an expression “#{d.person.firstName}”, the bean's root expression is “#{d.person}”. Now this bean is used in the department bean, e.g. to include the person-screen of the department's leader. The expression for including the page bean is “#{d.department.leader}”.
In the fully scenario “#{d.person” of the included screen is replaced with “#{d.department.leader” so that the full expression is “#{d.department.leader.firstName}”.
Again: expressions must start with “#{d.person” in order to be replaced. Expressions with two property references will fail (“#{d.person.salary + d.person.bonus”) because only the first property reference starts with a “#{d.person”.
The first consequence is: keep yourself out of the game of complex expressions!!! You see: this is the only chapter of the documentation mentioning them at all...
If you want to use complex expressions only use these ones...
...starting with “#{“ of with “.{“
...not holding additional references two, where the second one does not hold a leading “#{“ or “.{”
If you want to use complex expressions: do not use them in the grid column processing for server performance reason.
This issue is such important that we spend this own chapter for it. Please note: the management of date/time values is not only a user-interface-issue, but an issue that affects the whole application – including the application logic and the database management!
There are the following controls to enter or display date/time values:
CALENDARFIELD (which is a FORMATTEDFIELD with additional calendar popup)
FORMATTEDFIELD
CALENDAR
LABEL
All these controls behave the same way when it comes to transferring date/time values into a user-readable representation.
Date values are internally passed as long values from the server to the client processing. The long value is the one that represents the Milliseconds from 1st of Jan 1970 on – i.e. the one that is also used within the normal date management in Java.
In order to transfer the internal long value into some visible date the client control needs to know the time zone, that the long-value refers to. All the date/time-components as consequence provide two attributes – the one for passing the date value, the other for passing the time zone:
LABEL: TEXT / TIMEZONE
FORMATTEDFIELD/CALENDARFIELD: VALUE / TIMEZONE
CALENDAR: VALUE / TIMEZONE
This is the “traditional” way of defining Java-date/time-values:
Example:
<t:calendarfield value=”#{d.XyzUI.start}” timezone=”CET”/>
The server side Code looks like:
import java.util.Date;
public class XyzUI
{
...
Date m_start;
public Date getStart() { return m_start; }
public void setStart(Date value) { m_start= value; }
...
}
The timezone-value is the normal ISO code of the time zone, that is the one that is also managed within the Java-Timezone-class.
You can use the straight long/Long values instead of Date-values as well:
<t:calendarfield value=”#{d.XyzUI.start}” timezone=”CET”/>
The server side Code looks like:
import java.util.Date;
public class XyzUI
{
...
Long m_start;
public Long getStart() { return m_start; }
public void setStart(Long value) { m_start= value; }
...
}
Since Java 8 there is a set of “new” date/time classes, that unburden the developer from managing time zones. LocalDate/LocalDateTime are not representing a specific point of time at a specific location of the world – but refer to a general business date which is independent from time zones.
CaptainCasa internally transfers the value of LocalDate/LocalDateTime objects as long-value to the client, referring to UTC timezone. Instead of writing “UTC” you simple can use timezone “LOCAL”.
<t:calendarfield value=”#{d.XyzUI.start}” timezone=”LOCAL”/>
The server side Code looks like:
public class XyzUI
{
...
LocalDate m_start;
public LocalDate getStart() { return m_start; }
public void setStart(LocalDate value) { m_start= value; }
...
}
You always MUST pass some time zone value into the client side control processing! Also when using LocalDate/Time you need to tell the client by referring to the pseudo-time-zone “LOCAL”.
This is the “direct” way. You can directly set the time zone within the TIMEZONE attribute:
<t:calendarfield value=”#{d.XyzUI.start}” timezone=”CET”/>
Of course you can bind the TIMEZONE-value to some expression:
<t:calendarfield value=”#{d.XyzUI.start}” timezone=”#{d.XyzUI.timeZone}”/>
The implementation of the binding is completely up to you:
public class XyzUI
{
...
public String getTimeZone()
{
return TimeZone.GMT;
or:
return TimeZone.getDefault().getID();
or:
return MyApplicationConfig.getApplicationTimeZoneId();
or:
return “LOCAL”;
or:
...
}
...
}
It is also possible to set the time zone for the whole client centrally within the user-session – instead of doing it within each control definition.
To do so call the API “Client.instance().setTimeZone(...)” within the start-up of a user-dialog-session. A good point of time to do so is the constructor of your Dispatcher-class:
public class Dispatcher()
{
public Dispatcher()
{
Client.instance().setTimezone(...);
}
}
Now you can simply define the controls without explicitly defining the TIMEZONE attribute:
<t:calendarfield value=”#{d.XyzUI.start}”/>
If explicitly setting the TIMEZONE attribute this will over-rule the centrally defined value.
If not taking care of the time zone at all, then the client will always refer to the time zone that is defined by the browser environment.
Which means: a user in the US will see and enter Date/Time values with a different timezone than the user in Europe or Asia. This typically is only reasonable in very rare cases and typically causes quite some confusion on application processing side.
Example:
In a CALENDARFIELD component a user in Great Britain defines the 01st of January 2020. As consequence the date will be passed as long value representing “2001-01-01 00:00:00 GMT”.
If a user in the US, e.g. New Your, does the same data input then the date will be passed as long value representing “2001-01-01 06:00:00 GMT”
During “normal” testing you typically have straight forward situations in which the Java-server is located at the same location as the browser clients. So the time-zone-defaults for date management within the server and the defaults within the client do match. - This “normal” scenario of course needs to be the normal scenario on your users' side, where you in particular do not have any influence on the locale settings within the browser.
A strategy how to deal with date/time values is not driven by the user interface – but is some strategy for your complete application! - And: there are many strategies... So the following chapters only are some proposals, which may trigger the discussion on your side.
The scenario is:
Your application does NOT treats dates as accurate point of times at a certain location – but treats dates as definition which is independent from time-zone thinking.
Your application is using Java 8 or later.
Proposal:
Use LocalDate/Time everywhere.
Centrally define “LOCAL” to be used as client time zone
<t:calendarfield value=”...” /> <= no timezone definition required
Client.instance().setTimezone(“LOCAL”);
The scenario is the same as the previous one, but you are a Java version below Java 8.
Proposal:
Use Date everywhere.
Centrally define “UTC” to be used as client time zone
<t:calendarfield value=”...” /> <= no timezone definition required
Client.instance().setTimezone(“UTC”);
The scenario is:
Your application does treat dates as point of times that should be interpreted in a different way, dependent on the time zone of the user.
Proposal:
Use Date everywhere.
Centrally define the time zone in the user session, e.g. after the logon of the user. The time-zone may be selected as part of the logon-process.
<t:calendarfield value=”...” /> <= no timezone definition required
Client.instance().setTimezone(...timezoneOfLogon...);
The scenario is:
Your application does treat dates as point of times that should be interpreted by using different time zones within one user session.
Proposal:
Use Date everywhere.
Centrally define the default time zone in the user session, e.g. after the logon of the user. The time-zone may be selected as part of the logon-process.
<t:calendarfield value=”...” /> <= no timezone definition required
Client.instance().setTimezone(...timezoneOfLogon...);
In screens in which you do not want to use the default time zone of the user-session, explicitly define the time zone of the component:
<t:calendarfield value=”...” timezone=”...”/>
On client side an opens source library (“moment.js” - https://momentjs.com) is used for overcoming JavaScript weaknesses in the area of time zone/calendar management. This library supports the following time zones:
Africa/Abidjan, Africa/Accra, Africa/Addis_Ababa, Africa/Algiers, Africa/Asmara, Africa/Asmera, Africa/Bamako, Africa/Bangui, Africa/Banjul, Africa/Bissau, Africa/Blantyre, Africa/Brazzaville, Africa/Bujumbura, Africa/Cairo, Africa/Casablanca, Africa/Ceuta, Africa/Conakry, Africa/Dakar, Africa/Dar_es_Salaam, Africa/Djibouti, Africa/Douala, Africa/El_Aaiun, Africa/Freetown, Africa/Gaborone, Africa/Harare, Africa/Johannesburg, Africa/Juba, Africa/Kampala, Africa/Khartoum, Africa/Kigali, Africa/Kinshasa, Africa/Lagos, Africa/Libreville, Africa/Lome, Africa/Luanda, Africa/Lubumbashi, Africa/Lusaka, Africa/Malabo, Africa/Maputo, Africa/Maseru, Africa/Mbabane, Africa/Mogadishu, Africa/Monrovia, Africa/Nairobi, Africa/Ndjamena, Africa/Niamey, Africa/Nouakchott, Africa/Ouagadougou, Africa/Porto-Novo, Africa/Sao_Tome, Africa/Timbuktu, Africa/Tripoli, Africa/Tunis, Africa/Windhoek, America/Adak, America/Anchorage, America/Anguilla, America/Antigua, America/Araguaina, America/Argentina/Buenos_Aires, America/Argentina/Catamarca, America/Argentina/ComodRivadavia, America/Argentina/Cordoba, America/Argentina/Jujuy, America/Argentina/La_Rioja, America/Argentina/Mendoza, America/Argentina/Rio_Gallegos, America/Argentina/Salta, America/Argentina/San_Juan, America/Argentina/San_Luis, America/Argentina/Tucuman, America/Argentina/Ushuaia, America/Aruba, America/Asuncion, America/Atikokan, America/Atka, America/Bahia, America/Bahia_Banderas, America/Barbados, America/Belem, America/Belize, America/Blanc-Sablon, America/Boa_Vista, America/Bogota, America/Boise, America/Buenos_Aires, America/Cambridge_Bay, America/Campo_Grande, America/Cancun, America/Caracas, America/Catamarca, America/Cayenne, America/Cayman, America/Chicago, America/Chihuahua, America/Coral_Harbour, America/Cordoba, America/Costa_Rica, America/Creston, America/Cuiaba, America/Curacao, America/Danmarkshavn, America/Dawson, America/Dawson_Creek, America/Denver, America/Detroit, America/Dominica, America/Edmonton, America/Eirunepe, America/El_Salvador, America/Ensenada, America/Fort_Nelson, America/Fort_Wayne, America/Fortaleza, America/Glace_Bay, America/Godthab, America/Goose_Bay, America/Grand_Turk, America/Grenada, America/Guadeloupe, America/Guatemala, America/Guayaquil, America/Guyana, America/Halifax, America/Havana, America/Hermosillo, America/Indiana/Indianapolis, America/Indiana/Knox, America/Indiana/Marengo, America/Indiana/Petersburg, America/Indiana/Tell_City, America/Indiana/Vevay, America/Indiana/Vincennes, America/Indiana/Winamac, America/Indianapolis, America/Inuvik, America/Iqaluit, America/Jamaica, America/Jujuy, America/Juneau, America/Kentucky/Louisville, America/Kentucky/Monticello, America/Knox_IN, America/Kralendijk, America/La_Paz, America/Lima, America/Los_Angeles, America/Louisville, America/Lower_Princes, America/Maceio, America/Managua, America/Manaus, America/Marigot, America/Martinique, America/Matamoros, America/Mazatlan, America/Mendoza, America/Menominee, America/Merida, America/Metlakatla, America/Mexico_City, America/Miquelon, America/Moncton, America/Monterrey, America/Montevideo, America/Montreal, America/Montserrat, America/Nassau, America/New_York, America/Nipigon, America/Nome, America/Noronha, America/North_Dakota/Beulah, America/North_Dakota/Center, America/North_Dakota/New_Salem, America/Ojinaga, America/Panama, America/Pangnirtung, America/Paramaribo, America/Phoenix, America/Port-au-Prince, America/Port_of_Spain, America/Porto_Acre, America/Porto_Velho, America/Puerto_Rico, America/Rainy_River, America/Rankin_Inlet, America/Recife, America/Regina, America/Resolute, America/Rio_Branco, America/Rosario, America/Santa_Isabel, America/Santarem, America/Santiago, America/Santo_Domingo, America/Sao_Paulo, America/Scoresbysund, America/Shiprock, America/Sitka, America/St_Barthelemy, America/St_Johns, America/St_Kitts, America/St_Lucia, America/St_Thomas, America/St_Vincent, America/Swift_Current, America/Tegucigalpa, America/Thule, America/Thunder_Bay, America/Tijuana, America/Toronto, America/Tortola, America/Vancouver, America/Virgin, America/Whitehorse, America/Winnipeg, America/Yakutat, America/Yellowknife, Antarctica/Casey, Antarctica/Davis, Antarctica/DumontDUrville, Antarctica/Macquarie, Antarctica/Mawson, Antarctica/McMurdo, Antarctica/Palmer, Antarctica/Rothera, Antarctica/South_Pole, Antarctica/Syowa, Antarctica/Troll, Antarctica/Vostok, Arctic/Longyearbyen, Asia/Aden, Asia/Almaty, Asia/Amman, Asia/Anadyr, Asia/Aqtau, Asia/Aqtobe, Asia/Ashgabat, Asia/Ashkhabad, Asia/Baghdad, Asia/Bahrain, Asia/Baku, Asia/Bangkok, Asia/Barnaul, Asia/Beirut, Asia/Bishkek, Asia/Brunei, Asia/Calcutta, Asia/Chita, Asia/Choibalsan, Asia/Chongqing, Asia/Chungking, Asia/Colombo, Asia/Dacca, Asia/Damascus, Asia/Dhaka, Asia/Dili, Asia/Dubai, Asia/Dushanbe, Asia/Gaza, Asia/Harbin, Asia/Hebron, Asia/Ho_Chi_Minh, Asia/Hong_Kong, Asia/Hovd, Asia/Irkutsk, Asia/Istanbul, Asia/Jakarta, Asia/Jayapura, Asia/Jerusalem, Asia/Kabul, Asia/Kamchatka, Asia/Karachi, Asia/Kashgar, Asia/Kathmandu, Asia/Katmandu, Asia/Khandyga, Asia/Kolkata, Asia/Krasnoyarsk, Asia/Kuala_Lumpur, Asia/Kuching, Asia/Kuwait, Asia/Macao, Asia/Macau, Asia/Magadan, Asia/Makassar, Asia/Manila, Asia/Muscat, Asia/Nicosia, Asia/Novokuznetsk, Asia/Novosibirsk, Asia/Omsk, Asia/Oral, Asia/Phnom_Penh, Asia/Pontianak, Asia/Pyongyang, Asia/Qatar, Asia/Qyzylorda, Asia/Rangoon, Asia/Riyadh, Asia/Saigon, Asia/Sakhalin, Asia/Samarkand, Asia/Seoul, Asia/Shanghai, Asia/Singapore, Asia/Srednekolymsk, Asia/Taipei, Asia/Tashkent, Asia/Tbilisi, Asia/Tehran, Asia/Tel_Aviv, Asia/Thimbu, Asia/Thimphu, Asia/Tokyo, Asia/Tomsk, Asia/Ujung_Pandang, Asia/Ulaanbaatar, Asia/Ulan_Bator, Asia/Urumqi, Asia/Ust-Nera, Asia/Vientiane, Asia/Vladivostok, Asia/Yakutsk, Asia/Yekaterinburg, Asia/Yerevan, Atlantic/Azores, Atlantic/Bermuda, Atlantic/Canary, Atlantic/Cape_Verde, Atlantic/Faeroe, Atlantic/Faroe, Atlantic/Jan_Mayen, Atlantic/Madeira, Atlantic/Reykjavik, Atlantic/South_Georgia, Atlantic/St_Helena, Atlantic/Stanley, Australia/ACT, Australia/Adelaide, Australia/Brisbane, Australia/Broken_Hill, Australia/Canberra, Australia/Currie, Australia/Darwin, Australia/Eucla, Australia/Hobart, Australia/LHI, Australia/Lindeman, Australia/Lord_Howe, Australia/Melbourne, Australia/NSW, Australia/North, Australia/Perth, Australia/Queensland, Australia/South, Australia/Sydney, Australia/Tasmania, Australia/Victoria, Australia/West, Australia/Yancowinna, Brazil/Acre, Brazil/DeNoronha, Brazil/East, Brazil/West, CET, CST6CDT, Canada/Atlantic, Canada/Central, Canada/East-Saskatchewan, Canada/Eastern, Canada/Mountain, Canada/Newfoundland, Canada/Pacific, Canada/Saskatchewan, Canada/Yukon, Chile/Continental, Chile/EasterIsland, Cuba, EET, EST, EST5EDT, Egypt, Eire, Etc/GMT, Etc/GMT+0, Etc/GMT+1, Etc/GMT+10, Etc/GMT+11, Etc/GMT+12, Etc/GMT+2, Etc/GMT+3, Etc/GMT+4, Etc/GMT+5, Etc/GMT+6, Etc/GMT+7, Etc/GMT+8, Etc/GMT+9, Etc/GMT-0, Etc/GMT-1, Etc/GMT-10, Etc/GMT-11, Etc/GMT-12, Etc/GMT-13, Etc/GMT-14, Etc/GMT-2, Etc/GMT-3, Etc/GMT-4, Etc/GMT-5, Etc/GMT-6, Etc/GMT-7, Etc/GMT-8, Etc/GMT-9, Etc/GMT0, Etc/Greenwich, Etc/UCT, Etc/UTC, Etc/Universal, Etc/Zulu, Europe/Amsterdam, Europe/Andorra, Europe/Astrakhan, Europe/Athens, Europe/Belfast, Europe/Belgrade, Europe/Berlin, Europe/Bratislava, Europe/Brussels, Europe/Bucharest, Europe/Budapest, Europe/Busingen, Europe/Chisinau, Europe/Copenhagen, Europe/Dublin, Europe/Gibraltar, Europe/Guernsey, Europe/Helsinki, Europe/Isle_of_Man, Europe/Istanbul, Europe/Jersey, Europe/Kaliningrad, Europe/Kiev, Europe/Kirov, Europe/Lisbon, Europe/Ljubljana, Europe/London, Europe/Luxembourg, Europe/Madrid, Europe/Malta, Europe/Mariehamn, Europe/Minsk, Europe/Monaco, Europe/Moscow, Europe/Nicosia, Europe/Oslo, Europe/Paris, Europe/Podgorica, Europe/Prague, Europe/Riga, Europe/Rome, Europe/Samara, Europe/San_Marino, Europe/Sarajevo, Europe/Simferopol, Europe/Skopje, Europe/Sofia, Europe/Stockholm, Europe/Tallinn, Europe/Tirane, Europe/Tiraspol, Europe/Ulyanovsk, Europe/Uzhgorod, Europe/Vaduz, Europe/Vatican, Europe/Vienna, Europe/Vilnius, Europe/Volgograd, Europe/Warsaw, Europe/Zagreb, Europe/Zaporozhye, Europe/Zurich, GB, GB-Eire, GMT, GMT+0, GMT-0, GMT0, Greenwich, HST, Hongkong, Iceland, Indian/Antananarivo, Indian/Chagos, Indian/Christmas, Indian/Cocos, Indian/Comoro, Indian/Kerguelen, Indian/Mahe, Indian/Maldives, Indian/Mauritius, Indian/Mayotte, Indian/Reunion, Iran, Israel, Jamaica, Japan, Kwajalein, Libya, MET, MST, MST7MDT, Mexico/BajaNorte, Mexico/BajaSur, Mexico/General, NZ, NZ-CHAT, Navajo, PRC, PST8PDT, Pacific/Apia, Pacific/Auckland, Pacific/Bougainville, Pacific/Chatham, Pacific/Chuuk, Pacific/Easter, Pacific/Efate, Pacific/Enderbury, Pacific/Fakaofo, Pacific/Fiji, Pacific/Funafuti, Pacific/Galapagos, Pacific/Gambier, Pacific/Guadalcanal, Pacific/Guam, Pacific/Honolulu, Pacific/Johnston, Pacific/Kiritimati, Pacific/Kosrae, Pacific/Kwajalein, Pacific/Majuro, Pacific/Marquesas, Pacific/Midway, Pacific/Nauru, Pacific/Niue, Pacific/Norfolk, Pacific/Noumea, Pacific/Pago_Pago, Pacific/Palau, Pacific/Pitcairn, Pacific/Pohnpei, Pacific/Ponape, Pacific/Port_Moresby, Pacific/Rarotonga, Pacific/Saipan, Pacific/Samoa, Pacific/Tahiti, Pacific/Tarawa, Pacific/Tongatapu, Pacific/Truk, Pacific/Wake, Pacific/Wallis, Pacific/Yap, Poland, Portugal, ROC, ROK, Singapore, Turkey, UCT, US/Alaska, US/Aleutian, US/Arizona, US/Central, US/East-Indiana, US/Eastern, US/Hawaii, US/Indiana-Starke, US/Michigan, US/Mountain, US/Pacific, US/Pacific-New, US/Samoa, UTC, Universal, W-SU, WET, Zulu
Please check if the time zone that you are using is part of the list of available time zones.
A dialog on the client side is bound to some managed bean on server side – that's the basics of all interaction processing within CaptainCasa Enterprise Client. This chapter tells about the organization of beans on server side – and the integration into the http session management.
A user may open one or several browser instances (e.g. several browser tabs) in which he/she opens up CaptainCasa dialogs
The organization of beans guarantees that each dialog instance is talking to its corresponding server side bean.
The base of all organization is the http-session management which is part of the server side servlet engine (e.g. Tomcat). This http-session management can be used in two ways.
This is the “original way” that CaptainCasa used from its beginning on: the session management is done by using URL-encoding: each URL that is transferred from the server to the client is providing a session information (e.g. “http://......;jsessionid=....”), so that the session is correctly resolved when the client talks back to the server.
The session is built up on server side when the first URL of the dialog hits the server, and from then is kept due to the encoding information within the URL.
In this scenario each dialog instance (browser or browser tab) that is started on the client side resided in its own http session on server side.
The managed beans are resolved in a default way on server side within a session. i.e. if an expression is resolved then the expression is analyzed and resolved using e.g. faces-config.xml as definition point for root expressions.
Simple
...not using cookies! The application still works in environments in which no cookies are allowed at all.
...not using cookies! – Cookies more and more have become the default for session-tracking, especially when integrating CaptainCasa dialogs with other frameworks like single sign on (SSO) frameworks.
The session id is part of the URLs and as such is visible to attackers. Even though we re-check session ids from being high-jacked there is always some discussion on this security issue: auditors just like to see session ids being transferred by cookies...
Because of the disadvantages of the URL-encoding we introduced an updated way of session management with Update 20180416. Now cookies can be used for session tracking (it's the “JSESSIONID” cookie we are talking about). With version 7 of CaptainCasa Enterprise Client we defined the COOKIE way to be the default way for all newly created projects.
Everyone who uses cookies knows that cookies are used across multiple browser instances, so that a cookie-based session is shared across multiple browser instances of one user:
So how to we separate dialog sessions now?
The CaptainCasa JavaScript client is a single page application that talks via “AJAX-requests” to the server side. When starting an instance of this client within a browser page, each instance (the white boxes in the diagram) creates some client-unique identification. This identification, internally referenced as “subpageId” is sent with every communication from the client to the server.
On server side we use some own expression resolver – which is a usage of the default extension interface that is part of Java Server Faces. This means, whenever an expression is resolved (“#{d.Xxxx.Yyyy}”), then it's the own expression resolver that is used.
This expression resolver now checks for the “subpageId” that is available within each request processing – and guarantees that all the root expression objects (e.g. “#{d}”) are resolved as separate instances for each “subpageId”.
So the combination out of...
...some “subpageId” which is communicated and
...some adapted expression resolution
...ensures that the managed beans are properly resolved on server side.
Compatible with all cookie-based scenarios and frameworks (which are default)
Separation between a multi-dialog http-session (e.g. for keeping authentication-information) and dialog-sessions (per browser/browser tab)
Cookies are used... - (for people who do not like them at all...)
Some more understanding required, that there are now two levels of server-side sessions: the http-session that may span several browsers/browser tabs and the “suppage”-sessions that are managed per browser-tab.
The configuration is done by two files:
WEB-INF/web.xml
eclntjsfserver/config/system.xml
For both files there are template files in the webcontentcc-part of the project.
The configuration of “Way 1: Session Management by URL-encoding” is:
web.xml:
...
<session-config>
...
<tracking-mode>URL</tracking-mode>
...
</session-config>
...
system.xml:
...
<sessionmanagement type="URL"/>
...
The configuration of “Way 2: Session Management by COOKIEs” is:
web.xml:
...
<session-config>
...
<tracking-mode>COOKIE</tracking-mode>
...
</session-config>
...
system.xml:
...
<sessionmanagement type="COOKIE"/>
...
There are situations in which you want to store certain objects within the session context. You may compare this to the use of global variables which are bound to one session context.
The http-session is available by calling the function:
HttpSession session = HttpSessionAccess.getCurrentHttpSession();
...
session.setAttribute(“...”,...);
...
Object o = session.getAttribute(“...”);
...
If working in the scenario “Way1” (URL), then there is one http session for each dialog. So you may store data of this dialog instance there as well.
If working in the scenario “Way2” (COOKIE), then one http session is or might be shared across multiple dialog instances (browser tabs). In this case you must only use the http-session for storing information that really is shared between all of the dialog instances.
If working with “Way2” (COOKIE) then there is an additional session context available, which is called “SubpageContext”. This context is arranged below the http-session – and there is exactly one context per dialog instance (browser/browser tab).
This dialog context is available by the function:
SubpageContext spc = HttpSessionAccess.getCurrentSubpageContext();
...
spc.setAttribute(“...”,...);
...
Object o = spc.getAttribute(“...”);
...
You see: the “parking” of information is done through the same methods, but now on a different object.
There is an abstracted interface that allows to just call...:
ISessionAbstraction dialogSession = HttpSessionAccess.getCurrentDialogSession();
...
dialogSession.setAttribute(“...”,...);
...
Object o = dialogSession.getAttribute(“...”);
...
The HttpSessionAccess-function decides – dependent on the configuration of the system – if the session that is returned is an http-session or if it is a subpage-Context. The function ensures that the dialog session that is returned is always the one that is bound to the browser/browser-tab.
This is the recommended way of picking a dialog session, because it is compatible for both the COOKIE and the URL way of managing sessions.
In general the function...
ISessionAbstraction dialogSession = HttpSessionAccess.getCurrentDialogSession();
... delivers the session context that you by default use for binding applications objects. The dialog session is bound to the browser/browser tab instance in which your application is running. If there are multiple tabs then there are multiple dialog sessions.
Storing information at the level of the http session typically is done for selected scenarios only. The most use case: the currently logged on user is stored with the http session, so that – in case of using COOKIE-based session management – the user is known/taken over into newly created browsers/ browser tabs.
Both http-session and dialog-session can be used like maps – you can store any object with a certain key value. As consequence it is important to properly track access to these objects – and not to allow “everyone” to store “any” content.
It typically is a good idea to define one structured object, in which you keep all the data you want to store and access this object centrally, so that you can properly track access/manipulations.
Example:
public class MyDialogSessionContext
{
static final KEY = MyDialogSessionContext.class.getName();
public static MyDialogSessionContext getInstance()
{
MyDialogSessionContext result = (MyDialogSessionContext)
HttpSessionAccess.getCurrentDialogSession()
.getAttribute(KEY);
if (result == null)
{
result = new MyDialogSessionContext();
HTTPSessionAccess.getCurrentDialogSession()
.setAttribute(KEY,result);
}
return result;
}
// all data you want to keep
String m_user;
String m_language;
…
…
}
Starting a dialog session is always simple: it is created when it is required. ;-) This means: when the user starts a corresponding dialog in the browser, then the dialog session is started.
Closing a dialog session is much more interesting – because that's the point of time, when finally all session-related information should be tidied up and released from memory.
By default the client-side processing sends a “last signal” to the server-side when the user leaves the dialog. “Leaving the dialog” can be one of the following:
The user closes the browser / browser tab.
The user navigates to a new URL.
The user reloads the current URL.
This last signal is closing the dialog session on server-side.
The server-side servlet engine monitors the life cycle of a http-session. When an http-session is left without client-activity for a certain duration of time, then the corresponding http-session is closed.
Depending on the configuration of the session management (URL vs. COOKIE) an http-session is reflecting one (URL) or several (COOKIE) dialog sessions. All the related dialog sessions are closed as result.
The configuration of the time out is done in web.xml:
<session-config>
...
<session-timeout>60</session-timeout>
...
</session-config>
If you do not want sessions to be timed out then you may define “-1”.
In some (seldom...!) scenarios you may want a dialog session to be kept active even thought the corresponding browser tab is left by the user. In this case you can over come this default behavior by the following definition in configuration file “system.xml”:
<system>
...
<sessionmanagement
...
autoclose="true"
...
/>
...
</system>
In case of switching off the default behavior you may explicitly define the auto-closing of a session within a dialog by adding the component SESSIONCLOSER into the layout definition.
The invisible control SESSIONCLOSER (below BEANPROCESSING)must be arranged in the outest page (!) of your application. The SESSIONCLOSER sends some signal to the server side when the user leaves the client.
Both http-session and subpage-context provide an “invalidate” method.
The typical reaction on client side after invalidation is that the start-URL is reloaded – and that the user is brought back to the start page as consequence.
If you want to invalidate the current dialog session independent from the session configuration (URL/COOKIE), then use the following function:
HttpSessionAccess.getCurrentDialogSession().invalidate();
Dependent on the configuration this will either invalidate the http-session (URL-scenario) or the subpage-context (COOKIE-scenario).
Let's assume the session time out is configured to be “30 minutes”. This means that the server side removes the session after 30 minutes of inactivity. “Inactivity” means that no request from the client side was executed.
“No request” can mean:
(A) The browser was ended in an abnormal way (e.g. switched off) and no session-close-signal was sent to the serer side as consequence.
(B) Or, more probable: the user did not use the dialog on browser side – the dialog is still shown and active, but the user just did not use it for the last 30 minutes.
If you want to follow the strategy “keep the session open” while the dialog is still present on client-side then use a TIMER component within your layout definition in order to constantly send “still-alive-signals” to the server-side processing.
In this case: the session is not timed out for case (B), but is timed out for case (A).
The TIMER component provides an attribute DURATIONTYPE – so that you can define “always send a timer event after x milliseconds of not having sent any request to the server-side”.
You may want to clean up resources when a session is closed. In this case you need to listen to the closing of the session.
The method...
HttpSessionAccess.getCurrentDialogSession().addListener(...)
...provides the possibility to register an implementation of “IsessionAbstractionListener”:
public interface ISessionAbstractionListener
{
public void reactOnClosed();
}
This method is called at the following point of time:
“Way1” (URL): the http-session that is bound to the dialog is invalidated
“Way2” (COOKIE): the subpage-context that is bound to the dialog is invalidated
Independent from the listener on dialog-session level, there is a listener on http-session level:
HttpSessionAccess.getCurrentHttpSessionListenerDelegator().addReactor
(
“...”, // name of listener
listener, // instance of IHttpSessionClosedReactor
);
The interface IhttpSessionClosedReactor is:
public interface IHttpSessionClosedReactor
{
public void reactOnClosed();
}
This interface may be both interesting in the “Way1” (URL) and “Way2” (COOKIE) scenario.
Each dispatcher instance has a “destroy” method. This method is called when the corresponding dispatcher instance is closed:
The root dispatcher (i.e. the outest dispatcher “#{d}”) is bound to the dialog session that it lives in: the destroy() is automatically called when the dialog-session is closed.
When using the workplace framework then there is a “sub-dispatcher” created per workpage instance:
The workpage dispatchers are bound to the life-cycle of the workpage instance, so their “destroy()” method is called when the corresponding workpage is closed by the user.
Because the same Dispatcher-class is used both for the root-dispatcher and for the workpage-dispatchers you have to find out which level your concrete dispatcher instances has when overriding the destroy()-method:
public class Dispatcher extends WorkpageDispatcher
{
public void destroy()
{
if (getOwner() == null)
{
// this is the rooot dispatcher of the dialog session
}
else
{
// this is the dispatcher of the workpage
}
super.destroy();
}
}
Instead of overriding the destroy() method you may also use an other mechanism: each WorkpageDispatcher instance is bound to a Workpage instance. And a Workpage instance also has a life-cycle listener:
workpage.addLifeCycleListener(...);
public interface IWorkpageLifecycleListener
{
...
public void reactOnDestroyed();
...
}
The life-cycle listeners of the workpage are called by the default destroy()-processing of the corresponding WorkpageDispatcher instance.
All CaptainCasa Enterprise Client use cases are of type “Way 1” (URL) up to update 20180416.
There are several options for you to go:
Stay with “Way 1”. - No problem! You do not have to change/adapt anything, just continue to use the system.
Check and update your system to be able to both use “Way 1” (URL) and “Way 2” (COOKIE), so that you can run using both ways. - This is what we in general recommend to you!
The main difference between the URL-way and the COOKIE-way is that there is some layering between the http-session (which might be spanned across multiple browser instances) and the dialog-session (which exactly represents one browser instance).
Consequence: you need to check all the statements in your code in which you access the session context – and decide, whether you really want to access the http-session context or if you want to access the dialog-session context.
This means:
Search you code for the statement “HttpSessionAccess.getCurrentHttpSession()”
If you really want to access the “potencially-cross-browser-session”, then leave the statement as is, then “getCurrentHttpSession()” is OK.
If you want to access to “dialog-session” then do replace the code:
From:
HttpSession session = HttpSessionAccess.getCurrentHttpSession();
To:
IsessionAbstraction session = HttpSessionAccess.getCurrentDialogSession();
Typically you first are checking these places in your code where you access the session/dialog context for storing data (i.e. you use the “setAttribute(...)” and “getAttribute(...)” method).
Please do not forget to also check all occurances of the “.invalidate()” call. If running in COOKIE-mode then the invalidation of an http-session will not only affect the current dialog the user is working in, but it will affect all dialogs that are opened by one user for your application!
With older projects the context.xml file in the META-INF directory did contain information to not use cookies.
Example for some old and wrong! content:
<?xml version='1.0' encoding='UTF-8'?>
<Context cookies='false'>
</Context>
Please update the file to look like:
<?xml version='1.0' encoding='UTF-8'?>
<Context>
</Context>
Despite the fact that you should program your application in a way that supports both ways (which is easily possible due to “HttpSessionAccess.getCurrentDialogSession()”!), you have to decide for one default way to deliver your application.
Our recommendation / strategy here is:
Go the COOKIE way by default. - It's just more convenient for web scenarios, and you do not have to explain why you go some different way.
Only if you find some good reason NOT to go the COOKIE way, then select the URL way.
The class “HttpSessionAccess” (package “org.eclnt.jsfserver.util”) is a central Facade for accessing a lot of information that is available in the are of session management.
Prominent methods to use are:
“set/getCurrentLocale()” - set/get the session's localization which is the one used in the server side language management
Switch server side localization
“getCurrentDialogSession()” - access to current dialog session
Usage example: store centrally available data that is available for all parts of a browser client
“getCurrentHttpSession()” - access to current http session
Usage example: store authentication information for the current http session
“getCurrentRequest/Response()” - access to current http-request/response
Usage example: access http request parameters, access cookie information
Usage example: write cookies into the response to store certain information on client side
“checkIfInLayoutEditorPreview” - check if this session is opened in the preview of the Layout Editor
Usage example: you may initialize the class within the constructor for isolated preview purposes – so that the runtime object is directly run-able within the preview
Please check the Javadoc-documentation for more information.
Whenever the browser sends a request to the server then the servlet engine (e.g. Tomcat) is the one that starts a corresponding Java request-processing in a certain thread. The strategy of this thread selection is up to the servlet engine. It may for example use a pool of threads that are re-used, so that there is no overloading of the server with too many threads in case of many requests being processed by many browsers.
In general the browser processing of CaptainCasa sends data requests in an ordered way:
A request is sent from the browser.
The browser switches to mode “blocked” so the user cannot interact.
A response is coming from the server.
The response is processed within the browser (e.g. components are updated).
The browser switched to mode “unblocked”.
So, in general, requests are processed one after the next.
But: there are situations in which the browser processing does not wait for the response of a request, but immediately fires the next request. Example:
In a grid there is a click processing and a double click processing: the first request is sent out to the server with the first click - and a second request is directly sent with the seconds click.
In theses situations two requests are hitting the server, both requests belong to the same browser - and as consequence belong to the same dialog session.
Now, the CaptainCasa thread synchronization on server-side takes place: any data request picks a lock from the dialog session and synchronizes its processing by this lock. In other words: there are never two (or more) threads running in parallel for the same dialog session.
Due to the server-side thread synchronization you do not have to pay attention for multi-threading issues within the normal CaptainCasa processing: setting/getting properties of managed beans, processing action listeners etc.
All UI-related objects (e.g. page beans) are managed within a dialog session, one dialog session is never processed by two threads simultanously.
...of course: you have to pay attention to multi-threading when you access central objects within your UI-processing! You always have to be aware of the fact that other browsers' requests are processed in parallel. - But this is out of the scope of the CaptainCasa processing.
Your UI-processing may start own threads, of course. (If this is in sync with JEE-specifications or not: this is some different discussion...!)
If threads that you start access objects that are managed by CaptainCasa (e.g. page beans) then you are in the situation that these objects may be hit by browser requests of the corresponding dialog session.
Example:
You may implement some sophisticated export for a FIXGRIDListBinding - which you push into the processing of some own thread.
In this case the grid may be updated by the user (e.g. the user pressing a sort button and by this triggering a re-arrangement of items) during your export.
As consequence is may be required to synchronized your thread-processing with the normal request-response-processing. This is done by some API “ThreadingSynchronization” that CaptainCasa provides.
The class “ThreadingSynchronization” is internally used by CaptainCasa Enterprise Client to synchronize request-response-threads. You must use this class to now also synchronize your thread processing.
Example:
ThreadingSynchronization
.instance()
.executeSynchronized(dialogSessionId,new Runnable()
{
@Override
public void run()
{
...
...
}
});
Internally the “ThreadingSynchronization” uses a Java “ReentrantLock” object, that you can also access by some low level API:
ReentrantLock syncher = ThreadingSynchronization
.instance()
.getSynchObject(dialogSessionId);
try
{
syncher.lock();
...
...
}
finally
{
syncher.unlock();
}
There is a special document taking care of fail over management. Please check the documentation area of https://www.CaptainCasa.com.
The resources that we are talking about here, are the resources that are required to build the layout content of a dialog. These include:
The layout definitions (*.jsp/.xml)
Images (*.jpg, *.png, ...)
Static HTML pages (*.html)
Static PDF pages (*.pdf)
...and any other resource that is shown as part of the dialog within the browser.
Up to version 20200825 CaptainCasa followed the classical way of storing these resources: resources were part of the web-content.
Example: when following the standard CaptainCasa project layout then there is a “webcontent” directory in which the resources are kept:
<project-directory>
/src
/webcontent
/images
/icons
back.svg
save.svg
/pages
outest.jsp
logon.jsp
/webcontentbuild
/webcontentcc
Example: when following the Maven project layout thent there is a “webapp” directory in which the resources are kept:
<project-directory>
/src
/main
/java
/resources
/webapp
/images
/icons
back.svg
save.svg
/pages
outest.jsp
logon.jsp
...
Resource files are referenced from the web-content directory's perspective.
Example: “/images/icons/back.svg” points to the image file that is shown in the previous text.
Since version 20200825 you can store resources in the classes as well – so that they are loaded by the Java classloader.
Example: When following the standard CaptainCasa project layout then there is a “src” directory in which the all Java-class related issues are stored. Now you can also store the resources within the directory being part of any package that you select:
<project-directory>
/src
/com
/xyz
/images
/icons
back.svg
save.svg
/pages
outest.jsp
logon.jsp
/webcontent
/webcontentbuild
/webcontentcc
Example: when following the Maven project layout then there is a “resources” directory in which the Java-related resources are kept:
<project-directory>
/src
/main
/java
/resources
/com
/xyz
/images
/icons
back.svg
save.svg
/pages
outest.jsp
logon.jsp
/webapp
...
In both examples the resources are part of the Java compilation/build process and are stored e.g. in some /classes file or in some .jar file as result.
Resource files are referenced with their full package name and resource name:
Example: “/com/xyz/images/icons/back.svg” points to the image file that is shown in the previous text.
From development and logical runtime point of view both ways are the same: you store resources “somewhere” and you reference them. - There is no significant difference in quality or speed of access.
The difference comes when working in projects which are separated into diverse sub-projects.
Example: in a project you may want to separate some base dialogs (logon, workplace, ...) into “base”-project and you may want to have some own project for each area of the application (“masterdata”-project, ...).
When working with “web-content” based way of storing resources then the integration of projects always means that you have to...
1. include the jar-files (in order to include the logic)
2. copy over the web-resource files (in order to make the resources available)
When working with “classes” based way of storing resources then there is only one step – you only have to include the jar-files. The integration is much easier and feels much more “natural”.
Both ways of storing resources may coexist within one project. You need to make sure that a resource with a certain reference (e.g. “/images/icons/back.svg”) is either located in the web-content or is located in the classes.
In case of one resource being located at both locations, the “classes”-location is accessed first.
If you worked so far with “web-content”-managed resources then it is very easy to switch over to the “classes”-managed resources: you just have to copy over all the resources from the webcontent directory into the Java-sources directory (or the Java-resources directory) – that's it.
All the references are still the same – and due to the internal sequence of access (“classes”-location accessed first) you can be sure about, that your “webcontent”-based resources are no longer used.
If there is only one project – then things are simple. You may use both ways – there is no great advantage/disadvantage for one of the ways.
If there is a structure of different projects forming one big project at the end – then we clearly recommend to go the “classes”-way.
In the layout editor the two ways of managing resources are reflected by providing the selection between “Web content” and “Sources” at various places.
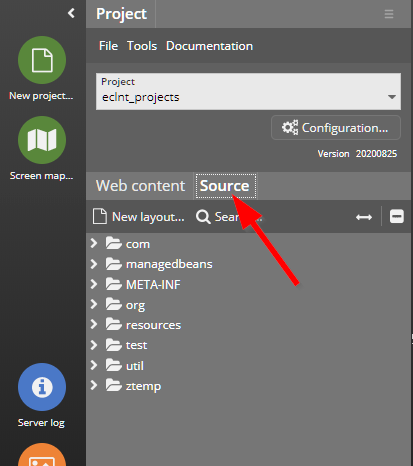
You may either create layouts in the “Web content” section or in the “Source” section. The tree structure below this selection adapts correspondingly.
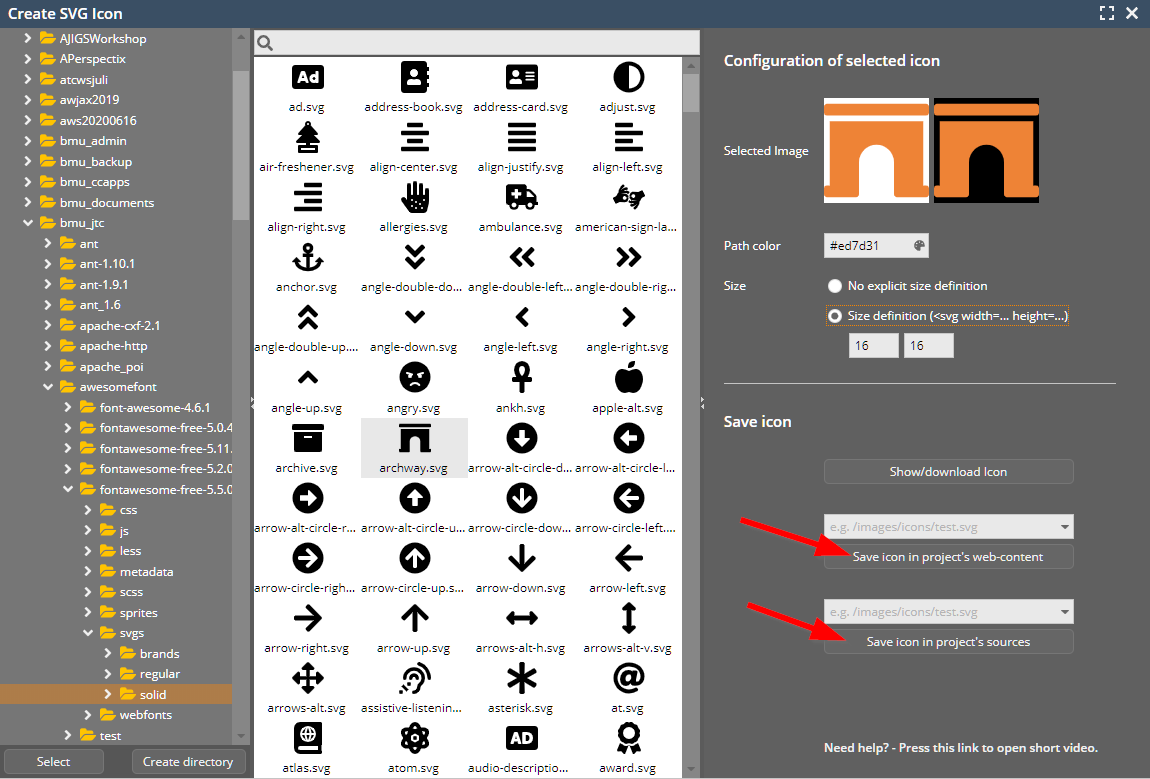
You may store the icons either in the web content or in the sources.
When opening the resource selection e.g. for image-attributes then there is a corresponding selection between “Web content” and “Sources”.
Please be aware of the fact that all resources which are part of your code are accessible by a web-reference.
You may switch off the “classes”-way of accessing resources by the following configuration in “/eclntjsfserver/config/system.xml”:
<system ...>
...
<resourceclassloaderaccess active="false"/>
...
</system>
Resources are identified by their extension. The following extensions are the default ones that are classified to be resources:
*.bmp
*.gif
*.giff
*.htm
*.html
*.jpg
*.jpeg
*.png
*.svg
*.tif
*.tiff
You may extend this list by editing “/eclntjsferver/config/system.xml”:
<system ...>
...
<resourceclassloaderaccess additionalextensions="doc;xls;docx;xlsx"/>
...
</system>
The basic size definitions within a layout are either pixel-based or percentage-based. The size of a physical pixel may of course differ from device to device. As consequence there is some simple possibility to scale the whole dialog – by appending “ccscale=xx” to the URL that starts the application.
The same screen is started first with its normal size, then with a scale of “1.5”:
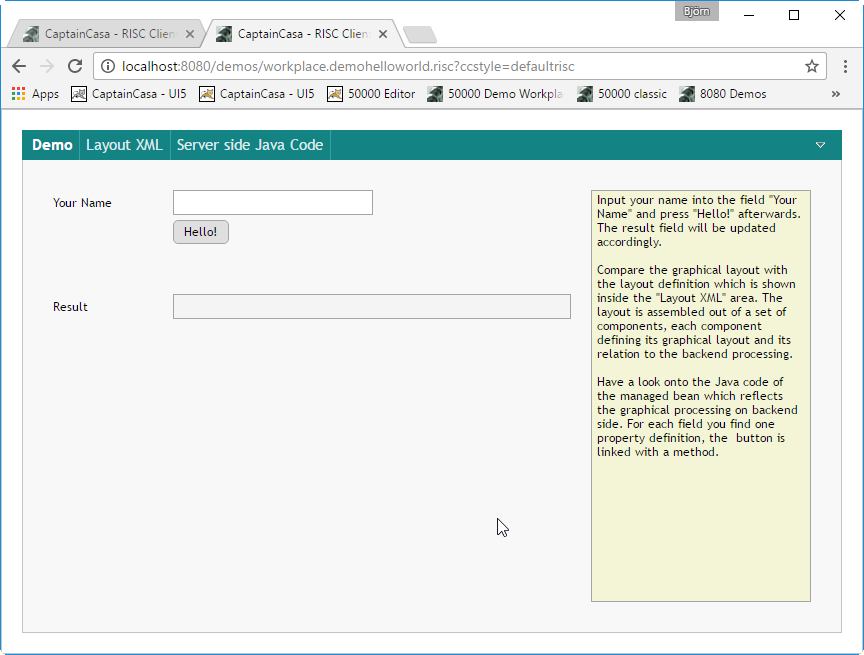
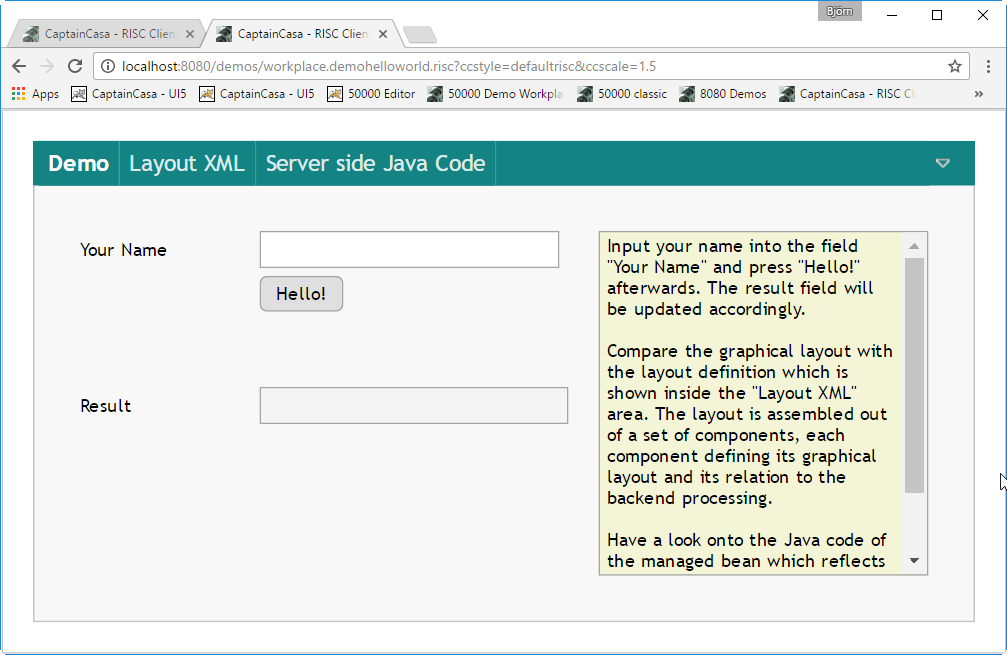
The “ccscale=xx” definition is a query parameter, i.e. it is appended to the URL with “?ccscale=xx” if it is the only parameter, or it is appended with “&ccscale=xx” if it is following another parameter.
Typically it makes sense to set the parameter for tablet and mobile phone scenarios.
The same scale parameter can also be set by using the CLIENTCONFIG component – and using the SCALE attribute there. If setting the parameter via CLIENTCONFOG then this will override the definition of the URL-parameter.
Within the Demo Workplace there is a separate chapter “Container Controls > Adaptive Containers”. Please check the examples there in addition to reading this text.
The special row component ROWFLEXLINECONTAINER allows to arrange a sequence of contained controls. The controls are horizontally listed – one after the other. If there is no sufficient horizontal space, then a “line break” is done, and the controls are arranged in a second (or third or fourth...) line.
In the following example the images are arranged in two lines...
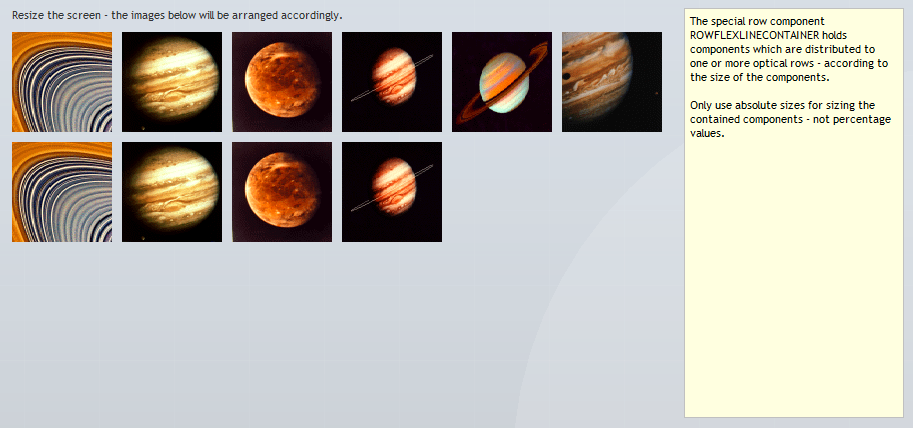
...or in three lines...
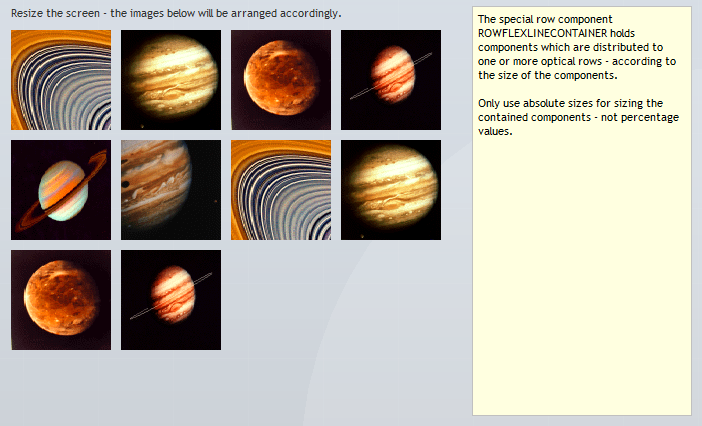
...dependent on the size of the screen.
The corresponding XML is:
<t:rowflexlinecontainer id="g_4" coldistance="10" rowdistance="10">0
<t:image id="g_5" height="100" image="/images/pictures/photo0.gif"
keepratio="false" width="100" />
<t:image id="g_6" height="100" image="/images/pictures/photo1.gif"
keepratio="false" width="100" />
<t:image id="g_7" height="100" image="/images/pictures/photo2.gif"
keepratio="false" width="100" />
<t:image id="g_8" height="100" image="/images/pictures/photo4.gif"
keepratio="false" width="100" />
<t:image id="g_9" height="100" image="/images/pictures/photo5.gif"
keepratio="false" width="100" />
<t:image id="g_10" height="100" image="/images/pictures/photo6.gif"
keepratio="false" width="100" />
<t:image id="g_11" height="100" image="/images/pictures/photo0.gif"
keepratio="false" width="100" />
<t:image id="g_12" height="100" image="/images/pictures/photo1.gif"
keepratio="false" width="100" />
<t:image id="g_13" height="100" image="/images/pictures/photo2.gif"
keepratio="false" width="100" />
<t:image id="g_14" height="100" image="/images/pictures/photo4.gif"
keepratio="false" width="100" />
</t:rowflexlinecontainer>
Please note: all components that are defined in the row should not be defined with a percentage width or height definition!
While the ROWFLEXLINECONTAINER arranges its content row by row, the ROWFLEXCOLUMNCONTAINER arranges its content column by column.
Example: the following content is filling up 2 ½ columns for a certain size:
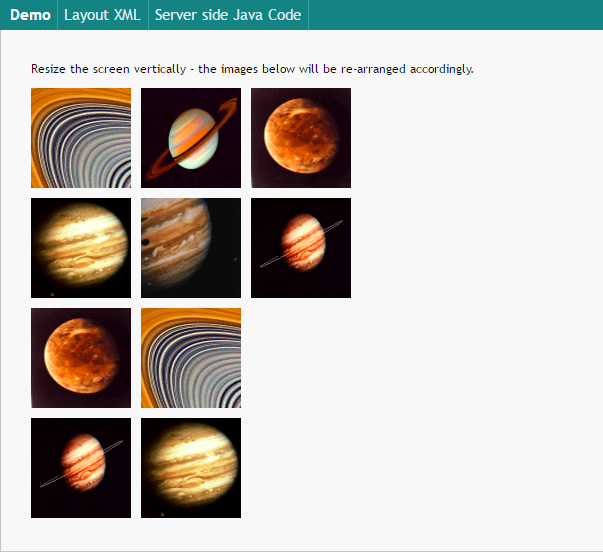
When the size is decreased then the content is rearranged correspondingly, so that more columns are filled:
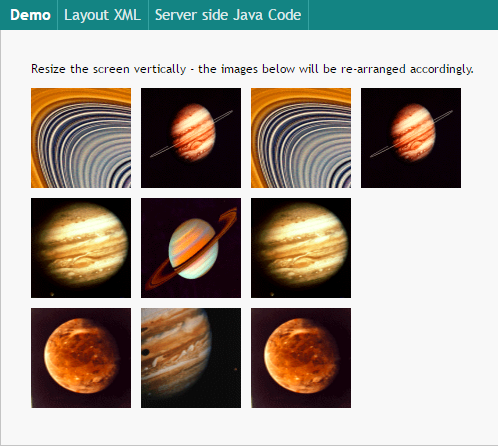
The programming of the ROWFLEXCOLUMNCONTAINER is exactly the same as the programming of the ROWFLEXLINECONTAINER.
...this container is such important that we created some own “main chapter” within this documentation! - Please check the subsequent chapter for details.
The ROWADPATIVEAREA is a very generically usable component: it holds any number of items (ROWADAPTIVEAREAITEM component), which it arranges to defined rules.
Within the ROWADAPTIVEARAE there is an attribute ADAPTIVECATEGORIES which is used to define certain categories of width definitions.
Example: the definition “narrow:400;normal:800;wide:1200” defines three width categories:
“narrow” for up to 400 pixels of width
“normal” for up to 800 pixels of width
“wide” for up to 1200 and more pixel of width
Within the ROWADAPTIVEAREA component you define any number of ROWADAPTIVEAREAITEM components, which themselves are “normal” container components.
The ROWADAPTIVEAREAITEM component provides two important attributes:
ADAPTIVEWIDTHS: this attribute holds the width that the item should hold – dependent from the width category. E.g. you may define “wide:400;normal:50%;narrow:100%”.
You see: per adaptive category there is one width definition. You may use both pixel and percentage width definitions.
ADAPTIVEBREAKS: this attribute holds the definition if to start a new line with this component or not. Again, the definition depends from the adaptive categories that are defined. E.g. you may define “wide:false;normal:false;narrow:true”.
As result you may define scenarios like the following:

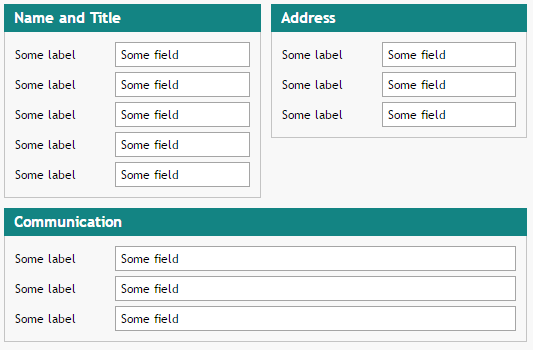
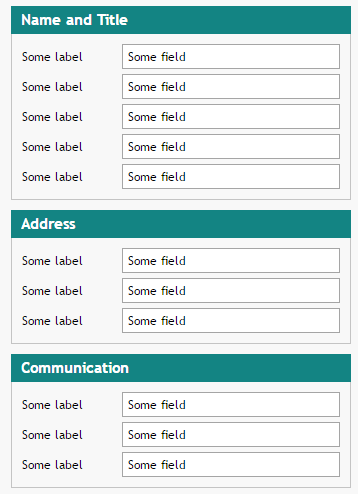
The three items of the scenario are arranged in a different way – dependent from the size that the ROWADAPTIVEAREA obtains.
This component is a quite simple – but a quite useful one: it represents a row, containing any number of contained items. The row provides two attributes:
BREAKPIXELS: this is the definition when the content of the row should be “broken” into two lines.
BREAKINDEX: this is the index of the sub components where the break should be applied
The following definition...
<t:rowadaptiveline id="g_2" breakindex="1" breakpixels="300" >
<t:label id="g_3" text="First name" width="100" >
</t:label>
<t:field id="g_4" width="100%" >
</t:field>
</t:rowadaptiveline>
...represents a scenario in which the line is broken in front of the FIELD if the available horizontal space is lower than 300.
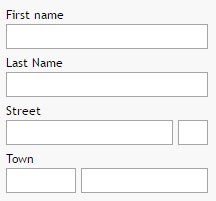
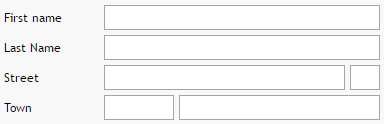
The principle is quite simple: in a typical form you have different content areas, each one having some individual size:

When arranging these content areas then the content areas are arranged in some matrix - so that the full form looks structured and the user has vertical and horizontal orientation. The number of matrix columns is defined by the available screen space.
Example: screen space allows rendering of 3 matrix columns:
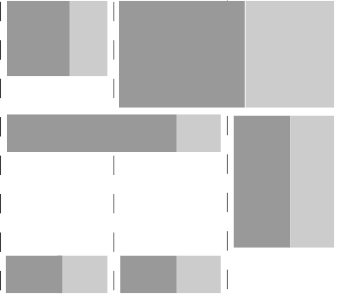
Example: screen space allows rendering of 2 matrix columns:

The strategy for each content item is: it occupies this number of matrix columns that is required by its content. The matrix is filled content by content time - when a content item does not fit into the current matrix row, then a new row is opened.
The following screen shots show some example of a layout definition being rendered with different screen space that is available:
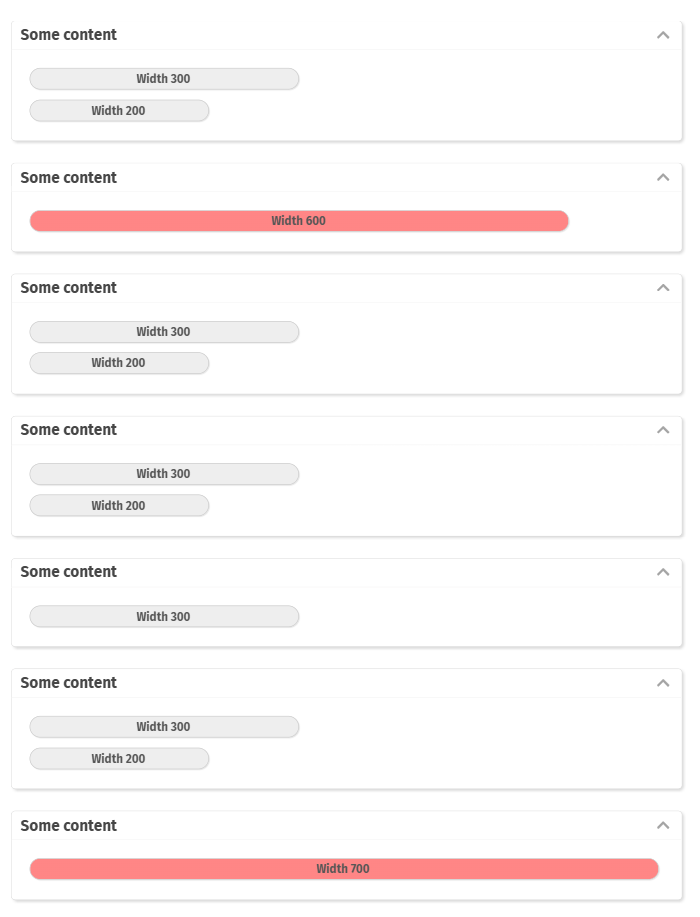
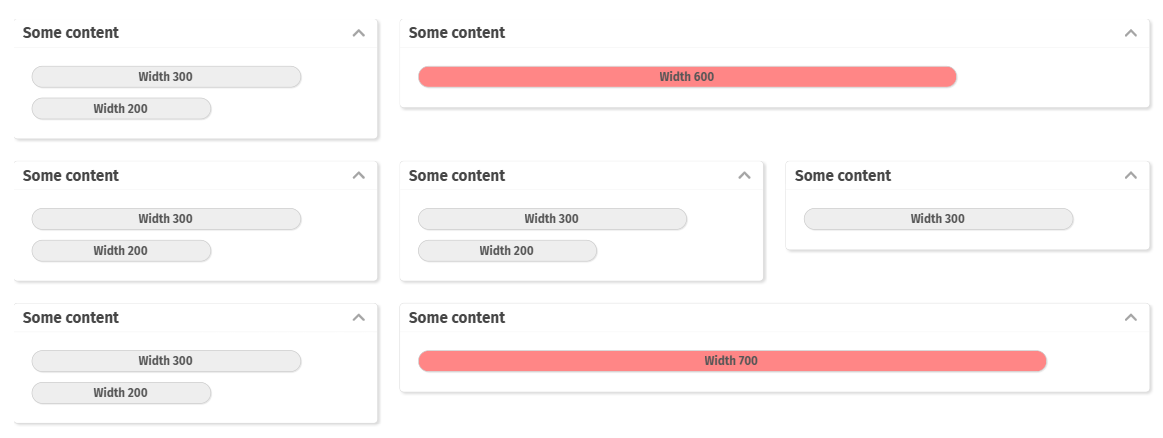
The layout definition is:
<t:rowspanmatrixarea id="g_6"
coldistance="20" matrixwidth="400" rowdistance="20">
<t:foldablepane id="g_8"
rowdistance="#{ccstylevalue['@defaultrowdistance@']}"
stylevariant="ccexposed" text="Some content">
<t:row id="g_102">
<t:button id="g_14" text="Width 300" width="300" />
</t:row>
<t:row id="g_109">
<t:button id="g_110" text="Width 200" width="200" />
</t:row>
</t:foldablepane>
<t:foldablepane id="g_103"
rowdistance="#{ccstylevalue['@defaultrowdistance@']}"
stylevariant="ccexposed" text="Some content">
<t:row id="g_104">
<t:button id="g_105" background="#FF8080"
text="Width 600" width="600" />
</t:row>
</t:foldablepane>
<t:foldablepane id="g_112"
rowdistance="#{ccstylevalue['@defaultrowdistance@']}"
stylevariant="ccexposed" text="Some content">
<t:row id="g_113">
<t:button id="g_114" text="Width 300" width="300" />
</t:row>
<t:row id="g_115">
<t:button id="g_116" text="Width 200" width="200" />
</t:row>
</t:foldablepane>
<t:foldablepane id="g_121"
rowdistance="#{ccstylevalue['@defaultrowdistance@']}"
stylevariant="ccexposed" text="Some content">
<t:row id="g_122">
<t:button id="g_123" text="Width 300" width="300" />
</t:row>
<t:row id="g_124">
<t:button id="g_125" text="Width 200" width="200" />
</t:row>
</t:foldablepane>
<t:foldablepane id="g_117"
rowdistance="#{ccstylevalue['@defaultrowdistance@']}"
stylevariant="ccexposed" text="Some content">
<t:row id="g_118">
<t:button id="g_119" text="Width 300" width="300" />
</t:row>
</t:foldablepane>
<t:foldablepane id="g_127"
rowdistance="#{ccstylevalue['@defaultrowdistance@']}"
stylevariant="ccexposed" text="Some content">
<t:row id="g_128">
<t:button id="g_129" text="Width 300" width="300" />
</t:row>
<t:row id="g_130">
<t:button id="g_131" text="Width 200" width="200" />
</t:row>
</t:foldablepane>
<t:foldablepane id="g_132"
rowdistance="#{ccstylevalue['@defaultrowdistance@']}"
stylevariant="ccexposed" text="Some content">
<t:row id="g_133">
<t:button id="g_134" background="#FF8080"
text="Width 700" width="700" />
</t:row>
</t:foldablepane>
</t:rowspanmatrixarea>
What you see:
Inside the ROWSPANMATRIXAREA there are a couple of content items - each one represented by a FOLDABLEPANE. Inside the FOLDABLEPANE there are just normal components defining the layout and sizing of each item.
There I a definition ROWSPANMATRIXAREA-MATRIXWIDTH which is set to “400”. This is the pixel value which defines the sizing of the column matrix.
If the screen space has a width of e.g. 600px, then one matrix column is rendered - because two matrix columns would exceed the available space.
If the screen space has a width of e.g. 1400px, then 3 matrix columns are rendered.
The content items are placed into this matrix. When being placed the width of each component is set to the width of the matrix columns that are occupied by the component.
By defining attribute COLSPAN on content items a content item can request an explicit number of matrix columns that it wants to occupy. If there are enough matrix columns then the content items is sized accordingly. Otherwise it “only” receives this number of matrix columns which is currently available.
<t:rowspanmatrixarea id="g_6"
coldistance="20" matrixwidth="400" rowdistance="20">
...
...
<t:foldablepane id="g_103" colspan="2"
rowdistance="#{ccstylevalue['@defaultrowdistance@']}"
stylevariant="ccexposed" text="Some content - COLSPAN 2">
...
...
</t:foldablepane>
...
...
</t:rowspanmatrixarea>
Take a look at the following screen shot:

<t:rowspanmatrixarea id="g_6" coldistance="20"
matrixwidth="400" rowdistance="20">
<t:foldablepane id="g_8" ...>
...
...
</t:foldablepane>
<t:foldablepane id="g_103" ...>
...
...
</t:foldablepane>
</t:rowspanmatrixarea>
...
<t:rowspanmatrixarea id="g_116" coldistance="20"
matrixwidth="400" matrixwidthexpand="true" rowdistance="20">
<t:foldablepane id="g_117" ...>
...
...
</t:foldablepane>
<t:foldablepane id="g_122 ...>
...
...
</t:foldablepane>
</t:rowspanmatrixarea>
The definition of the 2 ROWSPANMATRIXAREA is the same - with one difference: int the second ROWSPANMATRIXAREA the attribute MATRIXWIDTHEXPAND is set to “true”. Result: if the matrix-columns do not fill the full available space (because of missing content items) then the matrix-columns are sized to fill the available space. There is no gap left.
Despite all adaptive arrangements you need to consider that the minimum size of the ROWSPANMATRIXAREA is driven by the content items. If you define one content item to have fix size e.g. of 1000px, then this one drives the width of the whole ROWSPANMATRIXAREA!
Always size the content components in a reasonable way - and e.g. use a mixture out of percentage and absolute sizing (e.g. “100%;100”) if you want components to grow with the available screen space they receive.
There is a special control which you can embed into any PANE component and which reports the actual current size of the corresponding PANE to the server side. The component's name is SIZETRANSFER:
PANE
SIZETRANSFER SIZEVALUE='#{...}'
ROW
...
ROW
…
The size of the PANE is passes into the attribute SIZETRANSFER-SIZEVALUE. There are two ways to pass the sizes:
As pixel size (default): this size is transferred as a “x;y” string which directly passes the pixels size of the PANE.
As adaptive category: there are two attributes HORIZONTALCATEGORIES and VERTICALCATEGORIES by which you can define pixel categories (as with the ROWADAPTIVEAREA component). E.g. you may define:
horizontalcategories="narrow:400;normal:800;wide:1200"
If having defined categories then the corresponding size will not be transferred as pixel value but as category value.
Please note: the SIZEVALUE is always set by the client when the size changes (e.g. due to the user resizing the screen, or due to other components changing their size). It does by default not trigger a round trip to the server-side! Like e.g. a normal field, it keeps its values on client side until any other event causes a server side round trip. As with other controls there is the attribute FLUSH: is you set the attribute to “true” then size changes are transferred immediately.
If setting the FLUSH attribute to “true” the we (strongly) recommend to use adaptive categories both for the horizontal and for the vertical size. Then, changes are only transferred if there is a change of the size category – so the number of round trips to the server-side is drastically reduced.
When working with the CaptainCasa Enterprise Client toolset then the normal sequence of operations is:
You define the XML layout definition (.jsp/.xml file), using the Layout Editor. In the layout definition you define the assembly of components and the way they reference to managed beans using expressions.
You implement the managed beans.
The advantage of working this way is: the layout definition is done in a declarative way and it is kept outside the bean processing.
There are situations as well, in which it is difficult to completely specify a layout in a static way, because the layout depends on some logic.
Within a normal page you may define “dynamic areas” which allow to add the components dynamically. A “dynamic area” is represented by some component which binds to some Java processing.
There are two components which are identical from their processing side and which are just used at different places within a layout definition:
The component ROWDYNAMICCONTENT provides the possibility that you dynamically add some XML layout definition directly at the place where the component is located within the layout. The XML is defined by a server side managed bean property.
The component internally opens up a normal ROW component so that all the content that you dynamically place inside is added into this row. Of course you can add any type of component into the dynamic area, e.g. you may add container components (PANE, …) that internally then contain any type of other component.
The Component DYNAMICCONTENT is the same as ROWDYNAMICCONTENT, but it can be used with any other component, that does not provide a container to arrange ROWs inside.
The easiest way to embed dynamic layout into a page is the ROWDYNAMICCONTENT component. The component provides an attribute CONTENTBINDING which points to a server side property.
Example:
<t:row id="g_2">
<t:label id="g_3" width="120" />
<t:label id="g_4" text="Change Content" width="120" />
<t:button id="g_5"
actionListener="#{d.DemoRowDynamicContent.onFlip}" text="Flip" />
</t:row>
<t:rowdistance id="g_6" height="20" />
<t:rowline id="g_7" />
<t:rowdistance id="g_8" height="20" />
<t:rowdynamiccontent id="g_9" contentbinding="#{d.DemoRowDynamicContent.content}" />
<t:row id="g_10">
<t:label id="g_11" width="120" />
<t:label id="g_12" text="Change Content" width="120" />
<t:button id="g_13"
actionListener="#{d.DemoRowDynamicContent.onFlip}" text="Flip" />
</t:row>
In the layout there is a “dynamic row” opened via RODYNAMICCONTENT, the CONTENTBINDING attribute points to a certain managed bean property.
There are two ways of passing the dynamic layout into this property:
as XML string or
as tree of component nodes
The server side implementation shows both ways of usage:
public class DemoRowDynamicContent
...
{
protected ROWDYNAMICCONTENTBinding m_content = new ROWDYNAMICCONTENTBinding();
String m_firstName = "First";
String m_lastName = "Last";
boolean m_toggle = false;
public DemoRowDynamicContent(IWorkpageDispatcher dispatcher)
{
super(dispatcher);
renderDynamically();
}
public ROWDYNAMICCONTENTBinding getContent() { return m_content; }
public void setFirstName(String value) { m_firstName = value; }
public String getFirstName() { return m_firstName; }
public void setLastName(String value) { m_lastName = value; }
public String getLastName() { return m_lastName; }
public void onOK(ActionEvent event)
{
m_firstName = m_firstName + " OK";
m_lastName = m_lastName + " OK";
}
public void onFlip(ActionEvent event)
{
m_toggle = !m_toggle;
renderDynamically();
}
private void renderDynamically()
{
if (m_toggle)
{
// dynamic content via object tree
ComponentNode pane = new ComponentNode("t:pane");
pane.addAttribute("rowdistance","5");
{
ComponentNode row = new ComponentNode("t:row");
pane.addSubNode(row);
{
ComponentNode label = new ComponentNode("t:label");
row.addSubNode(label);
label.addAttribute("text","First Name");
label.addAttribute("width","120");
ComponentNode field = new ComponentNode("t:field");
row.addSubNode(field);
field.addAttribute("text",
"#{d.DemoRowDynamicContent.firstName}");
field.addAttribute("width","120");
}
}
{
ComponentNode row = new ComponentNode("t:row");
pane.addSubNode(row);
{
ComponentNode label = new ComponentNode("t:label");
row.addSubNode(label);
label.addAttribute("text","Last Name");
label.addAttribute("width","120");
ComponentNode field = new ComponentNode("t:field");
row.addSubNode(field);
field.addAttribute("text",
"#{d.DemoRowDynamicContent.lastName}");
field.addAttribute("width","120");
}
}
{
ComponentNode row = new ComponentNode("t:row");
pane.addSubNode(row);
{
ComponentNode distance = new ComponentNode("t:coldistance");
row.addSubNode(distance);
distance.addAttribute("width","120");
ComponentNode button = new ComponentNode("t:button");
row.addSubNode(button);
button.addAttribute("text","OK");
button.addAttribute("actionListener",
"#{d.DemoRowDynamicContent.onOK}");
}
}
m_content.setContentNode(pane); }
else
{
m_content.setContentXml
(
"<t:pane rowdistance='5'>" +
"<t:row>" +
"<t:label text='First/Last Name' width='120'/>" +
"<t:field text='#{d.DemoRowDynamicContent.firstName}' width='120'/>" +
"<t:field text='#{d.DemoRowDynamicContent.lastName}' width='120'/>" +
"</t:row>" +
"<t:row>" +
"<t:coldistance width='120'/>" +
"<t:button text='OK' actionListener='#{d.DemoRowDynamicContent.onOK}'/>" +
"</t:row>" +
"</t:pane>"
);
}
}
}
Have a detailed look onto the highlighted lines of code:
The server side property is a property of type ROWDYNAMICCONTENTBinding.
ROWDYNAMICCONTENTBinding provides a method setContentNode(...)/ setContentNodes(...) and a method setContentXML(...) by which you pass either the node-tree-definition or the XML-string-definition that you want to embed.
The layout definition itself may include static attributes, expressions – just as usual.
That's it. There is nothing more to take into consideration – you see: the dynamic content management basically is just the same as creating the XML definitions in the layout editor – but now by doing it by program.
You also see, that you can update the content of the dynamic content any time by just creating some new component-tree and passing it into the ROWDYNAMICCONTENTBinding instance.
Passing XML directly is the “hardcore” way of using this component – and maybe we only provide this function in order to better demonstrate that it is the same internal processing than the one that you know from static layout definitions.
Of course we 100% recommend to always use the ComponentNode-tree – and not to use the XML-way. Why?
You do not need to take care on the proper building of XML.
You can use extended features in the area of binding (explained later on).
...it is easier to prorgram, especially when using the “concrete classes”
In the example you saw that you can build up a tree structure, consisting of ComponentNode instances. Each instance holds its name (e.g. “t:label”), its attributes and its sub-instances.
Instead of using the generic ComponentNode class you may also use concrete classes: per component there is one class, e.g. there is a class “FIELDNode” for “t:field”. All attributes of the component are available through corresponding set-methods.
…
…
PANENode pane = new PANENode();
pane.setRowdistance("5");
{
ROWNode row = new ROWNode();
pane.addSubNode(row);
{
LABELNode label = new LABELNode();
row.addSubNode(label);
label.setText("First Name");
label.setWidth("120");
FIELDNode field = new FIELDNode();
row.addSubNode(field);
field.setText("#{d.DemoRowDynamicContent.firstName}");
field.setWidth("120");
}
}
…
…
The “concrete” classes are directly inheriting from class “ComponentNode” - so you can use the “concrete way” and the “generic way” in parallel.
In order to reduce the code you have to write for dynamic scenarios you may concatenate the set-methods for a component node:
Instead of...
FIELDNode f = new FIELDNode();
f.setText(...);
f.setWidth(...);
f.setFlush(...);
You may also write:
FIELDNode f = new FIELDNode()
.setText(...)
.setWidth(...)
.setFlush(...);
There are no restrictions of what you can assemble as content and then pass into the ROWDYNAMICCONTENTBinding instance. You may explicitly use:
Any type of “real” components: FIELD, COMBOBOX, …
Any type of container
ROWPAGEBEANINCLUDE, PAGEBEANCOMPONENT, …
Any type of menu components
Invisible components
Of course: the way you assemble the content must reflect a proper component hierarchy – e.g. in a PANE you first need a ROW in which you then can place a FIELD. We recommend to you, to first build up some simple version of what you want to dynamically create in a static way (JSP page) – before transferring it into a dynamic version.
Imagine you want to define a dialog in which you want to render a grid for each employee of a certain cost center – in the grid you may see for example the attendance time of the employee per day.
To do so you have to create some dynamic content in which for each employee a FIXGRID is created. For each grid you need an instance of FIXGRIDListBinding to manage the data of the grid.
The core parts of your program would look like the following:
public class MyPageUI extends PageBean
{
List<FIXGRIDListBinding> m_grids = new ArrayList<FIXGRIDListBinding>();
public List<FIXGRIDListBinding> getGrids()
{
return m_grids;
}
…
…
private void renderContent()
{
m_grids.getItems.clear();
…
int counter = 0;
for (Employee employee: m_employees)
{
FIXGRIDListBinding grid = new FIXGRIDListBinding();
m_grids.add(grid);
…
FIXGRIDNode gridNode = new FIXGRIDNode()
.setObjectbinding(“#{d.MyPageUI.grids[“+counter+”]}”)
.setWidth(“100%”)
…
…;
…
counter++;
}
}
}
You see, it's like doing it in the static definition of a layout: the binding of the grid references to some list of grid, which is available via a “getGrids(...)” method.
Advantage:
Things you do in the dynamic environment are 100% the same as if you did in the static environment.
Disadvantage:
There is some complexity in always having to exactly point with the expression to the corresponding object that fits to the component.
PageBean implementations provide a method “pbx()” for supporting the generation of expressions within your code. “pbx” is a shortcut for “page bean expression”.
When e.g. building the following dynamic content...
public class XyzUI extends PageBean
{
…
FIELDNode f = new FIELDNode();
f.setText(“#{d.XyzUI.someText”);
Button b = new BUTTONNode();
b.setActionListener(“#{d.XyzUI.onButtonAction}”);
…
}
...then you always have to define the full expresion. With using pbx() these parts of the expression are already taken over automatically which are known by the page bean management on its own. So the code now looks like:
public class XyzUI extends PageBean
{
…
FIELDNode f = new FIELDNode();
f.setText(pbx(“someText”));
Button b = new BUTTONNode();
b.setActionListener(pbx(“onButtonAction”));
…
}
This reduces the probability of errors significantly – and the implementation does not have to be updated when e.g. changing the name of the page bean.
To overcome the disadvantages you can use the “direct way” of binding:
public class MyPageUI extends PageBean
{
List<FIXGRIDListBinding> m_grids = new ArrayList<FIXGRIDListBinding>();
…
…
private void renderContent()
{
m_grids.getItems.clear();
…
for (Employee employee: m_employees)
{
FIXGRIDListBinding grid = new FIXGRIDListBinding();
m_grids.add(grid);
…
FIXGRIDNode gridNode = new FIXGRIDNode()
.bindObjectbinding(grid)
.setWidth(“100%”)
…
…;
…
}
}
}
You see: the grid instance is directly bound to the Grid-Node instance. There is no expression that needs to be built up and that 100% needs to match the property structure of the object. - It is also your decision if you require the “m_grids” member at all for some other processing.
The direct binding can be applied to all attributes (except the “id” attribute...). In the concrete component node classes there is a corresponding “bind” method.
It can be directly used for all attributes that bind to some complex object on server side:
Example: FIXGRID-OBJECTBINDING binds to an FIXGRIDListBinding/FIXGRIDTreeBinding instance. So the complex object can be directly passed within the binding-method as shown in the example code.
For attributes pointing to some simple, “primitive” class (String, BigDecimal, …) there are special binding interfaces and default implementations:
IValueDelegation
public interface IValueDelegation<VALUECLASS extends Object>
{
public Class getValueClass();
public void setValue(VALUECLASS value);
public VALUECLASS getValue();
}
… and its inheriting abstract classes: StringDelegation, DoubleDelegation, …
public abstract class StringDelegation implements IValueDelegation<String>
{
public Class getValueClass() { return String.class; }
}
...and its inheriting classes directly holding values: StringValue, DoubleValue
public class StringValue extends StringDelegation
{
String m_value;
public StringValue() {}
public StringValue(String value) { m_value = value; }
public void setValue(String value) { m_value = value; }
public String getValue() { return m_value; }
}
How does code look like when using these objects?
…
…
LABELNode l = new LABELNode()
.setWidth(100)
.bindText(new StringDelegation()
{
public void setValue() {} // not required for LABEL, values is never set
public String getValue()
{
return <your_implementation>;
}
})
.setForeground(“#FF8080”);
…
…
When the LABEL-TEXT attribute of the component is resolved then the corresponding “getValue()” is called transferring your value to the component.
In case of the LABEL-TEXT attribute the implementation of the setValue(...) method is not required, because a LABEL component will never change the text on client side. - In case of using the binding for e.g. a FIELD-TEXT attribute you need to implement both the set- and the get-method.
In the example above you see that we used “LABELNode.bindText(...)” but also used “LABELNode.setWidth(...)”.
You use the “bind...”-way if the value of the attribute might change during the life cycle of the component. Every time the dialog is communicated to the client side as part of the request-response processing the value will be checked for changes.
You use the “set...”-way if the value is fix for the whole life cycle of the component.
It's the same decision that you would within a static layout definition: some attribute you directly set, other attributes – these ones that represent dynamic data - you bind via an expression.
Last but not least: because the “actionListener” is not some value-attribute, but is some attribute pointing to some action-event-processing, there is also a specific binding object:
…
…
BUTTONNode b = new BUTTONNode()
.setText(“OK”)
.setWidth(“100+”)
.bindActionListener(new IActionListenerDelegation()
{
public void onAction(ActionEvent event)
{
…
…
}
});
There is a counter part to the ROWDYNAMICCONTENT component: the DYNAMICCONTENT component.
The simple reason for having two components:
The ROWDYNAMICCONTENT component always is embedded into a layout as a row. It automatically opens up a row so that its content is placed into this row.
The DYNAMICCONTENT component is working in the exact same way as the ROWDYNAMICCOMPONENT, but can embedded into a layout “everywhere”. Example: it can be embedded within a MENUBAR component (where the embedding of a row does not make sense).
The counter part bean property for the DYNAMICCONTENT component is the class DYNAMICCONTENTBinding, offering the exact same interface as ROWDYNAMICCONTENTBinding (actually DYNAMICCONTENTBinding is an “empty extension” of ROWDYNAMICCONTENTBinding).
You may have recognized that in the layout XML that was created dynamically in the example above there was no assignment of id-attributes. When defining a static layout then ids are mandatory attributes – though you will seldom recognized this, because they are generated internally.
The simple rule is: if you do not define ids on your own within your layout XML then the ROWDYNAMICCONTENT component will do this job for you. - But: if you define ids, then you need to pay attention at your own to not assigning the same id twice. Double assignment of ids will result in an ugly error “deep in the JSF functions”... Only assign ids, if you really have a good reason to.
What could be a good reason?
You need to be aware of that an id is the core parameter to indicate at client side that there is no change of the control structure. This means: the client, when executing its delta management when receiving an XML layout from the server, checks components that already were drawn against components coming through the new XML layout by their id. If the id matches, then the client component is continued to be used on client side, if the id does not match then the client component is removed and the new client component is drawn.
This means:
Only call the setContentXML() method when needed, i.e. when you really build up a new XML layout. Do not call it e.g. with every request processing.
When you create quite big layouts in a dynamic way, and when at same point of time only minimal parts of this layout really change then it makes sense to assign the ids by your own, so that the stable parts of what you generate do not always change their id.
Before we start any explanation on the styling of CaptainCasa component, we strongly recommend to you...: use the tool Style Editor, which is part of the CaptainCasa toolset! It drastically simplifies working with the configuration files that are explained in the following sections.
Single component styles can inherit information from some parent component style. Whole Style files can inherit information from parent style files (you extend one style from another one). - All this means that you might have to combine information that resided in several files in order to know how a component actually is styled.
The style editor automatically combines all this information so that you really see what the current style of a certain component is. You clearly see which parameters are inherited, and which are the ones that you explicitly defined.
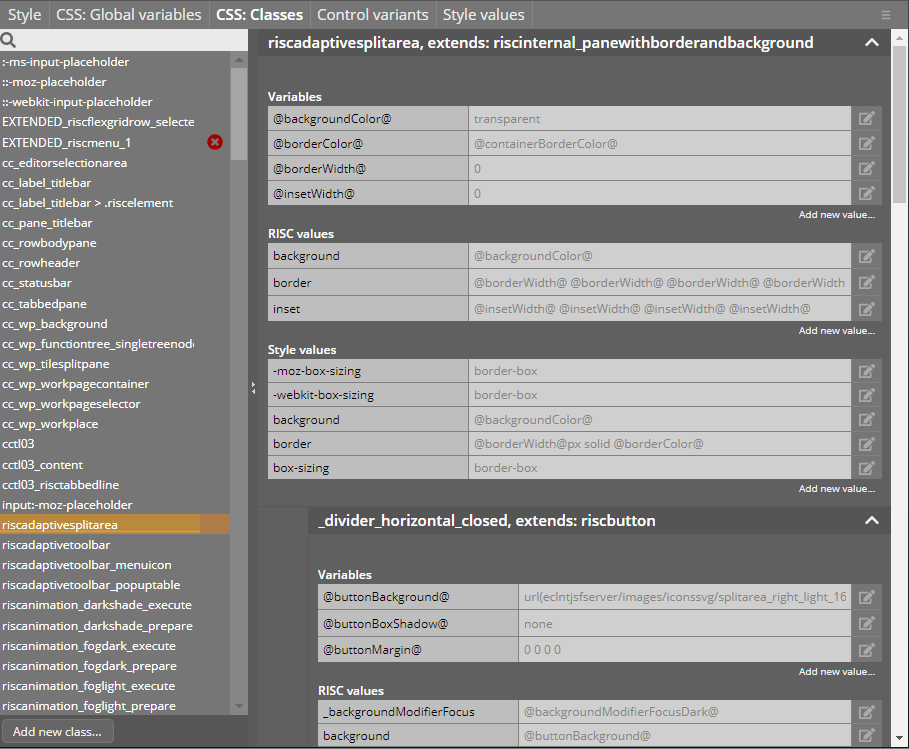
The Style Editor maintains all style configuration files that you will get to know in the next sections – so it is not some “second way” of doning the styleing, but it is exactly working on top of what is explained now.
CaptainCasa Enterprise Client comes with a style concept that provides the following functions:
You may define multiple styles for one and the same application, so that the whole look and feel of the application changes. E.g. CaptainCasa comes with multiple default styles (“defaultrisc”, “ccclassicrisc”, …). The user selects one style when starting the applciation.
Inside one style: you may define multiple style variants per component. E.g. you may have different types of buttons and want to define different style definitions for each button.
Styles are kept within the directory “eclntjsfserver/styles”. Within your project the default styles coming with CaptainCasa are part of the “webcontentcc” directory. If creating own styles then you need to add the corresponding information to the “webcontent” part of your project.
There is one directory per style in which all information for the style is located:
<project>
webcontent(cc)
eclntjsfserver
styles
...
ccclassicrisc
defaultrisc
defaultdarkrisc
...
Inside each style directory there are two files by default:
<project>
webcontent
eclntjsfserver
styles
defaultrisc
riscstyle.xml // name depends from style
style.xml
“style.xml” - This is a CaptainCasa style definition which describes the pre-setting of CaptainCasa attributes within components.
“riscstyle.xml” - This is a CaptainCasa style definition which is the base for the (dynamic) generation of CSS files at runtime.
At runtime there is a .css file and a .js-file that is created per style. Up to version 20190101 these files were explicitly generated as part of the development process. Now these files are dynamically generated out of the XML definitions at run time.
You may still access the definitions through the browser - e.g. the .css-file of a style can be accessed via...
http://<host>:<port>/<webapp>/eclntjsfserver/styles/<stylename>/riscstyle.css
...and the generated CSS file can be accessed via:
http://<host>:<port>/<webapp>/eclntjsfserver/styles/<stylename>/riscstyle.js
Within a component definition there is the attribute STYLESEQ (for “style sequence”). This attribute is the link into the CSS-style management.
Example:
...
<t:button ... styleseq=”riscbutton” .../>
...
The button now explicitly uses the style class “riscbutton” of the .css management. The “defaultrisc” style's riscstyle.xml-definition which looks like:
<class n="riscbutton">
<risc n="font" v=""@fontFamily@" @fontDefaultSize@ @buttonFontWeight@"/>
<risc n="background" v="@buttonBackground@"/>
<risc n="border" v="1 1 1 1"/>
<risc n="margin" v="@buttonMargin@"/>
<risc n="inset" v="@buttonInsets@"/>
<risc n="_backgroundModifierFocus" v="@backgroundModifierFocusDark@"/>
<risc n="_animationAction" v="@backgroundAnimationAction@"/>
<style n="font-family" v="@fontFamily@"/>
<style n="font-size" v="@fontDefaultSize@px"/>
<style n="background" v="@buttonBackground@"/>
<style n="border" v="1px solid @buttonBorderColor@"/>
<style n="border-radius" v="5px"/>
<style n="cursor" v="pointer"/>
<style n="white-space" v="nowrap"/>
<style n="box-shadow" v="@buttonBoxShadow@"/>
<class n=" > .riscelement">
<style n="font-family" v="@fontFamily@"/>
<style n="font-size" v="@fontDefaultSize@px"/>
<style n="font-weight" v="@buttonFontWeight@"/>
<style n="color" v="@buttonForeground@"/>
<style n="cursor" v="pointer"/>
<style n="white-space" v="nowrap"/>
</class>
<class n=".disabled">
<style n="cursor" v="default"/>
<style n="opacity" v="0.4"/>
</class>
<class n=".disabled > *">
<style n="cursor" v="default"/>
</class>
</class>
The XML definition itself is the base for some generated .css-file:
...
...
.riscbutton
{
font-family: Trebuchet MS;font-size: 12px;
background: #DDDDDD;
border: 1px solid #a0a0a0;
cursor: pointer;
white-space: nowrap;
}
.riscbutton > *
{
font-family: Trebuchet MS;
font-size: 12px;
font-weight: normal;
color: #000000;
cursor: pointer;
}
.riscbutton.disabled
{
cursor: default; opacity: 0.4;
}
.riscbutton.disabled > *
{
cursor: default;
}
...
...
So the attribute STYLESEQ is a quite important one! It is the link from the component into the CSS-style.
You may directly assign the STYLESEQ attribute to the component within your layout definition (.jsp/.xml) – or you may indirectly set it by using a CaptainCasa “style.xml” definition.
The “style.xml” is a quite simple file – and contains some configuration about how CaptainCasa presets certain component attributes. Inside the “style.xml” file definitions are done in the following way:
<style>
...
<tag name="button" variant="default">
<set attribute="styleseq" value="riscbutton"/>
</tag>
...
</style>
So every time a BUTTON is created, then automatically the STYLESEQ attribute is preconfigured with value “riscbutton”. You may do this with any other attribute of BUTTON as well.
You may define certain style variants in the style.xml file:
<style>
...
<tag name="button" variant="default">
<set attribute="styleseq" value="riscbutton"/>
</tag>
<tag name="button" variant="popupfooter">
<set attribute="styleseq" value="riscbutton"/>
<set attribute="width" value="150"/>
</tag>
...
</style>
The selection of the style variant is done within the layout definition using attribute STYLEVARIANT. By default the style variant “default” is applied to a control.
...
<t:button ... stylevariant=”popupfooter” .../>
...
As result now the button is preconfigured with STYLESEQ “riscbutton” and with WIDTH “150”.
Within the layout editor the attribute STYLEVARIANT can be set either just as a normal attribute or by some explicit selection:
The attributes that are preconfigured via the style.xml definitions of course can be overridden within your layout definition at any time. Example:
...
<t:button ... stylevariant=”popupfooter” width=”200” .../>
...
In this case the WIDTH definition within the layout definition (.jsp/.xml) is “stronger” than the WIDTH definition in the style (style.xml).
As you can see there are two levels of style management that are applied:
Component-Attribute level (style.xml):
A component provides a set of attributes – the ones that you edit when creating a dialog. By using the component-attribute style c(style.xml), you define one or more style variants. Each style variant contains the information how to preset the component's attributes.
CSS-level (riscstyle.css/.js)
Each control provides the attribute STYLESEQ that points to a style class to be used.
So the base look and feel of the component is coming from the CSS-level. The definition of the CSS level may be overridden by definitions on the Attribute-based style definition (style.xml). And these may finally be overridden by explicit attribute-definitions within the component.
Let's take as example the background color and border of a button which you want to centrally define for all your “Save”-buttons. Inside your dialog definition you want to define...
...
<t:button text=”Save” stylevariant=”savebutton” .../>
...
...so that the concrete definition of how a “Save”-button looks like is kept outside the individual component definition.
There are now – theoretically – two ways to go:
First way: you define the background color and border in the style.xml (component-attribute-level):
...
<tag name=”t:button” variant=”savebutton”
extendstag=”t:button” extendsvariant=”default”>
<set attribute=”background” value=”#C0C0C0”/>
<set attribute=”border”
value=”color:#FF0000;left:2;top:2;right:2;bottom:2”/>
</tag>
...
Inside the style.xml you preset the attributes BACKGROUND and BORDER.
Second way: you define the background color and border in the CSS style definition. This means you create a new style class in the .css file and you reference this class from the component-attribute style:
riscstyle.css:
...
.savebutton
{
background-color: #C0C0C0;
background-border: 2px solid #FF0000;
}
...
style.xml:
...
<tag name=”t:button” variant=”savebutton”
extendstag=”t:button” extendsvariant=”default”>
<set attribute=”styleseq” value=”savebutton”/>
</tag>
...
Which one is the better way?
We definitely recommend to push all look and feel related issues into the CSS styling. This is not only the common way of dealing with HTML – this is also the one which is most efficient from runtime point of view.
You may define a default style for all users:

Open the “Session Defaults” configuration of your project within the layout editor and define the XML file as follows:
<sessiondefaults
...
style="defaultgreenrisc"
...
/>
The XML is stored in “<project>/webcontent/eclntjsfserver/config/sessiondefaults.xml”.
In addition you can select the style by adding URL parameter “ccstyle=<styleName>” to the .ccapplet or .ccwebstart-URL for starting a CaptainCasa Enterprise Client page.
http://localhost:50000/demos/workplace.workplaceRisc.risc?ccstyle=defaultbluerisc
The same can be done at any place where you reference the .jsp/.xml page via URL.
In the CaptainCasa toolset there is a menu item “Create RISC style...”:
Select this menu item. A dialog will appear in which you simply have to define the name of your style and then presse the “Create Style” button. In the following text we will assume the name of your new style is defined as “ownstyle”.
The following files will be created within your project:
<project>
webcontent
eclntjsfserver
styles
ownstyle
riscstyle_ownstyle.xml
style.xml
style.xml is the file that presets the attributes on component level
riscstyle_ownstyle.xml is the base for creating the CSS definition for a style
After having creared the style you may start the style editor by selecting “Edit existing style” from the menu.

Within the style editor you can now set up your own style. The first 3 tabs of the tool are the ones that generate the “riscstyle_<styleName>.xml” definition, which itself is the base for the “.css” generation at runtime.
The principles behind are:
Within the “CSS:Classes” tab you can directly edit the style classes. When editing you always see the style definitions that you inherit from the parent styling. You either can override this styling or add own defintiions.
Inside the class-definitions, variables are used. Variable names follow the pattern “@<variableName>@”. The value of variables is defined in the tab “CSS: Global variabels” on a global leve – but you can also define/override the values on class level.
Some of the most important variables are selected to be shown in the first tab “Style”.
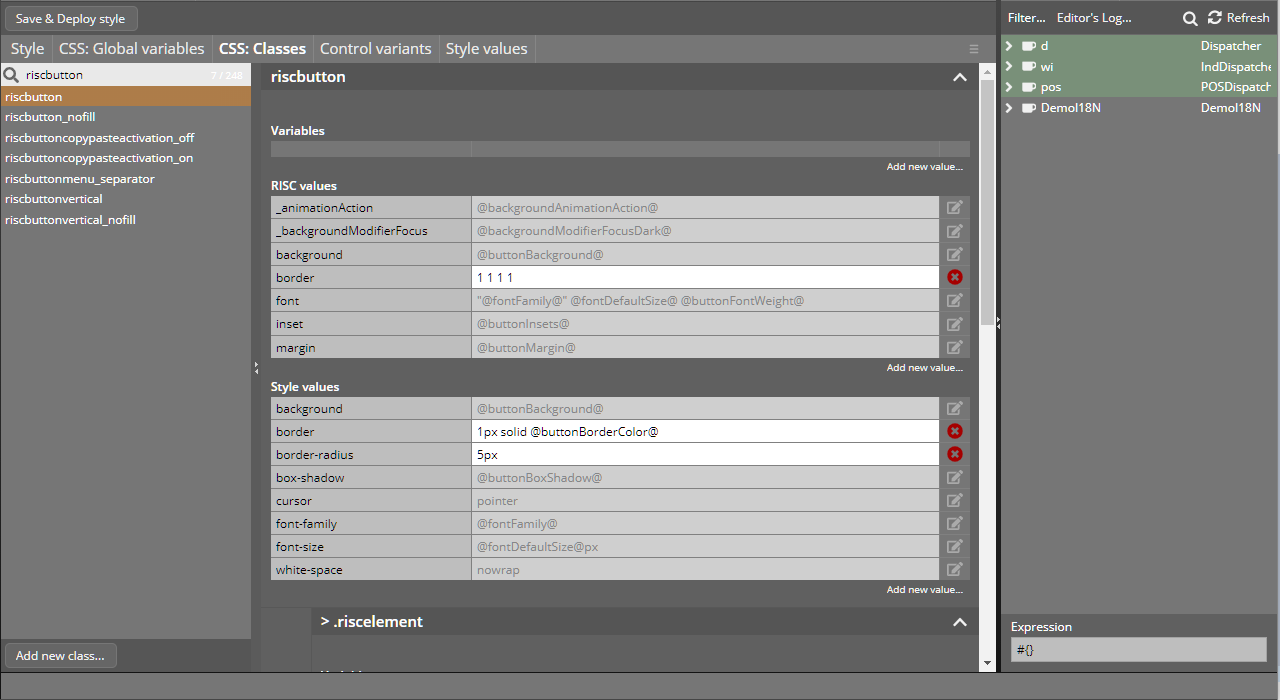
Result: if it's just some basic color changes you want to apply, then take a look onto the “Style”-tab, change the variables there and that's it. - If you really want to update the rendering on component level, then you need to dive into the corresponding style classes and the detail variables referenced there.
The component-based style definition (style.xml) is done within the “Control variants”-tab. Here you can edit/set up the style variants and their attribute values.
Components are typically assembled out of several inner areas – each of them referencing some own style class definition. This is the reason why a style class definition typically contains inner class definitions.
There are three types of definitions within a style class definition:
Variables: you may override/defined values of variables within a style class.
CSS-Style values: you may directly set CSS style values – which are the ones to actually form the CSS style.
RISC-parameters: certain information about the sizing, background coloring and font management need to be known to the client's layout management. This is the main purpose of the the RISC parameters. Please note: the sizing information must be in sync between the RISC-parameter definitions and the CSS-style values. - Example: when defining a CSS-style value “border: 5px solid #000000” then you need to define a corresponding RISC-parameter “border: 5 5 5 5”. The RISC definitions are the ones that are used for sizing, the style values are the ones that are used for drawing.
Style classes that are referenced by RISC components need to define these parameters which are relevant for sizing the control in a proper way.
The parameters that need to be known to RISC are:
border: the top/right/bottom/left border width
Example: <risc n=”border” v=”1 1 1 1”/>
Default: <risc n=”border” v=”0 0 0 0”/>
inset: the distance that the component's content should have from the border, again a top/right/bottom/left definition
Example: <risc n=”inset” v=”4 10 4 10”/>
Default: <risc n=”inset” v=”0 0 0 0”/>
margin: the margin that the component should have around the border. This is the space that is left around the component.
Example: <risc n=”border” v=”1 1 1 1”/>
Default: <risc n=”border” v=”0 0 0 0”/>
font: the font family, font size and (optional) font weight
Example: <risc n=”font” v=”"Arial" 12”/>
<risc n=”font” v=”"Arial" 12 bold”/>
background: the background you use for this component
Exapmple: <risc n=”background” v=”linear-gradient(to bottom, #FF0000, #00FF00)”/>
In addition there might by additional parameters, starting with “_” that contain content that is specific to a certain component: a component implementation can outsource configuration data that it internally requires into risc-parameters so that they can be set as part of the style definition.
As explained in the previous chapter, style definition files are the ones to pre-configure components on server side. Per component there is a default variant “default” and you may add any number of other variants.
You may define a style definition file completely on your own, in which you list all the components with all their variants. Or you may define a style definition file that extends an other style definition file. As consequence you take over all the information of the other file and only need to define the differences that you want to apply.
The format of the definition file is an extension of what you already know:
<style extends="defaultrisc">
...
...
<tag name="label" extendsparenttag="true">
<set attribute="font" value="weight:bold"/>
</tag>
<tag name="button">
<set attribute="contentareafilled" value="false"/>
<set attribute="font" value="weight:bold;size:14"/>
</tag>
...
...
</style>
By specifying “extends” on style-level you can define the parent style of your style definition. As consequence all tag definitions of the parent style are implicitly taken over.
You now define your own tag definitions just as normal. By default all your tag-attribute definitions are, if defined, overriding the complete tag definition from the parent style. But you can also define “extendsparenttag” to be “true”: in this case all the definition within the corresponding tag of the parent style are mixed into what you define within your style.
The example above extends the default style in the following way:
For the LABEL component in addition to the parent style definition the attribute FONT is set to the value defined.
For the BUTTON component the parent style definition is completely overridden with what is defined within this style.
In a similar way you can define tag variants that take over the style attributes of other tag definitions, and themselves just add some extra definitions:
<style ...>
...
...
<tag name="button">
<set attribute="font" value="weight:bold;size:14"/>
</tag>
<tag name="button" variant="HIGHLIGHTED"
extendstag="button" extendsvariant="default">
<set attribute="contentareafilled" value="false"/>
<set attribute="bgpaint" value="bgbackground(#FF000030)"/>
</tag>
...
...
</style>
The “HIGHLIGHTED” variant of the example extends the normal button definition. (Remember: if not explicitly defining a variant then the variant “default” is assumed – so the first button definition is the “default” one).
Of course you can mix both extension variants: the style extension described in the previous chapter and the tag extension that you see here. When mixing, the tag extension will be executed first, the style extension is applied afterwards.
In principal you may also use expressions as attribute value definition. Example:
<style ...>
...
...
<tag name="pane">
<set attribute="background" value="#{xxx.yyy}"/>
</tag>
...
...
</style>
Please note: like with the normal style management style values are applied when the page components are rendered on server side the first time. This means: if the value behind the expression changes, then this is only reflected by components which are new – not for existing ones.
Also use “HttpSessionAccess.reloadClient()” in order to re-create all components and as consequence to re-process all expressions.
Sometimes you want to pre-define attirbutes not only to one control but to many controls of the same type.
Example: there is a BUTTON, a BUTTONMENU, a BUTTONPOPUP, ... - All these controls look the same, because they are buttons with different functions behind. If you want to set up a style variant “redtext”, then you normally would have to define it in the way:
<style ...>
...
...
<tag name="t:button" extendstag=”t:button” variant=”quiteRed” extendsvariant=”default”>
<set attribute="foreground" value="#FF0000"/>
</tag>
<tag name="t:buttonmenu" extendstag=”t:buttonmenu” extendsvariant=”default”>
<set attribute="foreground" value="#FF0000"/>
</tag>
... etc. ...
...
...
</style>
Instead you can define a group of components:
<style ...>
...
...
<styletaggroup name="x:GROUP_BUTTON">
<styletaggrouptag name="t:button"/>
<styletaggrouptag name="t:buttonmenu"/>
<styletaggrouptag name="t:buttonpopup"/>
</styletaggroup>
...
...
<tag name="x:GROUP_BUTTON" variant=”quiteRed” extendsvariant=”default”>
<set attribute="foreground" value="#FF0000"/>
</tag>
...
...
</style>
Now the definition for the group is taken over for all members of the group.
Please note:
Use prefix “x:” for the group definitions. - In the example above we used uppercase characters for the group name - this was just done for better differentiation, you can use lowercase characters, too.
You can still define an individual style variant for each group member. In this case the individual one will override the group's one.
Example: for a t:button the definition with “t:button” will be used, not the definition for “x:GROUP_BUTTON”:
<tag name="x:GROUP_BUTTON" variant=”quiteRed” extendsvariant=”default”>
<set attribute="foreground" value="#FF0000"/>
</tag>
<tag name="t:button" variant=”quiteRed” extendsvariant=”default”>
<set attribute="foreground" value="#800000"/>
</tag>
Groups are locally defined within one “style.xml” and are only visible within this “style.xml”. There is no inheritance of group definitions.
When applying a style variant to a component within a layout definition then by default you select one style variant to be applied.
Layout definition:
<t:button ... stylevariant=”xxx” .../>
If you do not apply a style variant then automatically “default” is selected.
You also can define a sequence style variants:
Layout definition:
<t:button ... stylevariant=”default;addBlue” .../>
In this case the style definition of “default” is taken as base, and the style definition of “addBlue” is merged into the base.
It is also possible to write a sequence containing more than two style definitions:
Layout definition:
<t:button ... stylevariant=”default;addBlue;addBig” .../>
The set up of styles that can be added to other styles is the same as the set up of normal style variants:
style.xml definition:
<style>
...
<tag name="t:button" variant=”default”>
...
</tag>
<tag name="t:button" variant=”addBlue”>
<set attribute="foreground" value="#0000FF"/>
</tag>
<tag name="t:button" variant=”addBig”>
<set attribute="font" value="size:20"/>
</tag>
...
</style>
But there are some accelerators:
You can define a style to componentt “t:*” then this style can be used as add-on style variant for any component:
style.xml definition:
<style>
...
<tag name="t:button" variant=”default”>
...
</tag>
<tag name="t:*" variant=”addBlue”>
<set attribute="foreground" value="#0000FF"/>
</tag>
<tag name="t:*" variant=”addBig”>
<set attribute="font" value="size:20"/>
</tag>
...
</style>
The both add-on style variants now can be used for any component:
<t:button ... stylevariant=”default;addBlue;addBig” .../>
<t:label ... stylevariant=”default;addBlue;addBig” .../>
<t:field ... stylevariant=”default;addBlue;addBig” .../>
Consequence: you can add certain add-on information independent from the component.- Typical use case: you want to highlight controls in a consistent way (e.g. because the control shows some error status).
Of course you can also define the add-on style variants on a group level (see previous chapter). Example:
style.xml definition:
<style>
...
<styletaggroup name="x:GROUP_BUTTON">
<styletaggrouptag name="t:button"/>
<styletaggrouptag name="t:buttonmenu"/>
<styletaggrouptag name="t:buttonpopup"/>
</styletaggroup>
...
<tag name="x:GROUP_BUTTON" variant=”addBlue”>
<set attribute="foreground" value="#0000FF"/>
</tag>
<tag name="x:GROUP_BUTTON" variant=”addBig”>
<set attribute="font" value="size:20"/>
</tag>
...
</style>
Now the add-on style variants are only available for all components belonging to the group.
Please check the Java API documentation (Java Doc) within the style area. The central class “StyleManager” provides functions for accessing style information at runtime.
When working with styles then the typical procedure is: change the style... - ...and check how it looks like. So the cycle between changing the style and testing it should be as short as possible.
By appending “&ccresetbuffers=true” to the “.risc”-URL all the server side style data (style.xml level) is refreshed. So start the page by appending this parameter.
In the browser you have to make sure that the style data is not buffered, when testing a certain page.
You may want to add own fonts to your application. In this case please proceed as follows:
Add the font files to your web-application. When using the default project setup this means you need to store them somewhere in the “webcontent” part of your application.
CaptainCasa stores its font in the directory eclnt/risc/fonts. You may add your fonts in this directory as well – but you may also chosse some own directory.
Add a “.css” file to you style directory that points to your font. Example:
<webcontent>
eclntjsfserver
styles
yourstyle
...
fontreference.css <== file to be added
The .css file might look similar to:
@font-face
{
font-family: 'YourFontName';
src: url('../../../eclnt/risc/fonts/...yourFontDefinition...');
}
You see the definition of the font-family and you see the referencing of the font-files by relative URL – assuming that the font is located in eclnt/risc/fonts/-directory!
In principal it's simple... - but also might be confusing at first time: the referencing of images. Within the style management there are three areas where to reference images – each of the areas being explained in the following text.
Of course the way to go is: always use relative image definitions! Never expect your web application to be deployed with a certain name!
A css style is always generated in the following way:
“ecltnjsfserver/styles/<styleName>/riscstyle.css”
So this is the reference for all direct style definitions. Example:
<class n="riscshiftcontainerwithnavigation">
...
<class n="_left">
<style n="background" v="url(../../../eclntjsfserver/images/iconssvg/shiftcontainer_left_16x16.svg) no-repeat center"/>
The “risc” style values are directly used by the JavaScript processing on the client side and are transferred into image definitions without any conversion.
A page is always loaded as “.risc” page. Example: there is a page:
“http://localhost:50000/demos/workplace.demohelloworld.risc”
The context of the “.risc” page is the web application – in the example this is “http://localhost:50000/demos/”: So all relative image addresses that are directly managed within the page are referring to this context.
<class n="riscshiftcontainerwithnavigation">
...
<class n="_left">
...
<risc n="background" v="url(eclntjsfserver/images/iconssvg/shiftcontainer_left_16x16.svg) no-repeat center"/>
...
While the “style” and “risc” value definitions are direct part of the client processing, the control variants are part of the server processing – they are just some presetting of attributes of component instances.
Consequence: here the normal rules of setting the image in “.jsp/.xml” files are applied: all images should start with “/” - and the “/” is referring to the root of the web application. Example:
<tag name="helpicon" variant="default" extendstag="icon" extendsvariant="default">
<set attribute="image" value="/eclntjsfserver/images/lightbulb.png"/>
</tag>
As part of a style definition there are two places in which you can defined variables:
In the area of CSS style definitions you may define/use “Global Variables” to centrally manage information that is re-occurring in many style class definitions:
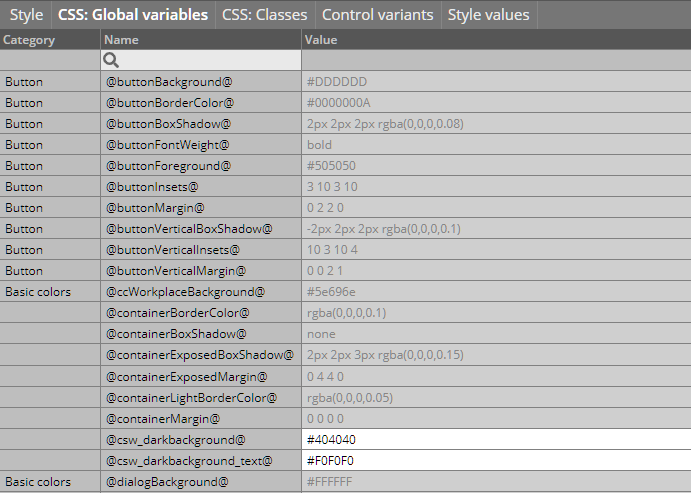
In the area of “Style Values” you may set up any number of values:
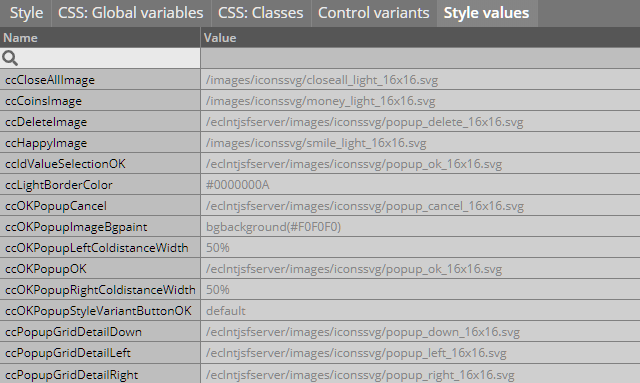
Both definitions can be used directly in a page by using the Expression “#{ccstylevalue.<nameOfValue>}”:
Examples:
…
<t:button … image=”#{ccstylevalue.ccDeleteImage}” … />
or
<t:button … image=”#{ccstylevalue['ccDeleteImage']}” … />
…
<t:pane … background=”#{ccstylevalue.@buttonBackground@}” … />
or
<t:pane … background=”#{ccstylevalue['@buttonBackground@']}” … />
User method “StyleManager.getStyleValue(<nameOfValue>)” to retrieve the style value from your Java code – using the currently selected style of the session:
String image = CCStyleManager.getStyleValue(“ccDeleteImage”);
String background = CCStyleManaer.getStyleValue(“@buttonBackground@”);
CaptainCasa comes with a set of default styles:
“defaultrisc”
“defaultlightbluerisc” (inheriting from “defaultrisc”)
“default202006risc” (inheriting from “defaultlightbluerisc”)
“default202201risc” (inheriting from “default202006risc”)
A user of CaptainCasa takes one of these styles as base-style and then inherits an own style definition from this one. Example:
“usage1” (inheriting from “default202201risc”)
Now imagine that you write a library of components (Page Bean Components). The library concept allows to you that you package all issues of the components together in one .jar file, including: the layout definition (.jsp/.xml), the code (.class), resources (.jpg, …).
Typically, when writing own components, you also create own style classes and/or own style variants. You could now create an own style variant “comp1” e.g. inheriting from “default202201risc” wher you add your definitions.
But...: now you have your style “comp1” for the page bean components, and the users who wants to user you pae bean components has style “usage1” - and would need to explicitly copy all yout “comp1” definitions into “usage1” to make the components work.
This is of course no solution, especially when it comes to regular updates that are done to libraries.
So, in addition to the “extension” of styles, there is the concept of “enrichting” style. The concept is rather simple:
When CaptainCasa reads a style (e.g. “defaultrisc”) then there are two definition files that are read:
“style.xml” (this name is fix for all styles)
“riscstlye.xml” (this name may be different with each style, e.g. it is “riscstyle_default202006.xml” for the “default202006risc” style).
While reading the style files, CaptainCasa checks in the class loader for any occurance of the resources in the package “eclntjsfserver/stylextensions”. Example: when reading style “defaultrisc” then the following resources are checked:
/eclntjsfserver
/styleextensions
/defaultrisc
style.xml
riscstyle.xml
And when reading “default202006risc” then the following resources are checked:
/eclntjsfserver
/styleextensions
/default202006risc
style.xml
riscstyle_default202006.xml
This means: any .jar file that you add as runtime library to your application may bring own addons and contribute them into the corresponding existing styles. They just need to be places into the .jar file into the correponding location.
CaptainCasa will, when reading the styles, combine the “fully style” that is available out of the style itself and all its contributions that come with various “.jar” files. Basically, CaptainCasa does nothin else than concatenating the XML definitions to from one big XML before parsing and interpreting this XML.
The style is dynamically assembled out of its basic definition and all its contributions.
If you add a library of Page Bean Components and bring in new style classes and style variants, then embed the correpsonding definitions into your .jar file – best using “defaultrisc” as base to add your definitions.
As consequence all library users will take benefit out of your style definitions without manually copying them from one style to the next.
You may also use this “enriching” feature if you have loosely coupled teams working on different part of the project. Each team can add own style definitions in its own “.jar” libraries. (Of course you have do define naming conventions so that class and variant names do not overlap.)
There is no need to have one central style only, that typically serves as some kind of bottle-neck within a project.
By default styles are located in the web content of your application. When delivering your application as .war file then they are positioned in the directory:
<war-file>
eclntjsfserver
styles
xyzStyle
style.xml
riscstyle_xyzStyle.xml
...
You may also move them into some .jar file of your project so that they are not read from the web content but so that they are read by the class-loader. Reading by class-loader implies that the one to access the class-loader (here: the CaptainCasa functions to read the style files) exactly know the name of the files to read. You cannot query a class-loader and e.g. ask for a list of files that is contained in a certain package.
The runtime API of the style management requires to execute queries. For this reason CaptainCasa internally requires some “helper information”. This means: you need to tell by an additional XML file about the files that are contained inside your “.jar” file.
This XML file has the fix name “eclntdirectoryinfo.xml” and needs to be passed in the root package of the .jar file in which you deliver your style:
your .jar file's structure:
eclntdirectoryinfo.xml
eclntjsfserver
styles
xyzStyle
style.xml
riscstyle_<yourstyle>.xml
The content of the file “eclntdirectoryinfo.xml” is a reflection of the directory structure of your .jar file:
<?xml version="1.0" encoding="UTF-8" standalone="yes"?>
<dir name="">
<dir name="eclntjsfserver">
<dir name="styles">
<dir name="xyzStyle">
<file name="riscstyle_xyzStyle.xml"/>
<file name="style.xml"/>
</dir>
</dir>
</dir>
</dir>
You only have to define the content of the “styles” directory – because this is the one that is queried by CaptainCasa functions.
At runtime CaptainCasa reads all the “eclntdirectoryinfo.xml” files from all the .jar files that are part of the delivery, combines them and then knows – at least for the directories that are mentioned in the files – which files are present in the class-loader. You may take a look into the eclntjsferver.jar file of CaptainCasa, where also such file is included.
The previous chapter concentrated on showing how to define styles so that style definitions are outsourced into corresponding style definitions. This chapter is a collection of issues that have to do with the way how you actually style your application.
You may pass images in various formats:
gif
jpg
png
svg
Because scaling typically is an important aspect of your application – especially when it is used on difference types of devices – we strongly recommend to use SVG-images in front of pixel formats.
There are also special components in CaptainCasa to directly support font images (awesome font, SAP image font) which support scaling as well. Please check the corresponding components (FONTICON, AWESOMEFONTICONS) for more information on these.
You can accelerate CaptainCasa's frontend processing in the area of images significantly if the size of an image can be directly derived from its name.
The default naming patterns are:
/[<DIR>.]<name>_<WIDTH>x<HEIGHT>.<EXTENSION>
/[<DIR>.]<name>.<WIDTH>x<HEIGHT>.<EXTENSION>
Examples:
/images/icons/warning_32x32.png
/images/icons/warning_16x16.png
/images/icons/error_16x16.svg
You can bring in own patterns as well – by implementing a JavaScript extension in the client. Check the “Developers' Guide – RISC Addons” for more information on this.
Images “typically” are stored in the webcontent-part of an application.
Please note that it is also possible (and 100% valid) to access images through the server side class loader. The URL format is:
/[<PACKAGE>.]<NAME>.<EXTENSION>.ccclresource
Examples:
/org.eclnt.xyz.resources.warning_32x32.png.ccclresource
/org.eclnt.xyz.resources.error_16x16.svg.ccclresource
/org.eclnt.xyz.resources.questionmark.svg.ccclresource
This is an important feature when e.g. using images in Page Bean Components: these components are delivered as .jar file, in which all resources need to be accessed via calss loader.
Especially when using flat images, then the color of the image heavily depends on the styling of the background area. A dark image icon is only looking nice if the background is styled in a light way. - So there is a high level of dependency between the style and the selection of image colors.
This is one of the reasons why there is the possibility to directly reference style variables within an image name:
In the style definition (CSS-XML level) you can define “@...@” variables.
<style>
...
...
<var n=”@imageDir@” v=”light”/>
...
...
</style>
These variables can be referenced within image URLs:
<t:icon … image=”/images/@imageDir@/xyz.png” … />
Consequence: in the one style “@imageDir@” might be defined in a different way than in another style.
We like SVG images...! ;-)
They are scale-able.
There are plenty of open sources libraries available.
They can be easily updated: the basic issues like coloring and sizing can be updated by simple text editing. As result it is simple to dynamically update their color scheme or their size.
There are nice editors available to create own icons – if you want...
A flat SVG icons consists of a definition as follows:
<svg xmlns="http://www.w3.org/2000/svg"
viewBox="0 0 448 512">
<path d=" … … … " />
</svg>
Updating this image to have a defined size and to have a defined color means that only some simple definitions have to be added:
<svg xmlns="http://www.w3.org/2000/svg"
viewBox="0 0 448 512"
width="16"
height="16"
fill="#F0F0F0" >
<path d=" … … … " />
</svg>
CaptainCasa provides some server side processing which does this replacement by passing the corresponding information through the URL of the image. The format is:
/[<DIR>.]<NAME>.<COLOR>.<WIDTH>x<HEIGHT>.ccsvg
or
/[<PACKAGE>.]<NAME>.<COLOR>.<WIDTH>x<HEIGHT>.ccsvg
The server side processing first checks for the SVG file in the webcontent – if it does not find it there then it checks within the class loader.
In your webcontent there is a flat SVG image:
<project>
webcontent
images
iconssvg
warning.svg
This SVG image may now be accessed in the following ways:
/images.iconssvg.warning.#606060.64x64.ccsvg
/images.iconssvg.warning.#800000.16x16.ccsvg
As said the image could also reside in a Java package and then gets loaded via server side class loader. In this case the image would reside in package “ images.iconssvg”.
Referencing style variables is of course also possible together with the dynamic SVG access.
Example: in the style you define the following variables:
<style>
…
<var n=”@imageColorLight@” v=”#F0F0F0”/>
<var n=”@imageSizeNormal@” v=”16x16”/>
…
</style>
You then can define the URL in the following way:
/images.iconssvg.warning.@imageColorLight@.@imageSizeNormal@.ccsvg
When using the style editor then you typically create or update style classes for certain components. These style classes contain both variables, “RISC values” and CSS style definitions.
Each style class has a name that by default is prepended with a “.” when being converted into a style class of the generated CSS. Example:
Style class: “riscbutton”
Occurance of class in generated CSS:
.riscbutton
{
...
...
}
Sometimes you want to define style classes which are pure CSS classes (i.e. no variable definitions, no “RISC values”) - and for theses ones you do not want that a “.” is automatically prepended.
In these case use the class “riscinternal_directcss” to extend from. Example:
<class n="::-webkit-scrollbar" extends=”riscinternal_directcss”>
<style n="width" v="16px"/>
</class>
Generated CSS:
::-webkit-scrollbar
{
width:16px;
}
You can simply view the generated CSS by opening a URL that follows the pattern:
http://<host>:<port>/<webapp>/eclntjsfserver/styles/<style>/riscstyle.css
Maybe you are also interested in seein the “RISC values” that are sent as JSON content. In this case you open:
http://<host>:<port>/<webapp>/eclntjsfserver/styles/<style>/riscstyle.json
The Enterprise Client allows to define user interfaces which are “fully internationalized”. This includes:
Date format, Decimal format etc. are formatted and checked against country / languages specific rules and formats
Literals can be translated in multiple languages. Multiple users can be logged on, each user seeing literals in his/her own language.
Right to Left is supported.
Before getting into details first have a look onto which pieces of software are concerned when talking about internationalization:
The client side is a JavaScript processing within the browser that by default takes over the language & country settings from the browser.
The server side is a Java program that by default takes over the language & country settings of the server side.
So, by default, both programs are decoupled from internationalization point of view. This makes sense in some scenarios and may be a bit confusing in other scenarios. Basically we took over this concept from normal browsers: also your normal HTML browser has a certain language (typically defined with installation) that has nothing to do with the language of the HTML content that is shown inside: you may start an English browser and view German pages. Print & configuration dialogs & default dialogs (e.g. calendar) will come up in the language of the browser, content dialogs of the application will come up in the language of the server side application.
This is important to always keep in mind. - In the next chapters we will first introduce how to configure the client locale settings, then we will talk about the server side settings – and then talk about strategies in order to combine both.
The country settings of the client define the way certain data is formatted. This includes:
Information about the format of dates.
Information about the format of numbers.
The language settings define the texts that are shown in some components, e.g. the calendar component or the file download component.
Both definitions are completely independent from one another. It is possible to apply any combination of country and language settings.
When the JavaScript client starts up then it asks the browser for its language/country settings using a JavaScript API. The result is checked against the available client languages. If there is no match then a German localization is used by default.
Use class “org.eclnt.jsfserver.defaultscreens.Client” to directly set the client parameters within a session.
Client.instance().setCountry(...);
Client.instance().setLanguage(...);
The API internally uses an “invisible” CLIENTCONFIG component that is always made available.
Please note: Client.instance() must be called during a request processing - only then the system knows about the session in which the client parameters are to be applied.
There is a component CLIENTCONFIG that allows to update the client's language and country definition from server side at runtime. The CLIENTCONFIG component provides a couple of client attributes that are normally passed statically when starting the client – and allows to set these parameters at runtime by your server side processing.
For updating the client side localization there are two attributes CLIENTCONFIG-LANGUAGE and CLIENTCONFIG-COUNTRY.
Please note: the CLIENTCONFIG component should be placed at the beginning of the out-most page of your scenario. This means: when building up pages out of other pages using ROWINCLUDE or ROWPAGEBEANINCLUDE then the CLIENTCONFIG typically should be defined within the “outest page”.
The client loads its configuration from the files that are available in the “<webcontent>/eclnt/risc/i18n” directory. Within this directory the client searches for files following the file name pattern “country_*.xml” and “language_*.xml”:
For each country and for each language that is supported, there is a corresponding XML file definition. For countries there are also generic country definitions (CCTYPE*) that you can use in the same way you use normal country settings.
The default language/country definitions are coming with XML files which are part of the “webcontentcc” part of your project.
You may add own definitions within your “webcontent” part, so that your own definitions and the default definitions are mixed during deployment. Example: in case you want to add some country “XX” and some language “yy”, then your project (if following the default project structure) looks like:
<project>
/src
/webcontent
/eclnt
/risc
/i18n
country_XX.xml
langauge_yy.xml
...
...
/webcontentcc
/eclnt
/risc
/i18n
...
country_DE.xml
country_FR.xml
...
langauge_de.xml
langauge_fr.xml
…
Use the files “country_DE.xml” and “language_en.xml” file from the default webcontentcc directory as copy source when creating your own files.
You set the language definition in the following way:
public void onGerman(ActionEvent ae)
{
HttpSessionAccess.setCurrentLocale(Locale.GERMANY);
}
public void onEnglish(ActionEvent ae)
{
HttpSessionAccess.setCurrentLocale(Locale.ENGLISH);
}
Typically you set the Locale at the very beginning of your user's session, e.g. at logon point of time. You may use any Locale definition that is available in Java.
Different users may be logged on with different languages.
Within your server side application you may use various ways to support multiple languages for your literals.
For all the ways you need to define an expression for accessing the literal instead of hard-wiring the literal. Example: instead of defining the attribute LABEL-TEXT in the way “First Name”, you need to define an expression like “#{xyz.firstName}”.
(1) You may use a default resource binding that is provided by the CaptainCasa Enterprise Client Framework. Using this resource you can reference different resource bundles that hold the literal translations.
(2) You may use normal managed bean binding in order to access your literals. Note that there is a “session” binding of managed beans and a “request” binding of managed beans. In many cases the binding to language information can be set to “request” based, while the application itself may be defined as “session” based. Within the managed bean binding you may use the possibilities that are offered as part of the server side interpretation of expressions: you many use the binding Maps in order to build up a flexible way to address your literals. Find an example on this in the next chapter.
In general we recommend to use option (1): in this case the management of resources is directly integrated into the tool environment (Layout Editor) and information is kept in a standard way: as resource bundle.
Option (2) is the one to do everything on your own, e.g. in case you keep your translation information in a text database.
CaptainCasa Enterprise Client provides a default way of managing multi language resources: literal information is outsourced in form of resource bundles. Resource bundles are text files that keep the information in the following way:
firstName=First Name
lastName=Last Name
Resource bundles are kept in several files, each one containing the “property=value” pairs for a certain language and/or country.
Example: there may be the files:
literals.properties
literals_en.properties
literals_de.properties
The file name is built out of the “resource bundle”, the language (optionally: the country) and the extension “.properties”. The files are located in a package of your compiled program. During runtime the multi language management will select the right file, which is closest to the session's internationalization settings.
Property files have some strange management of non-ASCII characters. All characters above ASCII code 127 need to be encoded. The German translation of the literal “street” is “Straße” - in the resource bundle file it is written in the following way:
street=Stra\u00DFe
Now, this is the technology behind, you will see that the default way of managing resources is quite simple:
Within the project's web application, inside the directory /eclntjsfserver/config there is the file “resources.xml”. Either edit the file from the file system or use the project configuration:
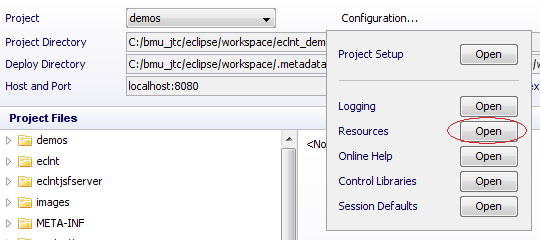
In the file you specify the resource bundles that you want to maintain within your project. Typically you have exactly one resource bundle for literals:
<resources>
<resource name="literals" package="workplace.resources"/>
</resources>
For each resource bundle you define the “base name” and you define the package, in which it is stored.
From now on you can use the “Resource Editor” tool, which is part of the Layout Editor:
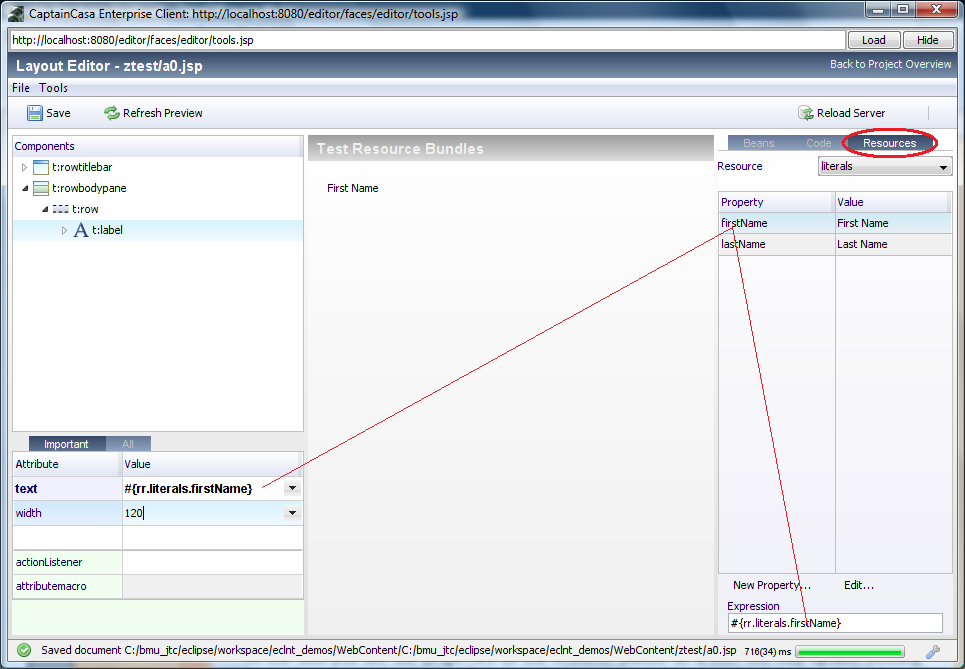
In the tool you see the properties of the resource bundle as a list. You may update existing properties or create new ones. Each property is associated with an expression, that can be used within component definitions. The expression is formed in the following way: “#{rr.resourceBundleName.propertyName}”.
The tool maintains the default property file. E.g. if the resource name is “literals”, then the tool will maintain the “literals.properties” file. This should be the one that you constantly use during development, and that you later on use as base for translations into other languages.
Translations are quite easily done: just copy the base file (e.g. “literals.properties”) into another file (e.g. “literals.properties_de”) and then replace the property values. Use an editor which automatically translates non-ASCII characters into corresponding escape sequences, there are e.g. a plenty available as plugins for the Eclipse environment.
If at runtime a certain property name is resolved and no information is found within the corresponding resource bundle then a default value is returned. The default for this default value is a string that contains the name of the resource bundle and the name of the property that is resolved – so that you can directly see which value is missing in which resource bundle.
You can override this default behavior by assigning an explicit return value within the resource definition:
<resources>
<resource name="literals" package="workplace.resources"
defaultvalue=”null”/>
</resources>
You may define either “null” or any other text value (e.g. “Literal missing”).
When using the resource management as described, then you can access literals within your server side Java code in the following way:
ResourceManagement.findLiteral(“literals”,”firstName”);
...accesses the same literals as accessed via:
#{rr.literals.firstName}
This chapter shows how you may on your own use managed beans to access multi language information. You should read this chapter in case you want to implement an own resource management. This chapter again uses resource bundles to keep the literal translations, but the main focus is on showing how to arrange managed bean codings in order to access the literal translations.
First, there's the definition of resource files. Within the resource files there is the translation from a key into a string value. Resource files have a “base name” and have variation names depending on the language information they are defined for. (All this is default Java resource management, so please also have a look into the JavaDoc of the class “ResourceBundle”).
Example: there are two files, which are part of the classes / library-jar file:
This is the content of the file “Literals.properties” within the package “org.eclnt.jsfserver.i18n.resources”:
OKPopup_ok = OK
YESNOPopup_yes = Yes
YESNOPopup_no = No
And this is the content of “Literals_de.properties” within the same package:
OKPopup_ok = OK
YESNOPopup_yes = Ja
YESNOPopup_no = Nein
You see: two files with two different translations for the same keys.
The next step is to provide a managed bean that accesses the resource bundle. The managed bean claims to be a map, so that an expression is translated into a corresponding “get()” call against the map:
public class I18N
implements Map<String,String>, Serializable
{
protected static String s_bundle = "org.eclnt.jsfserver.i18n.resources.Literals";
public void clear() {}
public boolean containsValue(Object value) { return false; }
public Set<Entry<String, String>> entrySet() { return null; }
public boolean isEmpty() { return false; }
public Set<String> keySet() { return null; }
public String put(String key, String value) { return null; }
public void putAll(Map<? extends String, ? extends String> m) { }
public String remove(Object key) { return null; }
public int size() { return 0; }
public Collection<String> values() { return null; }
public boolean containsKey(Object key)
{
String result = get(key);
if (result == null)
return false;
else
return true;
}
public String get(Object key)
{
ResourceBundle rb = ResourceBundle.getBundle(s_bundle,FacesContext.getCurrentInstance().getViewRoot().getLocale());
return rb.getString(key.toString());
}
}
Only two methods are implemented of the map: the get() method and the containsKey() method. You see that the get() method is delegating the call to the resource bundle. The locale used for accessing the resource bundle is taken from the root node element (getViewRoot()) - this is “normal JSF”.
All the manipulation part of the map is not required, because the map serves only the purpose of accessing literals.
The last step is to declare the class above as managed bean under a certain name. This is done in “faces-config.xml”:
<faces-config>
...
...
<managed-bean>
<managed-bean-name>eclnti18n</managed-bean-name>
<managed-bean-class>org.eclnt.jsfserver.i18n.I18N</managed-bean-class>
<managed-bean-scope>request</managed-bean-scope>
</managed-bean>
...
</faces-config>
That's it: you now can refer to a literal within a JSP definition in the following way:
<f:view>
<h:form>
<f:subview id="eclntjsfserver_popups_yesnog_8">
<t:rowbodypane id="g_2" >
<t:row id="g_3" >
<t:textpane id="g_4" height="100%" text="#{eclntdefscr.yesNoPopup.text}" width="100%" />
</t:row>
<t:rowdistance id="g_5" height="10" />
<t:row id="g_6" >
<t:coldistance id="g_7" width="50%" />
<t:button id="g_8" actionListener="#{eclntdefscr.yesNoPopup.onYes}" image="../images/yesnopopup_yes.png" text="#{eclnti18n.YESNOPopup_yes}" />
<t:coldistance id="g_9" />
<t:button id="g_10" actionListener="#{eclntdefscr.yesNoPopup.onNo}" image="../images/yesnopopup_no.png" text="#{eclnti18n.YESNOPopup_no}" />
<t:coldistance id="g_11" width="50%" />
</t:row>
</t:rowbodypane>
</f:subview>
</h:form>
</f:view>
Please note when transferring this example to your application:
You need to write an own class as described before. Your own class may be a subclass of the I18N class that sets the s_bundle member in the constructor to fit to your resource file names.
You need to bind the bean under a different way than “ecltni18n”.
Maybe you want to add a method to also access the resource bundle from outside, so that you can access your literals from application processing, then you may add a method like:
/**
* This method may only be called within a request processing.
*/
public static ResourceBundle getBundle()
{
return ResourceBundle.
getBundle(s_bundle,
FacesContext.getCurrentInstance().getViewRoot().getLocale());
}
Now you can also add your literals in order to for example output dynamic messages.
One last comment: pay attention that property resource files are NOT UTF-8 based. Unfortunately. You need to escape all characters with an internal integer value > 127. Best, you download a property file editor into your IDE for maintaining property files. There are plenty available for the Eclipse toolset, e.g. via http://propedit.sourceforge.jp/index_en.html.
In the following we explain some prefixes for simplifying the management of literals. We use a resource file as example. Please note: the prefixes are equally processed when accessing the literals by using interface IResourceAccess.
Example:
firstName=First Name
lastName=Last Name
address=!-Address
The prefix “!-” is an indicator that the literal value is not yet approved.
The literal value behind the “!-” will be used as result - so users see the literal “Address” (and not “!-Address”). But the one who edits the literals see that this is some value which needs to be approved still.
Use case: we use this prefix when generating translations (e.g. using the built in Deepl-interface). In this case the literals that are passed back from automated generation will start with “!-” always - so that the one who checks the translation results can identify theses ones that have been touched by automated translation.
Example:
firstName=First Name
lastName=Last Name
lsnam=!>lastName
addr=!>general:address
I the resolved value of a literal starts with “!>” then this value is interpreted as link to another literal definition. So the resolution of literal “lsnam” will point to the literal definition “lastName” and the value returned is “Last name”.
By default a link is pointing to a literal definition within the same resource. But: you may also switch to other resources by explicitly defining the resource name first, followed by a colon. So “addr” is pointing to the “general”-resource, in which the literal definition “address” is resolved.
As introduced at the beginning of the chapter client locale settings and server locale settings in principal are independent from one another. But, there are ways to combine both.
The current country/language settings are passed to the server side via http-header parameters (“eclnt-language”, “eclnt-country”).
Based on this, there is a special configuration on server side that will update (if required) the server side settings. Edit the configuration file “webcontent/eclntjsfserver/config/sessiondefaults.xml” so that the attribute “takeoverclientlocalesettings” is set to “true”:
<sessiondefaults
...
takeoverclientlocalesettings="true"
...
/>
Use the component CLIENTCONFIG, attributes LANGUAGE and COUTNRY in order to control the client locale settings from server side. Typically the CLIENTCONFIG component is placed into the out-most page of your application so that it is contained only one time – in order to avoid confusion.
When working with the class “jva.util.Date” in Java then you always need to pay attention to correctly managing the time zone aspect. Please read the Javadoc for details if being unsure about dealing with the classes “Date”, “Calendar”, “TimeZone”.
Every time a date is managed in a component (e.g. Calendar) then you need to also add a time zone reference. The date value that is passed “via the line” between client and server is the long-value of the date. A reliable date interpretation is only possible when ensuring that the time zone that is used in the client is exactly the time zone used on server side.
CaptainCasa contains a simple but flexible online help management. It provides the following functions:
Context sensitive online help – when pressing F1 on one component a different help will show up than pressing F1 on an other component.
Default management of online help texts – online help texts are stored by default within a defined directory of the web application.
Internationalization – the selection of online help depends from the language a user is currently working in
In addition to the default online help management there is an interface to plug in any other online help management frameworks. As consequence you can store the online help information in a completely different way than the default, and you can visualize the online help to the user in a different way.
The base of all is the assignment of so called “helpid” values to components. Most input components offer an HELPID attribute, into which you can pass a corresponding value:
<t:field id="g_6" helpid="/demo/firstName" width="200" .../>
The value that you assign is completely up to you. When using the default online help framework then the value must only contain characters that you can use for building proper file names.
Components with defined HELPID attribute automatically support the following behavior:
If the component is a FIELD or a CHECKBOX or RADIOBUTTON component then some information will be rendered into the field (default: a mini question mark), so that the user can directly see that online help is available.
When the user presses F1 onto the component then the online help framework is invoked.
Using the default framework a modal window will pop up showing a text which corresponds to the language and the value defined with attribute HELPID.
By default all online help texts are HTML texts that are stored within a certain directory. The name of the directory is specified in the configuration file “eclntjsfserver/config/onlinehelp.xml”:
<onlinehelp contentdirectory="/demo/">
</onlinehelp>
The online help can be both arranged within the resources part or the web-content part of your project. We strongly recommend to use the resources part - because this is the one that is easily distribute-able within a .jar file.
...project...
/src
/main
/resources (in case of Maven style project)
/demo <== “default” directory
firstName.html (or firstName.md)
/de
firstName.html (or firstName.md)
...
/en
firstName.html (or firstName.md)
...
You see:
For each language there is an own directory.
Each helpid corresponds to a text
Both direct .html files or .md markdown files can be used
The search sequence is: first a language specific file is searched, if no language-specific file is availabe then the file of the “main” directory is chosen.
This is the central interface that is called on server side when the user presses F1 on a component:
package org.eclnt.jsfserver.onlinehelp;
public interface IOnlineHelpProcessor2
{
/**
* @param helpId
* @param language
* @param refersToComponent
* true => online help directly belongs to the component on which F1 was pressed.
* false => online help belongs to an upper component and is NOT directly related.
*/
public void processOnlineHelp(String helpId, String language, boolean refersToComponent);
}
The help-id that fits to the component and the language are passed as parameters – now it's the processor's task to present to the user an adequate online help.
The name of the class that is implementing the interface needs to be defined in the configuration file /eclntjsfserver/config/onlinehelp.xml:
<onlinehelp
contentdirectory=”/demo/”
onlinehelpprocessor=
"org.eclnt.jsfserver.onlinehelp.defaultimpl.OnlineHelpProcessorJBrowser">
</onlinehelp>
If not explicitly defined, then by default the implementation “OnlineHelpProcessorBase” is selected.
<t:field ... helpid=”/demo/firstName” .../>
The default implementation checks which online help file is available in the project and will then translate the value of HELPID into a corresponding URL - by adding the language (if available) and by finding the right extension:
Example: if the HELPID is ”/demo/firstName” then the URL that is returned is:
/demo/de/firstName.html for German texts
/demo/firstName.html if no specific text for language is found
<t:field ... helpid=”firstName” .../>
Here the URL is built out of the content-directory that is configured in onlinehelp.xml (see above), the language and the available text:
So the result is the same as the previous one...:
/demo/de/firstName.html for German texts
/demo/firstName.html if no specific text for language is found
What's the difference?
The first way (with “/”) allows to combine multiple CaptainCasa projects - without requiring to share the same definitions of the content-directory. The one project can define HELPID “/project1/xxx” the next one can define HELPID “/project2/xxx”. In a shared project it is always clear which online help is the one to be addressed.
Without this (just “xxx”) the online help configuration of each project must be pointing to exactly same content directory - and HELPID values within this directory must be synchronized across projects.
Markdown text files are simple text files that allow an efficient writing of small formatted texts.
# This is the headline
some text some text some text some text some text some text some text some text some text some text some text some text some text some text some text some text some text **some bold** text some text some text
- some list
- some list
- some list
some text some text some text some text some text some text
1. some ordered list
2. some ordered list
Markdown files are converted into html-texts by simple converters.
In the default online implementation you can either use html files (“.html”) or markdown files (“.md”) for writing the online documentation. The URL that is created for an online help text is either a “.html”-URL or a “.ccmd”-URL. The “.ccmd”-URL points so some default servlet of CaptainCasa that reads the corresponding “.md” markdown file and dynamically converts its content into some HTML for the browser.
The toolset of CaptainCasa provides a tool to directly edit the markdown files:
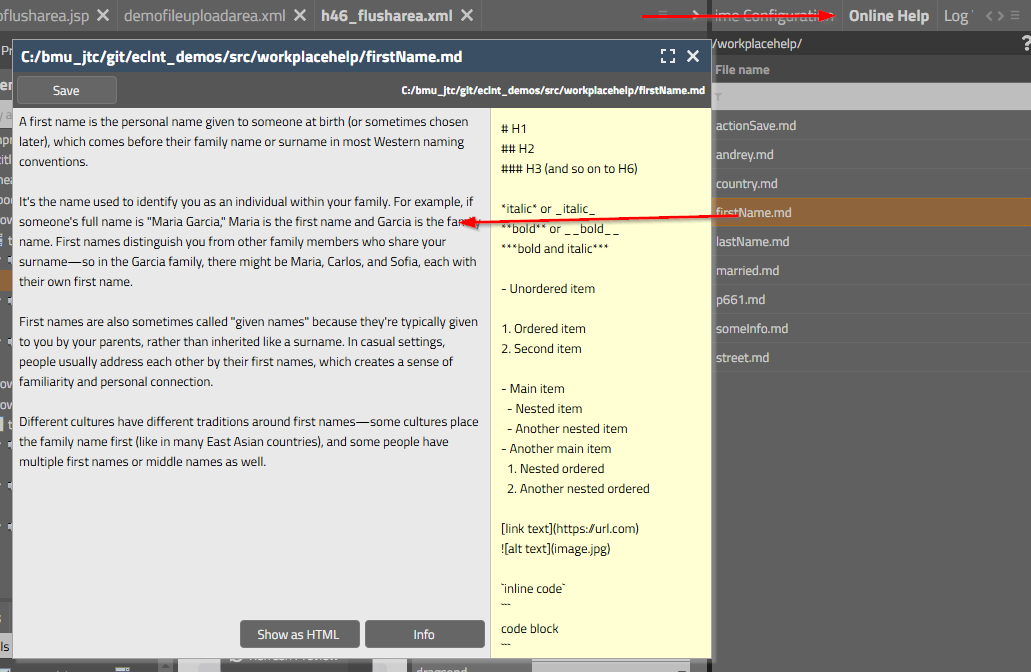
You see the list of online help files within the content directory and you can open a simple editor for editing the files. By dragging and dropping from the list you can directly set the HELPID value in the attributes section.
The user interface of typical applications consists out of a collection of individual functions. Each function is represented by some screen definition, the screen may of course itself subdivide into several other screens and may open various dialogs.
...so far you looked on Enterprise Client as technology to build such functions.
What you now need is some framework, to arrange these functions in order to form a workplace for an individual user. This includes the following aspects:
The user must see the set of functions that he/she can start, e.g. represented by one or more function tree.
Functions must be started in some kind of isolated container – both optically and from processing point of view. It must be possible to start the same function twice (e.g. to process two orders in parallel)
Functions must have a defined a life-cycle: being started, being processed – and being closed.
You may run multiple functions in parallel – e.g. you process an order, in parallel you create a customer record, in parallel you observe a stock list of a warehouse.
You may want to arrange these started functions flexibly on your screen.
The workplace framework of Enterprise Client is exactly serving these requirements. It is an optional framework, so you do not have to use it! But it definitely makes sense to take a deep look into it before coding your own workplace framework.
The demo workplace is started with two container areas, one on the left one on the right.
The user can start functions from several function trees, the functions are by default started within the right container area. For each function a “tab” is shown at the bottom of the container area.
By dragging and dropping the user can re-arrange the started functions and open up new container areas:

The user can isolate functions into own dialogs, so that they are running in a decoupled window (and e.g. can be moved on a different physical screen).
When talking about the workplace, then certain terms will be frequently used:
“Workplace” - this is the whole thing
“Workpage” - this is the dialog of a started function
“Workpage Container” - this is an area in which work pages are kept
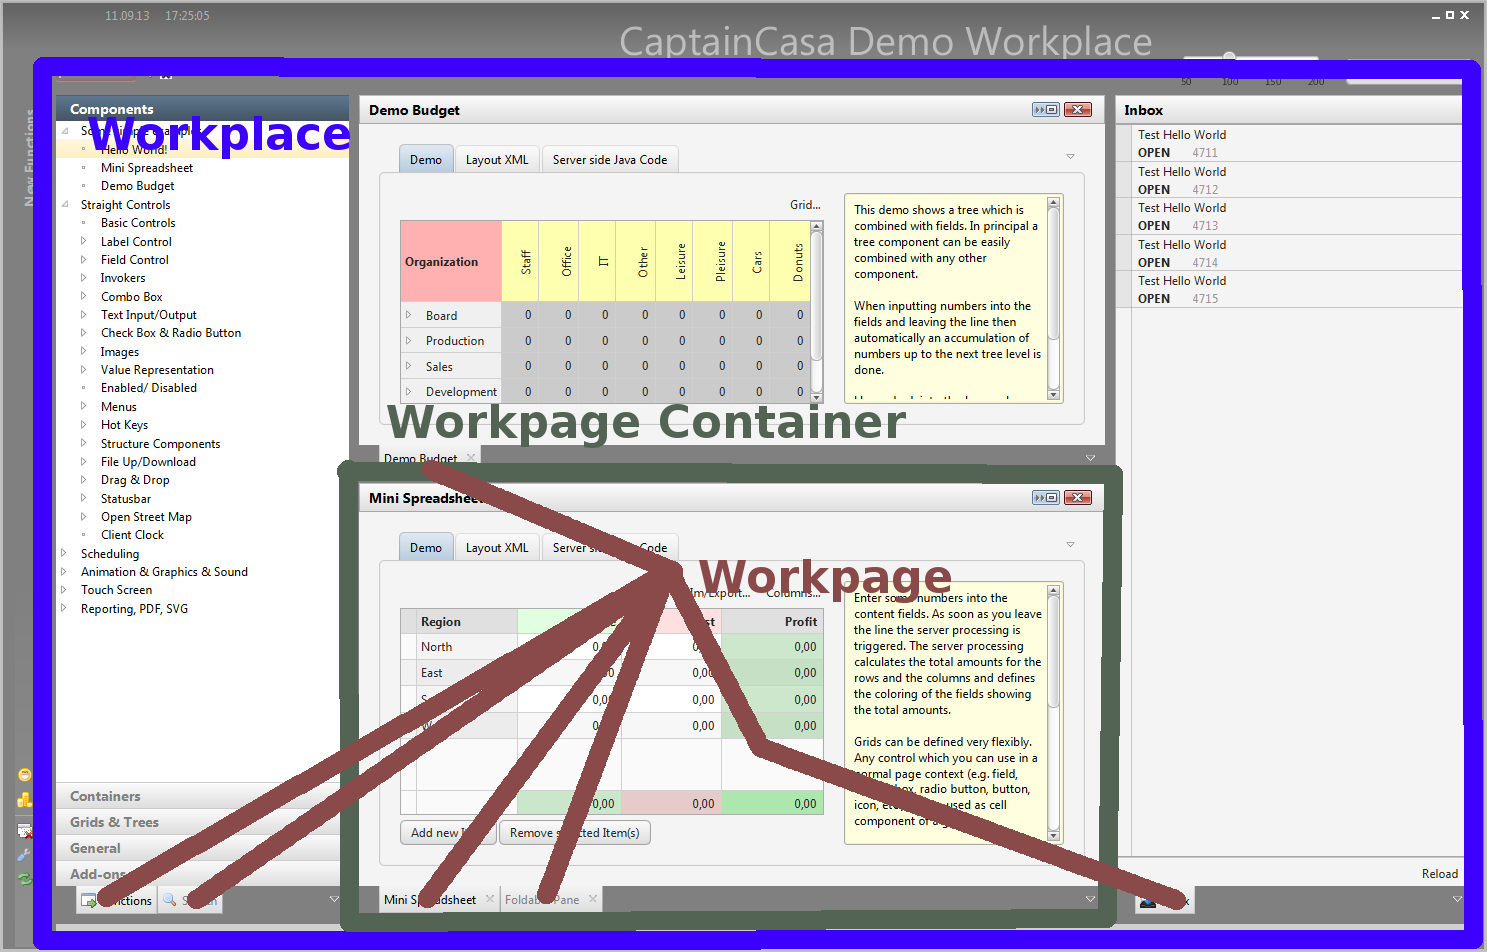
A workplace holds one ore more workpage containers.
A workpage container holds one or more workpages.
A workpage is a normal Enterprise Client page started within the context of the workplace.
Basically there is no effort at all to start all pages that you have developed within the context of a workplace. It just works...
But: you typically want to make use of the workplace APIs. Examples:
You may want to get notified when the user wants to close a workpage. You may want to not allow the user to close a page (e.g. because unsaved data is contained).
You may want to start workpages from your current one: e.g. from a list of orders you want to start the order detail page as a new workpage, so that it runs decoupled from the list.
In theses situations you want to talk to the workplace directly.
...all the information that you need in order to build your first workplace was outsourced into a separate tutorial “Building a workplace”.
We strongly recommend to process this tutorial so that you have some first, working workplace in which you can embed functions and in which you can test if you access the API in the right way.
This chapter is the toughest one. It explains how the workplace internally works. On the one hand you do not need to know too much about these internal things, because at the end you do not see them during development.
On the other hand they are essential for some deep understanding, especially when it comes to understanding how the objects are separated from one another on server side.
You got to know the Dispatcher class/object so far by being a factory object that is “always” written in front of the bean class that you address from a page.
Example: your page “order.jsp” binds a certain field via expression “#{d.OrderUI.orderNumner}” to the server side processing.
We already explained that the dispatcher is some kind of Map-instance, having a certain strategy for resolving names – if they are not contained in the map already. So if the map is asked for “OrderUI” and does not know a corresponding object yet, then the map is creating an OrderUI-object and adds it to its data.
Now comes the workplace...:
The workplace uses a dispatcher “WorkpageDispatcher” which is an enriched version of the normal dispatcher. It not only can resolve class names into objects, but it also can manage sub-dispatchers.
This sounds complex but indeed isn't. If a name to be resolved starts with “d_” then the dispatcher does not resolve this name as usual, but creates a new “WorkpageDispatcher” instance and manages this instance within its map. This instance is referred to as sub dispatcher in the following text.
When creating the instance of the sub dispatcher, then the same dispatcher-class is used than the one creating the dispatcher. E.g. if you derive your own dispatcher from “WorkpageDispatcher”, then the same class will be used for building the sub-dispatchers addresses via “d_”-names.
You may already see: the dispatcher – which actually is a factory – is now able to manage sub dispatchers, each one being a factory on its own. The workplace now is responsible for building one sub-dispatcher for each workpage.
Example: in the following workplace 6 workpages are started:
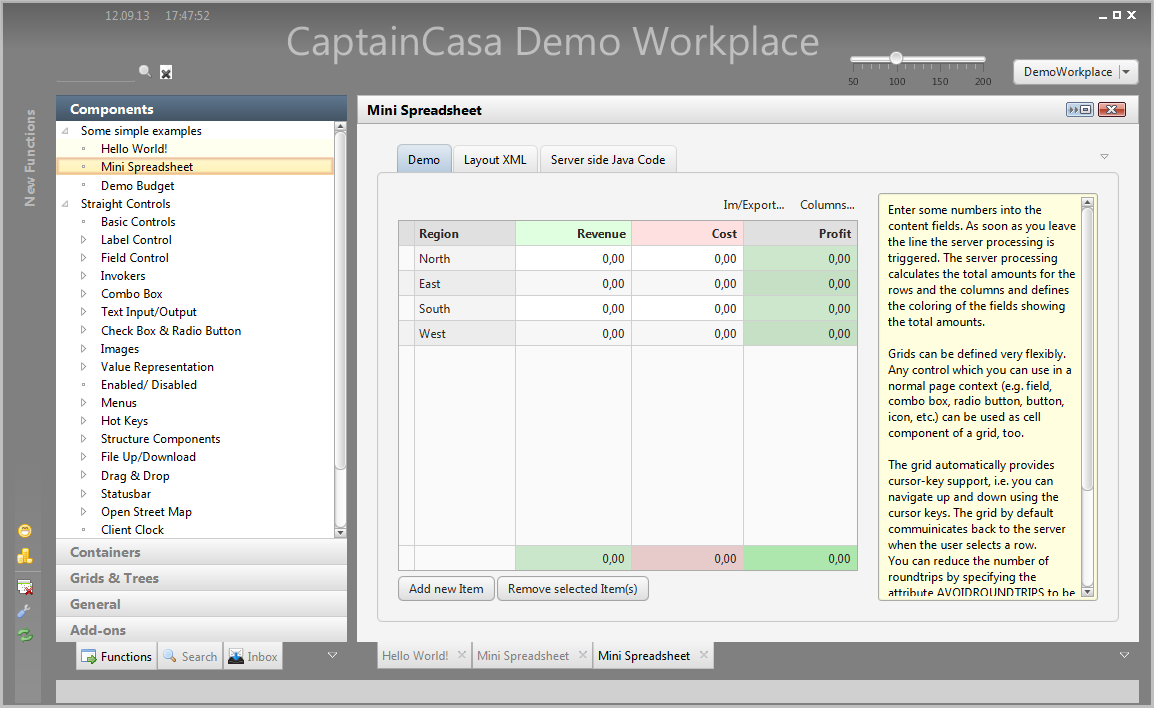
The workpages are: “Functions”, “Search”, “Inbox”, “Hello World”, “Mini Spreadsheet”, “Mini Spreadsheet”.
How is this represented within the objects on the server side? - The object are structured the following way:
d <== the root dispatcher
.d_1 <== subdispatcher instance
.FunctionsUI <== functions bean
.d_2 <== subdispatcher instance
.SearchUI <== search bean
.d_3 <== subdispatcher instance
.InboxUI <== inbox bean
.d_4 <== subdispatcher instance
.HelloWorldUI <== hello world bean
.d_5 <== subdispatcher instance
.SpreadSheetUI <== spreadsheet bean
.d_6 <== subdispatcher instance
.SpreadSheetUI <== spreadsheet bean
The root dispatcher is holding 6 subdispatchers. In each subdispatcher the corresponding page bean is referenced.
Each workpage is internally associated with one subdispatcher, so that the objects between workpages are never shared. Especially this is important when looking into the “Mini Spreadsheet”, which is started twice in the workplace: there is one instance per workpage. As consequence there never is some conflict between the user processing the first and the second instance.
The workplace is showing workpages in dedicated areas – called workpage containers. Each workpage is bound to a screen definition – the screen that is started with the workpage. Basically the workplace management does nothing else then managing which workpage is currently shown in which workpage container.
In the example above one of the “Mini Spreadsheet” instances is just shown to the user on the right side of the workplace. The workplace loads the corresponding page and while loading tells the page to update all contained expressions from “#{d.*}” to “#{d.d_5.*}”. As consequence the expressions in the page that originally are directly pointing to the root dispatcher and then to the bean are updated “on the fly” - and now are pointing to the correct subdispatcher.
This is done completely automatically.
In case that you are interested to get to know the dispatcher that is responsible for managing your bean, you need to inherit your bean class from the following base classes:
WorkpageDispatchedPageBean
(or WorkpageDispatchedBean when not using page beans)
Both provide constructors into which the “owning” dispatcher of the bean is passed as parameter.
public MyXXXXBean extends WorkpageDispatchedPageBean
{
public MyXXXXBean(IWorkpageDisatcher dispatcher)
{
super(dispatcher);
...
}
private void yyyy()
{
...
getOwningDispatcher();
...
getWorkpage();
...
}
}
As shown in the code above, you at any point of the class can access the core objects of the workplace environment:
getOwningDispatcher() - the “owning” dispatcher, returning a class of interface “IWorkpageDispatcher”
getWorkpage() - the workpage that the bean is started in, returning a class of “IWorkpage”
getWorkpageContainer() - the workpage container the page currently is kept inside, returning a class of “IworkpageContainer”
In the text above you saw, that the Dispatcher is some essential player within the workplace framework.
There is one root dispatcher – which is the “outest one”.
There is one sub-dispatcher per workpage which is started.
When creating a CaptainCasa project then automatically a Dispatcher.java source file is created that provides a Dispatcher implementation:
package managedbeans;
import org.eclnt.workplace.IWorkpageContainer;
import org.eclnt.workplace.WorkpageDispatcher;
public class Dispatcher extends WorkpageDispatcher
{
public static DispatcherInfo getStaticDispatcherInfo()
{
return new DispatcherInfo(Dispatcher.class);
}
protected String getRootExpression()
{
return "#{d}";
}
public Dispatcher()
{
}
public Dispatcher(IWorkpageContainer workpageContainer)
{
super(workpageContainer);
}
}
This class provides two constructors:
The one without parameters is the one used when a root dispatcher is created.
The one with parameter is the one that is used when a sub-dispatcher is created.
The dispatcher, which is some kind of context, now can be extended in any way you like in order to match your requirements.
Example: you may want to keep the information about the currently logged on user:
package managedbeans;
import org.eclnt.workplace.IWorkpageContainer;
import org.eclnt.workplace.WorkpageDispatcher;
public class Dispatcher extends WorkpageDispatcher
{
...
...
see above
...
...
String m_user;
public String getUser() { return m_user; }
public void setUser(String user) { m_user = user; }
}
You logon page may access its context and write the corresponding info into the dispatcher:
public class LogonUI
extends WorkpageDispatchedPageBean
{
public LogonUI(IWorkpageDispatcher dispatcher)
{
super(dispatcher);
}
public void onLogonAction(ActionEvent event)
{
...
...
((Dispatcher)getOwningDispatcher()).setUser(m_user);
...
...
}
}
Now, the information about the logged on user is “such global” within your processing, that you need to make sure that it is not handled on sub-dispatcher level only, but it should be handled on root-dispatcher level. So the following implementation of your Dispatcher class is the corresponding improvement:
package managedbeans;
import org.eclnt.workplace.IWorkpageContainer;
import org.eclnt.workplace.WorkpageDispatcher;
public class Dispatcher extends WorkpageDispatcher
{
...
...
public String getUser()
{
if (getOwner() == null)
return m_user;
else
return ((Dispatcher)getOwner()).getUser();
}
public void setUser(String user)
{
if (getOwner() == null)
m_user = user;
else
((Dispatcher)getOwner()).setUser(user);
}
}
The Dispatcher can now be extended to hold the user name, the database name, the tenant id, etc. etc. - and you can access this infor from all page beans within your workplace (if deriving them from WorkpageDispatchedPageBean).
So it makes sense to structure a bit better – and to introduce some own context object, that keeps ally the information you define to be relevant:
public class DialogContext
{
String m_user;
String m_databaseName;
String m_tennantId;
public String getUser() { return m_user; }
public void setUser(String user) { m_user = user; }
public String getDatabaseName() { return m_databaseName; }
public void setDatabaseName(String databaseName) { m_databaseName = databaseName; }
public String getTennantId() { return m_tennantId; }
public void setTennantId(String tennantId) { m_tennantId = tennantId; }
}
The improved Dispatcher implementation then is:
public class Dispatcher extends WorkpageDispatcher
{
...
…
DialogContext m_context;
public Dispatcher()
{
m_context = new DialogContext();
}
public Dispatcher(IWorkpageContainer workpageContainer)
{
super(workpageContainer);
}
public DialogContext getContext()
{
if (getOwner() == null)
return m_context;
else
return ((Dispatcher)getOwner()).getContext();
}
}
Now you can access your context information from “everywhere” within the workplace. So if you have a class that is opened by the workplace (e.g. from the function tree of the wokrplace), then the corresponding code is:
public class HelloWorldUI
extends WorkpageDispatchedPageBean
{
public HelloWorldUI(IWorkpageDispatcher dispatcher)
{
super(dispatcher);
DialogContext context = ((Dispatcher)dispatcher).getContext();
}
public String getPageName() { return "/helloworld.jsp"; }
public String getRootExpressionUsedInPage() { return "#{d.HelloWorldUI}"; }
}
The three core interfaces of the workplace management are accessible from the page bean that is started within the workplace context as shown in the previous chapter. For detailed information of each method of the interfaces please check the JavaDoc documentation.
public interface IWorkpageContainer
{
public void addWorkpage(IWorkpage workpage);
public void switchToWorkpage(IWorkpage wp);
public IWorkpage getWorkpageForId(String workpageId);
public void closeWorkpage(IWorkpage workpage);
...
...
}
This interface gives access to the workpage container, managing workpages.
When starting a workpage then part of the workpage information (IWorkpage) is always an id. The id is a string, that is built up by yourself – so you can use any semantics that is suitable to you. You use the id to identify a certain page in the workpage container.
Example: when you start a workpage showing an article 4711, then your id might be “ARTICLE_4711”. Maybe the article 4711 already is displayed as workpage within your workplace? So you do not want to show the page twice, but better want to switch to the workpage already displaying the article?
In this case you first check with “getWorkpageForId(“ARTICLE_4711”)” if there is already a workpage. If so you use “switchToWorkpage(...)” to bring it to the front, if not you create a new workpage. The creation is done on lower level by passing an instance of IWorkpage, using the default implementation “Workpage”.
Or you use a helper interface “IWorkpageStarter”:
public interface IWorkpageStarter
extends Serializable
{
public IWorkpage startWorkpage(IWorkpageDispatcher workpageDispatcher,
IWorkpageContainer workpageContainer,
WorkpageStartInfo startInfo);
}
You obtain an instance of IWorkpageStarter by calling WorkpageStarterFactory.getInstance().
With IWorkpageStarter you pass an instance of “WorkpageStartInfo”, which is a class that is used everywhere in the workplace context, where you specify information about a page to be started. You may remember the tutorial, when defining e.g. the function tree or the defaul perspective: there you defined WorkpageStartInfo instances using the JAX-B-XML representation, now you do it in the interface “by bean”.
The definition that is required for at runtime starting a page is kept in an object of type “WorkpageStartInfo”. Once started, an instance of “IWorkpage” is built and registered within the workplace. So “WorkpageStartInfo” holds the information about how to start a page, whereas “IWorkpage” holds the information about an actual instance of a started page.
WorkpageStartInfo contains the following information:
Which is the page to be opened for the function? - The workplace may switch from one function to another and as consequence has to update a certain graphical ROWINCLUDE area...
Please note: there are two ways of defining the page to be opened: the “page-way” and the “page bean way”: you either directly pass the name of the page that you want to open via the method “setJspPage(...)” - or you pass the name of the page bean instance via the method “setPageBeanName(...)”.
Please note that the name of the page bean instance is NOT its class name, but is the name under which the page beans is managed within the dispatcher. E.g. if the page beans is managed within the dispatcher via “#{d.AbcUI}” then the name is “AbcUI”.
Which is the title of the function? - The workplace shows all opened functions in a task bar – and it renders a title bar on top of the content area. Both require a textual information.
Which is the (language-independent) id of the function? - Maybe you want to ask the workplace if a function is already started in order to avoid a double-starting. Each function that is started is associated with an id, so that you can check at runtime.
Are there certain start parameters to pass to the function, so that it receives some additional information?
There is a clase “WorkpageStartInfo” and an interface “IWorkpageStartInfo” which collects all this information:
public interface IWorkpageStartInfo
{
public void setJspPage(String value);
public void setPageBeanName(String value);
public void setImage(String value);
public void setText(String value);
public void setDecorated(boolean decorated);
public void setOpenMultipleInstances(boolean openMultipleInstances);
public void setId(String value);
public void setParam(String paramName, String paramValue);
public void removeParam(String paramName);
...
...
}
Normally you define within the WorkPageStartInfo-instances which page to start.
You in addition can define that instead of starting a page a certain internal function is invoked. In this function you can “do what you want”.
You do so by passing a class name via the “setFunctionClassName(...)” method of WorkpageStartInfo. A new instance of the class will be created when the user starts the corresponding item. The instance is expected to support interface “IWorkpageFunctionExecute”. Example:
public class DemoWorkpageFunction implements IWorkpageFunctionExecute
{
public IWorkpage executeFunction(IWorkpageDispatcher rootDispatcher,
IWorkpageStartInfo workpageStartInfo)
{
...
...
return null;
}
}
When starting a workpage (e.g. by double clicking into the function tree), then a corresponding object is created within the workplace framework. The object supports interface “IWorkpage” - the default implementation is class “Workpage”.
The interface IWorkpage is:
public interface IWorkpage
{
public String getJspPage();
public String getTitle();
public String getIconURL();
public String getId();
public boolean isDecorated();
public void setWorkpageContainer(IWorkpageContainer container);
public IWorkpageContainer getWorkpageContainer();
public IWorkpageDispatcher getDispatcher();
public String getParameter(String name);
...
...
}
The work page is associated with certain information that the workplace needs in order to draw a titlebar for the work page and in order to list the page in the task bar:
the JSP page (“/order.jsp”)
the title (“Order 4711”)
an icon url (“/images/order.png”)
and id that differentiates the content of this page from other pages (“order/4711”)
There is also the possibiliy to define start parameters when defining a workpage: the start parameters are simple String-objects (for good reason we do not allow complex objects to be passed...).
The typical procedure of passing start parameters is:
The start parameters are defined within the WorkpageStartInfo using the setParam(..) method. You may pass any number of parameters.
At runtime when the page really is started (e.g. user double clicks function tree node) then a IWorkpage instance is created, taking over all start parameters from WorkpageStartInfo.
The application can take over the parameters by accessing the workpage using method “getWorkpage()”, reading the parameters and preparing its data content accordingly.
Example: in the function tree you add the function to show article with id “4711”. As consequence you create a WorkpageStartInfo instance (by bean, by XML) in which you define parameter “ARTICLEID” to be “4711”. The code to open the page in the workplace may look as follows:
...UI bean of the starting bean, e.g. list of articles...:
...
WorkpageStartInfo wpsi = new WorkpageStartInfo();
wpsi.setId(“ARTICEL_4711”);
wpsi.setPageBeanName(“ArticleDisplayUI”);
wpsi.setText(“Article Display 4711”);
wpsi.setParam(“ARTICLEID”,”4711”);
...
IWorkpageStarter wps = WorkpageStarterFactory.getWorkpageStarter();
wps.startWorkpage(getOwningDispatcher(),
getWorkpageContainer(),
wpsi);
...
The workpage is started, the ArticleDisplayUI instance is created – so in the constructor you read the start parameters in the following way:
public class AritcleDisplayUI extends WorkpageDispatchedPageBean
{
public ArticleDisplayUI(IWorkpageDispatcher dispatcher)
{
super(dispatcher);
String articleId = getWorkpage().getParam(“ARTICLE”);
initialize(articleId);
}
private void initialize(String articleId)
{
...
...
...
}
}
When a workpage is started (e.g. double click in the function tree) then a corresponding “IWorkpage” object is created, itself being linked to a corresponding dispatcher object that manages the UI beans for the workpage's context.
This is the starting procedure. But: the workplace management also manages the ending of a workpage: e.g. the user presses the “top right close button” of the workpage. The sequence of operations is as follows:
The workplace management tells the request to close to the workpage, by calling its “close” method.
The workpage delegates this close request to all objects which have registered. Objects (e.g. UI beans) can register themselves by implementing the interface “IWorkpageLifeCycleListener” and by adding themselves to the workpage using the method “IWorkpage.addLifeCycleListener(...)”.
The interface contains two important methods:
package org.eclnt.workplace;
public interface IWorkpageLifecycleListener
{
...
public boolean close();
public void closeForced();
...
}
The closing of the workpage is delegated to all listeners, i.e. The “close()” method of the listeners is called.
Each listener now can decide if it agrees with closing or not – by either returning “true” or “false”. If one listener returns “false” then the whole closing process is interrupted.
There is a second method “closeForced()”. In this method the listeners just have to close – there is no chance to escape.
Please take a detailed look into the IWorkpageLifecycleListener interface, it also contains very useful other methods:
package org.eclnt.workplace;
public interface IWorkpageLifecycleListener
{
// ...the ones from the previous chapter...
public boolean close();
public void closeForced();
public void reactOnDestroyed();
public void reactOnShownInContentArea();
public void reactOnHiddenInContentArea();
public void reactOnShownInPopup();
}
The most important method is the method “reactOnDestroyed()”. This is called in two situations:
The workpage is closed by the user. After the “close()” and “closeForced()” method call, the “reactOnDestroyed()” method is called.
Closing of the sessions, e.g. due to session timeouts: in this case the “reactOnDestroyed()” method is called without any other methods being called before.
You should use the reactOnDestroyed() method for tidying up resources,
The workplace framework allows to start functions in so called workpages. Each function's managed beans are isolated from other functions' managed beans so that there is a maximum level of isolation between: each workpage is running “on its own” without getting disturbed by other workpages running in parallel.
Now, there are certain situations in which you explicitly want one function of the workplace to talk to another function. For example there is a list of objects started as one function and a detail processing of an object started as a second function. As soon as the user updates the detail, the list should be updated as well.
Of course there is always the possibility to use some “model type of eventing” below the managed beans: i.e. if list and detail are talking to the same model then both can be updated by corresponding model events. But this in reality is not always available...
So what we explain in this chapter, is the possibility to let one function (workpage) talk to other functions (workpages) – but still following the concept of isolation between functions.
The solution is “by eventing”: there is a event processing that is added to the workpage management. You can throw events from one workpage and process these events on other workpages. In the demo workplace there is an example showing this:
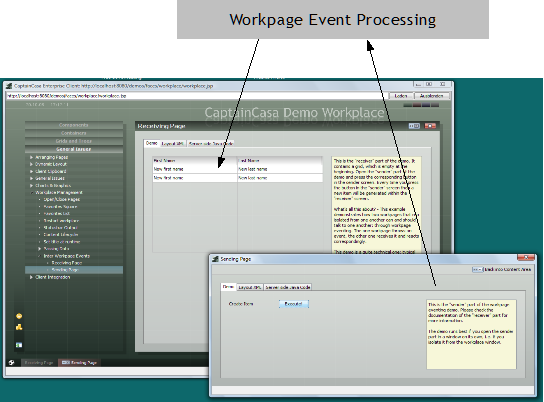
Two workpages are opened in parallel, one isolated as popup. When the user presses the button “Execute” on the foreground workpage then a grid item is added inside the background workpage.
Take a look onto the event sender:
public void onCreateItem(ActionEvent event)
{
DemoWpAddItemEvent workpageEvent = new DemoWpAddItemEvent();
getWorkpage().throwWorkpageProcessingEvent(workpageEvent);
}
The method onCreateItem() is called every time the user presses the button. It creates an instance of an event class and passes it to the workpage's method “throwWorkpageProcessingEvent()”. The event class itself looks the following way:
public class DemoWpAddItemEvent
extends WorkpageProcessingEvent
{
}
It just derives from “WorkpageProcessingEvent” which comes with the CaptainCasa server processing. Of course your implementation may contain additional members and methods that you want to pass with a certain event.
The receiver screens has the following code:
public class DemoWpReceive
extends WorkpageDispatchedBean
implements Serializable
{
public class MyWorkpageProcessingEventListener
implements IWorkpageProcessingEventListener
{
public void processEvent(WorkpageProcessingEvent event)
{
if (event instanceof DemoWpAddItemEvent)
addNewItem();
}
}
public class MyRow extends FIXGRIDItem implements java.io.Serializable
{
protected String m_lastName;
public String getLastName() { return m_lastName; }
public void setLastName(String value) { m_lastName = value; }
protected String m_firstName;
public String getFirstName() { return m_firstName; }
public void setFirstName(String value) { m_firstName = value; }
}
// ------------------------------------------------------------------------
// members
// ------------------------------------------------------------------------
protected FIXGRIDListBinding<MyRow> m_rows = new FIXGRIDListBinding<MyRow>();
// ------------------------------------------------------------------------
// constructors
// ------------------------------------------------------------------------
public DemoWpReceive(IDispatcher dispatcher)
{
super(dispatcher);
getWorkpage().addWorkpageProcessingEventListener
(new MyWorkpageProcessingEventListener());
}
// ------------------------------------------------------------------------
// public usage
// ------------------------------------------------------------------------
public FIXGRIDListBinding<MyRow> getRows() { return m_rows; }
// ------------------------------------------------------------------------
// private usage
// ------------------------------------------------------------------------
private void addNewItem()
{
MyRow row = new MyRow();
row.setFirstName("New first name");
row.setLastName("New last name");
m_rows.getItems().add(row);
}
}
It contains an event listener class/object that implements the interface IWorkpageProcessingEventListener. The listener gets called by the workplace processing every time a workplace event is thrown somewhere on another workpage. The listener checks if the event is relevant for the current page and executes a corresponding method.
Result: a coupling between two workpages is defined – without hard-wiring the processing of both pages.
There are some additional add on components that are available within the workplace framework.
ROWWORKPLACE – this is a complete workplace component that manages several workpage containers and allows to drag/drop workpages from the one to the next container. The ROWWORKPLACE component is internally using the ROWWORKPACECONTAINER and the ROWWORKPAGESELECTOR component.
ROWWORKPAGECONTAINER – this is one concrete content area. The component is internally created when using the “big” ROWORKPLACE component.
ROWWORKPAGESELECTOR – this is the task bar of one workpage container. The component is internally created when using the “big” ROWORKPLACE component.
ROWWORKPLACEFUNCTIONTREE – this is the function tree. You already got to know the component within the tutorial “Creating a Workplace”.
ROWWORKPLACEFAVORITES – this is a list of favorites. You may drop information from the function tree into this area. As consequence a corresponding icon will be added.
So far you have seen:
There is a dispatcher concept for separating objects between different user activities.
There is a workpage container concept, a workpage container being a container area in which workpages can be started.
There may be multiple workpage containers, separated by a workpage-container-id – allowing to distribute several workpages onto several workpage containers.
Now, all this is brought together into a quite powerful framework on top of this: the workplace perspective management.
The basis of the workplace perspective management is the capability to run multiple workpage containers in parallel. The user can – by simply dragging and dropping move functions from the one container into the next. The user can split up workpage containers into new ones and as result can flexibly arrange a workpage container environment that fits to his/her needs.
Example: the demo workplace is started with the following default perspective:

There are two areas: one on the left, holding the function tree and some inbox management – and one on the right, so far not holding any page (the background page is shown).
After starting some functions, the user can drag&drop the corresponding workpages by picking them within their title area – or by picking the corresponding selector item. The result may look like:
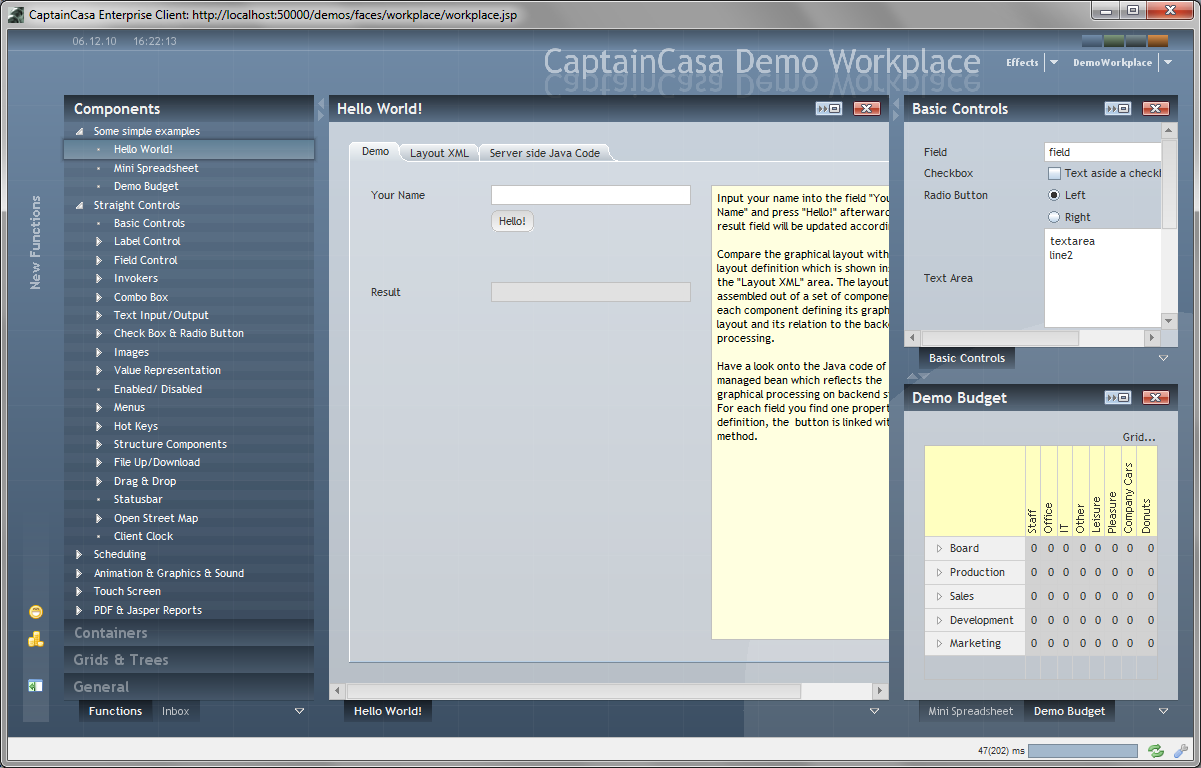
The “perspective” now contains four areas, one of them (the central) one, being the “root” area. A “perspective” is the definition of a certain arrangement of workpage containers, together with the information what page is started within a workpage container.
The perspective management can either be used by API or it can be used by configuration. Within the configuration it is possible to...:
...assign multiple pre-configured perspectives to one user
...define one default perspective for the user
...save the personal perspectives that a user creates on his/her own
The following text will guide you through the steps to create such a “perspective-driven” workplace environment.
The first step is to create a page that actually holds the workplace. This is quite simple – just define the following page:
<t:rowbodypane id="g_1" background="#808080">
<t:rowworkplace id="g_2" objectbinding="#{d.workpageContainer}"
wpselectorposition="bottom" />
</t:rowbodypane>
<t:rowstatusbar id="g_3" />
The central component is the ROWWORKPLACE component. It points via its OBJECTBINDING attribute to the workpage dispatcher's property “workpageContainer”.
When previewing the page the result looks like:
You see two workpage container areas, one on the left holding “Page 1”, one on the right holding no page. ...well yes, if we say “You see...” then actually you see some info about a missing page on the left, and some empty area on the right – but this is OK (up to now).
The information comes out of a default configuration that splits the workplace into two parts, and that opens “Page 1” on the left side.
Please note: you can create a workplace page by using a corresponding template when creating the page in the Layout Editor:
In this case the page will look like:
Some background coloring and some additional useful components are arranged in addition to the central ROWWORKPLACE component.
Now, let's update this perspective. To do so, open the “Runtime Configuration” tool within the layout editor's tool area (on the right):
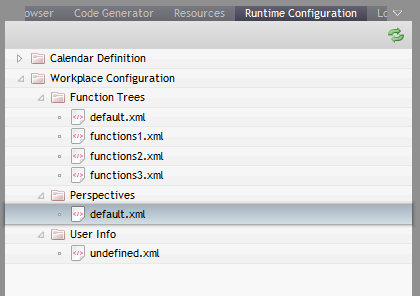
There are three sections of configuration:
function trees
perspectives
user infos
Inside the “Perspectives” section you see a file “default.xml”. By double clicking you can open and edit the file content. The default content is:
<?xml version="1.0" encoding="UTF-8" standalone="yes"?>
<workplaceTileInfo>
<text>Demo Workplace</text>
<split>
<orientation>horizontal</orientation>
<dividerLocation>250</dividerLocation>
<subContainer1>
<id>FUNCTIONS</id>
</subContainer1>
<subContainer2/>
</split>
<startViews>
<jspPage>/page1.jsp</jspPage>
<id>page1</id>
<text>Page 1</text>
<decorated>true</decorated>
<closeSupported>true</closeSupported>
<popupSupported>true</popupSupported>
<openMultipleInstances>false</openMultipleInstances>
<startSubWorkpageContainerId>FUNCTIONS</startSubWorkpageContainerId>
</startViews>
</workplaceTileInfo>
A perspective configuration always consists of two parts:
The definition of the screen split up – in this case the layout contains a split pane, being divided into two workpage containers, one with id “FUNCTIONS”, the other one without id (the default one).
The definition of what page to start where by default – in this case the page “/page1.jsp” is started within the workpage container with id “FUNCTIONS”.
You may update the file to your needs. Internally the XML definition that you edit is a JAXB binding to class “WorkplaceTileInfo”. Please consult the JavaDoc for details what configuration is possible to be done within the XML file.
Please note: the runtime configuration that you edit, is internally stored within the /webcontent/eclntjsfserver/config/ccworkplace directory of your project. You can also edit the information directly within your development environment (Eclipse, …).
You need to reload your application in order to bring changes from your project into the runtime.
After now having maintained the first perspective you can set up multiple perspectives, either to be used by one user (user may switch between different perspectives) or to be used by several users.
The way to do is: Just create new perspective definitions within the “Perspectives” section of the runtime configuration. Then edit the files within the “User Info” section. The default configuration file that is chosen is “undefined.xml”:
<?xml version="1.0" encoding="UTF-8" standalone="yes"?>
<workplaceUserInfo>
<perspectives>default</perspectives>
<defaultPerspective>default</defaultPerspective>
<functionTree>default</functionTree>
<backgroundPage>/empty.jsp</backgroundPage>
</workplaceUserInfo>
Within the file you may define multiple “perspectives” to be used. These are the “potencial” perspectives for one user. And there is one “defaultPerspective” which is the one that is opened by default.
How is this user info read at runtime?
The system calls interface “IUserAccess” in order to ask your application what the id of the currently logged on user is. With the result it tries to find a corresponding definition “<userId>.xml” within the “User Info” section.
When not explicitly defining an “IUserAccess” interface then a default/dummy one is used, returning user “undefined” by default – this is the reason, why “undefined.xml” is selected in the default environment.
When defining multiple perspectives to be available for a certain user, then you may use a nice component WORKPLACEPERSPECTIVESELECTOR to switch between the perspectives.
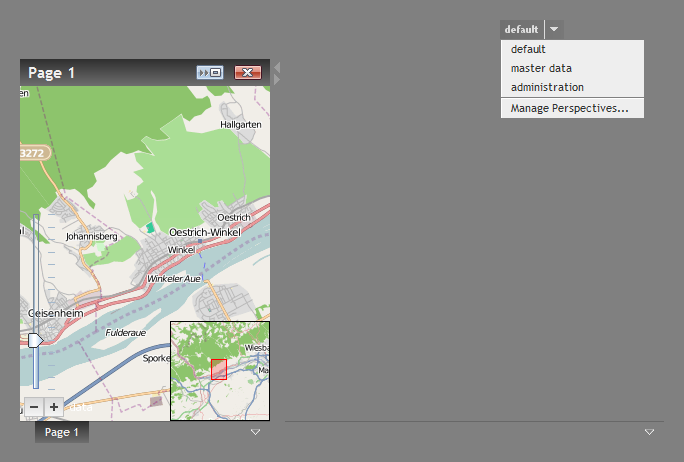
The layout definition is:
<t:rowbodypane id="g_1" background="#808080">
<t:row id="g_2">
<t:coldistance id="g_3" width="100%" />
<t:workplaceperspectiveselector id="g_4"
objectbinding="#{d.workpageContainer}" />
<t:coldistance id="g_5" width="100" />
</t:row>
<t:rowdistance id="g_6" height="20" />
<t:rowworkplace id="g_7" objectbinding="#{d.workpageContainer}"
wpselectorposition="bottom" />
</t:rowbodypane>
<t:rowstatusbar id="g_8" />
<t:pageaddons id="g_pa"/>
The component is bound via its OBJECTBINDING attribute to the “workpageContainer” of your workpage dispatcher.
As you may have seen already, the menu that allows to switch between different perspectives also provides a section “Manage Perspectives...”. The purpose behind is:
The user may create new perspectives by starting new functions (within your application) and by dragging and dropping workpages into different workpage containers.
The function “Manage Perspectives...” opens up a dialog, in which the user can store his/her personal perspective.
When changing the user then you have to tell the workplace perspective management about. This is done by calling the following function:
IWorkpageDispatcher
.getWorkpageContainer() // passes IWorkpageContainer
.prepareWorkplaceForCurrentUser()
So this is the function to be called after e.g. an explicit log on of a user.
So far you saw in this chapter how to set up a workplace using a configuration via XML definitions. This is the “automated and most comfortable” way of using the workplace perspective management.
Of course you can directly access the workplace perspective management via interfaces. The most important issues are:
In your dispatcher implementation you can switch off the automatic functions by creating a WorkpageContainer-instance through the following constructor:
/**
* This constructor may be used if you want to switch off the usage
* of the default workplace management. The default workplace management
* reads the runtime configuration for the current user and creates
* a corresponding workplace perspective.
*/
public WorkpageContainer(IWorkpageDispatcher dispatcher,
boolean withPreparingWorkplaceForCurrentUser)
{
...
}
For creating an own instance you need to override the dispatcher's createWorkpageContainer() method, e.g. in the following way:
protected IWorkpageContainer createWorkpageContainer()
{
return new WorkpageContainer(this,false);
}
Now there is “no automated magic” anymore, but you can directly access the interfaces. The workpage container (IWorkpageContainer) provides access to the perspetice management by its tile manager:
public interface IWorkpageContainer
{
...
public WorkplaceTileManager getTileManager();
...
}
The WorkplaceTileManager e.g. allows to render a certain layout that you pass inside via the method:
public class WorkplaceTileManager
{
...
public void importWorkplaceTileInfo(WorkplaceTileInfo tileInfo)
{
...
}
...
}
Please used these hints and the dive into the JavaDoc documentation for the corresponding classes.
Function trees are the typical tree structure of a workplace, providing all call-able functions for a certain user. You can either define function trees by program API or you can define function trees by XML definition. The XML that you define is a pure JAX-B XML representation of the API object that you pass by API.
This means: the functions management is exactly the same for both configuration scenarios. You may start to configure the function tree by XML and then later on decide to make it dnyamic, e.g. base on user- and role-specific authority definitions.
There are certain steps to set up a function tree, that is managed “by declaration”:
Create a page to hold the function tree(s)
Set up the function tree's XML definition
Assign the function tree XML definition to the user definition
The easiest way to create a page to hold the function trees is to use a certain template when creating the page in the Layout Editor:

After creating the page you will see the following preview in the Layout Editor:
Well, this looks not too nice – but remember: some more colorful background typically is provided “behind” the page when being used, so things will look much nicer then.
<t:row id="g_1">
<t:pane id="g_2" background="#00000010" height="100%" width="100%">
<t:rowworkplacefunctions id="g_3"
objectbinding="#{d.workpageContainer}" />
</t:pane>
</t:row>
The central component is the ROWWORKPLACEFUNCTIONS component – pointing to the dispatcher's workpage container via its OBJECTBINDING attribute.
The component checks the current user (IUserAccess interface), and loads the function tree that is defined for this user. By default there are some dummy function tree definitions already available – that's where the content you see is from.
Function trees are set up within the runtime configuration – very similar to the definitions in the perspective management:
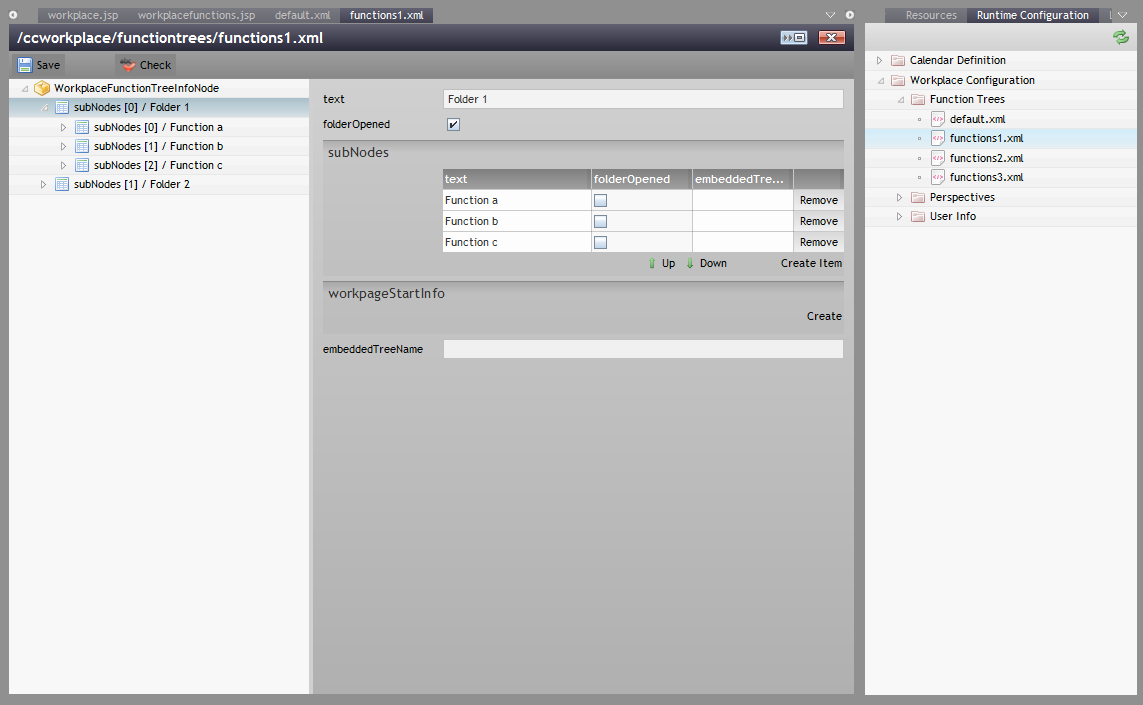
A function tree is a hierarchical arrangement of node definitions. Each node may either be a “folder node” - i.e. it contains a numer of sub-nodes. Or it may be a “page node”, i.e. it is associated with some information about which page to start.
There is a special type of node definition: nodes, that point to other function tree definition (in the default project this is the “default.xml” definition). By using these nodes you can build up function trees out of several other function trees – you do not have to embed all functions for a certain scenario into one tree definition, but can split the information into several re-usable tree definitions.
When defining function trees, please note: the first level of node definitions is always used to form the “outlook bar”.
The assignment is done within the user info section – each user points to one function tree.
The first step is the same as with the XML definition – you need to define a layout page to keep the function tree. So follow the steps for creating the function tree page that are listed in the previous chapter.
But now you do not define some XML function tree definition, but you use an API. Example:
for (int i=0; i<5; i++)
{
WorkplaceFunctionTreeInfoNode n2 = new WorkplaceFunctionTreeInfoNode();
n2.setText("Node Level 1 / Instance " + i);
n1.getSubNodes().add(n2);
for (int j=0; j<5; j++)
{
WorkplaceFunctionTreeInfoNode n3 = new WorkplaceFunctionTreeInfoNode();
n3.setText("Node Level 2 / Instance " + j);
for (int k=0; k<5; k++)
{
WorkplaceFunctionTreeInfoNode n4 = new WorkplaceFunctionTreeInfoNode();
n4.setText("Node Level 3 / Instance " + k);
WorkpageStartInfo wpsi = new WorkpageStartInfo();
n4.setWorkpageStartInfo(wpsi);
wpsi.setJspPage("/workplace/demohelloworld.jsp");
n3.getSubNodes().add(n4);
}
n2.getSubNodes().add(n3);
}
}
((WorkpageContainer)getWorkpageContainer()).getFunctionsManager().importWorkplaceFunctionTreeInfoNode(n1);
((WorkpageContainer)getWorkpageContainer()).getFunctionsManager().setObIndex(0);
The program is creating the following function trees:
Please check the demo “General > Workplace Management > Modify Function Tree at Runtime” within the demo workplace.
In certain environments users want to take benefit of working with multiple screens. For example they run overview and monitoring type of functions on one screen and operational functions with data input and output on the other screen.
A workplace (as any other CaptainCasa dialog) is running inside one browser instance. A browser instance may be an individual browser or a browser tab. - One browser instance cannot be spanned across multiple screens, so the natural way of running a web application across multiple screens is to start it two times and shifting the second browser instance to the second screen.
In this case, of course, the user works with two browsers, which are not synchronized with one another in any means.
With update 20210823 CaptainCasa introduced the support of multi-screen workplace scenarios and provides a simple to use API to setup a synchronization between workplace instances.
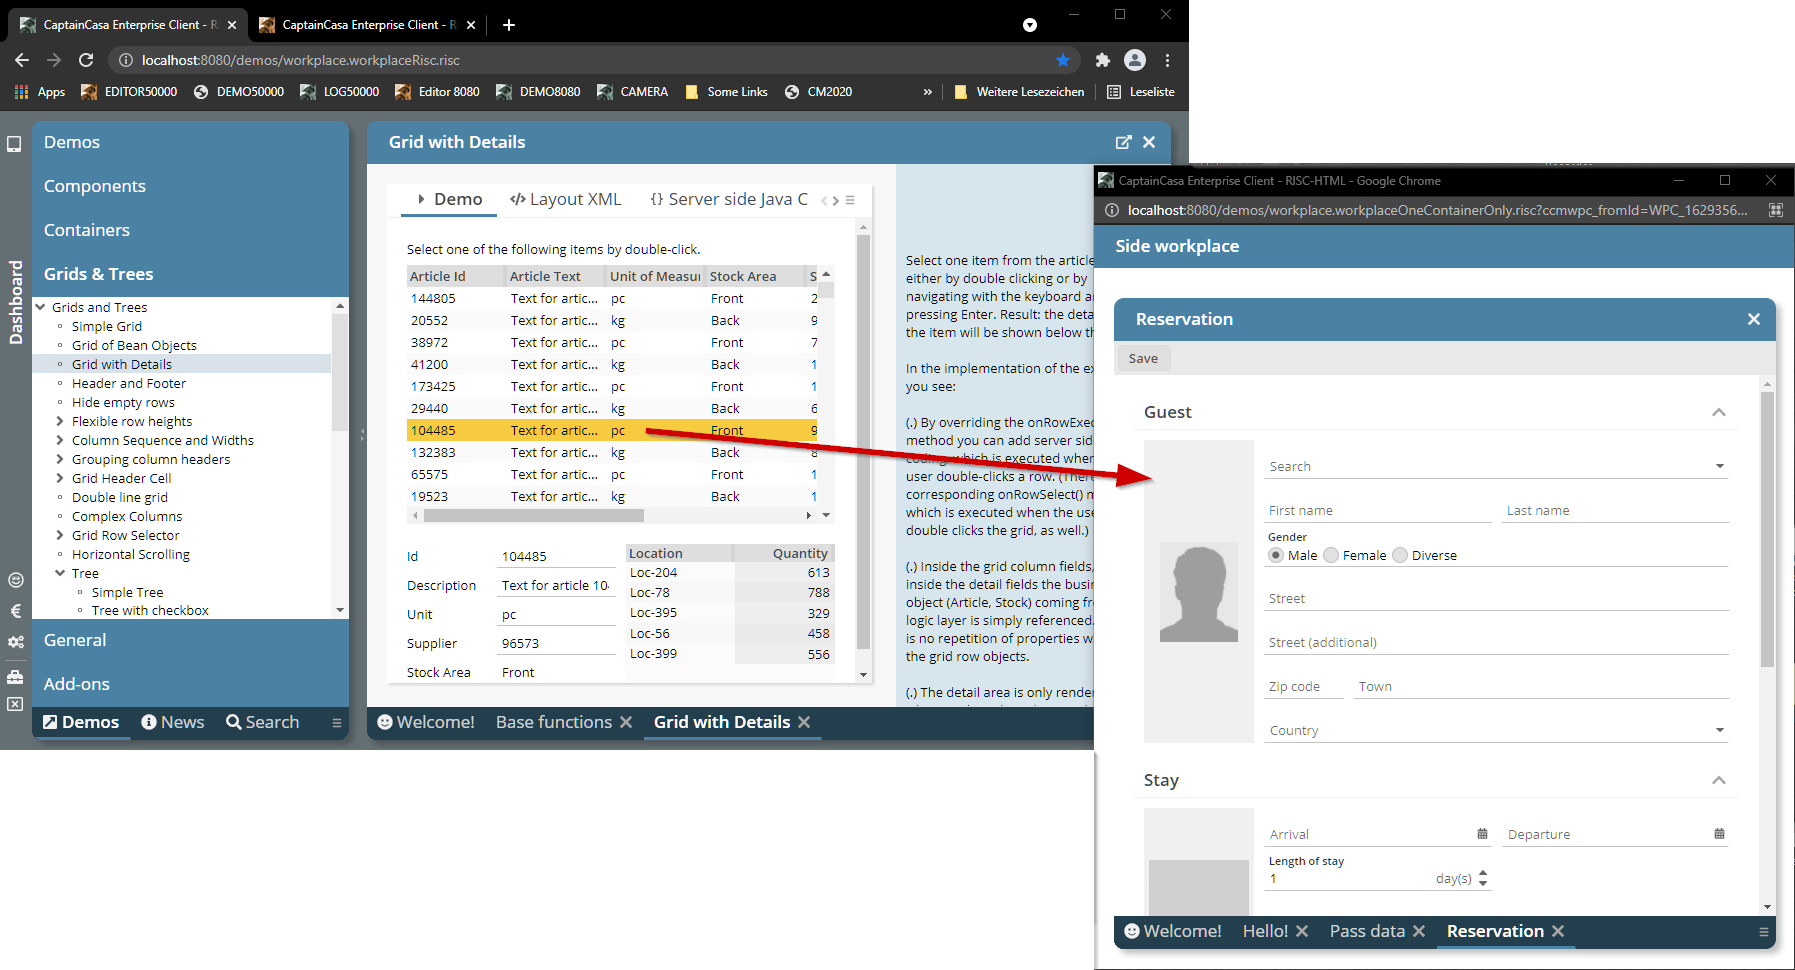
The functions include:
Starting a second (third, forth, ...) workplace with a certain name (e.g. “DETAIL”) from an existing workplace.
Starting a dialog in the second workplace.
Updating a dialog in the second workplace.
The individual workplaces are synchronized automatically: if the user e.g. starts a function from the “left” into the “right” workplace, then the “right” workplace immediately is updated, without requiring any activity by the user. This synchronization is internally done by the use of a web socket based communication.
The typical way to use the workplace management is to use the ROWWORKPLACE component. When working with this component then all UI parts which are required in the multi-screen scenarios are automatically created.
If not using this component, but if using the individual components for building the workplace (ROWWORKPAGECONTAINER and ROWWROKAGESELECTOR) then you need to add certain components to your workplace. These components to be added are described later.
We definitely recommend to use ROWWORKPLACE, of course!
The class “MultiWorkplaceConnector” is the central facade for accessing the multi-screen functions. You need to call the “instance()” method in order to access the central instance that you then use for calling:
startWorkplace(...)
Into the method you pass the URL of the workplace that you want to start as dependent workplace. This might be the URL of the normal workplace that you use or it might be the URL pointing to a reduced workplace (e.g. a workplace without function tree, so that this workplace is only used for displaying certain aspects)
Each workplace that you start received a logical name, e.g. “DETAIL”. This is the name that is later on used to start e.g. work pages within a dedicated dependent workplace.
startWorkpage(...)
For starting functions in the dependent workplace the “WorkpageStartInfo” object is used, which is the central configuration of what to start within the whole workplace management. So, starting a workpage in a dependent workplace is as easy as starting a workpage in the normal one-screen environment.
Dependent on the configuration in “WorkpageStartInfo” you might always create a new instances of the dialog in the dependent workplace – or you might switch to an existing dialog if it was opened. In the seconds case the parameters that you define with “WorkpageStartInfo” can be passed into the existing dialog so that it can adapte accordingly.
Please check the demos in the demo workplace and the JavaDoc for concrete coding hints.
From one browser running a workplace you can start multiple other browsers starting dependent workplace. Each dependent workplace receives a name (“DETAIL”). The multi-screen workplace management makes sure that only one instance per name can actually be started.
From the starting workplace you can trigger functions in the dependent workplace by passing its name. Example:
MultiWorkplaceConnector.startWorkpage(IWorkpageDispatcher fromWorkplace, WorkpageStartInfo wpsi, String targetWorkplaceName)
From the dependent workplace you can trigger functions in the original workplace it was started from by using the pre-defined name “ccstarter” (please use constant MultiWorkplaceConnector.CCSTARTER).
Now that you open up several browsers containing different functions of your application you may want to establish some eventing between the browsers: maybe you want to pass selections from the one screen to the next, or you want to refresh some other browser's content after having saved some data.
There is one “perfect” mechanism to do so - the “Dialog Message Bus”. This event mechanism is very simple to implement - and it automatically overcomes “browser borders”. So you can easily throw an event in the one browser's application processing and catch it in an other's browser processing.
There is an own chapter “Dialog Message Bus” in this documentation. Please check there for details.
As already shown in the previous screenshot...
...the workplace that is started as dependent workplace may be a reduced workplace without function tree or other workplace functions.
The layout is:
<t:rowtitlebar id="g_2" text="Side workplace" />
<t:rowbodypane id="g_9" padding="left:20;top:20;bottom:10">
<t:rowworkplace id="g_11" objectbinding="#{d.workpageContainer}"
wpselectorposition="bottom" />
</t:rowbodypane>
The code is:
package workplace;
import java.io.Serializable;
import org.eclnt.editor.annotations.CCGenClass;
import org.eclnt.workplace.IWorkpageDispatcher;
import org.eclnt.workplace.WorkpageDispatchedPageBean;
import org.eclnt.workplace.WorkplaceTileInfo;
import org.eclnt.workplace.WorkplaceTileInfoPageContainer;
@CCGenClass (expressionBase="#{d.WorkplaceOneContainerOnlyUI}")
public class WorkplaceOneContainerOnlyUI
extends WorkpageDispatchedPageBean
implements Serializable
{
public WorkplaceOneContainerOnlyUI(IWorkpageDispatcher workpageDispatcher)
{
super(workpageDispatcher);
loadEmptyWorkplace();
}
public String getPageName() { return "/workplace/workplaceOneContainerOnly.jsp"; }
public String getRootExpressionUsedInPage() { return "#{d.WorkplaceOneContainerOnlyUI}"; }
private void loadEmptyWorkplace()
{
WorkplaceTileInfo ti = new WorkplaceTileInfo();
WorkplaceTileInfoPageContainer tipc = new WorkplaceTileInfoPageContainer();
ti.setContainer(tipc);
getWorkpageContainer().getTileManager().importWorkplaceTileInfo(ti);
}
}
Please take a look at the “loadEmptyWorkplace()”-method:
A “WorkplaceTileInfo” instance is created that directly contains only one container area.
The instance is passed into the workpage container.
If one workplace starts a second workplace the both are running as completely separated browser instances – and as consequence as completely separated dialog sessions on server side.
Dependent on the session configuration of your application this means:
If you use session management “by URL-encoding” (which is default) then each dialog session is running in some own http session.
If you use session management “by Cookie” then both dialog sessions are running inside the same http session.
Please pay attention: both dialog sessions require to run in the same Java process!
In case of session management “by URL-encoding” this is only guaranteed if running in a single server scenario! It is not possible to run in a clustered scenario!
In case of session management “by Cookie” all dialog sessions are belonging to one http-session – and all traffic to this http session automatically is routed to the same cluster node.
One work page container may hold several work pages. There is a default component ROWWORPAGESELECTOR that renders a corresponding selection area to let the user switch between the different work pages. This component is used internally when using the ROWWORKPLACE component, too:

By default the rendering is done as part of the workplace framework using a TABBEDPANE component.
The component is using some own style class definition for its usage inside the workplace, so you can flexibly change the styling independent from the normal TABBEDPANE styling. But of course you are bound to the component's general capabilities – showing an image, some text and a close icon.
You can overcome the limits of the TABBEDLINE by rendering the work page selector are completely on your own. All you have to do is:
Develop a page bean that is used as row work page selector
Implement interface “IWorkpageSelector”
Register the page bean class within your system.xml
Let's assume, the rendering of the work page selector should be the following:
(The demo workplacea contains the implementation of this example. Please take a look into layout “/workplace/workplaceselector/DemoSelector.jsp” and code “/workplace/DemoSelector.java”.)
The layout of the selector is the following:
<t:beanprocessing id="g_1" beanbinding="#{d.DemoSelector}" />
<t:row id="g_2">
<t:slidecontainer id="g_6"
background="#{ccstylevalue['@baseColorDark@']}"
width="100%">
<t:pane id="g_3">
<t:rowdynamiccontent id="g_5"
contentbinding="#{d.DemoSelector.dynContent}" />
</t:pane>
</t:slidecontainer>
</t:row>
It contains a SLIDECONTAINER (so that the user can move the are with drag&drop), in which some dynamic content is embedded.
The code is:
package workplace;
import java.io.Serializable;
import java.util.ArrayList;
import java.util.List;
import org.eclnt.jsfserver.base.faces.event.ActionEvent;
import org.eclnt.editor.annotations.CCGenClass;
import org.eclnt.jsfserver.elements.componentnodes.COLDISTANCENode;
import org.eclnt.jsfserver.elements.componentnodes.ICONNode;
import org.eclnt.jsfserver.elements.componentnodes.PANENode;
import org.eclnt.jsfserver.elements.componentnodes.ROWDISTANCENode;
import org.eclnt.jsfserver.elements.componentnodes.ROWNode;
import org.eclnt.jsfserver.elements.componentnodes.TEXTPANENode;
import org.eclnt.jsfserver.elements.impl.ROWDYNAMICCONTENTBinding;
import org.eclnt.jsfserver.elements.impl.ROWDYNAMICCONTENTBinding.ComponentNode;
import org.eclnt.jsfserver.util.StyleManager;
import org.eclnt.workplace.IWorkpage;
import org.eclnt.workplace.IWorkpageContainer;
import org.eclnt.workplace.IWorkpageDispatcher;
import org.eclnt.workplace.IWorkpageSelector;
import org.eclnt.workplace.WorkpageDispatchedPageBean;
@CCGenClass (expressionBase="#{d.DemoSelector}")
public class DemoSelector
extends WorkpageDispatchedPageBean
implements Serializable, IWorkpageSelector
{
// ------------------------------------------------------------------------
// inner classes
// ------------------------------------------------------------------------
public class ItemInfo
{
IWorkpage i_workpage;
public ItemInfo(IWorkpage workpage)
{
i_workpage = workpage;
}
public String getBackground()
{
if (m_wpContainer.getCurrentWorkpage() == i_workpage)
return StyleManager.getStyleValue("@baseColor@");
else
return StyleManager.getStyleValue("@baseColorDark@");
}
public String getText()
{
String s = i_workpage.getSelectorTitle();
if (s == null)
s = i_workpage.getTitle();
return s;
}
public void onPaneAction(ActionEvent event)
{
m_wpContainer.switchToWorkpage(i_workpage);
}
public void onIconAction(ActionEvent event)
{
m_wpContainer.closeWorkpage(i_workpage);
}
}
// ------------------------------------------------------------------------
// members
// ------------------------------------------------------------------------
IWorkpageContainer m_wpContainer;
ROWDYNAMICCONTENTBinding m_dynContent = new ROWDYNAMICCONTENTBinding();
List<ItemInfo> m_itemInfos = new ArrayList<ItemInfo>();
// ------------------------------------------------------------------------
// constructors & initialization
// ------------------------------------------------------------------------
public DemoSelector(IWorkpageDispatcher workpageDispatcher)
{
super(workpageDispatcher);
}
public String getPageName() { return "/workplace/workplaceselector/DemoSelector.jsp"; }
public String getRootExpressionUsedInPage() { return "#{d.DemoSelector}"; }
// ------------------------------------------------------------------------
// public usage
// ------------------------------------------------------------------------
public ROWDYNAMICCONTENTBinding getDynContent() { return m_dynContent; }
public List<ItemInfo> getItemInfos() { return m_itemInfos; }
@Override
public void init(IWorkpageContainer container)
{
m_wpContainer = container;
}
@Override
public void update()
{
List<ComponentNode> l = new ArrayList<ComponentNode>();
List<IWorkpage> workpages = m_wpContainer.getAllWorkpages();
m_itemInfos.clear();
for (IWorkpage workpage: workpages)
{
m_itemInfos.add(new ItemInfo(workpage));
PANENode p = new PANENode()
.setHeight("60+")
.setWidth("100")
.setPadding("5")
.setBorder("right:1;color:#FFFFFF20")
.setBackground(pbx("itemInfos["+(m_itemInfos.size()-1)+"].background"))
.setInvokeevent("leftclick")
.setActionListener(pbx("itemInfos["+(m_itemInfos.size()-1)+"].onPaneAction"))
.setDragsend("CCWORKPAGE:"+workpage.getUniqueTechnicalId());
l.add(p);
ROWNode r = new ROWNode();
p.addSubNode(r);
TEXTPANENode tp = new TEXTPANENode()
.setWidth("100%")
.setForeground("#F0F0F0")
.setFont("weight:bold")
.setText(pbx("itemInfos["+(m_itemInfos.size()-1)+"].text"));
r.addSubNode(tp);
if (workpage.isCloseSupported() == true)
{
p.addSubNode(new ROWDISTANCENode().setHeight("100%;5"));
r = new ROWNode();
p.addSubNode(r);
r.addSubNode(new COLDISTANCENode().setWidth("100%"));
ICONNode ic = new ICONNode()
.setImage("/eclntjsfserver/images/iconssvg/close_light_16x16.svg")
.setActionListener(pbx("itemInfos["+(m_itemInfos.size()-1)+"].onIconAction"));
r.addSubNode(ic);
}
}
m_dynContent.setContentNodes(l);
}
}
What are the important issues?
The workplace management creates one instance of your page bean for each work page container. After creating the instance the “init” method is called, passing the work page container object (IWorkpageContainer-instance).
Every time, the work page container is updated (loosing, gaining items), the “update” method is called. Here the dynamic content area is filled accordingly.
The elements created in the dynamic content area are using the methods of the normal IWorkpageContainer-interface – e.g. for selecting a work page or for closing a work page.
The attribute DRAGSEND is filled with value:
"CCWORKPAGE:"+workpage.getUniqueTechnicalId()
From the IWorkpageContainer interface you may call get method “getWorkpageDispatcher()” in order to get access to the top level page bean instances of this work page (method “getDispatchedBean(...)”).
All you have to do now is to register this own implementation of the work page selector in the system.xml configuration file:
<system ...>
<workplace ...
workpageselector="workplace.DemoSelector"
...
/>
</system>
CaptainCasa Enterprise Client provides a so called Macro Management that can simplify the server side definition of JSP pages significantly. It is typically applied, when you have a quite generic way of passing data from and to your UI components
In short: a macro is a definition which allows to automatically set component attributes based on the macro's input parameters. The macro is executed at runtime on server side.
A FIELD component provides a high number of attributes that you may use:
The TEXT attribute is the field's value
The ENABLED attribute tells if the user may input data or not
The BGPAINT/ BACKGROUND and FOREGROUND attribute determine the field's coloring
In an application you typically want to control all of these attributes dynamically:
Well, with the TEXT, it's obvious – this is the core data passed in and out. But the other attributes are important as well: dependent on the user's rights or dependent on a logical decision within your business logic you want to enable or disable the field. If the field's content is not correct you want to highlight the field. Etc. etc. ...
As consequence your server side managed bean provides all this information for the FIELD component. The field's attribute definition may look like:
<field id=”g_57”
text=”#{bean.zipCode}”
bgpaint=”#{bean.zipCodeBGPAINT}”
enabled=#{bean.zipCodeENABLED}”
width=”200”/>
This is just an example! You may also shift the “paint” and “enabled” information into parallel objects!
What you see from the FIELD component definition: it binds to the property “zipCode” - and all the information around is arranged in properties that are linked with “zipCode”.
It's now a hell of work to manually maintain all this information – expecting that there are many fields following the same naming pattern. And: in case you extend the naming and logic pattern (e.g. introducing a new property “#{bean.zipCodeFOREGROUND}” to rule the foreground color) you need to update all the FIELD definitions within your JSP pages.
That's where macros come in! A macro is a simple and consistent way of defining how to apply attribute values following a naming pattern. Sounds difficult, but is not at all!
A macro is a Java object supporting interface “IMacro”. There are currently two way to create macro instances:
By defining an XML definition – in this case a default macro object will be created automatically that is following the XML definition
By defining a class implementing “IMacro” and by registring this class in a certain XML file
A macro is an XML definition that is stored in the directory “/eclntjsfserver/config/macros”. The file name that you assign is the macro's name.
Let's look onto the macro definition – using the name “prop.xml” - that simplifies the creation of FIELD components within the example use case scenario:
<macro>
<applysto>
<tag name="t:field"/>
<tag name="t:combofield"/>
</applysto>
<parameters>
<parameter name="property"/>
</parameters>
<attributes>
<attribute name="text" value="#{bean.${property}}"/>
<attribute name="bgpaint" value="#{bean.${property}BGPAINT}"/>
<attribute name="enabled" value="#{bean.${property}ENABLED}"/>
</attributes>
</macro>
The definition includes:
You define for which components the macro is usable.
You define the input parameters of the macros. In the example use case there is one parameter (“property”).
You define how attributes are automatically set – referencing the input parameter's value (“${property}”).
You can implement an own class supporting interface “IMacro”.
Example:
package demomacros;
import org.eclnt.jsfserver.elements.BaseComponentTag;
import org.eclnt.jsfserver.elements.macros.IMacro;
public class DemoMacro implements IMacro
{
public boolean checkIfApplicable(String tagName)
{
if (tagName.equals("t:field")) return true;
if (tagName.equals("t:combofield")) return true;
return false;
}
public boolean checkIfAttributeIsAffected(String attribute)
{
if (attribute.equals("text")) return true;
if (attribute.equals("bgpaint")) return true;
if (attribute.equals("enabled")) return true;
return false;
}
public void executeMacro(BaseComponentTag tag, String[] macroParams)
{
String property = macroParams[0];
String property = macroParams[0];
if (tag.getAttributeMap().get("text") == null)
tag.setText("#{bean."+property+"}");
if (tag.getAttributeMap().get("bgpaint") == null)
tag.setBgpaint("#{bean."+property+"BGPAINT}");
if (tag.getAttributeMap().get("enabled") == null)
tag.setEnabled("#{bean."+property+"ENABLED}"); }
public String getName()
{
return "propbyclass";
}
public String[] getMacroParamNames()
{
return new String[] {"property"};
}
}
The macro currently does exactly the same as the XML macro definition that was shown within the previous chapter. But, of course: now you could extend the macro's logic by any kind of Java programming.
From the example code you see that the macro only transfers values into the component's attributes if they are null. This means: in case the user explicitly defines component attributes then the macro will not override these definitions.
This is to be pointed out: if a macro does not do this check for null values then quite confusing situations will occur. The user e.g. specifies a value for a component that will be overwritten by your macro – as consequence the user will see his/her definition within the .jsp/.xml page, but this will not be the definition actually applied at runtime. - Consequence: you may only overwrite attribute values if they are null! (By the way: style attribute values are applied after macro values are applied!)
The macro is used both at runtime (this is when the executeMacro() is called) – and at design time: the Layout Editor needs to know which components and attributes of a component are affected. As consequence: keep the macro's internal Java coding as simple as possible, so that it can be instanciated without problems by the Layout Editor environment.
The class needs to be registered in the configuration file “/eclntjsfserver/config/macros/javamacros.xml”:
<javamacros>
<javamacro classname="demomacros.DemoMacro"/>
</javamacros>
When implementing your own macro by writing your own class for interface “IMacro”, then there is one special aspect that you have to pay attention to.
A grid definition is typically done int the following way:
FIXGRID objectbinding=”#{d.TestUI.grid}”
GRIDCOL text=”...”
FIELD text=”.{firstName]”
The property within the grid cell definition is typically not written with an absolute expression but with a relative expression (here: .{firstName}). At runtime the grid processing creates several instances of the cell component (here: FIELD) and assigns a correct, full expression to each cell instance.
Example: if the grid above creates its first line of controls the FIELD's text will get assigned the following expression: “#{d.TestUI.grid.rows[0].firstName}”.
Please be aware of the fact that the macro is called first for the original component (FIELD text=”.{firstName}”) and then for the generated components (FIELD text=”#{d.TestUI.grid.rows[0].firstName}”, ...). Changes that you might apply via macro when processing the “.{...}” expression will automatically be applied to the per-line-components.
In some special situations (e.g. when modifying a component's attribute) you need to pay attention to this, in order to avaoid a double-processing of the same rules you apply via Macro. In this case just check if an expression starts with “.{“ and only apply your rules when an expression starts with “#{“.
A macro is used in a component by defining the attribute ATTRIBUTEMACRO. Let's use the use the macro “prop.xml” of the previous chapter and apply it to the example use case:
<field id=”g_57”
attributemacro=”prop(zipCode)”
width=”200”/>
That's it! The field will look and behave exactly the same as in the “long definition” in the chapter above.
And: you may update the macro any time – e.g. you may add a new attribute that is generated (e.g. “zipCodeFOREGROUND”). You do not need to re-define the JSP pages using the macro – it is automatically applied. Of course you must not change the macro's structure in an incompatible way – e.g. removing a macro parameter or changing the order of parameters.
You may any time override a macro by an explicit attribute definition. Example:
<field id=”g_57”
attributemacro=”prop(zipCode)”
enabled=”false”
width=”200”/>
The ENABLED-definition of the component will always be stronger than the macro. A macro will only set a component's attribute value if it is not explicitly defined.
(Please note: in case of Java class based macros the implementor of the macro has to guarantee that no already defined values are overwritten!)
When applying a macro at runtime the macro management will only match these macro attribute definitions that can be applied to the UI component.
Example: the macro “prop.xml” from above should also be used for FORMATTEDFIELD components. These components do not hold their content in the TEXT attribute but in the VALUE attribute. As consequence the macro is extended in the following way:
<macro>
<applysto>
<tag name="t:field"/>
<tag name="t:combofield"/>
<tag name="t:formattedfield"/>
</applysto>
<parameters>
<parameter name="property"/>
</parameters>
<attributes>
<attribute name="text" value="#{bean.${property}}"/>
<attribute name="value" value="#{bean.${property}}"/>
<attribute name="bgpaint" value="#{bean.${property}BGPAINT}"/>
<attribute name="enabled" value="#{bean.${property}ENABLED}"/>
</attributes>
</macro>
Within the Layout Editor there is a “attributemacro” field in which you can define the macro:
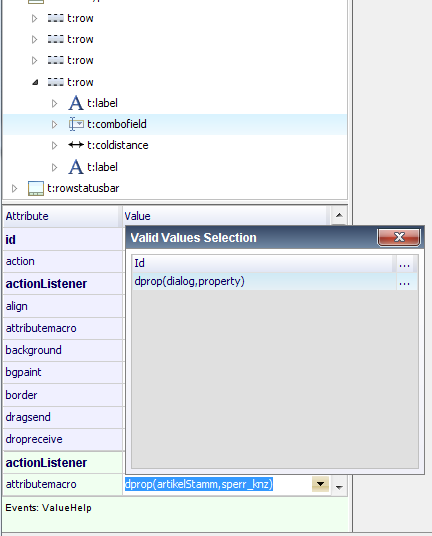
Only these macros will show up in the value help that can be applied to the selected component.
Once defining a macro then all attributes that are set by the macro will be marked:
The one way of passing parameters into a macro definition is to list the parameters in the macro call. Example: “dprop(artikelStamm,sperr_knz)”.
The second way is to use the REFERENCE attribute that is available with each component. Within the reference attribute you can pass a list of “name:value” pairs, separated by semicolon. This list can be accessed both from the XML Macro definition and from the implemented Macro definition.
Example: in a page there is the following definition:
<t:field id="g_48" attributemacro="crud.DetailField()" reference="b:address;p:town" />
The reference contains a “b”-value and a “p”-value (“b” for bean, “p” for property). Of course, the naming is completely up to you, “b” and “p” are just examples.
Now you can access these values inside your XML macro definition:
<macro>
<applysto>
<tag name="t:field"/>
<tag name="t:formattedfield"/>
<tag name="t:calendarfield"/>
<tag name="t:textarea"/>
<tag name="t:combobox"/>
<tag name="t:radiobutton"/>
</applysto>
<parameters>
</parameters>
<attributes>
<attribute name="bgpaint" value="#{d.${ref.b}.selBgpaints.${ref.p}}"/>
<attribute name="text" value="#{d.${ref.b}.sel.${ref.p}}"/>
<attribute name="value" value="#{d.${ref.b}.sel.${ref.p}}"/>
<attribute name="width" value="100%"/>
</attributes>
</macro>
The value of “b” is accessed with “${ref.b}” and the value of “p” with “${ref.p}”. The macro itself does not provide any parameters – all macro input information is taken from the REFERENCE attribute.
The implementation version of the macro would contain the following code:
public void executeMacro(BaseComponentTag tag, String[] macroParams)
{
String reference = tag.getAttributeMap().get(“reference”);
if (reference == null)
return;
Map<String,String> m = ValueManager.decodeComplexValue(reference);
String bValue = m.get(“b”);
String pValue = m.get(“p”);
...
...
}
When writing Java-based macros then you need to be aware of how the grid processing (FIXGRID component) internally works.
A gidi definition contains column definitions:
FIXGRID sbvisibleamount=”3”
GRIDCOL
FIELD/... <== cell component, FIELD as example
GRIDCOL
FIELD/... <== cell component, FIELD as example
The grid interprets this structure when it is accessed first time and internally multiplies out this structure:
FIXGRID
GRIDROW
GRIDHEADERLABEL <== derived from first GRIDLCOL
GRIDHEADERLABEL <== derived from second GRIDCOL
GRIDROW
FIELD
FIELD
GRIDROW
FIELD
FIELD
GRIDROW
FIELD
FIELD
From macro processing point of view there are two situations when macros are applied:
Processing of JSP page: this is what happens normally – the page's component tags are read and transformed into component instances.
Processing of FIXGRID component: this is the multiplication of grid cell items per row
It's now your choice when to apply your macro's functions: either with the JSP processing or with the FIXGRID processing or with both.
To find out BaseComponentTag provides a special method:
BaseComponentTag.isGridCellComponent()
This method returns “false” in the JSP processing phase, and returns “true” if the current component tag is a “multiplied-out-one”.
By the way: what's the main difference, when the components below GRIDCOL are multiplied out? - Answer: the expressions... - An expression “.{xxx}” is transferred into “#{yyy.rows[index].xxx}” by the grid management.
There are situations in which you want to always apply some “automated attribute value generation” as part of the component processing.
Example: all graphical components provide an attribute CLIENTNAME – which is a stable name that can identified by e.g. testing tools. You may of course individually define these names within the layout definition – but in many cases you have enough information inside the component to automatically derive some useful value.
So if there is a field with the following definition...
<t:field ... text=”#{d.XyzUI.firstName}” ... />
...then you may automatically set the CLIENTNAME to:
<t:field ... text=”#{d.XyzUI.firstName}” clientname=”firstName” ... />
(Similar examples could be desribed with other attributes like e.g. HELPID.)
For this reason you can define a Java-based macro class that implements interface “IDefaultMacro” (which is an extension of “IMacro”). The class needs to be registered in the configuration file “/eclntjsfserver/config/macros/javamacros.xml” - just as with “normal” macros.
The following macro generates CLIENTNAME values out of existing attribute definitions of a component:
package demomacros;
import java.util.HashSet;
import java.util.Set;
import org.eclnt.jsfserver.elements.BaseComponentTag;
import org.eclnt.jsfserver.elements.ICCComponentProperties;
import org.eclnt.jsfserver.elements.macros.IDefaultMacro;
/**
* Macro that is called with any component without being explicitly assigned.
* <br><br>
* The macro fills the CLIENTNAME field with some default value. The default value
* is derived out of the expression of certain attributes.
*/
public class AlwaysMacro
implements IDefaultMacro, ICCComponentProperties
{
// ------------------------------------------------------------------------
// members
// ------------------------------------------------------------------------
static String[] s_refAttributeNamesDefault = new String[]
{
ATT_text,
ATT_value,
ATT_selected,
ATT_valuereference,
ATT_OBJECTBINDING,
ATT_ACTIONLISTENER
};
static String[] s_refAttributeNamesInvokers = new String[]
{
ATT_ACTIONLISTENER,
ATT_value,
ATT_text,
};
static String[] s_invokers = new String[]
{
"t:button",
"t:icon",
"t:menuitem",
"t:link"
};
static Set<String> s_invokersAsSet; // same as s_invokers, filled in static-initializer
// ------------------------------------------------------------------------
// constructors
// ------------------------------------------------------------------------
static
{
s_invokersAsSet = new HashSet<String>();
for (String invoker: s_invokers)
s_invokersAsSet.add(invoker);
}
// ------------------------------------------------------------------------
// public usage
// ------------------------------------------------------------------------
@Override
public void executeMacro(BaseComponentTag tag, String[] macroParams)
{
String clientname = tag.getAttributeFromAttributeMap(ATT_clientname);
if (clientname == null)
{
String ref = findReference(tag);
if (ref != null)
{
if (clientname == null)
tag.setAttributeInAttributeMap(ATT_clientname,ref);
}
}
}
@Override
public boolean checkIfApplicable(String tagName) { return true; }
@Override
public boolean checkIfAttributeIsAffected(String attribute) { return false; }
@Override
public String getName() { return "always"; }
@Override
public String[] getMacroParamNames() { return null; }
// ------------------------------------------------------------------------
// inner usage
// ------------------------------------------------------------------------
/**
* Find any "stable" reference in the current tag.
*/
private String findReference(BaseComponentTag tag)
{
if (s_invokersAsSet.contains(tag.getTagNameWithPrefix()))
{
return findReferenceInAttributeSequence(tag, s_refAttributeNamesInvokers);
}
else if ("t:radiobutton".equals(tag.getTagNameWithPrefix()))
{
String ref = findReferenceInAttributeSequence(tag,new String[] {ATT_value});
if (ref != null)
ref += "_" + tag.getAttributeFromAttributeMap(ATT_refvalue);
return ref;
}
else
{
return findReferenceInAttributeSequence(tag, s_refAttributeNamesDefault);
}
}
/**
* Find the "best" reference that can be derived from component by checking for an
* expression within the attributes that are passed as sequence-parameter. If an
* expression is found then this expression is the base for calculating the reference.
* The last "word" of the expression is used as reference.
* <br><br>
* Example: if the expression is "#{d.XyzUI.firstName}" then the reference that is found
* is "firstName".
* <br><br>
* Please note: this is only an example of deriving information out of the component!
* You may use any other algorithm on any other attributes, of course!
*/
private String findReferenceInAttributeSequence(BaseComponentTag tag, String[] sequence)
{
for (String refAttributeName: s_refAttributeNamesDefault)
{
String s = tag.getAttributeFromAttributeMap(refAttributeName);
if (s != null)
{
// check if expression
if ((s.startsWith("#{d.") || s.startsWith(".{")) && s.endsWith("}"))
{
// return last part of expression
int index = s.lastIndexOf('.');
if (index <= 0)
index = 1;
String result = s.substring(index+1,s.length()-1);
// if expression is kept in array way e.g. "#[d.XyzUI.data['abc']}:
// remove certain characters
result = result.replace("\'","");
result = result.replace("]","");
result = result.replace("[","_");
return result;
}
}
}
return null;
}
}
The macro class needs to be registered in javamacros.xml:
<javamacros>
...
<javamacro classname="demomacros.AlwaysMacro"/>
...
</javamacros>
To run the macro you do not have to reference the macro from the component using the ATTRIBUTEMACRO attribute. The macro is automatically applied to all components for which the macro method “checkIfApplicable(String tagName)” returns a true value.
See “Dynamic Page Management” to dynamically define components and attributes within a page.
See “Adding own Components” to define components that themselves consist out of other components.
Page Beans are a comfortable and simple way of encapsulating a screen as object and re-use it throughout various parts of your application. (Please read details in the chapter “Page Navigation”.)
A page bean consists out of...:
The Java-logic of one page
The .jsp/.xml-page containing the XML layout definition
Through being an excellent modularization technology within one project, page beans are not really distributable throughout various projects in a simple way. Imagine you want to use one page bean implementation, that you made in one project, in another project as well. In this case you have to copy various issues from one project to the other:
the .class/.jar file containing the logic of the page bean-level
the .jsp/.xml file containing the layout
the .properties files that may contain text literals
various .png/.jpg/... files that are referenced within the page bean
So the concept behind Page Bean Components is:
Keep the normal, approved Page Bean processing,...
...but allow “everything” to be arranged inside a .jar file and thus make it simple to distribute the page bean component across projects
...and allow a nicer integration into the CaptainCasa toolset (e.g. by letting the developer configure the page bean component from the Layout Editor)
By adding the JAR file to your project (e.g. as JAR within WEB-INF/lib) you can use the page bean component – and do not have to think about cross-copying additional files in addition.
In the following text we will explain the Page Bean Component concept by using an example – the “multi text” component.
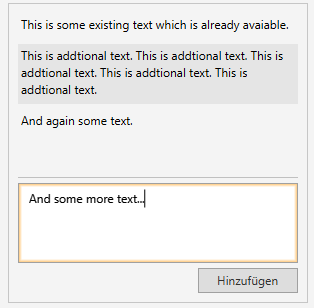
The component displays/edits a list of text-strings. Each time the user adds some new text and presses “Add”, the new text is added to the list of texts on top of the input text area.
The component is part of the demo workplace (demos-project). Is is contained in package “democontrols”. The class name of the component is “DemoPBCMultiText”.
There is a component PAGEBEANCOMPONENT that allows to use a page bean component:
<t:row id="g_2">
<t:pagebeancomponent id="g_3"
pagebeanbinding="#{d.DemoPageBeanComponent.multiText}"
pagebeanclass="democontrols.DemoPBCMultiText"
pagebeaninitdata="height:300;width:300" />
</t:row>
There are three important attributes:
The PAGEBEANBINDING is the expression that points to an instance of the page bean component inside your server side class.
The PAGEBEANCLASS is a hint for the Layout Editor toolset – By knowing the class, the tool environment can access some meta data about the page bean component. The PAGEBEANCLASS value is not required at runtime – and is optional.
the PAGEBEANINITDATA is a complex value string, that is passed into the page bean component when it is first time accessed. Each page bean component may specify a set of initialization parameters – typically configuring optical attributes of the page bean component.
The server side code for integrating the page bean component inside your class is:
package workplace;
...
public class DemoPageBeanComponent
extends PageBean
{
DemoPBCMultiText m_multiText = new DemoPBCMultiText();
public DemoPageBeanComponent(IWorkpageDispatcher workpageDispatcher)
{
super(workpageDispatcher);
// filling page bean with data + passing listener
List<String> texts = new ArrayList<String>();
texts.add("This is some existing text which is already avaiable.");
m_multiText.prepare(texts,new DemoPBCMultiText.IListener()
{
public void reactOnUpdate()
{
}
});
}
...
public DemoPBCMultiText getMultiText() { return m_multiText; }
...
}
You see: page bean components are embedded into your page and page processing in the same way as normal page beans.
Let's implement the “multi text” component as component “DemoPBCMultiText” in package “democontrols”.
The following files are contained in the package “democontrols”:
democontrols
DemoPBCMultiText.xml => The layout (.jsp or .xml)
DemoPBCMultiText.java => The code
DemoPBCMultiText.properties => Literals
DemoPBCMultiText_de.properties => Literals in German
DemoPBCMultiText.config => XML configuration
The layout of the page bean component is stored – just as normal – in a .jsp/.xml file. The .jsp/.xml file is expected to be located within the Java-resources, in the same package in which the .java code is located. The name of the layout must be the same as the name of the page bean component.
In the example the following XML is used within the file “DemoPBCMultiText.xml”:
<t:pagebeanroot id="g_1">
<t:pane id="OUTEST" border="#00000030"
height="#{d.DemoPBCMultiText.height}" padding="10" rowdistance="5"
width="#{d.DemoPBCMultiText.width}">
<t:row id="g_4">
<t:scrollpane id="SCROLLPANE" height="100%" width="100%">
<t:rowdynamiccontent id="g_6"
contentbinding="#{d.DemoPBCMultiText.dynContent}" />
</t:scrollpane>
</t:row>
<t:rowline id="g_7" />
<t:row id="g_8">
<t:textarea id="TEXTAREA"
bgpaint="#{d.DemoPBCMultiText.newTextBgpaint}" height="80"
requestfocus="#{d.DemoPBCMultiText.newTextRequestFocus}"
text="#{d.DemoPBCMultiText.newText}" width="100%;100" />
</t:row>
<t:row id="g_10">
<t:coldistance id="g_11" width="100%" />
<t:button id="ADDBUTTON"
actionListener="#{d.DemoPBCMultiText.onAddAction}"
text="#{d.DemoPBCMultiText.lit.btnAdd}" width="100+" />
</t:row>
</t:pane>
</t:pagebeanroot>
You see: just normal “layout XML”... Please note:
The important inner components of the layout hold explicit ids – e.g. the outest PANE holds the id “OUTEST”. By assigning explicit, stable ids to components you allow users of the component to easily extend the component, by adding additional attributes to the component, which you might not have thought about.
Example: users of the component may want to also access the background of the outest pane. In this case they can extend the component and define that the component with id “OUTEST” receives some additional attribute value. Please check the chapter “Extending Page Bean Components” for more information.
You may already see in the example that literals are referenced via “#{d.DemoPBCMultiText.lit.*}” - directly being resolved using the property files that are part of the package.
The “DemuPBCMultitext.java” file contains the code of the page bean component:
package democontrols;
import java.util.ArrayList;
import java.util.List;
import java.util.Map;
import org.eclnt.jsfserver.base.faces.event.ActionEvent;
import org.eclnt.jsfserver.elements.componentnodes.PANENode;
import org.eclnt.jsfserver.elements.componentnodes.ROWNode;
import org.eclnt.jsfserver.elements.componentnodes.TEXTPANENode;
import org.eclnt.jsfserver.elements.impl.ROWDYNAMICCONTENTBinding;
import org.eclnt.jsfserver.pagebean.component.PageBeanComponent;
import org.eclnt.jsfserver.session.RequestFocusManager;
public class DemoPBCMultiText extends PageBeanComponent
{
// ------------------------------------------------------------------------
// inner classes
// ------------------------------------------------------------------------
public interface IListener
{
public void reactOnUpdate();
}
// ------------------------------------------------------------------------
// members
// ------------------------------------------------------------------------
String m_width = "200";
String m_height = null;
String m_newText = null;
List<String> m_texts = new ArrayList<String>();
IListener m_listener;
ROWDYNAMICCONTENTBinding m_dynContent = new ROWDYNAMICCONTENTBinding();
boolean m_error = false;
long m_newTextRequestFocus;
// ------------------------------------------------------------------------
// constructors
// ------------------------------------------------------------------------
@Override
public String getRootExpressionUsedInPage() { return "#{d.DemoPBCMultiText}"; }
// ------------------------------------------------------------------------
// public usage
// ------------------------------------------------------------------------
public String getNewText() { return m_newText; }
public void setNewText(String newText) { m_newText = newText; }
public List<String> getTexts() { return m_texts; }
public void setWidth(String width) { m_width = width; }
public String getWidth() { return m_width; }
public void setHeight(String height) { m_height = height; }
public String getHeight() { return m_height; }
public ROWDYNAMICCONTENTBinding getDynContent() { return m_dynContent; }
@Override
public void initializePageBean(Map<String, String> initData)
{
super.initializePageBean(initData);
{
String s = initData.get("width");
if (s != null) setWidth(s);
}
{
String s = initData.get("height");
if (s != null) setHeight(s);
}
render();
}
public void prepare(List<String> texts, IListener listener)
{
m_texts = texts;
m_newText = null;
m_listener = listener;
render();
}
public String getNewTextBgpaint()
{
String result = "write_empty(10,50%,"+getLit().get("phText")+",10,#c0c0c0,leftmiddle)";
if (m_error) result += ";error()";
return result;
}
public long getNewTextRequestFocus() { return m_newTextRequestFocus; }
public void onAddAction(ActionEvent event)
{
m_error = false;
if (m_newText == null || m_newText.trim().length() == 0)
{
m_error = true;
m_newTextRequestFocus = RequestFocusManager.getNewRequestFocusCounter();
return;
}
m_texts.add(m_newText);
m_newText = null;
m_newTextRequestFocus = RequestFocusManager.getNewRequestFocusCounter();
render();
if (m_listener != null)
m_listener.reactOnUpdate();
}
// ------------------------------------------------------------------------
// private usage
// ------------------------------------------------------------------------
private void render()
{
PANENode p = new PANENode().setWidth("100%").setHeight("100%").setRowdistance(5);
int counter = -1;
for (String text: m_texts)
{
counter++;
ROWNode r = new ROWNode();
p.addSubNode(r);
TEXTPANENode t = new TEXTPANENode().setWidth("100%").setText(text);
if (counter%2 == 1)
t.setBackground("#00000010");
r.addSubNode(t);
}
m_dynContent.setContentNode(p);
}
}
Again you see: a just normal page bean implementation... - with some special remarks:
The method “getPageName()” which you normally have to implement, does not need to be implemented for page bean components. The page bean processing just knows that the page bean component's XML resides in a .jsp/.xml file with the same name as the class name.
There is a method “initializePageBean()” passing a String-Map of data. This method allows to pass initialization information that can be defined when embedding a page bean component in a page. It allows the user of a page bean to configure visual aspects within the layout editor.
Literals are kept in property files. The page bean component author decides which languages to support. In the example there are two files:
File: DemoPBCMultiText.properties
btnAdd = Add
phText = Please enter some text...
File: DemoPBCMultiText_de.properties
btnAdd = Hinzufügen
phText = Bitte geben Sie einen Text ein...
The configuration file “DemoPBCMultiText.config” passes information into the Layout Editor environment to support the user of a page bean component when embedding the component into a page. The file is NOT used operationally at runtime at the moment.
<?xml version="1.0" encoding="UTF-8" standalone="yes"?>
<pageBeanConfig>
<columnComponent>true</columnComponent>
<param>
<name>width</name>
</param>
<param>
<name>height</name>
</param>
</pageBeanConfig>
There are the following definitions:
The page bean component declares via tag “columnComponent” if it is used as column component (“true”) or as row component (“false”)
All parameters that are interpreted in the “initializePageBean()” method are listed.
When developing components then these components typically come with some own style definitions. These style definitions need to be located into some Java package as well. The name of the package is yours, you just have to provide the name later on when providing the meta information for the components. (See next chapter.)
Let's assume you select the package “democontrols.styleextensions”.
Inside the package you may now extend the existing styles of CaptainCasa or the ones that you define your own by following the same directory concept that your are used from normal CaptainCasa style definitions:
For each style you define one sub-directory (now: sub-package)
Inside this directory you have one XML file for keeping the CSS related information and one for keeping the CaptainCasa related information.
Example: you want to add own style definitions to the “defaultrisc” style. In this case the file structures looks as follows:
democontrols
styleextensions
defaultrisc
riscstyle.xml <== CSS styling
style.xml <== CaptainCasa attribute styling
Please pay attention: while the name “style.xml” is the same for all styles, the name for the CSS styling varies from style to style! You need to make sure that the same file name is used within your style extension than the one that is used in the original style.
At runtime the style definitions coming from the original styles and the style definitions coming from your extension are concatenated to form one XML which then is used within the style processing. As consequence please make sure:
You may add own style classes, style variants, style variables – but need to make sure that there names do no overlap with definitions in the existing styles. We recommend to use some unique prefix for all names that you define.
The names “cc*” and “default*” are reserved for CaptainCasa styles.
When packaging one or several page bean components into one .jar file, then you may add certain meta information. This meta information is user by the CaptainCasa tooling – so that the Page Bean Components that come with a certain .jar file are directly integrated into the layout editor.
The configuration is simple: just add a file “ccpagebeancomponentinfo.xml” to the source/resource part of your project and list the Page Bean Component classes, that are part of the .jar file:
CaptainCasa project layout:
<yourproject>
/src
ccpagebeancomponentinfo.xml
Maven project layout:
<yourprojec>
/src
/main
/java
/resources
ccpagebeancomponentinfo.xml
/webapp
Content:
<?xml version="1.0" encoding="UTF-8" standalone="yes"?>
<pageBeanComponents packageOfStyleExtensions=”democontrols.styleextensions”>
<pageBeanComponent className="democontrols.DemoPBCMultiText"/>
<pageBeanComponent className="..."/>
<pageBeanComponent className="...”/>
</pageBeanComponents>
You only need to defined the attribute “packageOfStyleExtensions” if you really extended the style.
This chapter describes the adding of meta information using interface IPageBeanComponentInfoService. This way is a bit more complex than the one presented in the previous chapter, but still is supported. - If you are not using the interface IPageBeanComponentInfoServer yet, then please skip this part of the documentation!
When packaging one or several page bean components into one .jar file, then you may add certain meta information. The meta information is:
Which page bean components exist within the .jar file? - This information is e.g. used by tools like the Layout Editor: when embedding a .jar containing page bean components into your project, then the page bean component classes will be directly visible inside the code generator when creating properties.
Where is the package location of style extensions that come with the page bean?
The meta information is added by following the Java Service Locator concept, in which some interface is defined and its implementation is registered within the META-INF directory of the .jar file.
You need to create a class, supporting interface “IPageBeanComponentInfoService”. The interface looks like:
package org.eclnt.jsfserver.pagebean.component;
...
public interface IPageBeanComponentInfoService
{
public List<Class> getPageBeanComponents();
public String getPackageNameOfStyleExtensions();
}
The implementation of the class in the “eclnt_pbc.jar” package looks like:
public class MyPageBeanInfoService extends
DefaultPageBeanComponentInfoService
{
List<Class> m_pageBeanClasses = null;
@Override
public List<Class> getPageBeanComponents()
{
if (m_pageBeanClasses == null)
{
m_pageBeanClasses = new ArrayList<Class>();
m_pageBeanClasses.add(democontrols.DemoPBCMultiText.class);
}
return m_pageBeanClasses;
}
@Override
public String getPackageNameOfStyleExtensions()
{
return "democontrols.styleextensions";
}
}
Please note: the class itself inherits from “DefaultPageBeanComponentInfoService” which is the default implementation of the interface. When CaptainCasa extends the interface then the default implementation will always provide some adequate default implementation and you do not have to immediately updated your own implementation.
You need to register your class in the META-INF directory of your .jar file. This is done in the following way:
Create the UTF8-file with the name...
src
META-INF
services
org.eclnt.jsfserver.pagebean.component.IPageBeanComponentInfoService
...within the META-INF/services/ directory of your .jar file. Inside this file you just list the implementation class of interface “IpageBeanComponentInfoService”, so the content of the file is:
org.eclnt.ccaddons.pbc.MyPageBeanInfoService
Make sure that this META-INF-information is added to the .jar file when packaging.
Packaging and delivering a page bean component means that you just have to package all artifacts into one JAR file. This JAR files then contains the following files:
democontrols
DemoPBCMultiText.xml => The layout
DemoPBCMultiText.class => The byte code
DemoPBCMultiText.properties => Literals
DemoPBCMultiText_de.properties => Literals in German
DemoPBCMultiText.config => XML configuration
ccpagebeancomponentinfo.xml
Of course you are “allowed” to add further class files in order to split the page bean component's functions into several classes. Of course you may bundle several page bean components into one JAR file.
The user of a page bean just has to add the JAR file to his/her server side processing – typically by adding it to WEB-INF/lib.
If using “ccdispatcherinfo.xml” for registering packages / managed beans then this step is obsolete!
If using “dispatcherinfo.xml” for registering packages / managed beans then you have to explicitly include the packages containing manages bean implementations. This step only needs to be done in the project in which you create the component – it is not required to be done in the projects which take use of the components.
Register the component's package within the Dispatcher-management of the project, most simply done by adding the package name into the “dispatcherinfo.xml” file:
<dispatcherinfo>
...
<managedpackage name="democontrols"/>
...
</dispatcherinfo>
The layout file must be part of your sources (at design time) and part of your classes/jar-libraries (at run time). So create the layouts in the “Source”-area of your project.
Example:
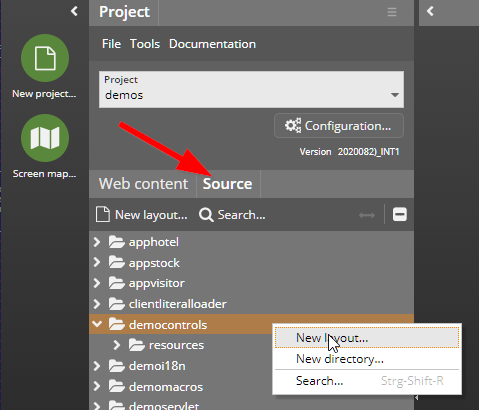
For the creation of page bean components there is a dedicated template:
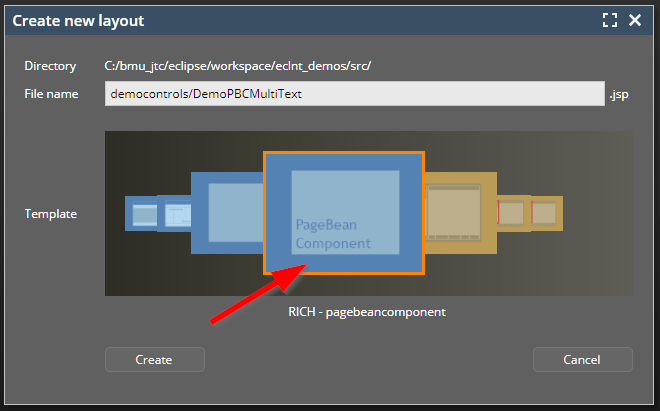
The template contains the following default layout:
<t:pagebeanroot id="g_ccpreview_1" >
<t:pane id="g_ccpreview_2" comment="Only one component is allowed below pagebeanroot!" >
<t:beanprocessing id="g_ccpreview_3" />
<t:row id="g_ccpreview_4" >
<t:label id="g_ccpreview_5" text="Some content" />
</t:row>
</t:pane>
</t:pagebeanroot>
Use the PAGEBEANROOT component as top anchor of your layout definition. Within the PAGEBEANROOT you can arrange exactly one (!) sub-component. In the template this component is proposed to be a PANE, in which you the can arrange any other content.
The PAGEBEANROOT component is a “quite clever” one: it allows to both position the component within a container-row (as column component) or to position the component inside a container (as row component).
When using the Java-program creation of the Layout Editor then create the program in the following way:
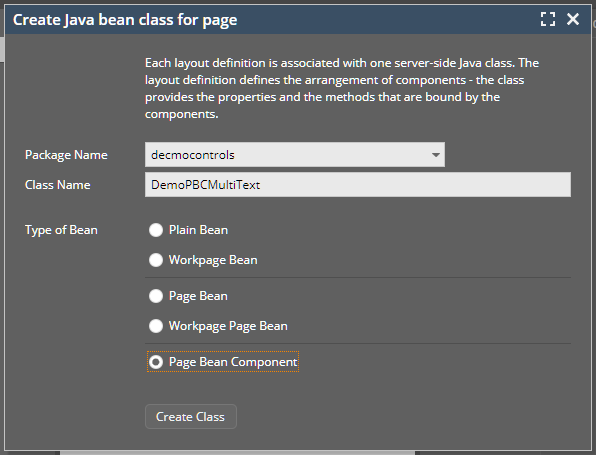
Pay attention to the following issues:
The package name is the package in which all component resources (.jsp/.xml layout, ...) is stored
The Name of the Java-class must be exactly the same as the name of the layout.
Use the bottom “Page Bean Component” as base to inherit from.
You now can develop the component in a just normal way – the same way that you use for developing normal pages.
The update 20200827 was the one in which resources also can be stored in the classes-area of an application – before it was by default only possible to store resources in the web content part of an application. Before 20200827 page bean components were specially treated by the runtime – and the layout was stored in some “.xml” file next to the code. This special treatment not completely became obsolete due to the improvements in the resources area.
The following information as consequence is obsolete if using a version >= 20200827.
Within the editor you can set up some bridge between editing JSP files and automatically storing them as XML files within the source directory. The advantage: you can use the editor for implementing your page beans “just as normal” and do not have to take care of transferring the layout from the “.jsp/.xml” file (managed by the Layout Editor) and the “.xml” file that holds the layout within your page bean package.
The bridge is quite simple:
Define an extra webcontent-directory that you use for your page bean layouts. E.g. you define the directory “webcontent/pagebeanlayouts”.
In the Layout Editor you now define that all layouts in directory “webcontent/pagebeanlayouts” will automatically be transferred to the page bean package in which you hold the page bean component.
The definition is done in the following way. Open the configuration “...PageBean Copy”:
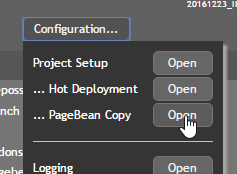
A dialog will show up:
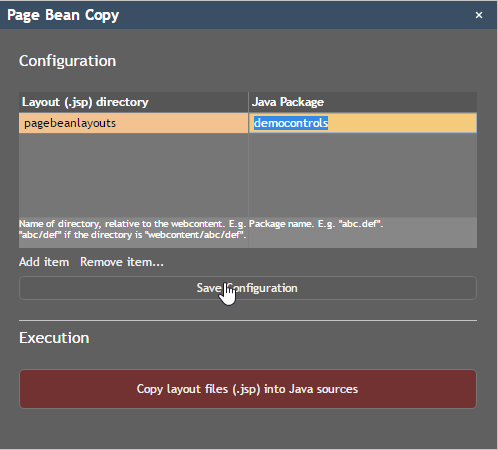
After saving the configuration the Layout Editor will know, that every time it stores a “.jsp/.xml” layout within the corresponding directory(ies) it will also store a copy in the corresponding package of the page bean component.
The information is saved within the CaptainCasa-project file (“.ccproject” within your project root directory):
<project ...>
...
<pagebeancomponentcopy jspdirectory="pagebeanlayouts"
packagename="democontrols" >
</pagebeancomponentcopy>
...
</project>
You may add resources like images into the .jar file that you build for the page bean component. E.g. you add an image to your page bean component source:
democontrols
DemoPBCMultiText.xml
...
resources
filter.png
So the name of the resource in the package is “democontrols.resources.filter.png”.
For accessing the resource from the client side there is a special servlet-API (“CLResourceAccessServlet”) which is registered inside your web.xml.
You simply have to form an image-URL in the following way:
/democontrols.resources.filter.png.ccclresource
Result: the image will be loaded into the corresponding browser processing.
You may easily adapt the management of page bean components by executing the following steps:
Copy the “.jsp/.xml” pages of your development from the web content into the sources.
Remove your “.xml” layout files inside the sources.
Remove the “.jsp/.xml” files from the webcontent of the project that you use for defining the page beans components.
From now on work in the “Sources” area when updating the layout – not in the “Web content” area.
In many cases you may want to extend page bean components to adapt to your needs.
There is a page bean component “CCCSVString” in which a semicolon-separated string is shown in some COMBOFIELD which then opens up a popup to edit the values:
The XML layout definition of the page bean component is:
<t:combofield id="COMBOFIELD"
actionListener="#{d.CCCSVString.onValueHelpAction}" editable="false"
enabled="#{d.CCCSVString.enabled}" text="#{d.CCCSVString.csvString}"
width="#{d.CCCSVString.width}" />
You see that the component designer did not consider the attribute LABELTEXT – and this is something that you want to add into the existing component.
The first step is to write a Java class extending the original class of the page bean component – and adding there the functions and properties that you require:
package workplace.pbcext;
import java.util.Map;
import org.eclnt.ccaddons.pbc.CCCSVString;
public class MyCSVString extends CCCSVString
{
// ------------------------------------------------------------------------
// members
// ------------------------------------------------------------------------
String m_labelText;
// ------------------------------------------------------------------------
// public usage
// ------------------------------------------------------------------------
public String getLabelText() { return m_labelText; }
public void setLabelText(String labelText) { m_labelText = labelText; }
@Override
public void initializePageBean(Map<String, String> initData)
{
super.initializePageBean(initData);
if (m_labelText == null) m_labelText = initData.get("labeltext");
}
}
Now you have some place to define the labelText in the code... But you somehow need to transfer the value of “labelText” into the COMBOFIELD's layout definition.
So what you need to do is to update the layout XML definition. You may either do this by completely writing the whole XML on your own and store it in the same package with the name “MyCSVString.xml”.
Or, which is much smarter in many case, you may write a little XML file that describes the layout modifications that you want to do...:
<?xml version="1.0" encoding="UTF-8" standalone="yes"?>
<modification>
<control id="COMBOFIELD">
<attribute name="labeltext" value="#{d.CCCSVString.labelText}"/>
</control>
</modification>
This file defines that in the original XML file (coming from CCCSVString.xml) you update the component with id “COMBOFIELD” and you define the attribute LABELTEXT to be bound to the expression pointing the getLabelText()-method. You may update one or several attributes. The values that you define overwrite existing values coming from the original value.
In the XML file you may define:
several control-segments – you can modify different controls of the original layout
several attribute-segments within one control-segment – you may modify different attributes within one component.
The value might be an expression-value or a direct value. Example:
<?xml version="1.0" encoding="UTF-8" standalone="yes"?>
<modification>
<control id="COMBOFIELD">
<attribute name="labeltext" value="#{d.CCCSVString.labelText}"/>
<attribute name="tooltip" value="This is a CSV value."/>
</control>
</modification>
You need to follow the conventions:
You may name the extension class any way you like.
The XML modifcation definition must be stored in an XML file with the name “<className>.mod.xml”.
For the example this means:
Class name: workplace.pbcext.MyCSVString
XML name: workplace.pbcext.MyCSVString.mod.xml
The base for defining layout modifications is the usage of stable ids within the original component's layout definition – which are also kept stable when the component is updated and modified by the author of the original component.
By default component ids in the CaptainCasa toolset are counted. So if the author of the original component provides ids like “g_##” then there's a high probability that these ids might not be stable with future enhancements of the component.
Talk to the author of the page bean component in case the naming of ids is not properly done...!
Within a page bean component literals are kept in property files. Sometimes you want to use a page bean component - but the texts of the page bean component do not match the texts of your application.
You can directly influence the page bean component's literal resolution by implementing interface “PageBeanComponentBase.ILiteralResolver”:
public interface ILiteralResolver
{
public String findLiteral(String key);
}
If there is a page bean resolved assigned then any literal resolution will be sent to the ILiteralResolver instance first. If the instance returns a text, then this is the one that is used - otherwise the texts of the page bean's property files are used.
You can assign your ILiteralResolver instance in two ways:
“for-all-way”: there is an class “PageBeanResolverOverride” which you can call in the following way:
PageBeanResolverOverride.addLiteralResolver(Class pageBeanClass, ILiteralResolver literalResolver)
Now any instance of the page bean class will use the ILiteralResolver instance that you pass.
“per-instance-way”: there is a default method “setLiteralResolver(...)” that is available with any page bean component implementation that extends “PageBeanComponentBase” - which is the case for all CaptainCasa components and which typically is the base for your implementations as well.
There are a couple of components that provide the possibility to upload/download files from/to the user's client. The demo workplace contains a number of examples that demonstrate what you can do – please take implementation details from there.
The following components all trigger the download of a certain file to the client side.
FILEDOWNLOADBUTTON
FILEDOWNLOADLINK
FILEDOWNLOAD
While FILEDOWNLOADBUTTON and FILEDOWNLOADLINK are visible components, that trigger the download when the user presses the button/link, FILEDOWNLOAD is an invisible component that start the download via a trigger-attribute.
Once triggered a corresponding popup will be opened for the user, so that the user can select/change the location of the file to be downloaded.
The download itself is done through a URL-attribute that is defined as attribute of the component. The URL should point into your web application. The client opens up the URL, reads the bytes by a corresponding http-request and stores the bytes within the defined file on client side.
Well, what we tell now sounds very easy (and it is), but it will not meet your real life requirements... Never the less it maybe useful for certain situations.
...
<t:filedownloadbutton url=”/images/car.png” filename=”car.png”/>
...
The URL “/images/car.png” point to a static file “car.png” within the “images” directory of your web application. The file name on client side, that will be proposed to the user is “car.png” as well.
You see, it is very easy to download static content that is part of your web application. BUT: you should never use this way of accessing information in order to download dynamic content!
Example: you could define a directory “download” within your web application, and then write some temporary files into the download directory, that you then dynamically pass as URL into the download-component.
Why you should never do this: first of all some applications server (different to Tomcat), do not open up a web-application-directory at all – but store the web application somehow in internal files. As consequence there is no directory to write to.
And: in clustered scenarios requests potencially may hit different machines. So the client, resolving the URL “/download/temp1234” may hit a different machine than the one were you wrote the file to.
In short: writing information into the web application directory is “dirty programming” and that's what you should not do. There are much nicer ways, in addition – please have a look into the next chapter.
The solution to provide dynamic content via URL is quite simple: instead of passing back a static URL, a URL is passed back that invokes a certain servlet, that then itself triggers the passing of the dynamic content. A consequence the request that is sent from client side when the download is triggered hits a dynamic program structure rather than a static file system.
In order to simplify this dynamic, servlet based loading of data there are already some structures defined within the server side processing of CaptainCasa Enterprise Client.
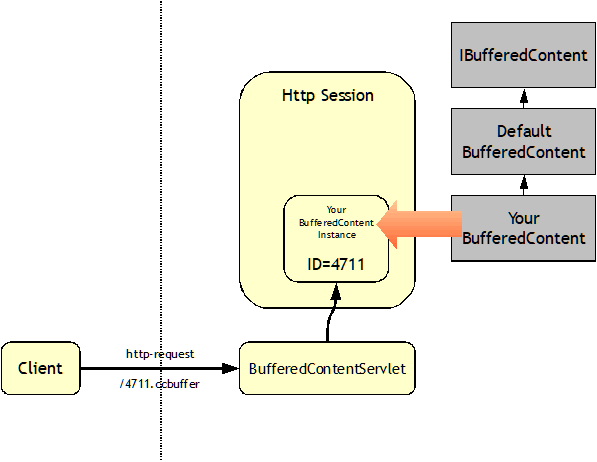
There is an interface “IBufferedContent” and a default implementation “DefaultBufferedContent”. The method that you need to define in your implementation is the following:
class YourBufferedContent extends DefaultBufferedContent
{
public byte[] getContent()
{
...
...
...
// load the content here
...
...
...
}
}
When creating an instance of this class you need to register this instance within the so called buffered-content-manager:
YourBufferedContent bc = new YourBufferedContent();
BufferedContentMgr.add(bc);
As part of the creating of the instance and of registering, the instance has received a unique id and is registered under this id within the session context.
From the instance you can now load a URL – the URL contains all the parameters that are required later on to find the instance from the BufferedContentServlet, shown in the graph above. The instance's URL may for example be:
BUFFERED_4711.ccbuffer;jsessionid=dfk34823544539
This URL, that you receive from the instance is “perfectly made” for being passed as URL into the download components.
When the user triggers the download, then the URL is requested from client side – the instance is caught up by accessing the session context and the instance's method “getContent()” is called. The result of “getContent()” is passed back as response to the client side – and stored as local file over there.
When applying the mechanism explained in the previous chapter to scenarios, in which you may want to download megabytes of data, then there is one problem: you have to pass back the content as byte-array. This means, that the whole megabyte-content is kept in memory on server side for a certain duration of time.
As consequence there is a a second interface mechanism, that exactly operates the same way as already described with IBufferedContent in the previous chapter – but now not loading the content as byte-array, but now by letting you pass the content into an output stream.
class YourBufferedContent extends DefaultBufferedStreamContent
{
public void writeStream(OutputStream stream)
{
...
...
...
// provide content and write into stream
...
...
...
}
}
Each component for downloading information from the server to the client provides an attribute ASYNCHRONOUS. By default the download is done in a synchronous way – i.e. the user has to wait with further processing on client side until the download is finished. By setting ASYNCHRONOUS to “true” you can decouple the downloading from the normal request/response processing of the Enterprise Client.
For uploading files there are a couple of components as well:
FILEUPLOAD – synchronous upload of files, component looks like a combo box
FILEUPLOADLINK, FILEUPLOADLINKASYNCHRONOUS – synchronous/asynchronous upload of files, component is rendered as link
FILEUPLAODBUTTON, FILEUPLOADBUTTONASYNCHRONOUS – synchronous/ asynchronous upload of files, component looks like a button
FILEUPLOADASYNCHRONOUS – asynchronous upload of files, component is not visible to the user – it can be triggered by server side processing.
The components provide a different way of rendering, but all operate the same way, when it comes to uploading client side file information.
There are two different usage modes that can be applied:
Synchronous Upload
Asynchronous Upload
This is the default mode. When the user triggers the upload (e.g. by pressing the button of FILEUPLOADBUTTON), then a file selection is popped up. After selecting the file the content will be uploaded as just normal request that is coming from the client.
Consequently the action listener that is associated with the component is called on server side, and the file information (client file name and file content) is passed through the “BaseActionEventUpload”.
Advantage: the processing of the server side is “in sync” with the upload processing: e.g. you might directly process the uploaded content within the follow-on processing.
There are two disadvantages of synchronous upload components that you need to pay attention to, especially when dealing with bigger file sizes (starting at “some megabytes”):
Because the content of the file is part of the normal data request processing, there is no feedback to the user, that the request processing will now take long(er). The user just sees some hour glass and e.g. does not get any feedback about how many bytes of the file are currently uploaded. The user also cannot interrupt the upload processing – all the client operation is blocked until the file is completely sent to the server side.
The content of the file needs to be converted into some string (here we use a simple hex-byte representation) in order to be embedded into the normal http request protocol (“name1=value1&name2=value2&name3=value3...). This means that the whole file is loaded within the client processing (e.g. 1MB of byte[] size), is converted into a hex-string (2 Mill. characters, 4 MB of char[] size) and in some situations kept twice temporarily (e.g. when appending it to a string buffer).
Consequence: use the synchronous upload for “not-too-big” file sizes and if there is a certain sequence of processing on server side that you want to enforce. For files which are bigger than 5MBs please use asynchronous upload components, especially because of memory considerations.
This mode is invoked when specifying the attribute ASYNCHRONOUSUPLOADURL within the components.
Now the file is uploaded to a URL in parallel to the normal request/response processing of the Enterprise Client. The URL needs to point to a servlet processing that processes the file content on server side.
Very similar to the servlet management that is used for downloading dynamic content (please take a look into this chapter), there is an interface/object structure available that simplifies the server side processing when receiving an upload request:
You either implement the interface IUploadContent (by sub-classing from DefaultUploadContent) or you implement the interface IUploadStreamContent (by sub-classing from DefaultUploadStreamContent).

The same structure is applied when using interface “IUploadStreamContent”.
public class MyUploadContent extends DefaultUploadContent
{
public void beginPassing()
{
m_content = "Upload started.\n";
}
public void passClientFile(String fileName, byte[] bytes)
{
m_content += "File was passed: client name " +
fileName + ", length " + bytes.length +"\n";
}
public void endPassing()
{
m_content += "Upload ended.";
}
}
public class MyUploadStreamContent extends DefaultUploadStreamContent
{
public void beginPassing()
{
m_content = "Stream upload started.\n";
}
public void passClientFilesAsStream(InputStream stream)
{
try
{
StringBuffer sb = new StringBuffer();
while (true)
{
int b1 = stream.read();
if (b1 < 0) break;
char c = (char)b1;
sb.append(c);
}
m_content += sb.toString()+ "\n";
}
catch (Throwable t)
{
CLog.L.log(CLog.LL_ERR,
"error when receivng file from client",t);
}
}
public void endPassing()
{
m_content += "Stream upload ended.";
}
}
When implementing your own classes to manage upload requests, you need to implement these methods that actually transfer the data from the upload-request into the application:
beginPassing()
passClientFile() for IUploadContent, passClientFilesAsStream() for IUploadStreamContent
endPassing()
When creating instances you need to register these instances, so that they are parked within the http session context on server side. The registration is done in the following way:
// creating instances + register
MyUploadContent muc = new MyUploadContent();
UploadContentMgr.add(muc);
MyUploadStreamContent musc = new MyUploadStreamContent();
UploadContentMgr.add(musc);
// assign URL of instances to propery-members that are
// references by the upload components
m_uploadURL = muc.getURL();
m_uploadStreamURL = musc.getURL();
The URL that you provide to be used as ASYNCHRONOUSUPLOADURL is taken out of the “getURL()” method of your instances.
Please read the JavaDoc in order to find more details about the usage of the interfaces, e.g. about the format of the stream when using IUploadStreamContent.
After having successfully uploaded a file/ some files the client side upload processing will trigger the action listener that is bound within the corresponding upload component. The event that is passed into the action listener is of class “BaseActionEventUploadAsynchronousFinished”.
The registration of “IUploadContent” and “IUploadStreamContent” objects into the “UploadContentMgr” means that a central session instance now keeps pointers to the instances that you pass.
You need to careful think about when to un-register your instances – otherwise your server side memory will not garbage collect your objects. Un-registering is done by calling the “UploadContentMgr.remove(...)”-method.
There are two techniques how to un-register:
The first one is “obvious”: if you have a certain point of time within your application processing, at which you know that you can release the instances, then you need to call the remove(...)-method. - When using CaptainCasa's workplace management, then pages are running in the context of so called workpages. Workpages provide a lifecycle listener interface, so your code might look like:
m_uploadContent = new MyUploadContent();
UploadContentMgr.add(m_uploadContent);
m_uploadStreamContent = new MyUploadStreamContent();
UploadContentMgr.add(m_uploadStreamContent);
getWorkpage().addLifecycleListener(new
WorkpageDefaultLifecycleListener()
{
public void reactOnDestroyed()
{
super.reactOnDestroyed();
UploadContentMgr.remove(m_uploadContent);
UploadContentMgr.remove(m_uploadStreamContent);
}
});
Another technique is to always re-new the objects with each request. For removing existing instances you may use the PhaseManager (a utility class of CaptainCasa):
IUploadContent m_uploadContent;
public class RemoveUploadContent implements Runnable
{
public void run()
{
if (m_uploadContent != null)
{
UploadContentMgr.remove(m_uploadContent);
m_uploadContent = null;
}
}
}
public String getUploadContentURL()
{
if (m_uploadContent == null)
{
m_uploadContent = new ...;
UploadContentMgr.add(m_uploadContent);
PhaseManager.runBeforeUpdatePhase(new RemoveUploadContent());
}
return m_uploadContent.getURL();
}
Result: the registration of an object is only kept for a certain point of time (until next request is processed).
When upload client side information, then you will typically exceed limits that are defined for “normal request processing”. Most typical, there is a “max request size” definition somewhere in your application server configuration settings...
You need to configure the connector in tomcat/conf/server.xml to allow post-request-sizes greater than 1 MB.
<Connector port="50000" protocol="HTTP/1.1"
connectionTimeout="20000"
redirectPort="50001"
maxPostSize="-1"/>
By defining a maxPostSize of “-1” any request sizes are allowed to be uploaded.
Please read further details within the documentation available with Tomcat.
CaptainCasa provides a couple of components that allow to key in text using virtual keyboards:
The TOUCHFIELD component is a keyboard that is directly rendered into the page:
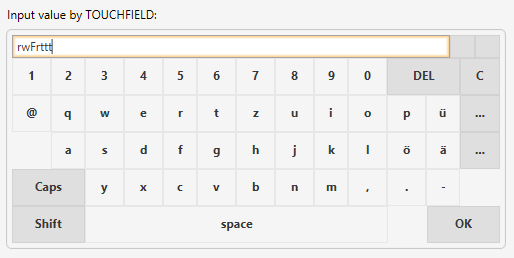
It allows the user to specify exactly one text value, which is bound to a server side property.
All *FIELD components provide two attributes:
TOUCHSUPPORT – if set to true then a virtual keyboard opens up below or on top of the component. By default the keyboard-type is derived from the field – e.g. a numeric keyboard is opened for FORMATTEDFIELD of type “integer”.
TOUCHLAYOUT – is a link to some own keyboard definition. You may define own keyboard layouts and reference them by setting this attribute.
The TOUCHVIRTUALKEYBOARD component is an independent keyboard that you can place somewhere into your layout. While the TOUCHFIELD only takes responsibility for one value, the TOUCHVIRTUALKEYBOARD component serves as independent keyboard for all fields / input element of one page. It always updates the component, that currently owns the focus.
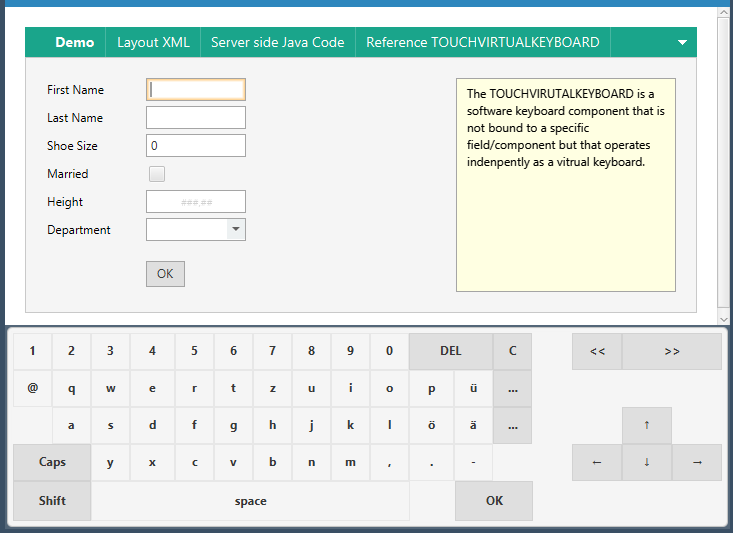
You may define own keyboard layouts that are referenced by the corresponding component definition.
Example:
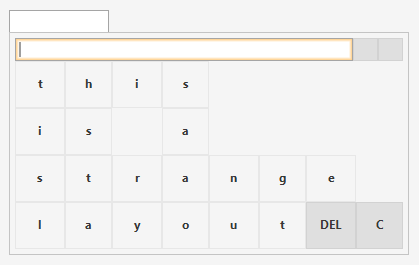
The field definition is:
<t:field id="g_11" touchlayout="owndef" touchsupport="true"
width="100" />
The attribute TOUCHLAYOUT is defined as “owndef”, which is the pointer to the server side definition of a keyboard layout.
On server side the definition is kept in a configuration file “touchlayouts.xml”, which itself is part of the directory “/eclntjsfserver/config”. The file's content is defined in the following way:
<touchlayouts>
...
...
<layout name="owndef"
line0="t;h;i;s"
line1="i;s;@null@;a"
line2="s;t;r;a;n;g;e"
line3="l;a;y;o;u;t;DEL/1/@clearlast@;C/1/@clearall@" />
<layout name="helloworld"
line0="H;e;l;l;o"
line1="w;o;r;l;d"
line2="DEL/1/@clearlast@;C/1/@clearall@" />
...
...
</touchlayouts>
For each layout there is one corresponsing “<layout … />” section. In the section there are several lines being numbered line0, line1, line2 etc.
Each line itself contains the key-definition for one row of the layout. The format is: “<def1>;<def2>;<def3>;...” - each definition representing one key.
A key definition may be defined in two ways:
“Simple way”: you just define the character that is the one to be represented by the key. The key itself has a default size, the text of the key is the character and the key that is added to the text when pressing the key also is the character.
Example: by defining “t” you define a “t”-key.
“Complex way”: you may define the key by three individual definitions, separated by as slash “/”. The definitions are “<displayText>/<width>/<char>”:
<displayText>: this is the text that is rendered onto the key
<width>: this is the width of the key button. “1” means the normal key width, “2” means 2 times the normal key width, etc.
<char>; the character that is added into the text when the user presses the key button
There are a couple of special characters that you may use as <char>-definition:
“\x47”: this is the representation of a slash (“/”)
“&#xx;” - you may define any unicode character by defining its decimal representation
@null@: this is a null key. I will not be rendered as button but as gap within the keyboard layout.
@clearall@: when pressed then the current content will be cleared
@clearlast@: when pressed then the last character/ character where the current focus is located will be removed
@shift@: shift-key for keying in uppercase characters
@capslock@: caps-key for a sequence of uppercase characters
@tab@/@backtab@: tab-navigation, only usefule for TOUCHVIRTUALKEYBOARD component
@cursorleft@,@cursorright@,@cursorup@,@cursordown@: cursor navigation in current input
@ok@: the enter key (character “\n”)
There is the possibility to navigate between different keyboard layouts. Just define the key “@layout:<layoutname>@” as character.
Within the Demo Workplace (“General Issues” > “Server Event Processing”) there are couple of examples for each aspect that is part of this chapter. Please look there for details for implementation.
The default way the CaptainCasa client talks to the server side processing is:
The client communicates a request to the server – e.g. after the user having pressed a button.
The request is assigned to a thread on server side, within this thread the request is processed, i.e. its values are set into the application, the action listeners are invoked and the components are rendered on server side.
The response is sent back to the client.
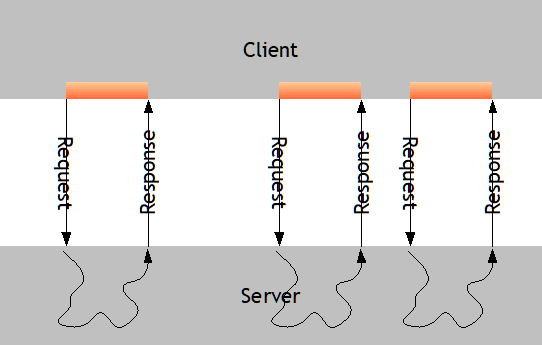
During the phase when the client talks to the server the client itself is blocked for input, in order to avoid inconsistency of data.
The strict request-response driven way of communication is the best type of communication for the default input/output while the user is working with a screen:
It only builds up connections for a limited point of time.
The server side processing is within one thread, there are no multi threading issues. The thread either can be destroyed or cleaned up for further usage after processing.
Since 20201221 it is possible to send interim information about the progress of the server side processing:
public void onLongAction(org.eclnt.jsfserver.base.faces.event.ActionEvent event)
{
try
{
for (int i=0; i<100; i++)
{
// ...
// do something
// ...
BlockerInfo.sendProgressToClient("Processing step " + (i+1),i+1);
}
}
catch (Throwable t)
{
Statusbar.outputError(t.toString());
}
}
The interim progress information is passed by calling the method BlockerInfo.sendProgressToClient(). There are two parameters:
A text (mandatory)
A progress indicator (optional, integer number between 0 and 100, representing the percentage value representing the progress)
On client side the progress information is added below the busy indicator that is shown when a dialog is waiting for the response of the server:
Internally the client opens up a web socket connection to the server side, which is used to transfer the progress information. This web socket connection is independent from the normal request/response based connection that is processed by normal user activities.
But of course there are certain limitations as well:
Long lasting server side operations mean a long blocking of the user interface. During blocking time there are only limited ways (see previous chapter) of informing the user what's going on – there is no possibility to update the screen (e.g. adding/removing items to/from a grid).
Events that are triggered on server side cannot be sent to the client side. The client can pick event data with the next request it sends, but this may depend on the user's activity.
Result: there is a need for enhanced, “event-driven” communication and processing for certain, dedicated scenarios – in parallel to the normal request-response driven way of processing.
In this chapter you will see, how certain processing on server side will be shifted into threads on their own, running in parallel to the normal request-response thread. Looking on pure JEE specifications you are not allowed to open threads on server-side on your own. Of course many JEE implementations (e.g. Tomcat) do not have problems, but some have.
So, in case you want to stick 100% to JEE rules you need to re-think how to decouple processing on server side - e.g. one way might be the usage of JMS...
In addition: working with threads etc. adds a certain additional complexity into your server side development. You need to be aware about this and you need to put extreme care into your implementation! - Finally you need to make sure that your network configuration and cluster configuration supports what you want to do.
If you only want to have strict request-response driven communication then this is the only way: you set up a TIMER component within the client that regularly polls information “every xx seconds”. It's like a button being pressed regularly by the user.
The TIMER component provides two significant attributes:
The DURATION – i.e. the polling rate in milliseconds
The ACTIONLISTENER – i.e. the method to be called on server side
You can update the duration by binding it to a property – if you set value “0” then the TIMER component will stop sending requests.
As result you can build scenarios like the following:
The first request from the client starts a processing thread on the server side – and returns back to the client – so that the user interface is “freed up” quite fast. A timer will afterwards regularly send requests to check the status of the processing thread. When finished, the timer may de-activate itself.
Of course there are some disadvantages with polling:
The number of requests is quite high.
The user interface is permanently blocked for short time because of the poller communicating to the server side.
As result we recommend timer based polling for scenarios in which you want to reguluarly but not very often (e.g. every 2 minutes) check for things happening on server side.
The principles behind long polling are:
The client opens up a parallel communication line to the server.
In case of an event the server notifies the client about this event and sends back a message to the client.
This notification may trigger the client to do a “real” round trip to the server side, i.e. the client will call an action listener - just as if it was triggered by e.g. a button.
There are two technical ways to establish the event connection between client and server:
Usage of traditional http-request/response
Usage of web sockets
From chronological point of view the long polling via traditional http-request/response was available first – and the web socket communication was added later on.
Today “all” networks are capable to handle web sockets, so you should go the web-socket way by default! It is much more lightweight both on client and on server-side. And it does not have as many restrictions as the traditional http-way. Example: even today (July 2018) a browser has a limited number of parallel connections that can be used to communicate to one server. A Chrome browser only allows 6 http connections to be opened against one server. This means: when having opened 6 long polling connections (e.g. by 6 browser tabs) then there is no communication channel left – and the corresponding pages will freeze from communication point of view.
Conclusion: by default we recommend to use the web socket way of communicating events from the server to the client.
In CaptainCasa the traditional long polling is implemented in the following way:
On client side a special request from a long polling component (LONGPOLLING) is sent to the server. When being woken up the response is communicated back. As consequence the client side triggers a real, normal request-response communication. - What is not shown in the picture: after having processed the response, the long polling directly starts a new request to the server side, waiting for the next event.
You can think of the LONGPOLLING component as virtual button, that is pressed by receiving a response from the server side.
OK, so there are two levels of communication:
The “event channel” - i.e. the long polling
The “processing channel” - i.e. the normal data transfer by request-response.
The event channel now requires a URL to go to, behind this URL there needs to be the possibility to add some Java code. So for this purpose CaptainCasa introduces a concept that is very similar to the concept of providing URLs for dynamic down/upload of data:
Within the HttpSession context an instance of “DefaultLongPolling” (or sub-class) is registered with a certain id. The instance passes back a URL, containing this id. The client is calling the URL, the central servlet dispatches the request to the LongPolling instance.
Have a look into the following codes:
package workplace;
public class DemoLongPolling
extends DemoBase
implements Serializable
{
// -----------------------------------------------------------------
// inner classes
// -----------------------------------------------------------------
class EventCreatorThread extends Thread
{
boolean i_continue = true;
public void run()
{
while (i_continue == true)
{
try
{
Thread.currentThread().sleep(5000);
if (i_continue == true)
m_longPolling.wakeup(true);
else
break;
}
catch (Throwable t)
{
CLog.L.log(CLog.LL_ERR,"Error occurred when waking up thread",t);
break;
}
}
}
}
// -----------------------------------------------------------------
// members
// -----------------------------------------------------------------
DefaultLongPolling m_longPolling = new DefaultLongPolling();
EventCreatorThread m_eventCreatorThread = new EventCreatorThread();
String m_message = new String();
// -----------------------------------------------------------------
// constructors
// -----------------------------------------------------------------
public DemoLongPolling(IWorkpageDispatcher dispatcher)
{
super(dispatcher);
LongPollingMgr.add(m_longPolling);
m_eventCreatorThread.start();
getWorkpage().addLifecycleListener(new WorkpageDefaultLifecycleListener()
{
@Override
public void reactOnDestroyed()
{
super.reactOnDestroyed();
CLog.L.log(CLog.LL_INF,"Cleaning up threads...");
LongPollingMgr.remove(m_longPolling);
m_eventCreatorThread.i_continue = false;
}
});
}
// -----------------------------------------------------------------
// public usage
// -----------------------------------------------------------------
public String getLongPollingURL() { return m_longPolling.getURL(); }
public void onLongPollingAction(ActionEvent event)
{
m_message = "Call to server...! " + System.currentTimeMillis() + "\n" + m_message;
}
public String getMessage() { return m_message; }
}
An instance of DefaultLongPolling is created and registered.
Whenever a long polling request is started, then this waits within the DefaultLongPolling instance, until the method “wakeup(true/false)” is called. By passing back “true” you define that long polling will continue, i.e. the client will send the next long polling request immediately after having processed the response of the current one.
For a better understanding, what's going on internally, we show you some code of DefaultLongPolling:
public boolean waitForEvent()
{
...
...
synchronized(this)
{
try
{
CLog.L.log(CLog.LL_INF,"Now waiting for event to wakeup this long polling thread");
m_justWaiting = true;
this.wait();
CLog.L.log(CLog.LL_INF,"Event woke up this thread");
m_justWaiting = false;
return m_continuePolling;
}
catch (Throwable t)
{
CLog.L.log(CLog.LL_ERR,"Error occurred when falling to sleep.",t);
throw new Error(t);
}
}
...
...
}
public void wakeup(boolean continuePolling)
{
...
...
{
...
synchronized(this)
{
try
{
CLog.L.log(CLog.LL_INF,"Wakeup was called for the long polling thread, continuePolling = " + continuePolling);
m_continuePolling = continuePolling;
this.notify();
}
catch (Throwable t)
{
m_continuePolling = false;
CLog.L.log(CLog.LL_ERR,"Error occurred when falling to sleep.");
throw new Error(t);
}
}
}
...
}
You see that the thread waits within the waitForEvent method (which is called by the LongPollingServlet) until someone calls the wakeup method.
Finally have a look onto the JSP definition:
<t:beanprocessing id="g_1">
<t:longpolling id="g_2"
actionListener="#{d.DemoLongPolling.onLongPollingAction}"
longpollingurl="#{d.DemoLongPolling.longPollingURL}" />
</t:beanprocessing>
<t:rowdemobodypane id="g_3" objectbinding="#{d.DemoLongPolling}">
<t:row id="g_4">
<t:textarea id="g_5" enabled="false" height="100%"
text="#{d.DemoLongPolling.message}" width="100%" />
</t:row>
</t:rowdemobodypane>
You see the LONGPOLLING component's main configuration consists of:
the URL it calls (the one provided by DefaultLongPolling on server side)
the ACTIONLISTENER it calls when receiving a response due to a server side event.
In the meantime there is a long polling available that internally works the same principal way as the “traditional” long polling just described – but which now uses web-sockets for communicating events from the server to the client. Because web-socket connections are much more lightweight than traditional http-connections, we strongly recommend to use web-socket based long polling.
(This function is only available within the RISC HTML Client – it is not available in the Java-Swing and Java-FX based client.)
In the meantime web sockets are a common, proven way to setup communication between the browser client and the backend server. As consequence they are also used to communicate server side events to the client. The way, web sockets are used for “long polling” eventing is following the same procedure then explained with normal long polling:
By using the component WEBSOCKETLONGPOLLING the client sets up a web socket connection to the server.
In case of a server side event the server sends a notification to the client.
Depending on the content of this notification the client will trigger some action method on server side.
The example in the demo workplace demonstrates a parallel thread sending events to the polling mechanism.
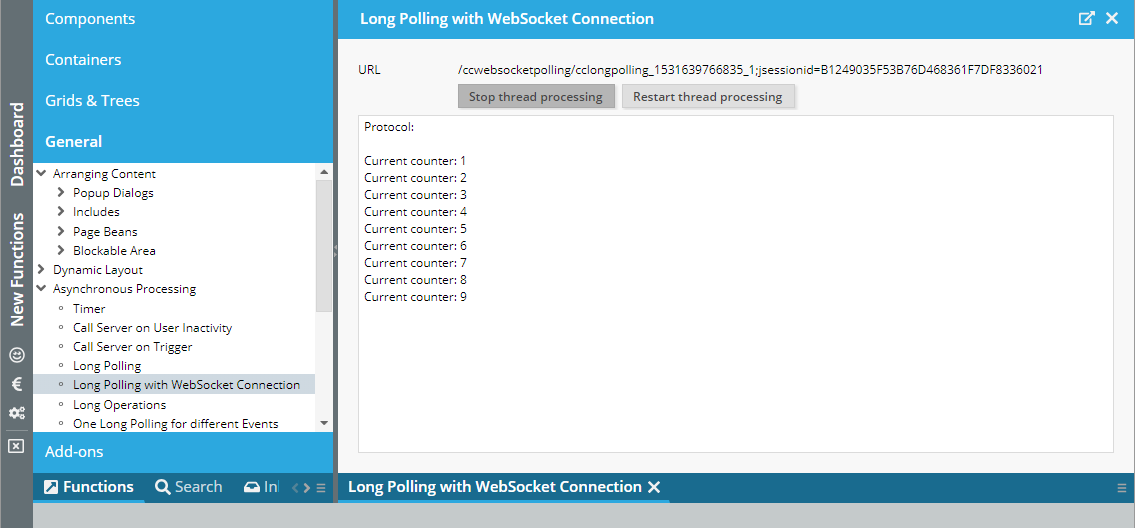
The layout is:
<t:beanprocessing id="g_1">
<t:websocketpolling id="g_2"
actionListener="#{d.DemoWebSocketPolling.onWebSocketAction}"
duration="100"
websocketurl="#{d.DemoWebSocketPolling.webSocketUrl}" />
</t:beanprocessing>
<t:rowbodypane id="g_3" rowdistance="5">
<t:row id="g_4">
<t:label id="g_5" text="URL" width="100" />
<t:label id="g_6" cutwidth="true"
text="#{d.DemoWebSocketPolling.webSocketUrl}" width="100%" />
</t:row>
<t:row id="g_7">
<t:coldistance id="g_8" width="100" />
<t:button id="g_9"
actionListener="#{d.DemoWebSocketPolling.onStopAction}"
text="Stop thread processing" />
<t:coldistance id="g_10" width="5" />
<t:button id="g_11"
actionListener="#{d.DemoWebSocketPolling.onRestartAction}"
text="Restart thread processing" width="100+" />
</t:row>
<t:row id="g_12">
<t:textarea id="g_13" height="100%"
text="#{d.DemoWebSocketPolling.protocol}" width="100%" />
</t:row>
</t:rowbodypane>
The WEBSOCKETPOLLING component is bound to a WEBSOCKETURL which provides the web socket communication.
The DURATION of 100ms means that after being notified by a server side event, the client will wait for the duration to get triggered by new events. This duration will avoid, that there is too much traffic being caused by the web socket eventing (e.g. the server sending out events every 10 milliseconds...). Please note: there is no loss of events, it's just the reaction on the events that is shifted accordingly.
The ACTIONLISTENER is the method on server side that is called in case an event is received.
The Java implementation is:
package workplace;
import java.io.Serializable;
import org.eclnt.editor.annotations.CCGenClass;
import org.eclnt.jsfserver.elements.util.Trigger;
import org.eclnt.jsfserver.polling.LongPollingMgr;
import org.eclnt.jsfserver.polling.websocket.DefaultLongPollingWebSocket;
import org.eclnt.workplace.IWorkpageDispatcher;
import org.eclnt.workplace.WorkpageDefaultLifecycleListener;
import org.eclnt.workplace.WorkpageDispatchedPageBean;
@CCGenClass (expressionBase="#{d.DemoWebSocketPolling}")
public class DemoWebSocketPolling
extends WorkpageDispatchedPageBean
implements Serializable
{
// ------------------------------------------------------------------------
// inner classes
// ------------------------------------------------------------------------
public class MyThread extends Thread
{
boolean i_threadStop = false;
@Override
public void run()
{
for (int i=0; i<100; i++)
{
try { Thread.sleep(500); } catch (Throwable t) {}
if (i_threadStop == true) break;
m_counter++;
m_longPollingWebSocket.wakeup(true);
}
if (m_thread == this) m_thread = null;
}
}
// ------------------------------------------------------------------------
// members
// ------------------------------------------------------------------------
DefaultLongPollingWebSocket m_longPollingWebSocket;
MyThread m_thread;
int m_counter = 0;
String m_protocol = "Protocol:\n";
// ------------------------------------------------------------------------
// constructors & initialization
// ------------------------------------------------------------------------
public DemoWebSocketPolling(IWorkpageDispatcher workpageDispatcher)
{
super(workpageDispatcher);
m_longPollingWebSocket = new DefaultLongPollingWebSocket();
LongPollingMgr.add(m_longPollingWebSocket);
getWorkpage().addLifecycleListener(new WorkpageDefaultLifecycleListener()
{
@Override
public void reactOnDestroyed()
{
if (m_thread != null)
m_thread.i_threadStop = true;
LongPollingMgr.remove(m_longPollingWebSocket);
}
});
m_thread = new MyThread();
m_thread.start();
}
public String getPageName() { return "/workplace/demowebsocketpolling.jsp"; }
public String getRootExpressionUsedInPage() { return "#{d.DemoWebSocketPolling}"; }
// ------------------------------------------------------------------------
// public usage
// ------------------------------------------------------------------------
public String getWebSocketUrl() { return m_longPollingWebSocket.getURL(); }
public String getProtocol() { return m_protocol; }
public void setProtocol(String value) { this.m_protocol = value; }
public void onWebSocketAction(org.eclnt.jsfserver.base.faces.event.ActionEvent event)
{
m_protocol += "\nCurrent counter: " + m_counter;
}
public void onStopAction(org.eclnt.jsfserver.base.faces.event.ActionEvent event)
{
if (m_thread != null)
m_thread.i_threadStop = true;
m_thread = null;
}
public void onRestartAction(org.eclnt.jsfserver.base.faces.event.ActionEvent event)
{
if (m_thread != null)
return;
m_thread = new MyThread();
m_thread.start();
}
}
An instance of DefaultLongPollingWebSocket is created and registered in the LongPollingMgr.
The de-registration in this example is done as part of listening to closing the workpage. This is specific to workplace scenarios and might be solved in a different way on your side. - You “just” need to follow the rule, that you should de-register from the LongPollingMgr once the long polling is not required anymore.
There is a parallel thread that sends wakeup-events regularly.
“wakeup(true)” is called, so that the web socket connection is kept open. If calling “wakeup(false)” then the client will close the web socket connection (and there is no polling anymore).
The clear decision which way to choose is simple:
Use the web socket based approach in general!
Web sockets are accepted and supported by “all” infrastructures in the meantime.
Only use the more traditional approaches of long polling, which are based on classical http-connections, only if there is some explicit, good reason.
...and: take look onto the next chapter if you want to dynamically decide which one to use.
The component UNIFIELDPOLLING either uses the “preferred” WebSocket polling or uses the “traditional” http-request-polling - and lets you decide which one is taken by configuration.
The component requires the binding to an object of type UNFIEDPOLLINGBinding. It's core attributes are:
ACTIONLISTENER - the action that is called in case of an activation
DURATION - duration to wait on client side with sending the ntext activation - so that in case of many activations the client is not calling the ACTIONLISTENER permanently
optional: POLLINGTYPE - the type of polling to use: either “WEBSOCKET” or “URL”.
The POLLINGTYPE can be either set for each definition if UNIFIEDPOLLING (typically binding to an expression of your application that decides which polling type to sue). Or you can define centrally by calling:
UNIFIEDPOLLINGBinding.initializePollingType(ENUMPollingType pollingType);
The polling is triggered by calling the UNFIEDPOLLINGBinding's method “wakeup(...)” - as usual with parameter “true” if the polling is continued or “false” if is not required anymore.
The following shows an example in which events from an external thread are passed to the dialog processing - which shows the events in a protocol, which is shown inside a TEXTAREA:
<t:beanprocessing id="g_1"
beanbinding="#{d.DemoPBCUnifiedPolling}">
<t:unifiedpolling id="g_6"
actionListener="#{d.DemoPBCUnifiedPolling.onPollingAction}"
duration="100"
pagebeanbinding="#{d.DemoPBCUnifiedPolling.polling}" />
</t:beanprocessing>
<t:rowdemobodypane id="g_4"
rowdistance="#{ccstylevalue['@defaultrowdistance@']}">
<t:row id="g_5"
coldistance="#{ccstylevalue['@defaultcoldistance@']}">
<t:label id="g_14" text="Server-side event generation:" />
<t:button id="g_10"
actionListener="#{d.DemoPBCUnifiedPolling.onStartAction}"
text="Start" width="100+" />
<t:button id="g_12"
actionListener="#{d.DemoPBCUnifiedPolling.onStopAction}" text="Stop"
width="100+" />
</t:row>
<t:row id="g_3">
<t:textarea id="g_8" height="100%" stylevariant="cc_code"
text="#{d.DemoPBCUnifiedPolling.protocol}" width="100%" />
</t:row>
</t:rowdemobodypane>
The code is:
package workplace;
import java.io.Serializable;
import org.eclnt.editor.annotations.CCGenClass;
import org.eclnt.jsfserver.elements.polling.ENUMPollingType;
import org.eclnt.jsfserver.elements.polling.UNIFIEDPOLLINGBinding;
import org.eclnt.workplace.IWorkpageDispatcher;
@CCGenClass (expressionBase="#{d.DemoPBCUnifiedPolling}")
public class DemoPBCUnifiedPolling
extends DemoBasePageBean
implements Serializable
{
// ------------------------------------------------------------------------
// inner classes
// ------------------------------------------------------------------------
public class MyThread extends Thread
{
boolean m_stopped = false;
@Override
public void run()
{
while (m_stopped == false)
{
try { sleep(2000); } catch (Throwable t) {}
if (m_stopped == false)
m_polling.wakeup(true);
}
}
}
// ------------------------------------------------------------------------
// members
// ------------------------------------------------------------------------
String m_protocol = "";
UNIFIEDPOLLINGBinding m_polling = new UNIFIEDPOLLINGBinding();
MyThread m_thread;
// ------------------------------------------------------------------------
// constructors & initialization
// ------------------------------------------------------------------------
public DemoPBCUnifiedPolling(IWorkpageDispatcher workpageDispatcher)
{
super(workpageDispatcher);
// central configuration: should be called e.g. during startup!
UNIFIEDPOLLINGBinding.initializePollingType(ENUMPollingType.WEBSOCKET);
// you can also directly set the polling type by using component
// attribute TPBC:UNIFIEDPOLLING-POLLINTYPE - in this case the
// component definition overrules the general definition
}
public String getPageName() { return "/workplace/demopbcunifiedpolling.xml"; }
public String getRootExpressionUsedInPage() { return "#{d.DemoPBCUnifiedPolling}"; }
// ------------------------------------------------------------------------
// public usage
// ------------------------------------------------------------------------
public String getProtocol() { return m_protocol; }
public void setProtocol(String value) { this.m_protocol = value; }
public UNIFIEDPOLLINGBinding getPolling() { return m_polling; }
public void onStartAction(javax.faces.event.ActionEvent event)
{
m_protocol += "START called\n";
if (m_thread != null)
{
m_thread.m_stopped = true;
m_thread = null;
}
m_thread = new MyThread();
m_thread.start();
}
public void onStopAction(javax.faces.event.ActionEvent event)
{
m_protocol += "STOP called\n";
if (m_thread != null)
{
m_thread.m_stopped = true;
m_thread = null;
}
}
public void onPollingAction(javax.faces.event.ActionEvent event)
{
m_protocol += "Server side event: " + System.currentTimeMillis() + "\n";
}
// ------------------------------------------------------------------------
// private usage
// ------------------------------------------------------------------------
}
Some comments:
The buttons are calling the onStartAction and onStopAction methods - themselves controlling the life cycle of the external thread.
Inside the thread the polling is activated by calling the wakeup method.
Based on long polling and on the usage of a modal popup there is a nice way of defining long operations that run within a processing thread on server side and which pass text messages into an observer-object.
Please have a look into the demo workplace “General Issues > Server Events > Long operations” for viewing an example.
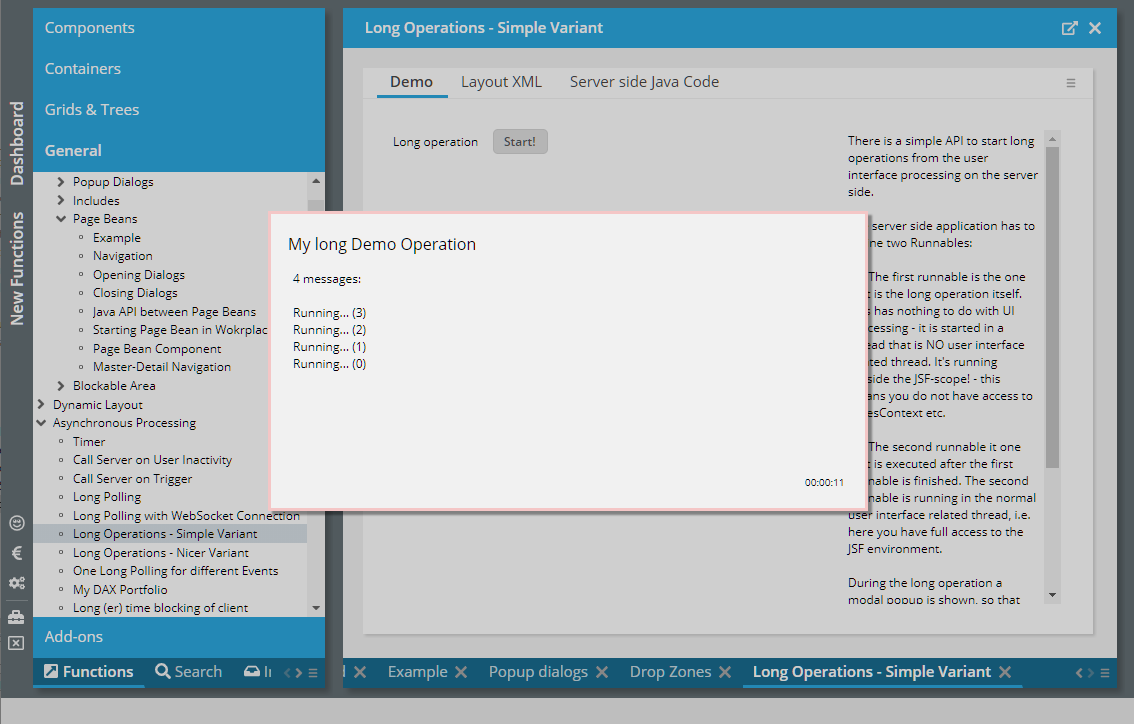
The application using “long operations” needs to define two “Runnable” instances:
The first, obligatory one is the long operation itself. This operation is started in a thread on its own so it should not perform any access to JSF processing (e.g. call functions related to the FacesContext).
The second, optional one is an operation that is executed after the long operation has finished. This second operation is executed within the JSF processing thread.
For writing messages, so that the user gets notified about the status of the processing, there is an observer object, that provides a corresponding interface. The messages are transferred to the client, internally using long polling as described in the previous chapter.
The following shows the code of the example that is available within the demo workplace:
public void onStartOperation(ActionEvent event)
{
final IObserver observer = LongOperationWithObserverPopup.prepare("My long Demo Operation");
Runnable longOperation = new Runnable()
{
public void run()
{
for (int i=0; i<5; i++)
{
observer.addMessage("Running... ("+i+")");
try
{
Thread.currentThread().sleep(3000);
}
catch (Throwable t) {}
}
}
};
Runnable finishOperation = new Runnable()
{
public void run()
{
Statusbar.outputSuccess("Finished!");
}
};
LongOperationWithObserverPopup.run(longOperation,finishOperation);
}
The long operation is a simple loop, containing some sleep-statements in order to simulate some long processing. The second operation is a simple output to the status bar.
Please pay attention: with the utility class “LongOperationWithObserverPopup” you can only start one long operation on server-side, within the scope of one user session. Nesting of long operations will lead into an error situation.
The “Dialog Message Bus” is a server-side framework with the following goals:
Simplify the exchange of messages between different parts of a complex dialog.
Simplify the sending of messages from external threads - without the need to directly deal with polling components (LONGPOLLING, WEBSOCKETPOLLING, UNIFIEDPOLLING).
Enable the simple communication of messages between browsers that are started on the same client.
For understanding the Dialog Message Bus it is important to differentiate the different levels of messaging:
One browser instance - regardless if it is a full browser or a tab within a browser - corresponds to one dialog session on server-side. The CaptainCasa dialog started within this browser instance may consist out of various page beans that are nested and that may be e.g. embedded within a workplace.
A browser runs on a client (e.g. a desktop PC). There may be various browsers (or browser tabs) on one client on which CaptainCasa dialogs for one application are started.
Take a look into the following code:
public class MyMessage
{
...
}
Sender: e.g. reaction on pressing a button:
public void onButtonAction(...)
{
MyMessage m = new MyMessage();
m.set...;
m.set...;
DialogMessageBus.instance().publishMessage(m);
}
Receiver:
public class MyXyzPageBean
{
public MyXyzPageBean()
{
DialogMessageBus.instance().addListener(new DefaultDialogMessageBusListener()
{
@Override
/*
* This method is always executed in the "UI processing thread".
*/
public void reactOnMessage(Object o)
{
if (o instanceof MyMessage)
{
MyMessage mm = (MyMessage)o;
...
...
}
}
});
}
}
In short:
You define a message (“MyMessage” in the example) containing the information that you want to publish.
The sender publishes the message.
The receiver listens to messages and executes corresponding action.
Sender and receiver live in the same dialog session - so this is a nice way to communicated information between loosely coupled areas of one screen.
In CaptainCasa Enterprise Client one dialog consists out of page beans that are nested into one another.
Page beans that directly belong together are coupled in a tight way: the one page bean knows the instance of the other page bean and typically registers to a listener (“IListener”) of the other page bean to get notified about events.
Example: if the outer page bean is a list, that contains an inner page bean showing the detail, then there is a direct PageBean-to-PageBean API to notify the inner screen that new selections were in the list were executed - and the inner screen communicates back that e.g. the details of the object were changed.
But there also scenarios in which one page bean wants to send out events to other page beans which are “far away”.
Example: in the workplace you start one general info page “on the right”. This page should be updated on certain events, e.g. selection of some information in some other dialog.
Here a direct communication between the involved page beans is quite difficult - and exactly here the Dialog Message Bus is a nice way to simplify the update.
The dialog message bus typically is triggered from the server-side “UI thread”: as in the example, a message is published as result of pressing a button and processing the corresponding action listener method.
As result the listeners are directly called within this thread, so that corresponding updates within the page beans of the listeners are also updated in the UI thread. Which means: changes to page bean of the listener are directly populated in the response to the client.
But: the dialog message bus can be also used for sending messages from external threads!
The dialog message bus will always call the listeners within a UI thread (so that updates to the page beans are immediately visible). In other words: if the message is not published in a UI thread, then the dialog message bus will automatically trigger some event from the corresponding client side, and the event is processed in the request that is sent from the client side.
You do not have to establish some own polling in order to synchronized the client with the server side! - The polling is automatically executed and the listener-processing of the Dialog Message Bus is always executed in the proper UI thread of the listener.
If using this feature please make sure that the asynchronous processing of the Dialog Message Bug is switched on:
system.xml
<system>
...
<dialogmessagebus asynchronous="true"/>
...
</system>
The following shows an example implementation of an external thread updating the protocol of a page bean:
package workplace;
import java.io.Serializable;
import org.eclnt.editor.annotations.CCGenClass;
import org.eclnt.jsfserver.messages.DefaultDialogMessageBusListener;
import org.eclnt.jsfserver.messages.DialogMessageBus;
import org.eclnt.jsfserver.messages.IDialogMessageBusListener;
import org.eclnt.jsfserver.pagebean.IDestroyable;
import org.eclnt.workplace.IWorkpageDispatcher;
@CCGenClass (expressionBase="#{d.DemoDialogMessageBusAsynchronous}")
public class DemoDialogMessageBusAsynchronous
extends DemoBasePageBean
implements Serializable, IDestroyable
{
// ------------------------------------------------------------------------
// inner classes
// ------------------------------------------------------------------------
class MyMessage
{
String i_text;
public MyMessage(String text)
{
i_text = text;
}
public String getText() { return i_text; }
}
class MyThread extends Thread
{
int i_counter = 0;
boolean i_stopped = false;
DialogMessageBus i_bus;
public MyThread(DialogMessageBus bus)
{
i_bus = bus;
}
@Override
public void run()
{
while (i_stopped == false)
{
try { Thread.sleep(2000); } catch (Throwable t) {}
i_counter++;
i_bus.publishMessage(new MyMessage("Current counter: " + i_counter));
}
}
}
// ------------------------------------------------------------------------
// members
// ------------------------------------------------------------------------
String m_protocol = "Protocol:\n";
MyThread m_thread;
IDialogMessageBusListener m_messageBusListener;
// ------------------------------------------------------------------------
// constructors & initialization
// ------------------------------------------------------------------------
public DemoDialogMessageBusAsynchronous(IWorkpageDispatcher workpageDispatcher)
{
super(workpageDispatcher);
m_messageBusListener = new DefaultDialogMessageBusListener()
{
@Override
/*
* This method is always executed in the "UI processing thread".
*/
public void reactOnMessage(Object o)
{
if (o instanceof MyMessage)
{
MyMessage mm = (MyMessage)o;
m_protocol += mm.getText()+"\n";
}
}
};
DialogMessageBus.instance().addListener(m_messageBusListener);
}
public String getPageName() { return "/workplace/demodialogmessagebusasynchronous.xml"; }
public String getRootExpressionUsedInPage() { return "#{d.DemoDialogMessageBusAsynchronous}"; }
// ------------------------------------------------------------------------
// public usage
// ------------------------------------------------------------------------
public String getProtocol() { return m_protocol; }
public void setProtocol(String value) { this.m_protocol = value; }
/**
* This message is sent directly from the "UI processing thread".
*/
public void onDirectSendAction(javax.faces.event.ActionEvent event)
{
DialogMessageBus.instance().publishMessage(new MyMessage("This is a directly sent message. " + System.currentTimeMillis()));
}
public void onStartAction(javax.faces.event.ActionEvent event)
{
if (m_thread == null)
{
m_thread = new MyThread(DialogMessageBus.instance());
m_thread.start();
}
}
public void onStopAction(javax.faces.event.ActionEvent event)
{
if (m_thread != null)
{
m_thread.i_stopped = true;
m_thread = null;
}
}
@Override
public void destroy()
{
DialogMessageBus.instance().removeListener(m_messageBusListener);
if (m_thread != null)
{
m_thread.i_stopped = true;
m_thread = null;
}
}
// ------------------------------------------------------------------------
// private usage
// ------------------------------------------------------------------------
}
So, now the dialog message bus is used to publish an event not only within the context of one brwoser (one dialog session) but across all browser instances that are started on the client.
Sender: e.g. reaction on pressing a button:
public void onButtonAction(...)
{
CrossDialogMessage m = new CrossDialogMessage(“articleSelected”,”4711”);
DialogMessageBus.instance().publishMessageToAllClientDialogs(m);
}
Receiver:
public class MyXyzPageBean
{
public MyXyzPageBean()
{
DialogMessageBus.instance().addListener(new DefaultDialogMessageBusListener()
{
@Override
/*
* This method is always executed in the "UI processing thread".
*/
public void reactOnMessage(Object o)
{
if (CrossDialogMessage.checkIfMessageMatches(m,”articleSelected”))
{
String content = ((CrossDialogMessage)m).getMessageContent();
...
...
}
}
});
}
}
You see that the API is very similar to the API for local messaging. But there are differences:
There is only message class “CrossDialogMessage” which has a type-String and a content-String.
The message is published by calling “publishMessageToAllClientDialogs(...)” and not by “publishMessage”
That's it! All the other issues do not change from API perspective.
From user's perspective now the message is started from browser one and automatically processed in the browser two processing. Again the processing of the listener will be executed in the “UI request/response thread” automatically.
There may be complex use cases in which one and the same client is connected to two (or more) server instances. Example:
You run your application on one cluster node. After some update of the application you start a new cluster node with the new version, but still let existing sessions run on the “previous” node. This means: some users may open several browser instances on the same instance, of which some still run against the “previous” version of the application while other browser instances are connected to the “new” version already. Behind the scenes “previous” and “new” versions are own server instances, well hidden behind some dispatcher/balancer.
In this case, messages that are published with Dialog Message Bus should not only be communicated in one server node, but must be published throughout the whole cluster of server nodes, so that all browser instances of one user are notified correctly.
In this case the Dialog Message is able to connect to a messenger system which executes the communication between the server nodes.
Our default messenger system is “ActiveMQ”. We internally access “ActiveMQ” behind some internal, abstracted API - so there is also the chance to bring in different messenger systems. Please check with CaptainCasa in this case.
You need to install the ActiveMQ message broker within your runtime. The message broker runs as own, independent service. The server nodes of the application access the message broker by a URL (e.g. “tcp://hostxyz:61615”).
There are some artifacts required to establish the messenger infrastructure.
The ccee library
The ActiveMQ client libraries
<dependency>
<groupId>org.eclnt</groupId>
<artifactId>eclntccee_jakarta</artifactId>
<version>${cc.version}</version>
</dependency>
<dependency>
<groupId>org.apache.activemq</groupId>
<artifactId>activemq-client</artifactId>
<version>6.1.4</version>
</dependency>
<dependency>
<groupId>org.eclnt</groupId>
<artifactId>eclntccee_jakarta</artifactId>
<version>${cc.version}</version>
</dependency>
<dependency>
<groupId>org.apache.activemq</groupId>
<artifactId>activemq-client</artifactId>
<version>5.17.6</version>
</dependency>
<dependency>
<groupId>org.fusesource.hawtbuf</groupId>
<artifactId>hawtbuf</artifactId>
<version>1.11</version>
</dependency>
ActiveMQ is accessed through the “ccee”-library of CaptainCasa. The central configuration file here is “ccee_config.properties”.
Add here the following 3 parameters.
activemq_brokerurl=tcp://localhost:61616
activemq_username=admin
activemq_password=admin
Here the central configuration is done in system.xml:
<system>
<clustermessagebus
queueclassname="org.eclnt.ccee.mq.clustermessagequeue.MQBridgeClusterMessageQueue"
topic="demos"/>
</system>
The “quueclassname” is the name of the class that actually connects the Dialog Message Bus to the messaging system: currently there is only one implementation - the one bridging to the ActiveMQ messaging.
Messaging systems typically classify messages that are distributed by a “topic”. For the messages of the Dialog Message Bus you need to define one topic per cluster. Each cluster instance of the Dialog Message Bus will only listen to messages and will only send messages with this topic. So in case of using e.g. ActiveMQ for multiple clustered applications then each application must have its own topic - not to send messages of the Dialog Message Bus from one application to the other.
How does the Dialog Message Bus know that two browser instances belong to the same client - so that the messages are only exchanged between the browsers of one user?
In a straight, non-clustered scenario this is simple: all instances are bound by the http-session-id that is shared. (Please note: you need to you use cookie-based session management within CaptainCasa! With URL-based session management each browser instance will live in its own session!)
In a clustered scenario as described before there are two levels
First the cookie based session id typically is re-used between the browser instances. The domain of the URL for the browser typically stay stable - which means: the URL of the “previous” version is the same URL as the “new” version, because both share the same cookie on client side. - The dialog message recognizes this and automatically knows that all browser instances using the same cookie-based session-id belong to one client.
In addition there is the usage of the “client id”. This is a cookie-based id, that is set by default to a secure-randomly generated number - and which also can be explicitly set by the application.
HttpSessionAccess.setCurrentClientId(“...”);
In case of explicitly setting this id, the application must make sure that each client's id is unique!
Clients sharing the same client-id are considered to run on the same client and as consequence the Dialog Message Bus will distribute messages accordingly.
This chapter provides information about an optional feature of the server infrastructure of CaptainCasa Enterprise Client: “Hot Deployment”.
The focus of the chapter is to describe a hot deployment strategy that “natively” comes with CaptainCasa Enterprise Client and that is based on a quick exchange of the class loader that loads the UI classes.
Please: there are other hot deployment strategies as well, e.g. CaptainCasa runs without any problems with the open source “HotSwapAgent”. Corresponding information can be found at the end of this chapter.
The typical development process when developing user interfaces is:
You design the .jsp/.xml pages within the Layout Editor
You develop classes which are referenced by the pages via expressions
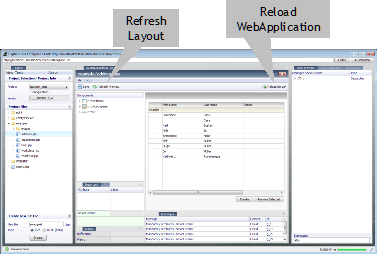
While changes in .jsp/.xml files are recognized by the tool environment immediately (with the next refreshing), changes in the Java classes are recognized in the following way:
The developer needs to re-deploy the web application.
During the reload a copying of the complete web content from your project into the Tomcat webapps-directory and a restarting of the web application is done.
Due to the restarting of the web application the runtime environment works on refreshed classes, i.e. the changes that you did within your Java code are visible.
Now, where's the problem?
Well, the reload of the web application may just take some time. In many applications a reload means a re-initialization of the whole application. As a result each class change and each testing of changed classes in the UI area mean a quite long waiting time for the developer.
On the other hand also the Java VM processing has some limits: because classes that are loaded into the VM are typically not released from the VM memory, there is a constant growth because of constant reloading of classes. Well, there's no way to bypass this fact, but in case of reloading whole applications quite oftenly, the load put onto the memory is quite high. Typical messages you will receive as result are “OutOfMemory” messages, talking about “PermGen Space” that is not sufficient.
The solution of this problem is quite easy: these classes that have to do with UI processing and that are very likely to be changed during the development process need to be separated from these classes which are not changed so frequently. Typical scenarios are:
You have business logic classes, accessing the database and providing business functions. These classes are “quite stable”.
You have UI classes (e.g. the beans referenced by expressions of JSP pages) that change quite oftenly.
The runtime environment of CaptainCasa Enterprise Client is able to separate the classes by using different class loaders. The “stable” classes are running in the normal web application class loader (the one using WEB-INF/classes and WEB-INF/lib), and the “volatile” classes are running in an extra class loader, named “UI Hot Deployment Class Loader”.
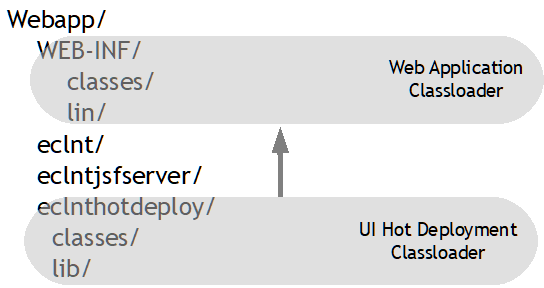
The UI Hot Deployment Class Loader is a child of the Web Application class loader. This means it knows all the classes from its parent. But, vice versa, the Web Application class loader does not know any classes of the UI Hot Deployment Class Loader.
This typically makes sense and is in sync with your normal class dependencies: the UI classes can access logical classes, but logical classes never must access UI classes.
Now having separated UI classes and logical classes you already might guess what the advantage is: you do not have to restart the whole web application in order to see changes that you did within your UI classes. It's enough to restart the UI Hot Deployment Class Loader. This takes much less time than restarting the web application.
If enabling the hot deployment for your project, then within the Layout Editor there will be a “Hot Deploy” button next to the “Reload” button for the fast hot-deploying of UI classes:
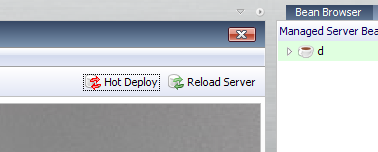 .
.
The central location where the separated class loader is used is the resolution of managed beans that are defined in the faces-config.xml file. In the JSF / CaptainCasa server side framework there is a so called “VariableResolver” that creates managed bean instances for names defined in face-config.xml. CaptainCasa comes with an own implementation of “VariableResolver” that loads resolved objects within the context of an own classloader.
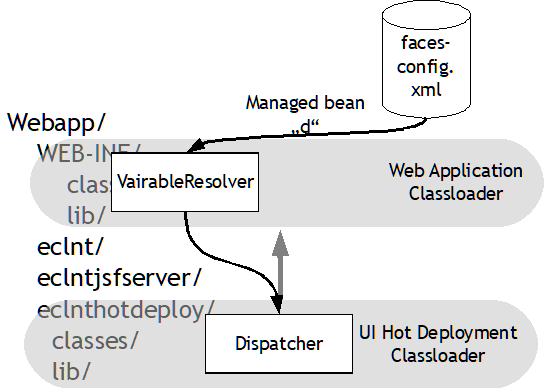
The “UI Hot Deployment Classloader” is not used by default. It requires some extra configuration.
There is some direct configuration of the hot deployment that you may call from the CaptainCasa toolset:
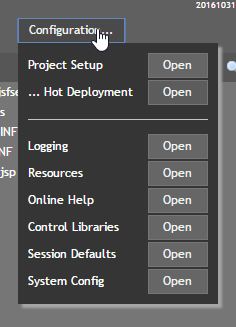
A dialog will show up:
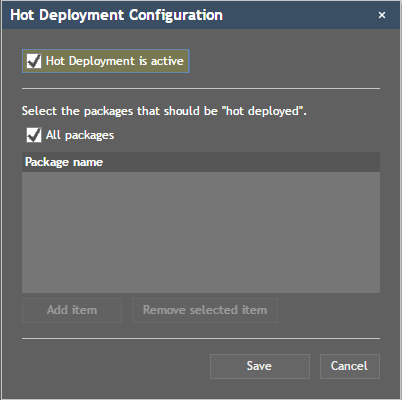
In the dialog you can switch on/off the hot deployment. If switched on, then you may either decide to include all packages into the hot deployment – or you may add these packages that you explicitly want to add. When selecting one package, then automatically all sub-packages will be added as well.
This configuration dialog will update two configuration files, one for controlling the runtime, the other one for controlling the deployment process of the project.
There is a configuration file “eclntjsfserver/config/hotdeploy.xml” that controls the class loading. If the file is available then class loading will be done using the “UI Hot Deployment Classloader”. You may copy the file from the template “hotdeploy.xml_template” that comes with the CaptainCasa delivery (webcontentcc).
The default content is:
<!--
Configuration for the optional hot deployment framework. The directories
that are listed + their containing jar files are added to the classpath
of the hot deployment classloader.
-->
<hotdeploy>
<webappdir name="/eclnthotdeploy/classes"/>
<webappdir name="/eclnthotdeploy/lib"/>
</hotdeploy>
In the XML definition the directories where the class loader searches for UI classes are listed. Please always use this default configuration.
You may add additional directories as well. A directory can be defined in two ways:
by “webappdir”: in this case the directory is interpreted as directory of the web content directory. At runtime the webcontent directory is determined via an API provided by the servlet contatiner (e.g Tomcat).
by “dir”: in this case the directory is interpreted as “absolute directory”. You may either specify a full directory path (e.g. in Windows: “c:\xyz\xyz”) or you may define a relative path (e.g. Windows: “..\xyz\xyz”) - the relative path is then relative to the call of the Java-runtime (Windows: java.exe).
The packages that are part of the hot deployment are part of the normal project configuration file (“.ccproject” within your project root directory:
<project ...>
...
<hotdeploymentpackage name="com.xyz.packageA"/>
<hotdeploymentpackage name="com.xyz.packageB"/>
...
</project>
Within your project the sources are compiled into the WEB-INF/classes folder of your project.
When deploying your application (i.e. “Reload”) then normally (without hot deployment) all web content of the project is directly copied into the Tomcat runtime. This means: also the WEB-INF/classes directory is copied.
Now, with hot deploymnet, the content of WEB-INF/classes is not directly copied, but all the content that is part of the hot-deployment-packages is copied into the directory /eclnthotdeploy/classes of the runtime – and the rest is copied as usual into the WEB-INF/classes directory. - In other words: the deployment process that is triggered by the tool is a bit more sophisticated and copies the classes into different directories.
Parts of this already were mentioned in the previous chapter – and are pointed out in this one.
You may add any directory – in inside the web content or outside the web content to the Hot Deployment management.
Example:
<hotdeploy>
<webappdir name="/eclnthotdeploy/classes"/>
<webappdir name="/eclnthotdeploy/lib"/>
<webappdir name=”/mysuperclasses/”/>
<dir name=”c:/myspecialclasses/classes”/>
<dir name=”c:/myspecialclasses/lib”/>
</hotdeploy>
(Please do not touch “/eclnthotdeploy/classes” and “/eclnthotdeploy/lib”!).
Each directory that you add is treated in two ways:
It is added as directory into the classloader's path definition
It is scanned for “.jar” files which then are added to the classloader's path definition
<hotdeploy>
<webappdir name="/eclnthotdeploy/classes"/>
<webappdir name="/eclnthotdeploy/lib"/>
<webappdir name=”/mysuperclasses/${latest}/”/>
<dir name=”c:/myspecialclasses/${latest}/classes”/>
<dir name=”c:/myspecialclasses/${latest}/lib”/>
</hotdeploy>
By embedding the term “${latest}” into the directory definition you can set up scenarios in which you have a certain versioning in the corresponding directory location. The “${latest}”-term is replaced by the latest directory that is available – the “latest” is the one which is alphabetically the last one.
Example:
In the scenario above you have the following directory structure:
c:
myspecialclasses
20201031
classes
lib
20201102
classes
lib
20201116
classes
lib
20201224
classes
lib
If now the definition in the hotdeploy.xml file is...
<hotdeploy>
...
<dir name=”c:/myspecialclasses/${latest}/classes”/>
<dir name=”c:/myspecialclasses/${latest}/lib”/>
...
</hotdeploy>
...then “${latest}” will be replaced by “20201224” because it is the last directory in alphabetical order.
In the name of directories you can embed environment / system variables by using the patterns:
${sys.xxxx}
${env.xxxx}
System variables are resolved by Java function “System.getProperty(...)”. Environment variables are resolved by function “System.getenv(...)”.
There are situations in which you use other frameworks which assume that your code runs on “WEB-INF/class” level.
Example: Your code is structured into the following pagackes, all of them are hot deployed:
com.xxxxx.yyyyy.data => contains data structures and data access
com.xxxxx.yyyyy.logic => contains logic
com.xxxxx.yyyyy.ui => contains UI managed beans
Now your application should provide some REST service and you decide to e.g. use the Jersey framework (or any other one) to support this.
The Jersey libraries must be installed in WEB-INF/lib because they must reachable for the web application classloader. And: the classes that you add to the Jersey framework must run within the same classloader as Jersey.
So the overall deploy situation is:
<yourwebapp>
eclnthotdeploy
classes
com
xxxxx
yyyyy
data
logic
ui
WEB-INF
classes
com
xxxxx
yyyyy
restapi <== you REST implementations
lib
Jersey*.jar
The problem now is:
You need to develop classes that are directly accessible from the Jersey framework
But: if these classes access data and logic from the corresponding packages they fail, because these classes are not visible in the web application classloader. You receive a “ClassNotFound” exception at runtime.
You may arrange your class structure in the following way...
<yourwebapp>
eclnthotdeploy
classes
com
xxxxx
yyyyy
ui
WEB-INF
classes
com
xxxxx
yyyyy
data
restapi <== you REST implementations
lib
Jersey*.jar
...so that the data and logic packages are moved to the web application classloader level. As consequence they are directly visible for both the REST-processing and for the UI-processing (which still runs in the hot deploy classloader).
Advantage:
All the logical aspects are “together” on web application level
“Straight forward”
Disadvantage:
You now always need to do a “reload” of the web application if having changed code on data- or logic-level. The “hot deployment” is only reasonable anymore after having changed ui-classes.
You may arrange you class in the following way...
<yyourwebapp>
eclnthotdeploy
classes
com
xxxxx
yyyyy
restapi
impl
XYZServiceImplementation.class
data
logic
ui
WEB-INF
classes
com
xxxxx
yyyyy
restapi
def
IXYZServiceInterface.class
XYZServiceInterfaceLoader.class
lib
Jersey*.jar
Inside your code you define some explicit interface, here “IXYUServiceInterface”. The interface definition is done on web application class loader level.
The implementation of the interface is eon in some separate class “XYZServiceImplementation”.
When accessing the interface on web application class loader level you need to go though an explicit loader:
public class XYZInterfaceLoader
{
public IXYZServiceInterface load()
{
// the following does NOT work!!!
// return new XYZServiceImplementation();
// so instead:
Class c = Class.forName
(
“com.xxxxx.yyyyy.restapi.impl.XYZServiceImplementation”,
true,
HotDeployManager.currentClassloader()
);
IXYZServiceInterface result = (IXYZServiceInterface)c.newInstance();
}
}
You see:
Directly accessing the class via “new” is not possible because of the web application classloader cannot see the classes of the hot deployment classloader
Indirectly accessing the class via explicit-class loading is possible. The interface is visible on both classloader levels, so as result the web application classloader processing can now access all logic within the hot deploy part of the application.
The Hot Deployment Classloader is the one to load the UI classes. Hot deployment on the one hand means that you copy the updated web application from your project into the (e.g. Tomcat) runtime. And it on the other hand means that the runtime receives a certain trigger so that it knows that it has to reload certain classes.
The default way (and the one described in the introduction of this chapter) is to use the CaptainCasa toolset: by pressing the “Hot Deploy” button within the Layout Editor the project files are copied into the (Tomcat) runtime – and then the page within the preview area is refreshed in a way (using a certain URL parameter) that tells the Hot Deployment Classloader to reload its content.
In addition there is a possibility to trigger an update of the Hot Deployment Classloader from outside:
By updating the content of the following file...
tomcat/
webapps/
<webapplication>/
eclnthotdeploy/
.cctrigger
...the hot deployment will be started with the next new session that is created on server side.
As consequence you can integrate the hot deployment into your build infrastructure:
You may define some own ANT-script to copy over the project into the runtime. At the end of the script you write e.g. some time-stamp into the .cctrigger-file to let the runtime know that UI classes need to be reloaded.
Please pay attention: you really have to change the content of the .cctrigger-file! Changing the modified-time-stamp of the file is not sufficient.
By appending query parameter “cc_hotdeploy=true” to the .risc-URL starting a page, the hot deploymenet is triggered.
Example:
http://localhost:8080/demos/workplace.workplaceRisc.risc?cc_hotdeploy=true
Sometimes it is useful that your application gets notified in case of a hot deployment being executed. This typically happens with framework classes, that store instances of a certain object for a duration that is longer or independent from the life cycle of a dialog session.
Example: In a class XyzBuffer you hold an instance of IXyz interface. The class name of the interface implementation is read from some configuration.
XyzBuffer may run as library (jar file) in WEB-INF/lib – this means it is loaded by the web application class loader. The implementation of the IXyz interface may be located in the hot deployment area (eclnthotdeploy/classes):
public class XyzBuffer
{
static IXyz s_instance;
public static IXyz instance() throws Exception
{
if (s_instance == null)
{
String className = ...readClassNameFromConfiguration...;
ClassLoader cl = HotDeployManager.currentClassLoader();
Class c = Class.forName(className,true,cl);
s_instance = (IXyz)c.newInstance();
}
reteurn s_instance;
}
}
The XyzBuffer now loads its internal member “s_instance” at a certain point of time with an instance of the current hot deployment class loader. After the next hot deployment there will occur problems, because now the “s_instance” will be loaded with an instance from an outdated class loader.
As result you need to update the instance. For doing so you may use class HotDeployNotifier:
public class XyzBuffer
{
static IXyz s_instance;
static
{
HotDeployNotifier.addListener(new DefaultHotDeployListener()
{
@Override
public void onClassLoaderUpdate(ClassLoader newClassLoader)
{
s_instance = null;
}
});
}
public static IXyz instance() throws Exception
{
if (s_instance == null)
{
String className = ...readClassNameFromConfiguration...;
ClassLoader cl = HotDeployManager.currentClassLoader();
Class c = Class.forName(className,true,cl);
s_instance = (IXyz)c.newInstance();
}
reteurn s_instance;
}
}
Every time a hot deployment is execute the API “onClassLoaderUpdate(...) is called. In the implementation the s_instance-member is set to null, so that it will be re-created with the next access to “instance()”-method.
Hot deployment is based on the fact that at design time the classes are NOT taken over into the WEB-INF/classes directory of the servlet engine – but that they are copied into a /eclnthotdeploy/classes directory of your web content. This special copying is done by the deployment functions within the CaptainCasa toolset.
When deploying your webcontent to some “real” environment, you typically create a .war file in which all classes are part of the WEB-INF/classes directory. You may use the ANT-script “<project>/build/buid_war.xml” in order to do this, but of course may also use any other mechanism as well. Consequence: hot deployment is only active within your design time environment, not in your production environment.
In addition to his you may also remove the file “eclnjsfserver/config/hotdeploy.xml” - so that hot deployment is deactivated even if you should by accident deliver some class files in the “/eclnthotploy/classes”-directory. The ANT script “build/build_war.xml” that is created as part of your project contains a corresponding section:
<copy todir="${build.targetdirectory}/webcontent" overwrite="true">
<fileset dir="../webcontent">
<include name="**/**"/>
<!--
The file triggering the hot deployment is explicitly removed
so that hot deployment is switched off by defult.
-->
<exclude name="eclntjsfserver/config/hotdeploy.xml"/>
<!--
Here you may add some exclude statements for specific files that
should not be copied into the delivery. Example: subversion files
<exclude name="**/.svn"/>
-->
</fileset>
<fileset dir="../webcontentbuild">
<include name="**/**"/>
</fileset>
<fileset dir="../webcontentcc">
<include name="**/**"/>
</fileset>
</copy>
Spring be default is a library that you load into the context of the web application. This means:
The libraries are stored within WEB-INF/lib
Inside the web.xml you have some Spring listener that initialize the Spring context
Example:
Spring info added into web.xml:
<!-- Spring startup - XML based -->
<context-param>
<param-name>contextConfigLocation</param-name>
<param-value>classpath:spring_context_webapplication.xml</param-value>
</context-param>
<listener>
<listener-class>org.springframework.web.context.ContextLoaderListener</listener-class>
</listener>
Objects are now created by going through this application context – both explicitly (“springContext.getBean(...)”) or implicitly by using injection.
The problem now is, that the Spring application context now is bound to the web application class loader – so loading e.g. Page Bean classes from outside the WEB-INF/classes and WEB-INF/lib scope is a problem. - This is what CaptainCasa's hot deployment class loader does: it reads its content from the eclnthotdeploy/classes and eclnthotdeploy/lib directory...
Spring is flexible! - and allows to define contexts below the application context and allows to assign an explicit class loader to each context.
So you may define an own Spring context in the following way (here: using XML configured context):
public class DialogSessionXMLApplicationContext
extends ClassPathXmlApplicationContext
{
public DialogSessionXMLApplicationContext() throws BeansException
{
super();
WebApplicationContext wac = WebApplicationContextUtils.getWebApplicationContext(HttpSessionAccess.getServletContext());
setParent(wac);
setClassLoader(HotDeployManager.findCurrentClassLoader());
AppLog.L.log(LL_INF,"Creating Spring DialogSessionXMLApplicationContext.");
}
...
}
Inside the constructor you see the initialization:
The web-application context is picked by a Spring-API
The web-application context is set as parent of this context. This means that all definitions of the web-application context are available within this context – but not vice versa.
The class loader is set to the current class loader of Hot Deployment.
The “Dispatcher” class is the anchor class of CaptainCasa to resolve expressions (“#{d.Xxx.yyy}”).
In the Dispatcher you need to...
Pick an instance of the “sub-context” (DialogSessionXMLApplicationContext in the exmample above) and use this to create the page bean instances at runtime.
The following code shows a dispatcher implementation which creates a “sub-context” in its constructor and which then uses this context to resolve instances in the “readObject()” method.
The “readObject()” method is implemented as combination out of Spring access and “classical” CaptainCasa access to page bean instances.
public class Dispatcher
extends WorkpageDispatcher
{
//-------------------------------------------------------------------------
// members
//-------------------------------------------------------------------------
DialogSessionXMLApplicationContext m_springContext;
//-------------------------------------------------------------------------
// constructors
//-------------------------------------------------------------------------
/**
* Constructor for the root dispatcher within the dialog session.
*/
public DispatcherByXMLSpringAccess()
{
m_springContext = new DialogSessionXMLApplicationContext();
}
// ------------------------------------------------------------------------
// public usage
// ------------------------------------------------------------------------
protected Object readObject(String key) throws Exception
{
Object result = null;
Throwable springError = null;
Throwable superError = null;
// first try via spring
try
{
result = resolveBeanFromSpringContext(m_springContext,key);
}
catch (NoSuchBeanDefinitionException e)
{
springError = null;
}
catch (Throwable t)
{
springError = t;
}
// then try by normal Dispatcher access
if (result == null && springError == null)
{
try
{
result = super.readObject(key);
}
catch (Throwable t)
{
superError = t;
}
}
if (result == null)
{
if (springError != null)
throw new Error("Problem creating bean in dispatcher: " + key,springError);
else if (superError != null)
throw new Error("Problem creating bean in dispatcher: " + key,superError);
else
throw new Error("Problem creating bean in dispatcher: " + key);
}
// pass dispatcher
// (Spring expects a constructor without parameters, so the owning
// dispatcher has to be passed directly after construction)
if (result instanceof DefaultDispatchedBean &&
((DefaultDispatchedBean)result).getOwningDispatcher() == null)
{
((DefaultDispatchedBean)result).setDispatcher(this);
}
else if (result instanceof DefaultDispatchedPageBean &&
((DefaultDispatchedPageBean)result).getOwningDispatcher() == null)
{
((DefaultDispatchedPageBean)result).setDispatcher(this);
}
return result;
}
CaptainCasa comes with a project archetype that already includes a Spring management as described. When creating a Maven- / Gradle-project use the option “JEE – CaptainCasa project with Spring-managed-beans”...
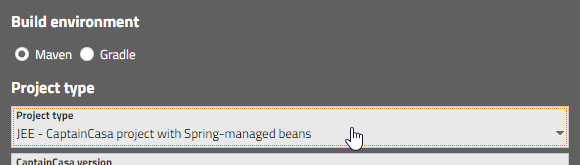
...and the Dispatcher will be defined and configured correspondingly.
The hot deployment strategies in this chapter are based on the fast exchanging of the class loader - and a separation of theses classes being hot deployed from these ones that area loaded with the servlet engine's class loader.
There are other hot deployment strategies available as well. These extends the virtual machine's processing in a way that it is able to directly reload classes during runtime.
We know two technologies in this area:
JRebel - https://www.jrebel.com, which is a commercial product
HotSwapAgent - http://hotswapagent.org, which is an open source product
We tested HotSwapAgent with Java 17 and the CaptainCasa runtime and found out, ...that it is working! The concrete steps to follow and things to pay attention to are contained in some extra document:
https://www.captaincasa.com/docu/eclnt_risc_hotswap
Please check for details there.
CaptainCasa Enterprise Client is based on standards:
http(s) is used as communication protocol between client and server
The server side is based on default servlet processing. The session management on server side is just the normal http session management.
This does not completely unburden you from checking certain security considerations which have to be applied to any http scenarios. This chapter lists these issues that typically are checked when going through security audits and tells you how to react on technical side correspondingly.
All traffic between browser and server might go through infrastructures that you are not really aware about! Consequence: sending data without encryption and sending data without any technical authentication of the server is a no-go!
Do never use “http://” in production environments. Always go through “https://”!
A “.risc” URL starts the corresponding page on server side.
Typically you want to define dedicated entrance pages into your application system – and you do not want to allow the user to “free-style” open any page that you provide.
To check this there is an own mechanism that is part of the CaptainCasa server runtime:
There is an interface “IStartPageChecker”:
package org.eclnt.jsfserver.starter;
import jakarta.servlet.http.HttpServletRequest;
public interface IStartPageChecker
{
public boolean checkIfPageCanBeDirectlyStarted(HttpServletRequest startRequest, String page);
}
There is a default implementation “DefaultStartPageChecker” that is always active.
This default implementation is checking for definitions inside the system.xml configuration file:
<system>
<riscstarter
...
>
...
<allowstart page="/abc/*"/>
<allowstart page="/*/index.*"/>
<allowstart page="/xxx/yyy.jsp"/>
...
<excludestart page="/abc/*"/>
<excludestart page="/*/index.*"/>
<excludestart page="/xxx/yyy.jsp"/>
...
</riscstarter>
</system>
Here you have two options:
You may explicitly define these pages which you allow the user to directly open.
You may explicitly define these pages which you do not allow the user to directly open.
Of course: adding one “allowstart” definition will automatically over-rule all “excludestart” definitions! So you need to either do “allowstart” definitions or “excludestart” definitions – doing both does not make sense.
You can use the wildcard character.
If you want to set up some own implementation of “IStartPageChecker” then you can do so – we recommend to extend your implementation from CaptainCasa's default implementation. You nee to register your implementation in system.xml:
<system>
...
<riscstarter
...
startpagecheckerclassname="<class name of IStartPageChecker implementation>"
...
>
...
...
</riscstarter>
</system>
Please pay attention:
The default implementation does not become active when accessing the system with “http://localhost”-calls. - Reason: for testing during development you need to access pages directly.
If you want during development to test, if a page can be accessed in “non-development “-mode you need to add the parameter “ccprodmode=true” to the .risc URL.
All application data is kept on server-side within an http-session. There are two types of session management (see chapter “Session Management”):
URL-based, default: the session-id (“jsessionid”) is part of all calls that are communicated between the browser and the server. Here the http-session is the one, in which application data is directly managed.
COOKIE-based: the session-id is transferred as a “jsessionid”-cookie. Here the http-session is “sub-divided” into dialog sessions on server side in order to identify individual browser instances. Application data is managed inside these dialog sessions.
So, the http-session is the core-session in both scenarios. Access from outside into this session needs to be secured.
In case of using the URL-based session management, the session-id is directly “steal-able” by a man in the middle, because obviously the URL of a request is not part of the encryption of https.
CaptainCasa provides a simple but efficient approach to generally restrict the access to session-related content.
With the first contact of a browser to a CaptainCasa-session, the server will send a cookie to the browser, that contains a secure-randomly generated content. The value of this content is stored within the http-session on server-side.
From now on any request from the browser to the server that requires session-related information first is checked if the request contains the cookie-value and if it is the same that is managed within the server-side session.
In short words: a request without this correct cookie will not be accepted.
The cookie value is protected in the following way:
In general, cookie values are part of the encrypted payload of a request. There is no way for a man in the middle to find out the value.
The cookie itself is marked with “httpOnly” - so it's not possible to access the value through JavaScript-injection.
The value is never output or logged on server-side.
Within the http session the value is not kept as plain string but there is an hiding object in front, so that it is not output as String in monitoring tools. Example: the Tomcat-manager application is able to list all data that is directly bound to the http-session.
The check is done on server side by the filter class “SecurityFilterGeneral”.
The name of the cookie is “ccclientcheckidgeneral”.
The cookie based checking is done for the (Browser) RISC-client. (With the former Swing/JavaFX client the sending of cookies by default was no supported. Please check the next chapter.)
The cookie based checking is switched on by default if running in https environment (otherwise the session-id can be hijacked by a man in the middle anyway...). You should definitely not switch off if using URL-based session management. You may switch off for COOKIE-based session management, because here the session-id is part of the encrypted part of the http communication anyway, and the session-id cannot be hijacked by a man in the middle.
The session-id also can be hijacked directly by gaining access to the browser of the end user: you just need to press F12 and get into the developer mode of the browser and you can see it in the cookie overview.
Each http-request contains a parameter “remote address” - which is the client-ip-address of the one who created the request. In normal scenarios, when being connected to the Internet, then the remote address will NOT be the actual address of your client computer, but more likely will be the address of some router of your Internet provider.
But: nevertheless it is useful to do some rough checking: when creating a session on server-side then the remote address...
A similar function is/was used for observing session-related communication between client and server which is based on a parameter which is managed per session and which is part of the post-data of a request.
The principal behind is the same as described in the previous chapter: an additional id for the session is communicated between client and server – and is checked on server-side.
Because this function is not based on Cookies but on post-data (request) and header-data (response), the functions are working with the Swing/FX client, too.
The check is done on server side by the filter class “SecurityFilter”.
The name of the post-parameter is “ccclientcheckid”.
The name of the response-header-parameter is “ccclientcheckid”.
The SecurityFilter provides an interface by which you can influence its behavior. The interface is defined inside the SecurityFilter-class itself:
public interface IExtension
{
public boolean checkIfToExecuteCheck(ServletRequest request);
}
You can add an implementation of the interface either by defining the corresponding class in the system.xml configuration file...
<system ...>
...
<securityfilter extensionclassname="workplace.SecurityFilterExtension"/>
...
</system>
...or by directly setting an instance through the method:
SecurityFilter.setSecurityFilterExtension(IExtension extension)
The interface method “checkIfToExecuteCheck(...)” is processed prior to any processing of the security filter. When returning “false” then the security filter will not check the corresponding request.
What is a situation in which an over-ruling the SecurityFilter is reasonable?
Example: you start an inner CaptainCasa dialog inside an outer dialog by using the SUBPAGE component. In this case the inner dialog runs decoupled from the outer dialog in an own Html-IFRAME. The SUBPAGE component is able to keep track of the session id that is used in the inner dialog – in order to remember when the inner dialog is hidden and then re-shown (e.g. at an other place of the screen). If not implementing an extension of the security filter, then there will be a error message if the SUBPAGE is shown the second time, because there is a IFRAME-browser-instance accessing the session with a pre-selected session id.
The demo workplace provides a demo implementation:
package workplace;
import jakarta.servlet.ServletRequest;
import jakarta.servlet.http.HttpServletRequest;
import jakarta.servlet.http.HttpSession;
import org.eclnt.jsfserver.util.SecurityFilter;
public class SecurityFilterExtension
implements SecurityFilter.IExtension
{
public static void addSessionNotToCheck(HttpSession session)
{
session.setAttribute(SecurityFilterExtension.class.getName(),"NOCHECK");
}
public boolean checkIfToExecuteCheck(ServletRequest request)
{
try
{
HttpSession session = ((HttpServletRequest)request).getSession(false);
if (session != null)
{
String s = (String)session.getAttribute(SecurityFilterExtension.class.getName());
if ("NOCHECK".equals(s))
return false;
}
}
catch (Throwable t)
{
return true;
}
return true;
}
}
In the demo application a session can tell the SecurtiyFilterExtension that it should not be checked by using the method “addSessionNotToCheck()”. The corresponding information is registered in the context of the session – and is used later on to decide if to override the security filter (by returning false in mehod “checkIfToExecuteCheck(...)”).
There are security scenarios in which you have to explicitly avoid that the network activity of a certain http-request-processing is recorded and replayed somewhere after-wards.
To avoid this, CaptainCasa introduced a component CLIENTSECID that is bound to a server side object of type CLIENTSECIDBinding. The component requests from the CLIENTSECIDBinding a new id within each request-response processing on server side. This id is sent to the client side and re-sent to the server with the next request.
On server side a request is checked if the id that is received corresponds to the last id that was sent to the client. Then a new id is generated and sent with the response to the client.
The ids that are generated are random ids, that are not predictable to anyone trying to replay a certain recorded http-sequence against your server.
The CLIENTSECID component (arranged below the component BEANPROCESSING) should be placed on the most-outest page of your scenario, i.e. the one that is your starting page.
By using the HTML element “iframe” you can embed one page into another page. There is a certain risk involved, named “clickjacking”. Basically the embedding page can try to overlay the content of the embedded page without showing to the user and by this e.g. can capture field input.
As consequence an HTML page needs to control the scenarios, in which it wants to be embedded into other pages – or not. This is controlled by the http header parameter “X-Frame-Options”.
CaptainCasa by default (from 20210628 on) sets the parameter to value “sameorigin” - which means: all pages that are running on the same domain can embed.
You can explicitly control the value of the parameter by configuring the system.xml file. The valid values are described within the documentation inside the template file:
<system>
...
...
<!--
*************************************************************************
Configuration of RISCStarter - the servlet that is responding on .risc
request.
...
...
embedableasiframe: default "sameorigin"; completely switch off by value
"deny" or "false"; allow embedding by value "true".
...
...
*************************************************************************
-->
<riscstarter
...
embedableasiframe="sameorigin"
...
/>
...
...
</system>
All CaptainCasa client side components are programmed to avoid JavaScript injection. This means, that any usage of passing HTML text into the existing HTML of the client side are checked for injection.
By default the HTML that is inserted is escaped – this means, that any HTML-character is converted into a safe variant before being output:
var result = value.replace(/&/g, "&")
.replace(/>/g, ">")
.replace(/</g, "<")
.replace(/"/g, """)
.replace(/'/g, "'")
.replace(/\//g, "/");
This means: if e.g. assigning a BUTTON-TEXT with the value “Hal<b>lo</b>”, then the text that is shown in the button is not “Hallo” (i.e. “Hallo” with the “lo” being output with bold font weight) – but the text that is shown in the button really is “Hal<b>lo</b>”.
In some few cases and for dedicated controls only, the corresponding controls accept meaningful HTML code – this means the HTML is inserted “as is”. These cases are:
TEXTPANE being used with content type “text/html”
TEXTWITHLINKS
SMARTLABEL
TREENODE with smart text being switched to “true”
In these cases the HTML is sanitized on client side before being passed into the client processing. This sanitizing is done by using the corresponding algorithms from the Google-caja project – using an HTML4-base white list of allowed tags and attributes.
There are certain areas in which resources can potentially be accessed by classloader:
As developer you can decide if you want to store layout (.jsp/.xml files), images and other web resources inside the normal web content or within the sources.
SVG Images can be accessed e.g. by a “.ccsvg” exension, by which you can pass the size and the coloring of the image as part of the URL.
You can explicitly load any resource by using “.ccclresource” extension.
Every time CaptainCasa accesses a resource by class loader then certain security rules are processed:
Inside the system.xml configuration file there is a definition which resources can be read via class loader. The definition is done by defining a list of extensions.
<resourceclassloaderaccess additionalextensions="doc;xls;docx;xlsx">
...
...
</resourceclassloaderaccess>
There is an interface IResourceSecurityChecker which you may implement and add to the rules that are processed with extenal access into the class loader:
public interface IResourceSecurityChecker
{
/**
* @param path
* Access path into the classloader. String starting with "/" e.g.
* "/com/xyz/resources/whatever.png"
*
* @return
* true ==> access is allowed, false ==> access is not allowed,
* null ==> path not relevant for this checker
*/
public Boolean checkClassLoaderPathForOutsideUsage(String path);
}
Implementations of the interface can be registered by calling:
ResourceSecurity.addResourceSecurityChecker(...);
The server side processing of CaptainCasa Enterprise Client provides some extra functions in order to check any outgoing or ingoing values.
The following interface is processed for each request and for each response:
package org.eclnt.jsfserver.injection;
public interface ICheckInboundAndOutboundValues
{
public String checkInboundValue(String tagName,
String attributeName, String value);
public String checkOutboundValue(String tagName,
String attributeName, String value);
}
The implementation of the interface is registered within the sytem.xml configuration file (webcontent/eclntjsfserver/config/server.xml):
<system>
...
<checkinboundandoutboundvalues name="...className..."/>
...
</system>
At runtime an instance of the class is created by using a constructor without parameters.
Any client side value (e.g. a field content) that is passed into the server side processing can be updated by implementing the method “checkInboundValue()”.
Any value (e.g. value behind an expression) that is sent to the client side as part of the response may be updated by implementing the method “checkOutboundValue()”.
All file access within the CaptainCasa server processing is done through the class “FileManager” (org.eclnt.util.file.FileManager). The class is a public class so it may also be used by your application.
Inside the FileManager there is the possibility to restrict the access to the file system. There are two corresponding methods:
FileManager.addAllowedRootDirectoryReadWrite(...directoryName...)
FileManager.addAllowedRootDirectoryRead(...directoryName...)
By default the FileManager starts without any restrictions, so it has full access to the file system. After calling one of the methods, the FileManager will run in restricted mode.
You may define restrictions in addition by using the configuration file “system.xml” (<webcontent>/eclntjsfserver/config/system.xml). Example:
<system>
...
...
<filemanagerreadaccess directory="${servletwebapp}"/>
<filemanagerwriteaccess directory="${temp}"/>
<filemanagerwriteaccess directory="${servlettemp}"/>
<filemanagerreadaccess directory="c:/bmu_jtc"/>
<filemanagerreadaccess directory="c:/temp"/>
...
...
</system>
There are some predefined variables, please check the documentation in the template file (system.xml_template) for detailed information.
If restricting the access then make sure that the following directories are always added, because CaptainCasa requires access:
<filemanagerreadaccess directory="${servletwebapp}"/>
<filemanagerwriteaccess directory="${temp}"/>
<filemanagerwriteaccess directory="${servlettemp}"/>
When the client side JavaScript processing renders an image (e.g. IMAGE component itself, or: BUTTON-IMAGE) and when the size of the image is not explicitly set, then the size of the image is calculated by a server-side function, which is accessed through the servlet “ImageSizeServlet”.
The default operations are as follows:
The browser renders an image “/images/xyz.png”
The browser asks the ImageSizeServlet about the size of the image and sends a correpsonding request
The ImageSizeServlet reads and analyses the image and sends back the image size as string, e.g. “100;50” for 100 pixels of width and 50 pixels of height.
(Of course result information is buffered both on client and on server-side.)
By default image definitions are links to images that are part of the web application. This means the image URL is following the format “/aaa/bbb/ccc.jpg”, addressing the file “webcontent/aaa/bbb/ccc.jpg”.
But: you can also define images coming from external addresses. Example:
<t:button ... image=”http://captaincasa.org/wp-content/uploads/2020/06/stock2-768x505.png” .../>
In this case the server side reads the image from the specified address by http-request and retrieves the size from the image data. The image data itself is afterwards removed, only the width/height result are kept.
In order to prevent the server to load data from any server of the world wide web, there is an interface “IExtImageFilter”:
package org.eclnt.util.image;
/**
* Filter to check URLs to be loaded by image size processing of the server side
* image manager (class ServerImageManager). Here is is possible to find the size
* of some image from some external url. This url can be checked with this interface
* to prevent uncontrolled loading of images.
*/
public interface IExtImageFilter
{
/**
* @param url - url of the image that is analyzed
* @return - true: image is ok and can be loaded, false: image must not be loaded!
*/
public boolean checkURL(String url);
}
The default implementation that is used inside the ImageSizeServlet is:
package org.eclnt.util.image;
import org.eclnt.util.log.CLog;
/**
* Implementation of {@link IExtImageFilter} which blocks any type
* of loading external images. This is the default manager that is used
* and which avoids any external URL to be loaded.
*/
public class ExtImageFilterAllBlocked implements IExtImageFilter
{
public boolean checkURL(String url)
{
CLog.L.log(CLog.LL_WAR,"The external image was NOT read: " + url);
CLog.L.log(CLog.LL_WAR,"Reason: it is blocked by " + this.getClass().getName());
return false;
}
}
This default implementaion always returns “false” - which means: all image loading from the server-side to other servers is completely blocked.
You need to add some own implementation, in order to open up this mechanism. Your implementation needs to be registered in the “eclntjsfserver/config/system.xml” conifguration file:
<!--
*************************************************************************
Server image manager.
*************************************************************************
-->
<serverimagemanager
...
extimagefilterclassname="...implementation of class IExtImageFilter..."
...
/>
The servlet filter “ErrorAnonymizerFilter” catches any error message of any request processing within your web application. It is the out-most filter that is defined in the filter-configuration of the CaptainCasa runtime.
As result the client only sees a generic message – produced by the “ErrorAnonymizerFilter”-filter and e.g. does not see a detailed stack trace about the cause of the problem.
The filter can be switched off in “system.xml” configuration file:
...
<filterconfiguration
active="false"
classname="org.eclnt.jsfserver.util.ErrorAnonymizerFilter"/>
...
The error itself is logged in the log files of CaptainCasa with all details.
Why should you take care of cache at all? Because the cache of the browser is something which is not protected to be mis-used. Imagine you are in an Internet cafe and you watch some nice PDF report that is generated by your business application. If this report is cached by the browser then the next user of the computer could open the cache and check what you left as information...
The main data communication between the browser client and the server is based on a POST-processing – which by default is not cache-able. Nevertheless (and after the experience of security audits...) we define a “no-cache/no-store” statement in the POST-responses... ;-).
Special resources such as JavaScript and CSS-files are explicitly cached on client side, so that they do not have to be loaded every time you start the application. CaptainCasa appends a version-stamp to all the requests that are loading “.js” and “.css” files. In case the version of CaptainCasa changes (which means: updated “.js” files), the new versions will be automatically read because the URL now has a different version stamp.
All content that is dynamically created (e.g. PDF created via BufferedContentMgr or by TempFileManager) is defined as being not-cache-able.
SVG, PNG, GIF, JPG resources are not explicitly cached or not-cached.
CaptainCasa comes with the following servlet filters that are used for cache-management. You can configure them to be used for you own resources, as well:
“NoCacheNoStoreFilter” - this filter adds header information to the response that the content of the response must not be cached by the browser
“CacheFilter” - this filter adds header information to the response that the content of the response should be cached by thr browser “forever”
You may extend both filters to include by updating the “system.xml” configuration:
...
<filterconfiguration
active="true"
classname="org.eclnt.jsfserver.util.NoCacheNoStoreFilter"
additionalmappings="...mapping...;...mapping...;...mapping..."
/>
...
The “mapping” definition is the one that is directly passed into the filter configuration. It is the same mapping that you would define in “web.xml” files and allows the positioning of a “*” either at the end or at the beginning. Examples:
“/xxx/*”
*.xxx”
This filter is setting 4 security-related response header parameters:
“x-xss-protection” is set to “1; mode=block”
“x-content-type-options” is set to “nosniff”
“referrer-policy” is set to “same-origin”
“content-security-policy” is set to “default-src 'self' data: 'unsafe-inline' 'unsafe-eval'; img-src * data:”
The filter is applied to all extensions that are the ones to be directly loaded within the browser:
“.risc” requests
“.html” requests
You may extend the usage by adding own patterns, as usual by using “system.xml”:
...
<filterconfiguration
active="true"
classname="org.eclnt.jsfserver.util.HttpHeaderAttributesForPagesFilter"
additionalmappings="...mapping...;...mapping...;...mapping..."
/>
...
There are two options of configuring this filter:
You may switch off the filter by normal filter management in “system.xml”:
...
<filterconfiguration
active="false"
classname="org.eclnt.jsfserver.util.HttpHeaderAttributesForPagesFilter"
/>
...
You may configure the values that are set – also by some configuration in “system.xml”:
...
<httpheaderattributesforpages
x-xss-protection="1; mode=block"
x-content-type-options="nosniff"
content-security-policy="default-src 'self' data: 'unsafe-inline' 'unsafe-eval'; img-src * data:"
referrer-policy="no-referrer"
/>
...
In the definition of the “httpheaderattributesforpages” element you only need to defines these attributes that you want to explicitly control. Example: if you only want to update the content-security-policy, then you may define:
...
<httpheaderattributesforpages
content-security-policy="...your definition..."
/>
...
We do not explain the meaning of each of the http-header parameters in this documentation. Please refer to publically available information.
If you want to add certain Java logic that should be executed just after the web application is started then you may implement the interface “IStartup”:
package org.eclnt.jsfserver.util;
public interface IStartUp
{
public void startUp();
}
Your implementation needs to be registered in the system.xml configuration file:
<system>
<startupclass
name="xxx.yyy.zzz.ApplicationStartUp"
/>
</system>
The CaptainCasa server-runtime is a just normal JEE web application that may be run in any servlet container of version >= Servlet specification 3.1. The runtime provides a couple of...
filters,
servlets,
listeners
...that correspond to JEE APIs and that are registered in the corresponding servlet container.
There are two types of configurations within the servlet specification:
by WEB-INF/web.xml
by API
CaptainCasa started to just normally configure the web application by a corresponding web.xml definition – and moved over to an API-based configuration in 2019.
Reasons for moving were:
Any time CaptainCasa introduced a new filter / servlet / listener, users of CaptainCasa had to take over this information into their web.xml – because there is no way to “inherit” web.xml information. Result: there were a lot of situations in which the web.xml was not correctly configured.
Spring boot does not know any web.xml configuration either – but only knows the API based configuration.
So, by moving to an API based configuration, both problems were solved
The current web.xml is a very thin one. It is always part of the eclntjsfserver.jar file (path is WEB-INF/web.xml_template) and is copied into your project when creating the project.
<?xml version="1.0" encoding="UTF-8"?>
<!--
The default configuration of the servlet context is done in class
CCInitialiServlets.
-->
<web-app xmlns="http://xmlns.jcp.org/xml/ns/javaee"
xmlns:xsi="http://www.w3.org/2001/XMLSchema-instance"
xsi:schemaLocation="http://xmlns.jcp.org/xml/ns/javaee http://xmlns.jcp.org/xml/ns/javaee/web-app_3_1.xsd"
id="WebApp_ID"
version="3.1">
<display-name>CaptainCasa based application</display-name>
<welcome-file-list>
<welcome-file>index.html</welcome-file>
<welcome-file>index.htm</welcome-file>
<welcome-file>index.jsp</welcome-file>
<welcome-file>default.html</welcome-file>
<welcome-file>default.htm</welcome-file>
<welcome-file>default.jsp</welcome-file>
</welcome-file-list>
<!-- ********** CONTEXT PARAMETERS *************************************** -->
<!-- JBoss Deployment - use the reference implementation that comes
with CapatainCasa by default -->
<context-param>
<param-name>org.jboss.jbossfaces.WAR_BUNDLES_JSF_IMPL</param-name>
<param-value>true</param-value>
</context-param>
<!-- ********** LISTENERS ************************************************ -->
<listener>
<listener-class>org.eclnt.jsfserver.util.CCServletContextListener</listener-class>
</listener>
<!--
PLEASE PAY ATTNETION: the registration of the CCServletContextListener in the web.xml
is sufficient for many servlet engines (e.g. Tomcat). For other servlet engines (Glassfish,
JBoss) the regsitration needs to be done through a file "META-INF/services/jakarta.servlet.ServletContainerInitializer".
This file needs to be visible to the webapp classloader, i.e. needs to be part of WEB-INF/classes
or part of one of the .jar libraries in WEB-INF/lib.
<br><br>
A template file is coming with CaptainCasa's eclntjsfserver*.jar file, here:
"META-INF/services/jakarta.servlet.ServletContainerInitializer_template".
-->
<!-- ********** SESSION MANAGEMENT *************************************** -->
<session-config>
<session-timeout>60</session-timeout>
<tracking-mode>URL</tracking-mode>
</session-config>
<!--
Alternative session management via cookies. Also has to be configured in
eclntjsfserver/config/system.xml!
<session-config>
<session-timeout>60</session-timeout>
<tracking-mode>COOKIE</tracking-mode>
<cookie-config>
<http-only>true</http-only>
<secure>true</secure>
</cookie-config>
</session-config>
-->
</web-app>
The main item form configuration point of view is the central listener “CCServletContextListener” that is centrally called when the servlet context starts up – and which then calls the servlet APIs to register all other artifacts.
Please check the information in the comment of the web.xml_template file: some application servers require the initial loading to be started by a file “META-INF/services/jakarta.servlet.ServletContainerInitializer” - there is a template file that is part of the eclntjsfserver.jar which you can use as copy source. The file is accessed through the class loader – it needs to be part of your application classes (and NOT e.g. part of the web-content of you application!).
This is the class in which all filters, servlets, listeners are configured. We do not bore you with the complete code, but just show the significant parts:
protected void initializeInstance(ServletContext servletContext)
{
CLog.L.log(CLog.LL_INF,"***********************************************************");
CLog.L.log(CLog.LL_INF,"* CCInitializeServlets of: " + servletContext.getContextPath());
try
{
CCInitializeServletsBase.initialize(servletContext);
}
catch (Throwable t) {}
initializeFilters(servletContext);
initializeListeners(servletContext);
initializeServlets(servletContext);
CLog.L.log(CLog.LL_INF,"***********************************************************");
}
protected void initializeFilters(ServletContext servletContext)
{
initializeFilter(servletContext, NoCacheNoStoreFilter.class, "*.risc");
initializeFilter(servletContext, SameOriginFilterForHtml.class, "/eclnt/risc/*");
initializeFilter(servletContext, CacheFilter.class, "*.js", "*.css");
initializeFilter(servletContext, CompressionFilter.class, "*.jsp", "*.xml", "*.css", "*.js", "*.ttf", "*.i18n", "*.json");
initializeFilter(servletContext, ResponseLoggerFilter.class, "/*");
initializeFilter(servletContext, SecurityFilter.class, "*.jsp", "*.ccupload", "*.ccinvalidatesession");
initializeFilter(servletContext, SecurityFilterGeneral.class,
"*.jsp",
"*.ccbuffer",
"/ccbuffer/*",
"*.ccupload",
"*.ccinvalidatesession",
"*.ccautocomplete",
"*.ccextcalendar",
"*.cclongpolling",
"/cctempfileaccess/*"
);
initializeFilter(servletContext, ThreadingFilter.class, "*.jsp");
initializeResourceAccessFilter(servletContext);
}
protected void initializeListeners(ServletContext servletContext)
{
initializeListener(servletContext, HttpSessionListenerDelegator.class);
}
protected void initializeServlets(ServletContext servletContext)
{
initializeServlet(servletContext,"Faces Servlet",FacesServlet.class,"/faces/*");
initializeServlet(servletContext,BufferedContentServlet.class,"*.ccbuffer","/ccbuffer/*");
initializeServlet(servletContext,UploadContentServlet.class,"*.ccupload");
initializeServlet(servletContext,SessionInvalidationServlet.class,"*.ccinvalidatesession");
initializeServlet(servletContext,AutoCompleteServlet.class,"*.ccautocomplete");
initializeServlet(servletContext,ExtCalendarServlet.class,"*.ccextcalendar");
initializeServlet(servletContext,LongPollingServlet.class,"*.cclongpolling");
initializeServlet(servletContext,RISCStarter.class,"*.risc");
initializeServlet(servletContext,ImageSizeServlet.class,"/ccimagesize/*");
initializeServlet(servletContext,DynamicImageServlet.class,"/ccdynamicimage/*","*.ccsvg");
initializeServlet(servletContext,CLResourceAccessServlet.class,"*.ccclresource");
initializeServlet(servletContext,TempFileAccessServlet.class,"/cctempfileaccess/*");
initializeServlet(servletContext,StyleReaderServlet.class,"/eclntjsfserver/styles/*");
initializeServlet(servletContext,ClientI18NReaderServlet.class,"/clientlocalization.i18n");
initializeServlet(servletContext,MonitoringServlet.class,"/ccstatus.ccstatus");
String alternativeExtension = SystemXml.getRiscStarter().getAlternativeextension();
if (alternativeExtension != null)
{
initializeServlet(servletContext,CCRedirectRiscExtensionServlet.class,"*"+alternativeExtension);
}
}
You see that all three types of artifacts are registered in corresponding methods.
In the system.xml configuration file there is the possibility to configure the functions of this class:
<system>
…
…
<filterconfiguration
active="true"
classname="...classNameOfFilter..."
additionalmappings="...mapping...;...mapping...;...mapping..."/>
<servletconfiguration
active="true"
classname="...classNameOfServlet..."
additionalmappings="...mapping...;...mapping...;...mapping..."
blockget="false"/> …
…
</system>
You can switch off dedicated filters and servlets from CaptainCasa by setting the attribute “active” to “false”.
You can define additional mappings that are added to he already configured mappings.
Please pay attention: these configuration are only applied to the servlets and filters that CaptainCasa configured in CCEEInitializeServlets! You cannot add new filters and/or servlets by this configuration!
And please also pay attention: switching off filters may have severe effect on the processing of the runtime! ;-) Please contact CaptainCasa when applying changes to the default configuration!
You can sub-class the class CCInitializeServlets and add own filters and servlets. The class CCInitializeServlets is built in way that allows to add additional logic in a flexible way by overriding protected methods.
Once having overridden class CCInitializeServlets you need to register your class in system.xml so that the runtime knows about:
<system>
…
<servletcontextconfiguration
initializationclass="...className of your extension...”
/>
…
</system>
When adding own definitions (e.g. own servlet) to the servlet configuration then there are two potencial ways:
Add your own definitions to web.xml
or: add your own definitions to an extension of class “CCInitializeServlets”.
In this case do not continue to think about where to add your definitions – sub-classing “CCInitializeServlets” is the way to go!
For the “normal” usage scenario in a JEE servlet container follow the following instructions:
...then just do so by server.xml configuration of filters and servlets.
With filters, the sequence definition is crucial! - We did not find any specification what happens if some filters are registered in web.xml and some other filters are registered by API. But: assuming that Tomcat is the reference implementation, we see that the web.xml artifacts are added before the ones that are added by API.
This means:
If the filter that you want to add is executed in front of all filter definitions of CaptainCasa, then you may just add it to web.xml “as usual”.
If the filter that you want to add is executed within the sequence of the filter chain of the CaptainCasa filters, then you have to add it by API and overriding the class “CCInitializeServlets”.
In the second case your implementation could look like:
public class MyInitializeServlets extends CCInitializeServlets
{
…
...
protected FilterRegistration initializeFilter(ServletContext servletContext, Class filterClass, String... mappings)
{
if (filterClass == CompressionFilter.class)
{
initializeFilter(servletContext,YouOwnFilter.class,”*.xxx”);
}
super.initializeFilter(servletContext,filterClass,mappings);
}
}
By this coding you add some own filter in front of the “CompressionFilter” of CaptainCasa.
Example: for what reason ever you have extended CaptainCasa's “CompressioFilter”. In this case you need to override the “CCInitializeServlets” class. Your code could look like:
public class MyInitializeServlets extends CCInitializeServlets
{
…
...
protected FilterRegistration initializeFilter(ServletContext servletContext, Class filterClass, String... mappings)
{
if (filterClass == CompressionFilter.class)
{
super.initializeFilter(servletContext,MyCompressionFilter.class,”*.xxx”);
}
else
{
super.initializeFilter(servletContext,filterClass,mappings);
}
}
}
With both servlet and listener definitions the sequence of definitions is typically not relevant. You can just add them to the web.xml “as usual” or add them to some own “CCInitializeServlets” implementations – both ways are correct.
Each component provides extended information about...
the type of the component (field, button, combo selection, ...)
the semantic context of the component (e.g. a field that Is used for a “name”-input)
the actual value of the component
The extended information is passed into two attributes of the corresponding HTML element:
the “title” label – which is the one behind the tooltip text of the component
the “aria-label” - which is an attribute that is recognized by screen-readers and other devices
The extended information is not shown by default – otherwise users would always see the extended information behind a control's tooltip - and not the “normal” tooltip.
You need to extend the URL starting your application by parameter “ccexttitles=true”. Example:
https://www.CaptainCasaDemo.com/ccdemos/workplace.DemoHelloworld.risc?ccexttitles=true
As result you may check the texts that are created by hovering with the mouse over the controls:
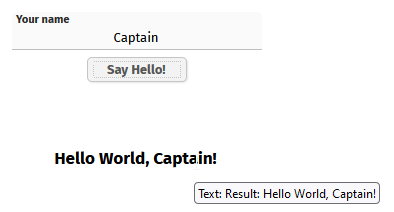
In the example of the screen shot the label is a “Text”-control, the context is “Result” and the content is “Hello World, Captain!”.
The type of the controls is defined by CaptainCasa – each control has a certain name. The name is part of the internationalized literals. The English names are:
File: eclnt/risc/i18n/language_en.xml
...
<literal id="controlLabel" text="Label"/>
<literal id="controlMenuItem" text="Menu item"/>
<literal id="controlOutlookbarButton" text="Accordion selection"/>
<literal id="controlPassword" text="Password"/>
<literal id="controlProgressBar" text="Progress bar"/>
...
The semantic context of the component is defined by the attribute ACCESSIBLENAME that is provided for nearly all components:
<t:row id="g_11">
<t:label id="g_12" accessiblename="Result" align="center" clientname="result" stylevariant="ccbig" text="#{d.DemoHelloWorld.output}" width="100%">
</t:label>
</t:row>
The value of course comes from the current status of the component – e.g. from the content of a LABEL or a FIELD. For some components there is an explicit translation from the value itself into its textual representation. Example:
The control name of the TABBEDPANE is “Area selection”. The context is “Layout XML”. The value itself is not “true” or “false”, but translated into “active” and “inactive”. The translation again is part of the internationalization file already mentioned above:
File: eclnt/risc/i18n/language_en.xml
...
<literal id="controlButton_selected" text="active"/>
<literal id="controlButton_unselected" text="inactive"/>
...
In many cases the attribute ACCESSIBLENAME can be derived from existing attribute definitions that are done in a control instance. This is the point of time when to remind you about using “Default Macros” to do this. Please read details chapter “Working with Macros”.
All issues like contrast, font-selection, color-choice are part of style definitions. In case of adding some own styling from your side, It may be required to add an additional “high contrast style” to better support users with viewing handicaps.
Of course the normal browser scaling is the default way to scale your application front-end. You can pass a default scale-factor either by URL parameter “ccscale” (e.g. “ccscale=1.5”) or by using component CLIENTCONFIG-SCALE. There is a default CLIENTCONFIG component which is automatically added to the front-end and that is addressed by the “Client”-Java-API:
Client.instance().setScale(new BigDecimal(1.25));
CaptainCasa on client-side logs its activities into the JavaScript-console – but performance reasons only does so, if explicitly switched on.
CaptainCasa provides two server-side log “output streams”:
“log_eclntjsfserver” - the normal logging of the server-side: infos, warnings, errors on the server-side processing
“log_performance” - special performance data
If you open the browser's JavaScript console (by opening your browser's “Developer Mode” and viewing the “Console”), then you see that CaptainCasa by default only outputs only rudimentary information:

In case of situations in which you want to take a look into the client-side processing you need to switch the logging on: append a URL parameter “cclogactive=true” to your URL (URL parameters are the ones that are appended by “?”/”&”...) and you will see a bit more:
The log level can be configured by a further URL parameter “ccloglevel=...”. You can pass the values “ALL”, “INFO”, “WARNING”, “ERROR”.
Please pay attention: logging costs time! Do not switch on the log if not explicitly required.
By default the log is written into the temporary-data directory that is granted by the servlet container. The default log level is “INFO”.
In case of Tomcat this is: “tomcat/work/Catalina/localhost/<yourWebApp>”.
The configuration is cone by using configuration file “eclntjsfserver/config/logging.xml”. You can either directly edit it (there is a “eclntjsfserver/config/logging.xml_template” in the eclnjsfserver.jar file) or you can use the tool set of CaptainCasa.
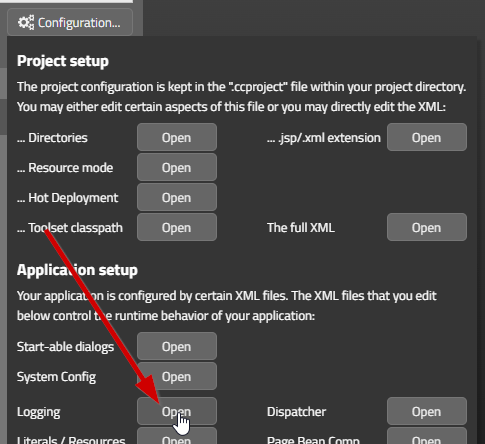
The template file contains the information what and how to set up. In particular you can...
Define if to output the log to the console (which is quite nice when developing...)
Change the location of the log files written
Change the log level
Define the “rotation system” of files – How many files are created? What is the file size when one log file is closed an the next one is started?
There is an interface “ILogOutput”:
package org.eclnt.util.log;
import java.util.logging.Level;
public interface ILogOutput
extends CLogConstants
{
public void log(Level level, String msg);
public void log(Level level, String msg, Throwable t);
}
By implementing this interface and by configuring the implementation-class in logging.xml all logging-calls that are done inside the CaptainCasa runtime are delegated to this API – and you can flexibly integrated with your own logging.
In logging.xml you can set up a connection to the commonly used logging API “SLF4J”. In this case the log info is output to a logger that redirects its logging to the SLF4J framework – the name of the log that is used is “org.eclnt.serverlog.VIASLF4J”.
Please follow instructions that are available in the logging.xml_template file!
CaptainCasa logs certain performance information in order to better analyze situations in which e.g. response times on client side were not adequate. This logging is done in the “log_performance” log – which you by default find in the temp-directory of the servlet container as well.
The log contains three different pieces of information:
The runtime regularly outputs information about the current memory usage:
MEMORY : Occupied: 146M, Total: 437M, Max: 932
These are the normal heap parameters of the Java virtual machine. For interpretation you should have some understanding of the memory management inside the virtual machine!
Each time request is processed on server-side some information is written. Example:
REQUEST: Session: 84ECB8E4159768E9614646244DA17C32, Total: 10028ms, Invoke: 10007ms (#{d.d_8.DemoBlockerInfo.onLongAngryAction})
The information contains:
The session-id (so you can see all requests that belong to one user-session)
The processing time on server-side
The action that was executed
In the concrete example the request was taking 10 seconds (!) and the reason was the calling of method “DemoBlockerInfo.onLongAngryAction”.
In addition the client-side processing records performance figures as well:
CLIENT : Session: 84ECB8E4159768E9614646244DA17C32, RoundtripDuration: 10031ms, ClientUpdate: 1 ms
For each request the following information is recorded:
The session-id
The duration between sending the request and receiving the complete response
The time that the client required to process the response and update the current dialog
By nature of the infrastructure the client always sends the information about its last request processing with a new request. Consequence from logging perspective the client side log message for a request always comes after the server-side message!
Example: the performance log contains the following information – and the user is angry about a slow response time:
REQUEST: Session: 84ECB8E4159768E9614646244DA17C32, Total: 10028ms, Invoke: 10007ms (#{d.d_8.DemoBlockerInfo.onLongAngryAction})
CLIENT : Session: 84ECB8E4159768E9614646244DA17C32, RoundtripDuration: 10031ms, ClientUpdate: 1 ms
From the CLIENT-message you see, that the user is right! - And you see that the problem is not on client side (rendering of 1ms is fast...) but on server-side (response processing takes 10031ms).
On server-side you see the corresponding REQUEST-message before the CLIENT-message. And you see that the processing took 10028ms.
Result:
The client is fast.
The network is fast.
The server-side processing is “guilty”! So you need to check the processing in “DemoBlockerInfo.onLongAngryAction”.
Compare to the following:
REQUEST: Session: 84ECB8E4159768E9614646244DA17C32, Total: 5099ms, Invoke: 10007ms (#{d.d_8.DemoBlockerInfo.onLongAngryAction})
CLIENT : Session: 84ECB8E4159768E9614646244DA17C32, RoundtripDuration: 10031ms, ClientUpdate: 1 ms
Now the same suffering on user side – but you see: the processing on server-side “only” took 5099ms. This means there is a gap of round about 5 seconds between the client-round-trip-duration and the processing on server-side.
Result: check the network which is between the client and the server!
You may extend the logging of the performance log so that own information is added to the logging of each request (“REQUEST: ...”) line.
There are two APIs:
PLog.logApplicationInfo(String keyword, String info)
This will add any information straight into the log with the format “<keyword>:<info>”.
PLog.accumulateNumberInCurrentRequest(String type, long number)
By calling this API you may add some figure that you want to accumulate during the request processing. Several calls to the same figure (identified by the “type” parameter) will accumulate the values per request.
Concrete use case: in the database processing of the CaptainCasa EE layer (“DOFWSql”-calls) the duration of each access to the database is measured - the result is passed by calling...
PLog.accumulateNumberInCurrentRequest(“DOFWSql.query”,duration);
As result the “REQUEST:” line of the performance log will contain the accumulated duration of all database requests that were done during the corresponding request processing:
REQUEST:....;DOFWSql.query:2932;...
Each dialog that is processed in the browser is bound to some bean on server side. The bean (e.g. an instance of PageBean) is an ideal entry point for doing JUnit tests.
The server side bean normally is used within the context of an http-request. There is e.g. some http-session available that you normally can access. When creating the bean in a JUnit environment then this context is missing. Consequence: you see errors at these parts of the code that directly access the outside context (normally done by using the facade class “HttpSessionAccess”).
In order to avoid these errors you can call one of the following the methods...
1. UsageWithoutSessionContext.initUsageWithoutSessionContext()
2. UsageWithoutSessionContext.initCurrentThreadWithoutSessionContext()
Both of the methods set some flag that suppresses errors coming from accessing the context.
The first method sets some global flag that is kept for the whole Java runtime (as a static variable). This is the default way of setting up the test environment. - The second method sets a flag that is valid within the current thread only, so that only calls to the context within this thread are treated in some error-tolerant way.
When running application tests without session context then there might be certain information required from the session context that needs to be explicitly set. Please check the JavaDoc of class UsageWIthoutSessionContext, there are set-functions to pass information, such as:
UsageWithoutSessionContext.setServletTempDirectory(...)
UsageWithoutSessionContext.setWebcontentDirectory(...)
UsageWithoutSessionContext.setSessionInfo(...)
Since 20201222 we introduced a new class “Testing” which serves as facade for useful functions in the area of server side testing.
Testing.startTest();
This function indicates that a server side test is started. It internally calls the function UsageWithoutSessionContext.initUsageWithoutSessionContext(), that is mentioned above.
Testing.startTest();
final Dispatcher d = new Dispatcher();
final DemoHelloWorld ui = (DemoHelloWorld)d.getDispatchedBean(DemoHelloWorld.class);
Testing.simulateRequest(new RequestSimlulation()
{
@Override
public void processUpdate()
{
ui.setName("Captain");
}
@Override
public void processInvoke()
{
ui.onHello(Testing.createEvent("invoke()"));
}
@Override
public void processRender()
{
String result = ui.getOutput();
assertEquals("Hello World, Captain!",result); // JUnit assert
}
});
This method processes the three phases of a typical request processing:
passing the data in the update phase (set, set, set, ...)
processing the data in the invoke phase (on...Action)
checking the data in the render phase (get, get, get, ...)
A couple of functions that the CaptainCasa framework executes around these phases (e.g. executing phase-runnables) are executed also in this environment.
There are a couple of functions accessing the default popup dialogs and other default objects (such as status bar).
There are various tools outside that you can use for testing “through the browser”. All of them share the same challenge: components on the screen need to be identified in a proper way, so that events that are created by the test tools are passed to the correct component.
The ids of the elements that are created for each component are not stable at all – but they are counted ids. So do not use the HTML-element-ids for identifying components!
Each component provides an attribute with the name CLIENTNAME. The content of this attribute is passed to the HTML-elements that are created for the corresponding component.
In the HTML-elements the id is stored in two attribute:
“data-riscclientname” - this is the orginal attribute that was used by CaptainCasa
“data-test” - this is the attribute that was added with 20250303 in order to support scenarios in which some test tools are strictly bound to this attribute name...
Because one component typically consists out of several HTML-elements (DIV, …), each of the elements receives some own clientname by concatenating some additional information. Example:
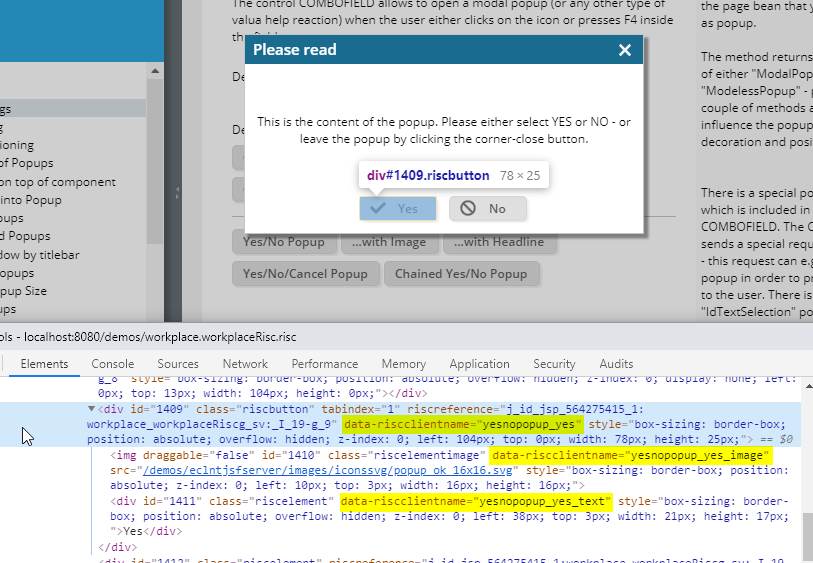
In the dialog definition the button is defined as:
<t:button … clientname=”yesnopopup_yes” … />
In the screenshot you see that one button internally is rendered out of three HTML elements:
One outside rectangle (DIV) with “data-riscclientname” set to the original clientname-value “yesnopopup_yes”
One inside rectangle (IMG) with “data-riscclientname” set to “yesnopopup_yes_image”
One inside rectangle (DIV) with “data-riscclientname” set to “yesnopopup_yes_text”
As consequence you can access any inner content of the component by some “solid and stable” name.
Please check the usage of a “Default Macro” in order to automatically generate the values for the attribute CLIENTNAME: The “Default Macro” (Chapter: “Working with Macros” of this documentation) is a mini-Java program, in which you can automatically define attribute values out of exsiting values.
Dialogs can be re-used on one screen multiple times. To ensure that each component can still be uniquely identified you may pass a CLIENTNAME to the ROWPAGEBEANINCLUDE component as well. The CLIENTNAME-value that you assign on this level is prepended to all CLIENTNAME-values of components that are inside of the contained page.
The same is available for the component PAGEBEANINCLUDE und PAGEBEANCOMPONENT – which share the basic behavior with the ROWPAGEBEANINCLUDE component.
If you define a fix value as CLIENTNAME for a component that is used within a cell of a grid, then the row-index of the grid is pre-pended automatically.
Example:
FIXGRID
GRIDCOL
LABEL CLIENTNAME=”greatLabel”
In this case the clientname of the LABEL of the first row will be “0_greatLabel”, the one of the seconds row will be “1_greatLabel” etc.
You may also assign some flexible value by expression:
FIXGRID
GRIDCOL
LABEL CLIENTNAME=”.{myClientName}”
In this case there is no automated pre-pending of information, but you have to make sure on your own, that each CLIENTNAME-value is unique.
When building up the DOM element tree on client side, the CaptainCasa client processing always creates one DOM element with the special client name “riscform_outest”:

This element holds special data that is very useful for client side testing.
The existence of this element is the best indicator for making sure that the CaptainCasa client is up and running – having received its first layout definition from the server side.
Remember: the CaptainCasa client is a single page application which starts up and then requests a layout to be displayed from the server side processing. So waiting for the client to be started not only means that you have to wait for the client (= the JavaScript program) to be technically loaded, but that the first page is visually appearing.
In the DIV with id “riscform_outest” element there is a special attribute data-riscclientcounter. The value of this attribute is increased every time a new/updated layout definition is received and processed from the server side. So at the end of each request/response, the client increases the value of this attribute.
Observing this attribute is the best way to check if/when a communication round trip to the server side has ended.
This attribute is switched to “true” while a server-side roundtrip is going on – and is switched to “false” afterwards. Pay attention: the attribute is not set befire the first communication is started!
The server side processing can send explicit data to the client side testing environment. Example:
public void onHello(ActionEvent ae)
{
if (m_name == null)
{
m_output = "No name set.";
Statusbar.outputError("Please define some name!");
}
else
{
m_output = "Hello World, "+m_name+"!";
}
// test framework
Statusbar.addMessageToClientTester("onHello:"+m_name);
}
The text message that is passed on server side is written into the client side attribute “data-clientmessagetotester”. You can as consequence pass concrete application information to the client, that is not e.g. encapsulated in some status bar message.
Find below some mini-program to start a dialog using the Selenium testing framework. Please do not use this as show-case for how to use Selenium in general... - but use the example to see how Selenium accesses elements of the dialog and how the test waits for responses of the server-side.
package testselenium1;
import java.time.Duration;
import org.openqa.selenium.By;
import org.openqa.selenium.Dimension;
import org.openqa.selenium.WebDriver;
import org.openqa.selenium.WebElement;
import org.openqa.selenium.chrome.ChromeDriver;
import org.openqa.selenium.support.ui.ExpectedConditions;
import org.openqa.selenium.support.ui.WebDriverWait;
/**
* Mini test - Selenium controlling CaptainCasa dialog
*
*/
public class Test1
{
// ------------------------------------------------------------------------
// members
// ------------------------------------------------------------------------
// ------------------------------------------------------------------------
// public usage
// ------------------------------------------------------------------------
static int s_compareCounter = -1;
final static long DEFAULT_REQUEST_WAITINGTIME = 10000;
public static void main(String[] args)
{
WebDriver driver = null;
try
{
System.setProperty("webdriver.chrome.driver", "C:\\bmu_jtc\\selenium\\chrome117\\chromedriver.exe");
driver = new ChromeDriver();
driver.manage().window().setSize(new Dimension(1024, 768));
driver.get("http://localhost:8080/demos/workplace.demominispread.risc");
WebDriverWait waiter = new WebDriverWait(driver,Duration.ofMillis(5000));
waiter.until(ExpectedConditions.visibilityOfElementLocated(By.cssSelector("div[data-riscclientname='riscform_outest']")));
waitAfterLoadPage();
for (int j=0; j<3; j++)
{
WebElement addButton = driver.findElement(By.cssSelector("div[data-riscclientname='ADDITEM']"));
for (int i=0; i<5; i++)
{
prepareRequest(driver);
addButton.click();
waitForResponse(driver);
}
WebElement field = driver.findElement(By.cssSelector("input[data-riscclientname='REGION_0_field']"));
WebElement removeButton = driver.findElement(By.cssSelector("div[data-riscclientname='REMOVEITEMS']"));
for (int i=0; i<5; i++)
{
prepareRequest(driver);
field.click();
removeButton.click();
waitForResponse(driver);
}
}
}
catch (Throwable t)
{
t.printStackTrace();
}
finally
{
try { driver.close(); } catch (Throwable t) {}
try { driver.quit(); } catch (Throwable t) {}
}
}
// ------------------------------------------------------------------------
// inner usage
// ------------------------------------------------------------------------
private static void prepareRequest(WebDriver driver)
{
s_compareCounter = getCurrentResponseCounter(driver);
}
private static void waitForResponse(WebDriver driver)
{
waitForResponse(driver,DEFAULT_REQUEST_WAITINGTIME);
}
private static void waitAfterLoadPage()
{
try { Thread.sleep(2000); } catch (Throwable t) {}
}
private static void waitForResponse(WebDriver driver, long maxDuration)
{
System.out.print("Waiting for response: "+s_compareCounter + "\n");
long start = System.currentTimeMillis();
while (true)
{
try { Thread.sleep(50); } catch (Throwable t) {}
long now = System.currentTimeMillis();
if (now - start > maxDuration)
{
System.out.println("");
throw new Error("Time out - wating for response");
}
int currentResponseCounter = getCurrentResponseCounter(driver);
if (currentResponseCounter != s_compareCounter)
{
System.out.println("");
return;
}
if (checkIfCommunicatingToServer(driver) == false)
{
return;
}
System.out.print(".");
}
}
private static boolean checkIfCommunicatingToServer(WebDriver driver)
{
WebElement formOutest = driver.findElement(By.cssSelector("div[data-riscclientname='riscform_outest']"));
String text = formOutest.getAttribute("data-riscclientcommunicatingtoserver");
if ("true".equals(text))
return true;
else
return false;
}
private static int getCurrentResponseCounter(WebDriver driver)
{
WebElement formOutest = driver.findElement(By.cssSelector("div[data-riscclientname='riscform_outest']"));
String text = formOutest.getAttribute("data-riscclientcounter");
return Integer.valueOf(text);
}
}
There is a “Templates” section within the Layout Editor:
Templates are arranged in categories (same way as controls in the “Controls” section). By clicking a template text, information about the template is shown: a screen shot, some text, the layout XML and the Java code (if there is some).
You also can directly drag&drop the template into the component tree - and by this take over the template's layout into the current layout.
You may add own templates by defining some XML file “cctemplates.xml” in the resources part of your project. Example:
<?xml version="1.0" encoding="UTF-8" standalone="yes"?>
<templates>
...
<template
category="Images"
text="Image list with click action, adaptive arrangement of images"
descriptionPath="org/eclnt/editor/templateseditor/imageList.html"
layoutXmlPath="org/eclnt/editor/templateseditor/imageList.xml"
javaSourcePath="org/eclnt/editor/templateseditor/imageList.java.txt"
/>
...
</templates>
You can defined multiple templates within this XML definition. For each template you need to definie:
“category” - the templates are arranged by category, this is the name of the category
“text” - this is the text that shows up in the template list of the Layout Editor
“descriptionPath” - the resource that contains HTML text (as HTML fragment)
“javaSourcePath” - if required: the Java source that the user might copy into the own Java code
All “path”-attributes are referenced into the resources of the project.
<p>
This example shows how to define an image to build the full background of some form content.
</p>
<p>
<img src="org/eclnt/editor/templateseditor/imageList.png" style="width:400px;height:400px">
</p>
<p>
You need to copy the Java code into your code in order to fill the list with images.
</p>
<t:rowflexlinecontainer id="g_6" coldistance="10" rowdistance="10" >
<t:repeat id="g_8" listbinding="#{pb:images}" >
<t:image id="g_10" actionListener=".{onImageAction}" height="100" image=".{image}" invokeevent="leftclick" width="100" />
</t:repeat>
</t:rowflexlinecontainer>
Please note: expressions are starting with “#{pb:”. This will be replaced by the actual page bean expression of the currently edited page when executing a drag&drop from the “Templates” section into the component tree.
// -------------------------------------------------------------------------
// call renderImages e.g. from constructor
// -------------------------------------------------------------------------
public class ImagesItem extends Object implements java.io.Serializable
{
String i_image;
public String getImage() { return i_image; }
public void setImage(String value) { this.i_image = value; }
public void onImageAction(javax.faces.event.ActionEvent event)
{
Statusbar.outputAlert("Image clicked: " + i_image);
}
}
List<ImagesItem> m_images = new ArrayList<ImagesItem>();
public List<ImagesItem> getImages() { return m_images; }
private void renderImages()
{
String[] colors = new String[] { "#0000FF", "#FF0000", "#008000", "#FFFF00", "#FFA500", "#800080", "#000000", "#808080" };
for (int i=0; i<20; i++)
{
ImagesItem ii = new ImagesItem();
String color = colors[i%colors.length];
ii.setImage("/eclntjsfserver.images.iconssvg.play."+color+".100x100.ccsvg");
m_images.add(ii);
}
}
Write the Java code fragment in a way, that allows the user to easily copy&paste the text into his/her existing Java code.
The Layout Editor will read all “cctemplates.xml” files that are part of the class-directories and .jar files that are referenced by a project. The “Templates” section will show a combination out of all “cctemplates.xml” as result.
By default the layout definition JSP files are read from the web application's directory. The reading is done by the servlet container (e.g. Tomcat). You may override this behavior and for example define, that certain pages should be loaded from some other source, e.g. from some database.
Typical scenario: the layout of certain pages is kept in some database because it is adapted on customer side.
The dynamic loading of pages is done by a “Dynamic Page Provider” that is explained in this chapter.
The creation of dynamic layouts is quite simple:
You define a class that implements interface “IDynamicPageProvider”:
package org.eclnt.jsfserver.dynamicpages;
public interface IDynamicPageProvider
{
String getPath();
String readDynamicPage(String pageName);
}
Your implementation needs to implement two methods:
“getPath()”: this method returns the page-name-path that is managed by this dynamic page provider. The path must be returned with leading slash, e.g. “/dynpath”. As result, all pages that are included with a page name starting with “/dynpath” will be managed by your implementation.
“readDynamicPage(..)”: this method is called when a page actually is to be loaded at runtime. As parameter you receive the full page's name – so you can deduct any type of information out of the page name, that you require for your dynamic layout creation.
Example:
package dynamicpages;
import org.eclnt.jsfserver.dynamicpages.IDynamicPageProvider;
import org.eclnt.util.dynaccess.IDynamicIntrospectionSupported;
public class DemoDynamicPageProvider
implements IDynamicPageProvider
{
public String getPath()
{
return "/demodyn";
}
public String readDynamicPage(String pageName)
{
return
"<t:row>"+
"<t:label text='Hello world! Page name: "+pageName+"'/>"+
"</t:row>"+
"";
}
}
This page provider is rather simple, but it shows the most important issues:
The layout that you create does not need to be a full JSP page, but it's just the XML part.
You do not have to care about the id-attributes of elements – if you do not explicitly specify then they are created dynamically.
The layout must be “one row' with contained content”. In case of returning several rows you must build up a container that contains the rows:
NOT:
row
label
field
row
label
field
BUT:
row
pane
row
label
field
row
label
field
The registration of your page provider is done within the file “/eclntjsfserver/config/system.xml”:
<system>
...
...
<dynamicpages>
<dynamicpageprovider
name="dynamicpages.DemoDynamicPageProvider"/>
</dynamicpages>
...
...
</system>
Pay attention – the page provider is called in the same way as normally static “.jsp/.xml” pages are read from the file system. Once read, they are buffered.
The dynamic page provider is NOT called every time a dynamic page is resolved within a ROWINCLUDE, but is typically called one time per page name only!
When the CaptainCasa server side runtime reads a layout definition (.jsp/.xml file) then it allows you to on the fly update the document that was read.
The interface for doing so is:
package org.eclnt.jsfserver.util;
public interface ILayoutXMLModifierAfterRead
{
public String updateLayoutXML(String fullPageName, String xml);
}
In the interface the page name and the XML content of the page is passed into your processing – and you may update the XML content in any way. The XML that you pass back is the XML hat is then passed into the page processing.
You implementation of the interface needs to be registered in the system.xml configuration file. Example:
<system>
...
...
<layoutxmlmodifierafterread name="tools.LayoutPimper"/>
...
...
</system>
When using the ccee-library of CaptainCasa (“Enterprise Edition”) then you may use the class “SimpleXML” to work with the XML in a simplified way.
In the following example, the layout is changed in a ways so that any occurance of the text-attribute “Hello” is changed into “Hallo”:
package tools;
import java.util.List;
import org.eclnt.ccee.xml.simplexml.SimpleXML;
import org.eclnt.ccee.xml.simplexml.SimpleXMLElement;
import org.eclnt.jsfserver.util.ILayoutXMLModifierAfterRead;
public class LayoutPimper implements ILayoutXMLModifierAfterRead
{
@Override
public String updateLayoutXML(String fullPageName, String xml)
{
SimpleXMLElement top = SimpleXML.parseXML(xml);
replaceDemo(top);
xml = SimpleXML.createXML(top);
return xml;
}
private void replaceDemo(SimpleXMLElement top)
{
String text = top.getValue("text");
if (text != null && text.contains("Hello"))
{
text = text.replace("Hello","Hallo");
top.setValue("text",text);
}
List<SimpleXMLElement> subs = top.getSubElements();
for (SimpleXMLElement sub: subs)
{
replaceDemo(sub);
}
}
}
Of course you may use any other framework for parsing and assembling the XML content.
By using the possibility to update the layout directly before it is processed to resolve abbreviations that you might use inside layout definitions.
Example: in a layout you may write...
<t:button … text=”i18n:firstName” … />
...which you then extend to...
<t:button … text=”#{rr.literals['firstName']}” … />
CaptainCasa is a frontend-related technology and itself does not have too much to do with persistence. Of course applications, built with CaptainCasa, have to deal with persistence! - but this is typically something in some deep layers, well behind the user interface processing.
But: there are some situations in which CaptainCasa wants to persist data as well. Examples are:
When a user changes the sequence of columns, then this may be stored, so that the column layout is updated for this user.
In the workplace management, there are some configuration files, that are to be defined at runtime – e.g. the definition of a function tree for a specific user.
In the workplace management the user may update the perspective's layout by drag & drop. Again this needs to be persisted...
In order to persist all this data at runtime, there is a persistence mechanism, called “Stream Store” (the name of the corresponding Java class is “StreamStore”).
Imagine the stream store to be a file system, that allows to store UTF8-based files (typically XML files). For each file/content you want to persist you define:
...the directory, in “slash”-notation, e.g. “/aaa/bbb/”
...the name of the file, e.g. “ccc.xml”
...the content of the file as UTF8-String
This is represented by the stream store API that is available through the interface “IStreamStore”:
public interface IStreamStore
{
public List<String> getContainedStreams(String dirpath, boolean withError);
public List<String> getContainedFolders(String dirpath, boolean withError);
public String readUTF8(String path, boolean withError);
public void writeUTF8(String path, String xml, boolean withError);
public void removeStream(String path, boolean withError);
public boolean checkIfStreamExists(String path, boolean withError);
}
Based on this API, the individual functions define where and how to store their information within the stream store. For example, the workplace perspective management stores its information in the following directory:
/ccworkplace
/perspectives
/<username>
/<perspectiveName>.xml
You may use the stream store API for persisting own data as well. Please keep in mind that all directory names starting with “cc” are reserved for use by CaptainCasa only.
And (of course...): only use the stream store for UI related data. Do NOT use the stream store for any other purpose. The stream store's persistence is not built for mass—data-management and does not ensure any type of transactional consistence.
Now, let's get to the “most important” question: where is the data stored? The answer is: this depends on the stream store implementation...!
In principal any implementation of the IStreamStore interface can be activated. You need to register the corresponding class in the configuration file /eclntjsferver/config/system.xml – that's it:
<system>
<streamstore
name="org.eclnt.jsfserver.streamstore.StreamStoreFile"
/>
</system>
There are two default implementations that come with the CaptainCasa runtime:
A file system based persistence
A JDBC based persistence
This is the persistence that is activated by default – i.e. if not doing any specific definitions within the system.xml configuration file.
The directory structure of the stream store is directly reflected into the directory structure of a certain area of the file system. If not doing any specific definition, then this area is selected in the temporary work area of the web application.
(In case of Tomcat this is the directory in tomcat/work/Catalina/localhost/<webapp>.)
But you can override this directory and explicitly set an own one, by doing the following definition in system.xml:
<system>
<streamstore
name="org.eclnt.jsfserver.streamstore.StreamStoreFile"
rootdir="c:/streamstoredir"
/>
</system>
The file based stream store is positioned for “small scenarios”, without clustered application servers only! - Imagine: when having multiple application servers then the only way to store data at one common place is to define one central file server (“x:/streamstore”) that is acessed from each application server node remotely.
There is a JDBC based implementation of IStreamStore as well. It is invoked in the following way:
<system>
<streamstore
name="org.eclnt.jsfserver.streamstore.StreamStoreJDBC”
/>
<jdbcconnectionprovider
name="demostreamstore.DemoConnectionProvider"
/>
</system>
The first “streamstore” definition in system.xml tells the stream store management to use the JDBC based implementation. Because the JDBC based implementation requires a JDBC connection to a database, the second “jdbcconnectionprovider” definition is required as well.
The JDBC connection provider is a class of your application, implementing the interface IJDBCConnectionProvider. A (very simple) example is:
package demostreamstore;
import java.sql.Connection;
import java.sql.DriverManager;
import org.eclnt.jsfserver.streamstore.IJDBCConnectionProvider;
import org.eclnt.util.log.CLog;
public class DemoConnectionProvider implements IJDBCConnectionProvider
{
static
{
try
{
Class.forName("org.hsqldb.jdbcDriver");
}
catch (Throwable t)
{
CLog.L.log(CLog.LL_ERR,"",t);
}
}
public Connection createConnection()
{
try
{
Connection result = DriverManager.getConnection("jdbc:hsqldb:hsql://localhost/PIM", "sa", "");
return result;
}
catch (Throwable t)
{
throw new Error(t);
}
}
}
There are often situations in which configuration on the one hand comes from the program (i.e. it is part of your design time) and on the other hand comes from definitions that are made during runtime.
The stream store is able to handle this – by always taking the directory /webresource/config of your application into consideration as well. If the stream store is asked for the content of “/ccworkplace/perspectives/default.xml”, then...
...it first checks the “normal” place of persitence, e.g. the database when using the JDBC based stream store implementation
...and then – if the first access was not successful checks the web application for the file “/eclntjsfserver/config/ccworkplace/pespectives/default.xml”.
This means that you always can integrate design time data into your stream store.
Of course the design time data is read-only. When writing back data into the stream store that was picked from the design time part, then automatically the updated file will be saved int the “normal” stream store persistence (e.g. the JDBC database)), and will override the design time data as consequence.
RISC dialogs are started by using extension “.risc” together with the name of the .jsp/.xml-page. Directories need to be separated by “.”.
Example:
Project:
webcontent
pages
subfirst.jsp
subsecond.jsp
first.jsp
second.jsp
Call:
http(s)://<server>:<port>/<webapp>/first.risc
http(s)://<server>:<port>/<webapp>/second.risc
http(s)://<server>:<port>/<webapp>/pages.subfirst.risc
http(s)://<server>:<port>/<webapp>/pages.subsecond.risc
You may append predefined URL parameters by “?” and “&”
Example:
http(s)://<server>:<port>/<webapp>/first.risc?<name>=<value>&<name>=<value>
|
Name |
Description |
|
ccconfirmexit |
true/false, default false
If set to true, then the user will be asked if he/she really wants to leave the current browser page. Without setting to true, the user can navigate to any other page within the browser – with the consequence of potentially loosing input data on the current page.
Please note: the confirmation of the exit can also be controlled by using the Java API “Client.instance().setConfirmexit()” - or by using the CLIENTCONFIG component (which is implicitly used by the Client-API). |
|
ccfullscreen |
true/false, default false
Starts the browser in full screen mode. Only supported with browser supporting the corresponding JS-interface. |
|
cclogactive |
true/false, default false
By default the client side JavaScript logging to the console is switched off in order to save performance on client side. You may switch on in case of client JavaScript errors. |
|
ccloglevel |
ERROR, WARNING, INFO (default), ALL
Client side log level of JavaScript logging. |
|
cclogoutput |
true/false, default false
If switched to true then the log output on client side is not only done into the browser console but also in some modeless popup dialog. This is extremely useful for mobile devices in which the developer options to view the console typically are not available |
|
cckeepdialogsession |
true/false, default false
Only useable when using session mode “COOKIE”!
If switched to “true” then the client reconnects to the exisiting dialog session when the user performs a refresh within the browser, or if the user navigates to some different page in the browser and the navigates back to the .risc page later on.
The session is not terminated by the .risc page being unloaded, but is only terminated by server-side session timeouts. |
|
ccpageicon |
relative URL to image (xyz/xyz.png)
Name of icons that should be shown within the browser for this page. The icon needs to be part of the webcontent and is addressed as relative URL.
Please note: you may also use the Java API “Client.instance().setTitleimage(...)” to pass this information dynamically. |
|
ccresetbuffers |
true/false, default false
Of set to true then all internal buffers on CaptainCasa server side will be cleared. Style information, layouts and other artifacts are buffered on server side (e.g. to not calculate the style out of its various contributing XML files with every new session).
Especially useful when working with styles, because CaptainCasa buffers style information. |
|
ccscale |
double value, default “1.0”
Scaling of the client. “1.1” means that the client is scaled at 110%.
If setting the value to “auto” then the scale will be calculated internally, using the browser's value “window.devicePixelRatio”.
You may also use Java API “Client.instance().setScale(...)” to pass this information dynamically. |
|
ccstyle |
name of style
Explicit setting of style via URL. The name of the style is the name of the style's directory in eclntjsfserver/styles. |
|
cctitle |
string
Title string that is shown in the window title of the browser for this dialog.
You may also pass this information dynamically by using Java API “Client.instance().setTitle(...)” . |
|
cctouchsupport |
true/false, default false
By setting to true, all input fields automatically will provide some touch keyboard to key in their value without keyboard usage. |
|
cctouchdesktop |
true/false, default false
This parameter tells the client processing that the current client is a desktop client which is used as touch device. The desktop client does not use touch-events but mouse-events. - This is the typical behavior of Windows-based industry PCs which are equipped with touch-sensitive screens.
Major consequences, when swicthing to “true”: 1. double clicks are replaced by long clicks 2. grids can be scrolled by drag&drop on their items |
|
ccdesktop |
true/false, default auto-detection, if not successful: true
Indicator if the client is a desktop client (“PC”) or a mobile client (“tablet”, “phone”). For iOS and Android devices there is a clear auto-detection. For Windows devices you may have to explicitly set the parameter, to indicate if you use the device as “dektop” (mouse, kreyboard) or as “tablet” (touch). |
|
ccusetouchevents |
true/false, default: auto-detection: false for desktop clients, true for mobile clients, if not successful: false
You can tell the client processing explicitly which type of events are used to process touch input. On some devices (e.g. desktop devices which both support mouse and touch input) you need to explicitly tell which events to use. |
|
cciostouchscrolling |
true/false – default true
This is a very special switch for iOS based devices (iPhone, iPad). In scenarios with deep nesting of components we experienced a problem on these devices: the client just stops with a certain exit code – and restarts the current URL. This problem occurs when normal scroll panes are part of this deep nesting.
As consequence we have developed a bypass – in which the scrolling inside scroll panes is not managed by the browser but by own processing. Advantage: it is stable also for deeply nested scenarios. Disadvantage: it is not 100% compatible with the typical scrolling: there is no “fading out” of the speed with which the scrolling is processed. And: there are currently no scroll bars shown.
We did set the switch to “true” by default, because stability is first. In case of missing the normal browser scrolling on iOS devices: switch to “false” but please check if your dialogs are not causing the browser error. |
You can find template files for each configuration file in the eclntjsfserver.jar library. The configuration file templates are located in the “/eclntjsfserver/config”-directory:
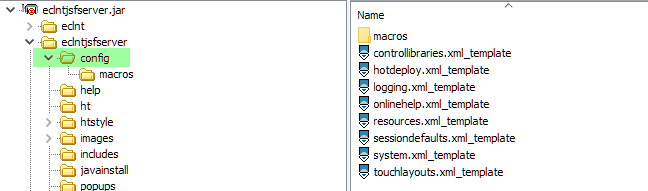
The role and functions behind each configuration file is explained through this documentation – within the chapters, describing the context they are used in.
This chapter provides detail on the way the configuration files are read at runtime – and where you have to place them.
The following configuration files contain runtime information:
/eclntjsfserver/config/logging.xml
/eclntjsfserver/config/sessiondefaults.xml
These files are read in the following way:
The customer needs to influence these files – without changing them in the .war/.ear file that makes the delivery of your software. So the first place to check for is an external file location.
The directory which is checked for configuration files has to be defined by environment variable “cc_configDirectory” or “ccee_configDirectory”. Environment variables are the ones that you set with “SET xxx” within the operating system before calling the server.
If one of the two variables is defined then the file is read in the following way:
First the file is checked within the subdirectory “<cc_configDirectory>/<webappName>/<configFileName>”. If the file is found – then this is the file to be used.
Then the file is checked at the following location: “<cc_configDirectory>/<configFileName>”. If the file is found – then this is the file to be used.
If the first reading was not successful, then the file is read from the web content.
Example: in a CaptainCasa-based project layout the file might be placed here:
<project>
/webcontent
/eclntjsfserver
/config
<configFileName>
In a Maven-based project layout the file might be placed here:
<project>
/src
/main
/webapp
/eclnjsfserver
/config
<configFileName>
If the second step was not successful, then the file is read from the class loader. This means you might place it in the following way:
CaptainCasa-based project layout:
<project>
/src
/eclntjsfserver
/config
<configFileName>
Maven-based project layout:
<project>
/src
/main
/java
/eclnjsfserver
/config
<configFileName>
The following configuration files contain contain runtime information as well, but are read in a different way:
/eclntjsfserver/config/controllibraries.xml
/eclntjsfserver/config/hotdeploy.xml
/eclntjsfserver/config/onlinehelp.xml
/eclntjsfserver/config/resources.xml
/eclntjsfserver/config/system.xml
The challenge with these files is that a project may be distributed into several sub-projects, each one containing this part of the configuration that is relevant for the sub-project.
In the “resources.xml” configuration file each project defines its resources:
Project A:
<resources>
<resource name="aliterals" package="com.xxx.a"/>
</resources>
Project B:
<resources>
<resource name="bliterals" package="com.xxx.b"/>
</resources>
If now using project A inside project B it has to be made sure that both the definitions of project A and the definitions of project B are applied.
As consequence this reading is done in the following way:
All three steps of the previous chapter are executed – with one significant differences: the configuration files that are found for each step are collected and concatenated to build one “virtual big configuration file” as result.
The reading in the class loader is not executed in a direct way (“Read this resource!”), but checks for multiple occurrences of the corresponding file in different .jar files. Each occurrence is used and added to the “virtual big configuration file”.
The sequence of merging the files is:
First the web content/classloader based files are merged. The inner sequence here is not predictable.
Then the external configuration files are merged.
Reason: by this sequence the external files are the one which override information from the internal configuration files.
Example: as part of the system.xml configuration the JDBC connection of the stream store might be set. You might set this internally in your program e.g. for some default database location – but the customer can override in his concrete scenario.
The configuration files contain a lot of information that defined the behavior of your application. There are some definitions that are “like code” and must not be changed when installing your application. But there are other definitions that are likely to be changed for each installation.
Example: “system.xml”
On the one hand you may define the class name of the implementation that registers filters and servlets:
...
<servletcontextconfiguration
initializationclass="org.eclnt.jsfserver.util.CCInitializeServlets"
/>
...
This definition is central part of your application – and must not be changed from outside.
On the other hand you may define security settings:
...
<httpheaderattributesforpages ...
content-security-policy="default-src 'self' data: 'unsafe-inline' 'unsafe-eval'; img-src * data:"
... />
These settings can be different for each installation.
It is not a perfect strategy to now deliver different “.war”-files which are specific to the customer scenario. So there is a better way – the possibility to add dynamic definitions.
The principle is very simple: inside the configuration files you defined placeholders. The actual value of the placeholders is replaced by corresponding dynamic information at runtime.
Example:
<httpheaderattributesforpages ...
content-security-policy="${env.cspdefinition}”
... />
At runtime, when the configuration file is read, then the placeholders are resolved. In the example the placeholder is resolved by a value which set as “environment variable” of the operating system.
Example (Windows):
set cspdefinition=”...xxx...yyy...”
tomcat/bin/catalina run
There are three types of placeholders:
Environment variables: “${env. ... }”
System variables: “${sys. ... }”
Configuration parameters: “${ccparam. ... }”
As shown in the previous example the placeholder refers to an operating system environment variable.
Java system variables are passed into the virtual machine in the following way:
set JAVA_OPTS=... -Dxxx=yyy ...
tomcat/bin/catalina run
This is the most powerful approach! It allows you to add an implementation of the interface “ICCConfigParams”:
package org.eclnt.util.configparams;
public interface ICCConfigParams
{
public String getConfigParam(String name);
}
There is a simple default implementation which you might use, in which a map stores the parameters.
package org.eclnt.util.configparams;
import java.util.HashMap;
import java.util.Map;
public class CCConfigParamsMapImpl implements ICCConfigParams
{
Map<String,String> m_params = new HashMap<String,String>();
@Override
public String getConfigParam(String name)
{
return m_params.get(name);
}
public synchronized void setConfigParam(String name, String value)
{
m_params.put(name,value);
}
}
By calling “CCConfigParams.initializeConfigParams()” you register the implementation of interface ICCConfigParams:
CCConfigParamsMapImpl cccpmi = new CCConfigParamsMapImpl();
cccpmi.setConfigParam("param1Name","param1Value");
cccpmi.setConfigParam("param2Name","param2Value");
CCConfigParams.initializeConfigParams(cccpmi);
Now any occurrence of “${ccparam.param1Name}” in a configuration file will be replaced the the value defined via the interface (here: “param1Value”).
Up to now: everything is quite simple... But there's one complexity involved: when is the appropriate point of time to register the “ICCConfigParams” interface?
The appropriate time is at the very beginning of the initialization of the CaptainCasa runtime. - The initialization already contains the reading of all configuration files – so it's a good idea to place the registration of the configuration parameters at the very beginning, before the reading of configuration files starts.
The most conventient way is to use the interface IBootstrap:
package org.eclnt.jsfserver.util;
public interface IBootstrap
{
public void startUp(ServletContext servletContext);
}
To use the interface, first implement it:
package demobootstrap;
import org.eclnt.jsfserver.util.IBootstrap;
import org.eclnt.util.configparams.CCConfigParams;
import org.eclnt.util.configparams.CCConfigParamsMapImpl;
public class DemoBootstrap implements IBootstrap
{
@Override
public void startUp(ServletContext servletContext)
{
CCConfigParamsMapImpl cccpmi = new CCConfigParamsMapImpl();
CCConfigParams.initializeConfigParams(cccpmi);
cccpmi.setConfigParam("param1Name","param1Value");
cccpmi.setConfigParam("param2Name","param2Value");
}
}
Then, the bootstrap class name needs to be registered in the file “ccbootstrap.xml” which is placed in the root directory of you resources:
<?xml version="1.0" encoding="UTF-8" standalone="yes"?>
<bootstrap class="demobootstrap.DemoBootstrap"/>
If using the CaptainCasa project file layout then the files is located at:
<project>
/src
...
ccbootstrap.xml
...
If using the Maven project layout then the file is located at:
<project>
/src
/main
/java
/resources
...
ccbootstrap.xml
...
So the overall result is:
CaptainCasa starts the “DemoBootstrap. startUp()” method before CaptainCasa accesses its own configuration files.
Inside the method you may define and register the “ICCConfigParam” implementation. Where you now collect the values of your configuration parameters, this is up to you and your implementation.
When the configuration files are read then the content of the placeholders with the format “${ccparam. ...}” is replaced accordingly
How to connect all information that was provided in the previous chapters in order to create a scenario in which configuration parameters are dynamically passed? Let us take a look onto a typical scenario: certain configuration parameters are stored within a “.ini” file which is used during startup.
The first question is: where is the location of the “.ini” file? - You now could build up some strategy where the file might be located somewhere on the file system of your server, but the clearest way is to pass this location by an environment variable before starting your application server:
SET MYCONFIGLOCATION=c:\xyz\config
...
CATALINA START ...
In your IBootstrap implementation you now can read this variable:
public class MyBootstrap implements IBootstrap
{
@Override
public void startUp(ServletContext servletContext)
{
// find directory
String myConfigLocation = System.getenv(“MYCONFIGLOCATION”);
if (myConfigLocation == null)
throw new RuntimeException(“MYCONFIGLOCATION is not defined.”);
...
}
}
You now know the directory. The file name itself should be dependent from the name of the web application – which you can derive from the ServletContext. Why? Because your application might be installed several times on the same servlet engine (e.g. Tomcat) and you may want to configure each instance in a different way.
public class MyBootstrap implements IBootstrap
{
@Override
public void startUp(ServletContext servletContext)
{
// find directory
String myConfigLocation = System.getenv(“MYCONFIGLOCATION”);
if (myConfigLocation == null)
throw new RuntimeException(“MYCONFIGLOCATION is not defined.”);
// find name of deployed webapp
String iniFilePath = servletContext.getContextPath();
String fullFileName = myConfigLocation + iniFilePath + “/config.ini”;
...
}
}
The path returned by Servlet.getContextPath() already starts with a slash (“/”). In the example code there is one configuration directory per deployed web application in which the “config.ini” is stored.
c:\xyz\config
\denos
\config.ini
\demo2
\config.ini
Finally you now can read this file, parse it and pass the configuration into the “ICCConfigParams” instance that you use.
Please note: the definition of “ccbootstrap.xml” and the loading of your implementation of “IBootstrap” is done before any initialization of the CaptainCasa runtime – and this means: it is also done before the initialization of the hot deploy management! Take care that corresponding classes and resources are available via the main class loader (webcontent class loader).
As mentioned in the previous chapter, you can apply information from operating system variables and from system variables within configurations files.
Accessing these values is done in two steps (since update 20241216):
First the variable is accessed with the prefix “<yourwebapp>.”
Then the variable is accessed with its original name
Example:
CONFIGURATION FILE:
<httpheaderattributesforpages ...
content-security-policy="${env.cspdefinition}”
... />
Let's assume the web application is installed three times within your server environment - one time with name “myapp1”, second time with name “myapp2” and thirs time with “myapp3”.
tomcat/
webapps/
myapp1/
myapp2/
myapp3/
You now can now the environment variables as follows:
Example (Windows):
set myapp1.cspdefinition=”...xxx...yyy...”
set myapp2.cspdefinition=”...yyy...zzz...”
set cspdefinition=”...aaa...bbb...”
tomcat/bin/catalina run
When reading configuration files within a specific web application then the system will first check if there is a specific definition for this web application (e.g. “maypp1.cspdefinition”) and will fall back to the default definition (e.g. “cspdefinition”).
The default configuration (eclntjsfserver/config/logging.xml) is:
<logging level="INFO"
console="false">
</logging>
In this case the logging is done into the servlet-temp directory, which any servlet container needs to provide for web applications.
In case of Tomcat this is the folder:
tomcat
work
Catalina
localhost
<nameOfWebApp>
log_eclntjsfserver.txt.* <= log files
log_performance.txt.* <= logging of performance data
CaptainCasa internally uses Java-util-logging (“jul”) which is part of the Java Runtime Environment (JRE).
During development it is useful to directly log to the console:
<logging level="INFO"
console="true">
</logging>
You can select the log level values “SEVERE”, “WARNING”, “INFO”, “FINE”, “ALL”.
Do not use “INFO” for production use – each request processing is logged with something like 50-100 lines of logging!
<logging level="INFO"
console="false"
directory=”c:/yourlogs/xyz”>
</logging>
The directory that is specified is used instead of the servlet-temp directory.
The logging is done in a file. If the file exceeds a certain size, then a new fill be created. A counter in the extension indicates the sequence of files. When a certain number of files is created then old files are cleaned.
<logging level="INFO"
console="false"
limit=”10000000”
count=”10”>
</logging>
In the example the file size is limited to 10.000.000 bytes and there is a removing of files, if there are more than 10.
The location of the log directory can be defined by implementing interface “ILogInfoProvider”:
package org.eclnt.util.log;
/**
* Dynamic collection of information required by the logging.
* <br><br>
* Implementations are referenced in logging.xml, attribute
* "loginfoproviderclassname".
* <br><br>
* Please pay attention: implementations MUST reside within
* the web application classloader - it is not possible to
* run implementations within the hot deployment class loader.
* (Background: the initialization of the logging happens before
* the intialization of the Hot Deployment Management.)
*/
public interface ILogInfoProvider
{
public String getLogDirectory();
}
The implementation class needs to be registered in logging.xml:
<logging ...
loginfoproviderclassname=”...your class name...”
...>
</logging>
You may implement a class extending “ILogOutput”:
package org.eclnt.util.log;
import java.util.logging.Level;
public interface ILogOutput
extends CLogConstants
{
public void log(Level level, String msg);
public void log(Level level, String msg, Throwable t);
}
When registering the class in logging.xml...
<logging level="INFO"
console="false"
delegateclassname=”...your class name...”>
</logging>
...then all log output will be delegated to your implementation.
There are default implementations to delegate the output to a log4j-handler:
org.eclnt.util.log.Log4JLogOutput – using org.apache.log4j-logging
Variant org.eclnt.util.log.Log4JLogOutputPlainText decodes HTML characters before sending log messages to log4j
org.eclnt.util.log.Log4JLogOutputV2 – using org.apache.logging.log4j-logging
Variant org.eclnt.util.log.Log4JLogOutputV2PlainText decodes HTML characters before sending log messages to log4j
SLF4J was created as abstraction of logging frameworks. Both Java-util-logging and e.g. log4j-logging can be connected via SLF4J.
You switch the SLF4J functions on by defining:
<logging level="INFO"
console="false"
useslf4jbridge="true"
slf4jplaintext="true"
slf4jremovehandlersforrootlogger="true"
>
Let's take a closer look onto the parameters:
“useslf4jbridge” - this parameter needs to be set to “true” in order to invoke the bridge
“slf4jplaintext” - CaptainCasa sends all log messages into an ESAPI-based encoding, so that “strange characters” are encoded and cannot be executed when viewing the log inside an HTML context. You may not want to get this encoded messages, but may want to receive the “raw messages”. In this case set the parameter to “true”.
“slf4jremovehandlersforrootlogger” - When you set this parameter to “true” then all “normal” log handlers (including the simple logging of CaptainCasa) will be removed, so that all logging is done through SLF4J.
In case of using SLF4J then CaptainCasa logs to a log handler with the name “org.eclnt.serverlog.VIASLF4J”.
So this is the one you need to e.g. later on refer you log4j-definitions to. Example:
log4j.properties:
log4j.logger.org.eclnt.serverlog.VIASLF4J = DEBUG, FILE, STDOUT
# Define the file appender
log4j.appender.FILE=org.apache.log4j.FileAppender
log4j.appender.FILE.File=C:/temp/log/log4j.out
log4j.appender.STDOUT=org.apache.log4j.ConsoleAppender
log4j.appender.STDOUT.Target=System.out
# Define the layout for file appender
log4j.appender.FILE.layout=org.apache.log4j.PatternLayout
log4j.appender.FILE.layout.conversionPattern=%m%n
log4j.appender.STDOUT.layout=org.apache.log4j.PatternLayout
log4j.appender.STDOUT.layout.conversionPattern=%m%n
In order to properly work you need to add corresponding libraries to your application
The SLF4J core processing
The bridge between Java-util-logging and SLF4J
The bridge between SLF4J and log4j
In a Maven project this is done in the following way:
<dependency>
<groupId>org.slf4j</groupId>
<artifactId>slf4j-api</artifactId>
<version>1.7.36</version>
</dependency>
<dependency>
<groupId>org.slf4j</groupId>
<artifactId>slf4j-simple</artifactId>
<version>1.7.36</version>
<scope>test</scope>
</dependency>
<dependency>
<groupId>org.slf4j</groupId>
<artifactId>jul-to-slf4j</artifactId>
<version>1.7.36</version>
</dependency>
<dependency>
<groupId>org.slf4j</groupId>
<artifactId>slf4j-log4j12</artifactId>
<version>1.7.36</version>
</dependency>
(Please adapt to the version that you want to use.)
This chapter so far described the configuration of the server side logging. - There is a client side log as well, which is is the normal browser console.
By default due to performance reasons only very basic information is logged: per request the time taken for serer-side and client-side processing is logged.
11:48:283: FRC | CCPERFORMANCE: Communication with server, duration: 31
11:44:979: FRC | CCPERFORMANCE: Processing of response, duration: 26
Extensive logging is switched on by using client parameter “cclogactive=true” (e.g. http://..../xyz.risc?cclogactive=true).
You can view the browser console by switching into the “development mode” of your browser. How to do so is specific to your browser – on Windows systems you by default simply have to press the F12 key.
For mobile browsers there is typically no “development mode”. But there is a URL parameter “cclogoutput=true” that you may add to your .risc-URL. In this case the log is output into some modeless popup in addition:
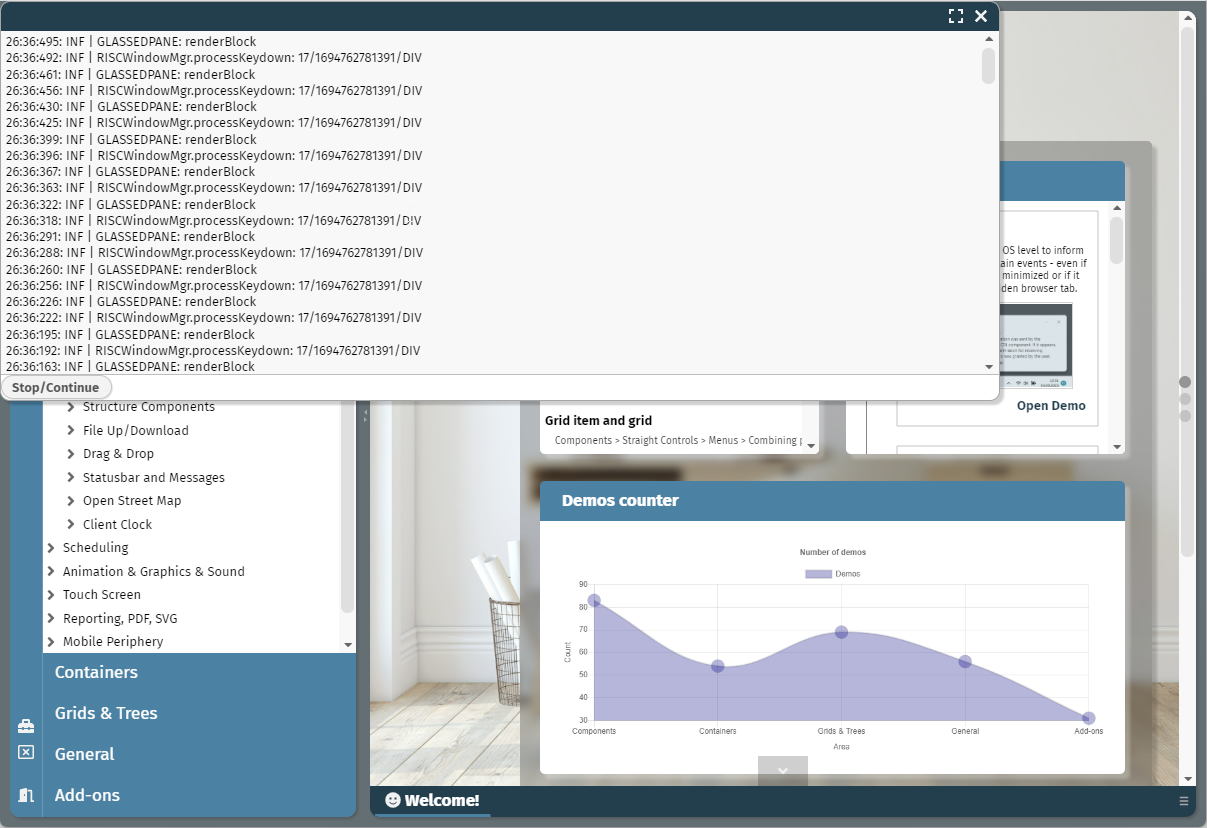
The client is a program that may run into error situations – sometimes. In this case an error pages is shown – that contains details about the error and that contains functions to restart the dialog.
The default error dialog is:
Errors can be caused by:
The server responding some error situation
Your application might throw an Error / RuntimeException that is not handled and as consequence causes an http-error-response (http return code 500)
Your server might have timed out the http-session
Functions of CaptainCasa detect some inconsistency in a request (e.g. the dialog session is accessed from some client that did not create the session)
The client program itself running into some error situation
CaptainCasa differentiates between two situations:
“real error” occurred
“session timeout” occurred
A session timeout is treated as special case because it is a situation which is some “normal situation” when running an application – and there is no need to bother the user with technical details about the situation.
The text of the error dialog that is shown is read from the configuration file:
eclntjsfserver/
config/
clienterrorscreen.txt
The content of the file is an HTML fragment that is loaded into the client's content area. The content is NOT a complete HTML pages (that's the reason we explicitly use the extension “.txt” instead of “.html”).
Example:
<div style='font-family:Fira Sans;width:100%;height:100%;padding:20px;background-color:#FFFFFF;-moz-box-sizing: border-box;-webkit-box-sizing: border-box;box-sizing: border-box;overflow:auto'>
<p style='font-family:Fira Sans;font-size:25px; font-weight:bold'>Ooops, a problem occurred</p>
<p style='font-family:Fira Sans;font-size:13px'>
A problem occurred when communicating between the client and the server.
</p>
<hr>
<p style='font-family:Fira Sans;font-size:13px'>
<b>Details:</b>
</p>
<p>
<div style='width=100%;background-color:#F0F0F0;padding:10px;font-family:Courier New;font-size:11px;border:0px #c0c0c0 solid'>
${message}
</div>
</p>
<hr>
<p style='font-family:Fira Sans;font-size:13px'>
Typical issues that may have caused the problem are:
<ul>
<li style='font-family:Fira Sans;font-size:13px'>The server is not available anymore.</li>
<li style='font-family:Fira Sans;font-size:13px'>The session on the server is not available anymore.</li>
<li style='font-family:Fira Sans;font-size:13px'>An error occurred in the server side application.</li>
</ul>
</p>
<hr>
<p>
<b><a href='javascript:location.reload();' style='text-decoration: none; background-color: #457b9d; border: 1px solid #659bBd; padding:5px; padding-left:10px; padding-right: 10px; font-family:Fira Sans; font-size:13px; font-weight:bold; color: #FFFFFF'>Reload current page</a></b>
</p>
</div>
Inside the page you should only HTML fragments that are completely self-containing. Imagine: the error screen is also showing up when e.g. the client cannot connect to the server anymore – so it's not a good idea to reference e.g. images by URLs that point to the server! Use data-URLs as consequence for showing images.
Inside the text you can use the string “${message}”. The concrete error detail information that is available on client side will be inserted at this location.
Inside the text you can define active elements: in the example above there is a link calling some JavaScript function at the end to reload the current screen. - Please note: you cannot add any “<script>...</script>” sequence! If you want to refer to explicit JavaScript coding then you have to add it by extending the client with an own JavaScript library (see documentation “Developer’s Guide – RISC Addons”).
In case of session timeouts there are two possibilities to define what is shown to the user:
You may also define an HTML-fragment as described in the previous chapter – the configuration file for the fragment now is:
eclntjsfserver/
config/
clienterrorscreensessiontimeout.txt
You may define an explicit URL that the client navigates to.
This is done by calling the function from Java:
Client.setSessionTimeoutUrl(“...”);
You may either pass an absolute URL (“https://....”) or a relative URL (“/html/timeout.html”). As usual with relative URLs, the root directory “/” is representing the web-content directory of your application.
You of course can reference a “.risc”-URL and e.g. immediately guide the user to the logon page. You may also use URL-parameters (“?xxx=yyy”) in order to pass information into the logon – maybe you want to bring the user back into the working environment he/she was in before the session timeout.
If you want to define the error text definitions in multiple languages then you can do so – just append the abbreviation of the language with an underscore to the name of the corresponding file.
eclntjsfserver/
config/
clienterrorscreen.txt <== general definition
clienterrorscreen_de.txt <== German
clienterrorscreen_fr.txt <== French
...
clienterrorscreensessiontimeout.txt <== general definition
clienterrorscreensessiontimeout_de.txt <== German
clienterrorscreensessiontimeout_fr.txt <== French
...
...the first configuration of the error page was made available by a dedicated “plugin-function” that you could add by implementing a JavaScript plugin. This configuration of course is still supported!
CaptainCasa provides two downloads:
The download for the Java EE version.
The download for the Jakarta EE version.
Select the correct version!
The CaptainCasa Maven artifacts for “Jakarta EE” are:
<dependency>
<groupId>org.eclnt</groupId>
<artifactId>eclntjsfserverRISC_jakarta</artifactId>
<version>${cc.version}</version>
</dependency>
The optional packages are available in:
<dependency>
<groupId>org.eclnt</groupId>
<artifactId>eclntccee_jakarta</artifactId>
<version>${cc.version}</version>
</dependency>
<dependency>
<groupId>org.eclnt</groupId>
<artifactId>eclntpbc_jakarta</artifactId>
<version>${cc.version}</version>
</dependency>
When creating a Maven project all CaptainCasa artifacts are correctly loaded if using project-archetype “org.eclnt.ecltnwebapparchetype_jakarta”. The archetype catalog is available via https://www.captaincasa.com/mavenrepository/archetypecatalog.xml.
All CaptainCasa libraries of the “Jakarta EE” version contain a corresponding suffix “_jakarta”:
eclntjsfserverRISC_jakarta.jar
eclntpbc_jakarta.jar (optional)
eclntccee_jakarta.jar (optional)
The Developer's Guide is using Java EE for its explanations and code examples. The Java EE usage and Jakarta EE usage of CaptainCasa is exactly the same – but you need to be aware of different package names when using Jakarta EE:
CaptainCasa Java EE ==> CaptainCasa Jakarta EE
javax.servlet.* jakarta.servlet.*
javax.el.* jakarta.el.*
javax.websocket.* jakarta.websocket.*
javax.xml.bind.* jakarta.xml.bind.*
javax.faces.* org.eclnt.jsfserver.base.faces.*
You may already wonder why the package “org.eclnt.jsfserver.base.faces.*” are not to be transferred to “jakarta.faces.*” anymore. The reason: CaptainCasa does not depend in its Jakarta-version from the JSF-standard anymore. CaptainCasa already introduced since 2020 an own “Mini-JSF-implementation” which was tailored for exactly these aspects that are required by CaptainCasa. With the Jakarta-version we now finalized this separation.
CaptainCasa provides a little Java program in its “eclntjsfserver”-jar library which you can directly use to convert source code from existing projects to run in the “Jakarta EE” environment.
Program : org.eclnt.tool.TransferJEE9Directory
Require libs: eclntjsfserverRISC_jakarta.jar
Parameters : 1. name of source code directory
Example for calling:
set cp=webcontentcc/WEB-INF/lib/eclntjsfserverRISC_jakarta.jar
java -classpath cp org.eclnt.tool.TransferJEE9Directory c:\temp\xyzproject\src
Clean up your libraries!
If using Maven: check the updated pom.xml that comes with the default project archetype for the “Jakarta EE” version of CaptainCasa. We recommend to create a new mini project first using project archetype “org.eclnt.ecltnwebapparchetype_jakarta” (details: see above) – and then bring in the changes into your exisiting project.
If not using Maven: make sure that you do not use “Java EE” libraries of CaptainCasa together with “Jakarta EE” libraries!
The conversion from “Java EE” to “Jakarta EE” affects all libraries that are using inside your project that somehow access the “EE” layer of Java! You need to scan you whole project dependencies and make sure that these libraries which access the “EE” layer are upgraded to their “Jakarta EE” version.
For many libraries there currently (Q4/2021) is no “Jakarta EE” version! This means: such libraries will cause major problems – and may even stop your plans to convert at all! One prominent library currently is the Spring-library.
Do not start a “Java EE” to “Jakarta EE” version just because you may want to use Tomcat 10 version – instead of Tomcat 9 version!
The conversion in most cases is a project on its own with many side effects, which has to be explicitly planned and executed.
On the right of the Layout Editor there is a tool “Bean Browser”:
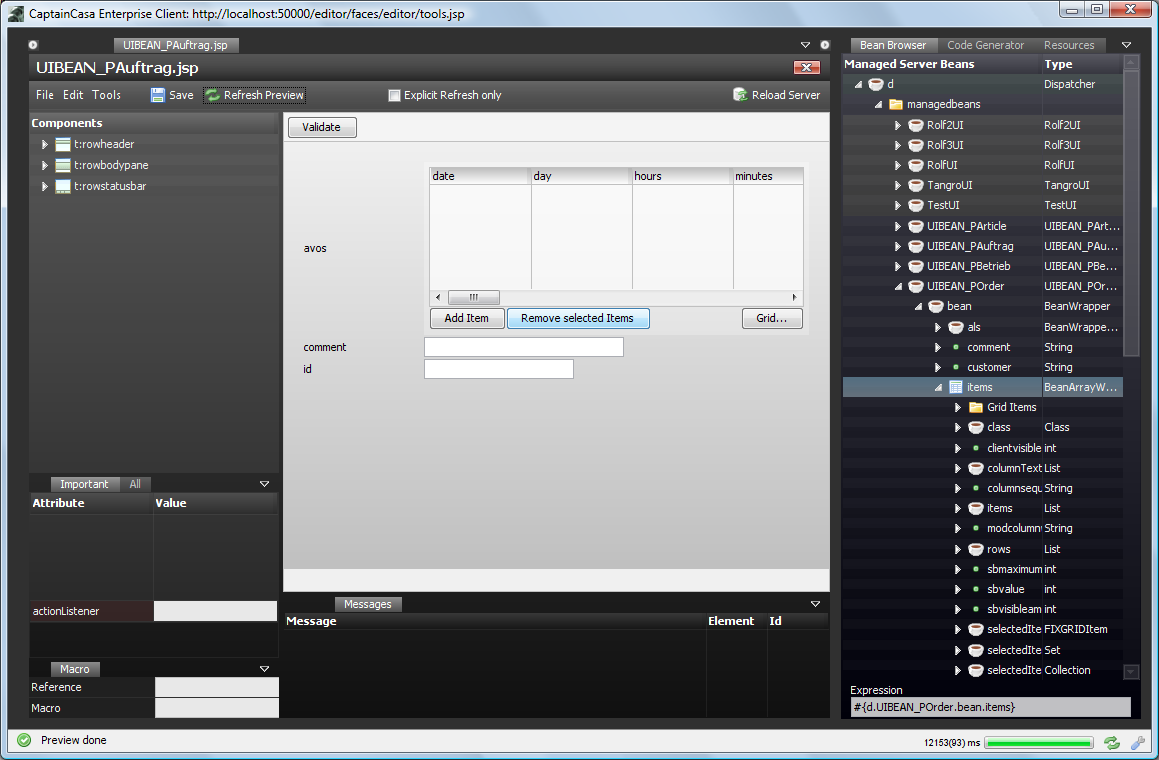
The Bean Browser shows the managed beans of your runtime and allows to drag & drop corresponding expressions into the attributes of components.
By default the Bean Browser uses straight Java introspection in order to show the properties and action listener methods of a selected bean. But: you may use dynamic properties (i.e. Map or Array/List implementations) – and as a result you may also want to show these properties within the bean browser.
When resolving the bean hierarchy then the Bean Browser always checks if the currently selected element's class provides the following method:
public static DynamicIntrospectionInfo introspectDynamically(List references,
List<String> pathList)
{
return ...;
}
If the class supports this static method then the information returned in the result of the method is used for navigating into the next “bean-level”.
The class DynamicIntrospection is contained in interface IdynamicIntrospectionSupported:
package org.eclnt.util.dynaccess;
import java.util.ArrayList;
import java.util.List;
/**
* Classes implementing this interface need to provide the static method
* "public static DynamicIntrospectionInfo introspectDynamically(List references, List<String> pathList)".
* which is used at design time by the bean browser.
*/
public interface IDynamicIntrospectionSupported
{
public static class DynamicIntrospectionInfo
{
List<DynamicPropertyInfo> m_properties = new ArrayList<DynamicPropertyInfo>();
List<DynamicMethodInfo> m_methods = new ArrayList<DynamicMethodInfo>();
public List<DynamicPropertyInfo> getProperties() { return m_properties; }
public List<DynamicMethodInfo> getMethods() { return m_methods; }
}
public static class DynamicPropertyInfo
{
String m_name;
Class m_propClass;
List m_references = new ArrayList();
public void setName(String value) { m_name = value; }
public String getName() { return m_name; }
public void setPropClass(Class value) { m_propClass = value; }
public Class getPropClass() { return m_propClass; }
public List getReferences() { return m_references; }
public void addReference(Object reference) { m_references.add(reference); }
}
public static class DynamicMethodInfo
{
String m_name;
public void setName(String value) { m_name = value; }
public String getName() { return m_name; }
}
}
In the result you can pass back properties and action listener methods.
The first parameter “references” contains additional information about a property's class. By default (i.e. coming from the introspection mode) the list may be filled with one object – representing the type class of a generic property type.
Example:
public class XYZBean
{
...
public AddInfo<Article> getArticleInfo()
{
...
}
...
}
In case the Bean Browser wants to show the properties and methods below “articleInfo” then the references-list that is passed into the method “introspectDynamically” holds as element the “Article.class” instance. If there is no generic type available then the list is empty.
Later on you may return “DynamicPropertyInfo” objects as part of the result: each object again provides a list of references that you may set on your own. These references are used, when continuing to drill down the bean object hierarchy.
The second parameter “pathList” contains the expressions of all Bean Browser nodes, starting with the top node and ending with the currently selected one. The list may look like...
#{d}
#{d.ArticleEditUI}
#{d.ArticleEditUI.article}
...assuming that the user is just about to open the Bean Browser tree below the “article” property.
CaptainCasa GmbH
Hindemithweg 13
D – 69245 Bammental
+49 6223 484147