This documentation describes how to set up a Gradle project for CaptainCasa.
CaptainCasa provides the following Maven repository location that is used from Gradle:
https://www.captaincasa.com/mavenrepository
In this repository there are a couple of artifacts:
/mavenrepository
/org
/eclnt
/eclntjsfserverRISC => CaptainCasa environment (RISC only)
/eclntjsfserver_jsfimpl => CaptainCasa mini JSF implementation
/eclntpbc => Page Bean Components (addons)
/eclntccee => CaptainCasa CCEE (addons)
/eclnteditor => CaptainCasa Editor/Toolset
...
There are two artifacts that are used to set up your Gradle project.
eclntjsfserverRISC: this is the jar file that add the CaptainCasa runtime environment.
eclntwebappaddons_jsfimpl: this is the CaptainCasa mini-JSF implementation.
By default the CaptainCasa installation comes with an own Tomcat instance running the application that you build. And it comes with some tooling (Layout Editor), that manages this Tomcat:
Within the tools you “reload” (or “hot deploy”) the application. This means that actually the result of your project is copied into the corresponding Tomcat/webapps-application-folder and that the application is restarted so that changes take effect.
Of course you may also think about running some Tomcat instance which is managed by your development environment (e.g. Eclipse). But this is not the CaptainCasa-default scenario, so this documentation assumes to develop your project on the left side – and run your project in some Tomcat on the right side, having the CaptainCasa toolset as linkage between.
In other words:
Gradle/Eclipse are the ones to produce the “.war”-like structure into the target directory of the project.
The CaptainCasa toolset is the one to take over this data into the Tomcat runtime.
The result is a very efficient way of developing user interfaces – which is not burdened by always running full Gradle builds and by always deploying full systems to the Tomcat instance. - Debugging your application can easily be done by remote debugging.
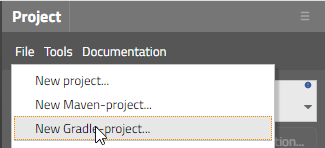
Open “File > New Gradle-project” from the menu:
The following dialog will show up:
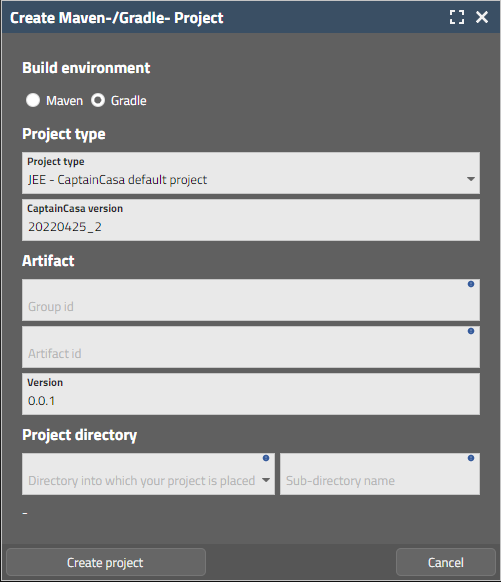
In the dialog define:
The “Group id” and the “Artifact id” and the “Version” of your project
The directory into which you project will be placed and the sub-directory which will represent your project.
Now import the Gradle-project in you IDE.
Example: in Eclipse you need to …
select “File > Import...” from the menu
select “Gradle > Existing Gradle Projects” in the follow-on dialog
select the directory of your project
Now build the project by starting Gradle-task “build” so that dependencies are resolved and the result is written into the target-directory.
By reloading, the target directory of your project is copied into the webapps-directory of your local Tomcat and the web application is reloaded.
The environment that was created during all this procedure now is:
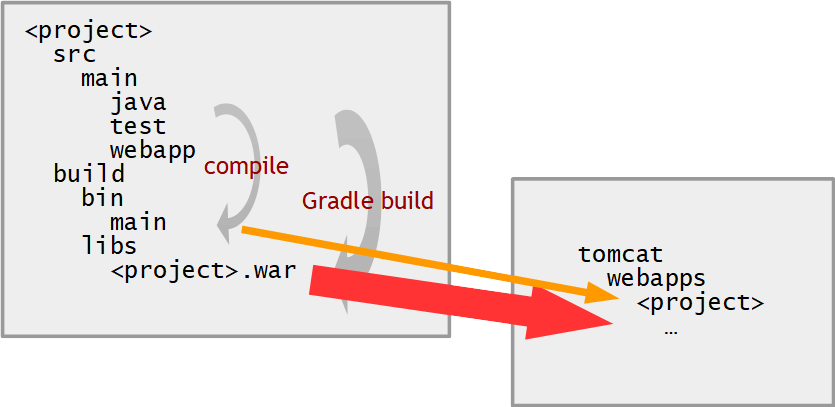
The rounded arrows are showing the typical steps during development:
You compile your Java programs from “src/main/java” to “build/bin/main”
You from time to time make full Gradle builds into the “build/libs” directory – into which the generated .war file is created.
The straight arrows are showing what happens when a “Reload” is executed within the CaptainCasa toolset:
The complete “build/libs/<projectName>.war” file is unzipped into the corresponding “tomcat/webapps/<projectName>” directory.
The content of the “src/main/webapps” folder is copied into the corresponding “tomcat/webapps/<projectName>” directory.
The content of the “build/bin/classes” folder is copied into the corresponding “tomcat/webapps/<projectName>/WEB-INF/classes” or into the “tomcat/webapps/<projectName>/eclnthotdeploy/classes” folder – according to hot deployment rules.
After the copying the “Reload” then restarts the “<projectName>”-web application by using the Tomcat manager API.
You may wonder: why are there three copying steps for loading the application into the Tomcat – and not only one, copying the Gradle-build into the Tomcat-webapps?
The reason is that by this procedure the number of Gradle builds that you need to do during development time is drastically reduced. A Gradle build typically takes quite some time, and it is just annoying to execute this build after every simple development activity.
Due to the copying above the Tomcat is constantly updated not only from the “target/<projectName>” directory, but also from the directories in which you typically work in when doing UI developments. You only have to run a full Gradle build, if really e.g. changing dependencies, so that new .jar files are to be copied into the Tomcat environment.
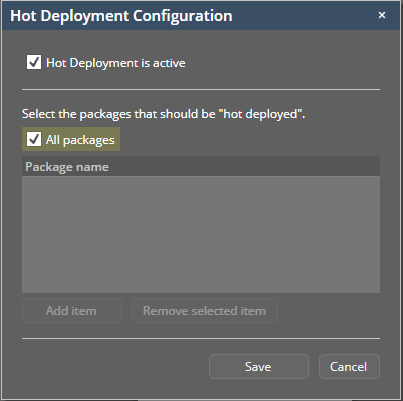
Just as with usual CaptainCasa projects you can use hot deployment to significantly reduce deployment times. Hot deployment is activated from the CaptainCasa tool set:
Open “Configuration → Hot Deployment”...
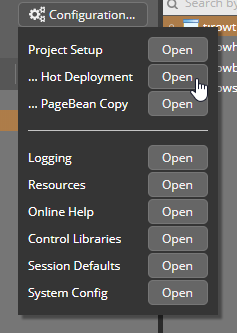
...and defined the packages to be hot deployed (or “all packages”) in the follow-on dialog:
More details on Hot Deployment are contained in the Developers' Guide.
After having created your project with e.g. CaptainCasa version “20220425” you may later on update to a newer CaptainCasa version. For updating your project to a new CaptainCasa version you just need to execute the following steps:
Update the version number within the “build.gradle” file.
Execute a “Gradle refresh” within your project (at least if you are using Eclipse).
Execute a Gradle-“build” with your project.
Execute a “Clean & Reload” of the project within the CaptainCasa tool set to deploy the updates to the Tomcat runtime.