CaptainCasa by default uses a separate Tomcat servlet container in which web applications are deployed at development time (reload within toolset) or in production scenarios (.war deployment). Of course any other servlet container (Jetty, JBoss, ...) can be used that supports Servlet API 3.1.
Since Q3/2020 there is a alternative runtime which is Spring Boot. Spring Boot is liked by many developers because it produces self containing result files (.jar or .war) which incorporate the runtime container (Tomcat), so that you do not require an explicit e.g. Tomcat installation to deploy your system to – you can directly run it from the .jar or .war file.
The CaptainCasa Spring Boot integration includes the following functions:
“Normal” creation of .war/.jar packaged Spring Boot result files
Reloading of classes using Spring's live reload functions
All you need to do is:
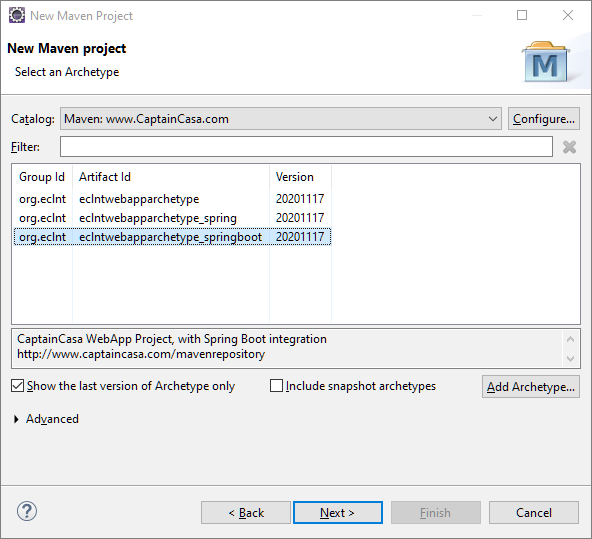
Create a Maven-project – exactly following the description of the previous chapter
But: select as project archetype “eclntwebapparchetype_springboot”:
All other steps are the same (including import into Layout Editor and editing first layout definitions) as with the normal creation of Maven projects.
The project archetype adds some Spring-Starter class into the project:
package springbootstartup;
import java.util.HashSet;
import java.util.Set;
import javax.servlet.ServletContext;
import javax.servlet.ServletException;
import javax.servlet.SessionTrackingMode;
import org.eclnt.jsfserver.managedbean.HotDeployManager;
import org.eclnt.jsfserver.util.CCInitialize;
import org.springframework.boot.SpringApplication;
import org.springframework.boot.autoconfigure.SpringBootApplication;
import org.springframework.boot.web.servlet.ServletContextInitializer;
import org.springframework.context.ApplicationContext;
import org.springframework.context.annotation.Bean;
import org.springframework.web.context.ServletContextAware;
import org.springframework.web.socket.server.standard.ServerEndpointExporter;
@SpringBootApplication
public class SBApplication
{
public static void main(String[] args)
{
SpringApplication.run(SBApplication.class, args);
}
@Bean
public ServletContextAware endpointExporterInitializer(final ApplicationContext applicationContext)
{
return new ServletContextAware()
{
@Override
public void setServletContext(ServletContext servletContext)
{
// code from https://stackoverflow.com/questions/25390100/using-java-api-for-websocket-jsr-356-with-spring-boot
ServerEndpointExporter exporter = new ServerEndpointExporter();
exporter.setApplicationContext(applicationContext);
exporter.afterPropertiesSet();
// initialize web socket management which was left out in "big" intialization
CCInitialize.postInitializeWebSocketPolling(servletContext);
}
};
}
@Bean
public ServletContextInitializer initializer()
{
return new ServletContextInitializer()
{
@Override
public void onStartup(ServletContext servletContext) throws ServletException
{
// set tracking mode
Set<SessionTrackingMode> stms = new HashSet<>();
stms.add(SessionTrackingMode.URL);
servletContext.setSessionTrackingModes(stms);
// initialize
CCInitialize.setInitWebSocketPolling(false); // is initialized in endpointExporterInitializer
CCInitialize.initializeCCEnvironment(servletContext,true); // true => forceReset!
// set classloader in HotDeployManager in order to support live reload
HotDeployManager.setCurrentParentClassLoader(SBApplication.this.getClass().getClassLoader());
HotDeployManager.triggerCreationOfNewInstance();
}
};
}
}
You can move this class to any package of your choice – all relevant Spring parts are annotated and will be discovered automatically by Spring.
The “SBApplication” class contains the instructions how to start the CaptainCasa runtime within the Spring Boot container. The central method to do so is “CCInitialize.initializeCCEnvironment(...)” - but there are other, special definitions as well:
The session tracking mode (URL or Cookie) needs to be initialized
The initialization of CaptainCasa's web socket management must not be executed as part fo the normal starting process but must be done later in method “endpointExporterInitializer(...)”
The CaptainCasa hot deploy management must be notified about the current Spring class loader (which is esp. important when using Spring live reload).
While in the normal Maven project you use “mvn clean install” to build the project, you now use “mvn clean spring-boot:run” to build and start your project.
Because CaptainCasa's layout tools require access to the “.war” image of the project we recommend to combine both and always call:
mvn clean install spring-boot:run
As result both the .war image will be built and the Spring Boot runtime will be started.
There are several ways to start the Spring Boot container in debug mode. One way is to adapt the pom.xml in the following way:
...
<build>
<plugins>
<plugin>
<groupId>org.springframework.boot</groupId>
<artifactId>spring-boot-maven-plugin</artifactId>
<configuration>
<jvmArguments>
-Xdebug -Xrunjdwp:transport=dt_socket,server=y,suspend=n,address=50010
</jvmArguments>
</configuration>
</plugin>
</plugins>
</build>
...
The live reload functions of Spring can be just used in a normal way. This means: you have to add the following to your pom.xml:
<dependency>
<groupId>org.springframework.boot</groupId>
<artifactId>spring-boot-devtools</artifactId>
<optional>true</optional>
</dependency>