This tutorial shows how to quickly setup a CaptainCasa project and develop first pages. The default environment in this tutorial is:
Windows as operating system
Eclipse as development environment
Information is provided how to proceed with other environments (e.g. NetBeans).
Download and install CaptainCasa from https://captaincasa.org/download. The installation is extremely simple – two setup.exe-files to run on Windows – two .tar-files to extract on Linux or MacOS.
Please follow the instructions in the installation guide at https://www.captaincasa.com/docu/eclnt_risc_installation/. You may install the Eclipse plugin from the beginning on – or you may install it later.
The installation directory is referred to as “<installdir>” in the following text.
Start the server, which will run your deployed project:
Either select “A Start Server” from the Windows Start Menu.
Or directly start “<installdir>/A_startserver.bat”
Start the tools' server, which host the CaptainCasa tools:
Either select “C1 Start Tools – Server” from the Windows Start Menu.
Or directly start “<installdir>/C1_starttoolsserver.bar”
(For Linux start the equivalent .sh-scripts within the installation directory.)
Open the CaptainCasa tools:
Either select “C2 – Start Tools – Client” from the Windows Start Menu.
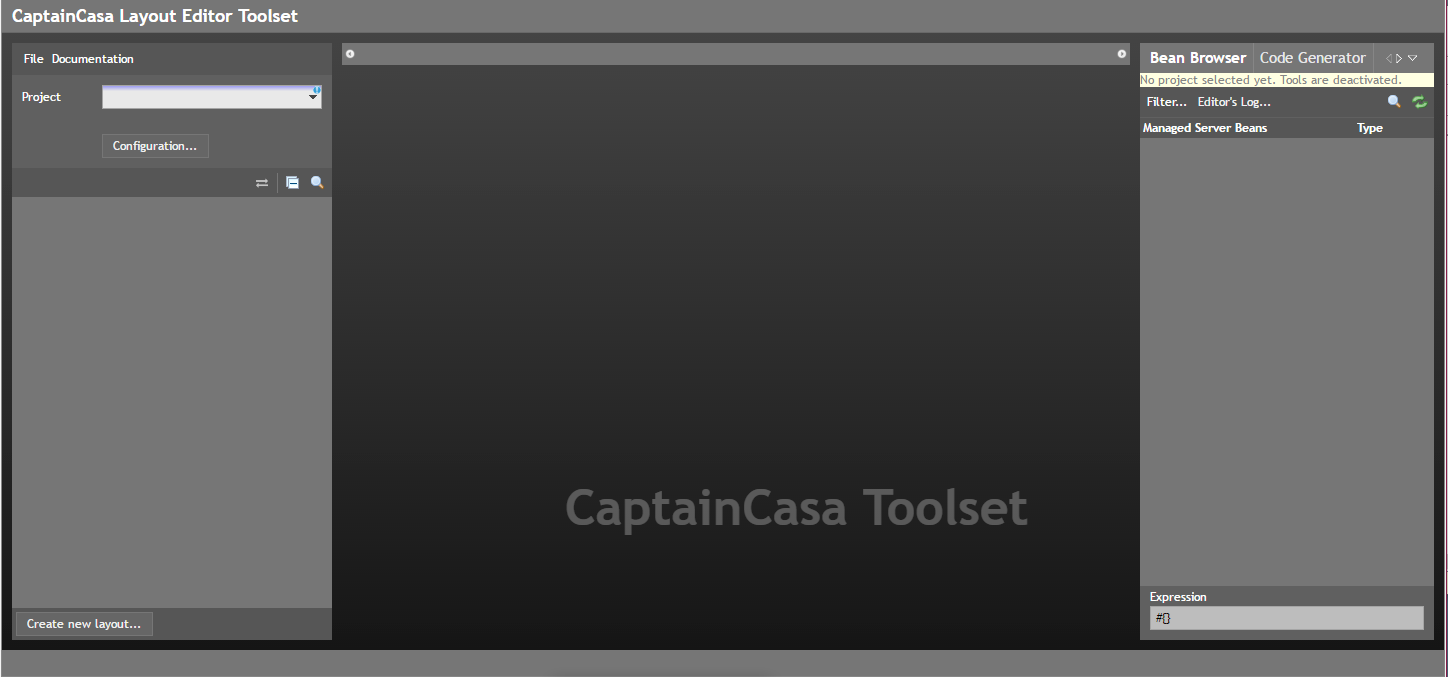
Or directly open http://localhost:51000/editor/indexRISC.html in the browser.
The following screen will occur:
Select “File => New project...” from the Menu at the top left.
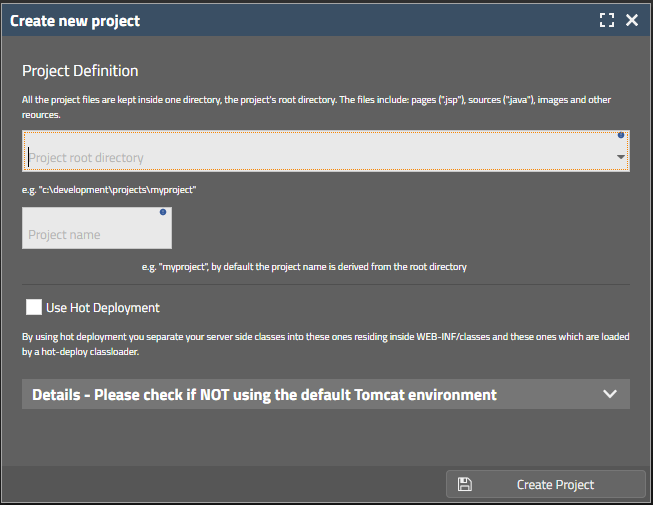
Define the root directory of the project – if it does not exist yet it will be created.
We use directory “C:\projects\ccfirst” and project name “ccfirst”.We recommend to use the same name for project and directory.
Switch “Use Hot Deployment” on.
Your screen may look like:
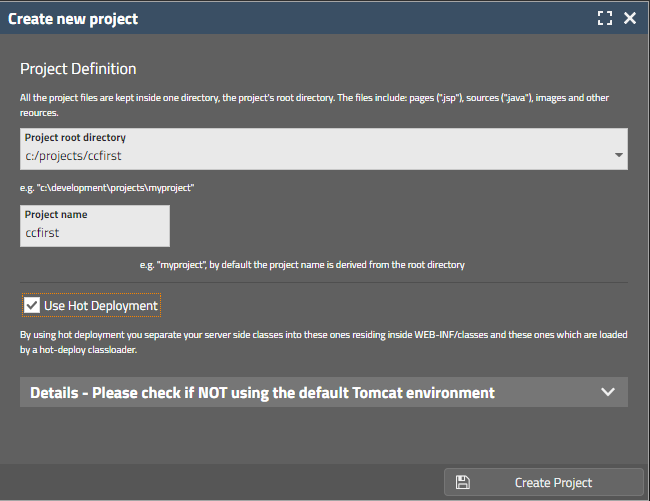
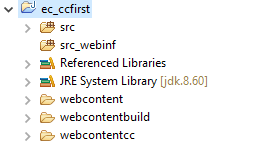
Now press the “Create Project” button. In the directory that you have specified (referred to as “<projectdir>” in the following text), the following structure is created:
<projectdir>
/src <== Java sources
/webcontent <== WebContent source files
/webcontentbuild <== compiled classes
/webcontentcc <== WebContent by CaptainCasa
.classpath <== preconfigured Ecljpse project file
.project <== preconfigured Eclipse project file
You now will see the project's /webcontent-diretory in the tree on the left side:

To make the project visible within Eclipse select “File => Import...” from the Eclipse menu bar:

Select the import “Existing Projects into Workspace”.
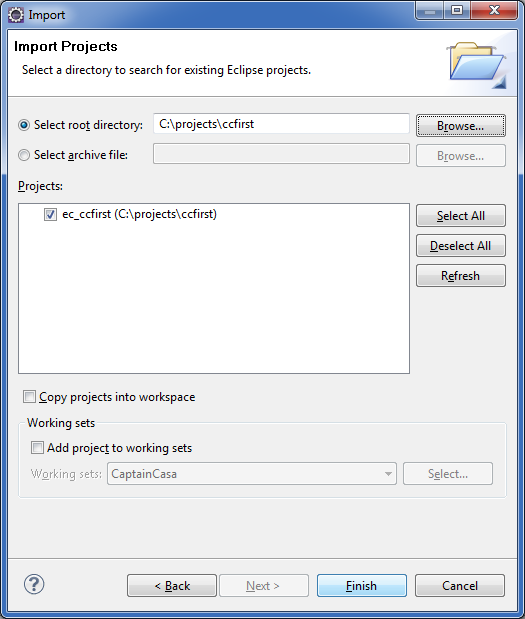
Select the root directory of your project. Make sure that the check box “Copy projects into workspace” is NOT selected.
Press “Finish” and the project will be added to your list of projects:
Please make sure that your project is built. With “normal” Eclipse configuration the building of projects is done automatically. - In case you do not use this automatic building you have to build the project explicitly, so call “Project – Build All... (Ctrl-B)” from the menu.
Now it's a good point of time to start the Eclipse plugin that is coming with CaptainCasa. Select “Window => Show View => Other...” from the Eclipse menu bar. In the tree that is shown within the following dialog select “CaptainCasa Enterprise Client => CC Project Synch”.
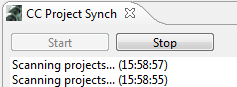
After having pressed OK, the tool will become visible. Press the “Start” button.
The plugin regularly checks if files of a project were updated by the CaptainCasa tool environment. If changes are detected, then the project is refreshed automatically.
Integration into other development environments is simple as well. Create the project by referring to the project directory, that was created and filled during the project creation.
You now need to make sure that your Java-sources are compiled into the correct directory, so that they are correctly picked up when deploying.
<projectdir>
/src <== Java sources
/webcontent <== WebContent source files
/webcontentbuild
/WEB-INF
/classes <== compiled classes
/webcontentcc <== WebContent by CaptainCasa
/WEB-INF
/lib
...
eclntjsfserver.jar
...
.classpath <== preconfigured Ecljpse project file
.project <== preconfigured Eclipse project file
So please make sure:
The Java-sources below “/src” need to be compiled into the direcotry “/webcontentbuild/WEB-INF/classes”.
Add the library “/webcontentcc/WEB-INF/lib/eclntjsfserver.jar” to the imported libraries, that are used when compiling the sources.
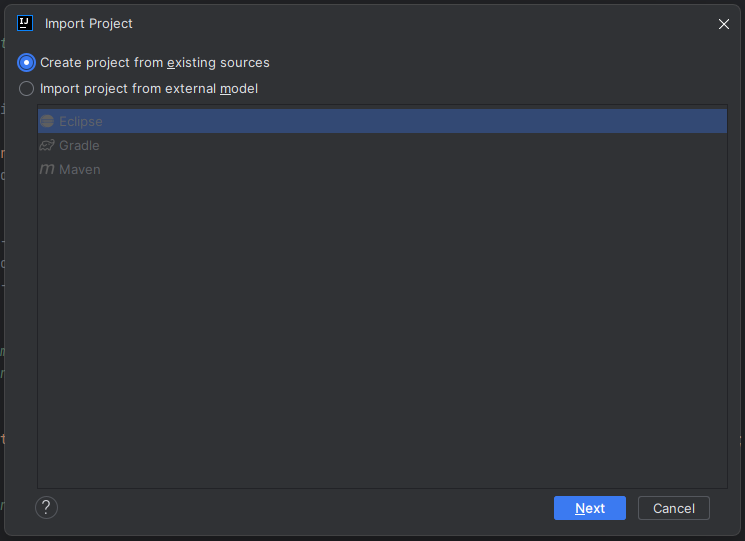
Open “File > Project from existing sources...” from the menu and define the project directory. Confirm “Create project from existing sources” in the follow on dialog...
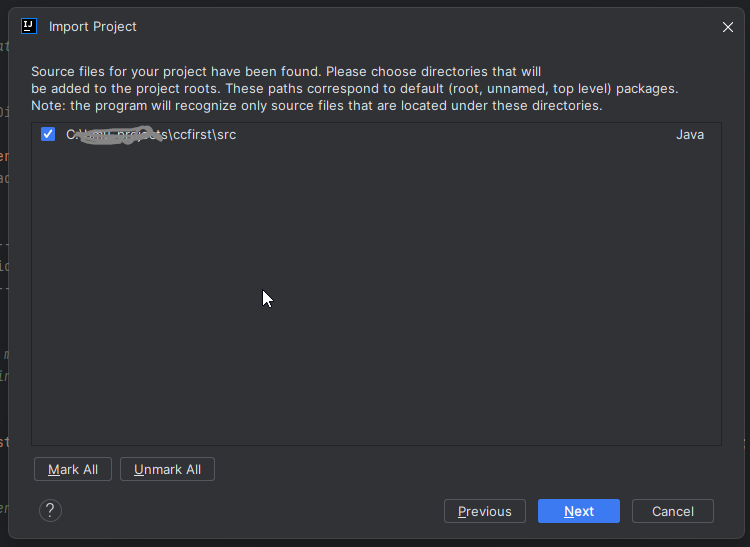
...and confirm project name (same as directory name) and project location once again. IntelliJ will automatically scan the directories and propose the “/src” directory as the one where Java sources are stored:
After pressing “Next” the list of “.jar” files is shown that are part of the project:

Select the “eclntjsfserver.jar” always. - If using CaptainCasa based on JEE (and not on Jakarta) then in addition select “jsf-api.jar”.
After pressing several times “Next” the project will be created.
Last thing to do: adjust the compiler output path by opening “File > Project Structure...” from the menu:
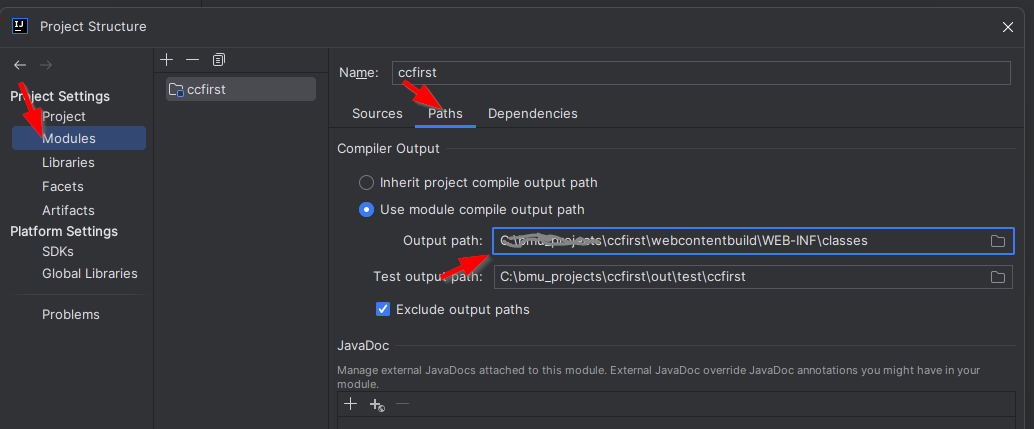
Define the output path to match the project's “webcontentbuild/WEB-INF/classes” directory.
Press “ctrl-F9” and the project will be built.
The most simple way is: select “File > Import Project > Eclipse Project...” from the menu:
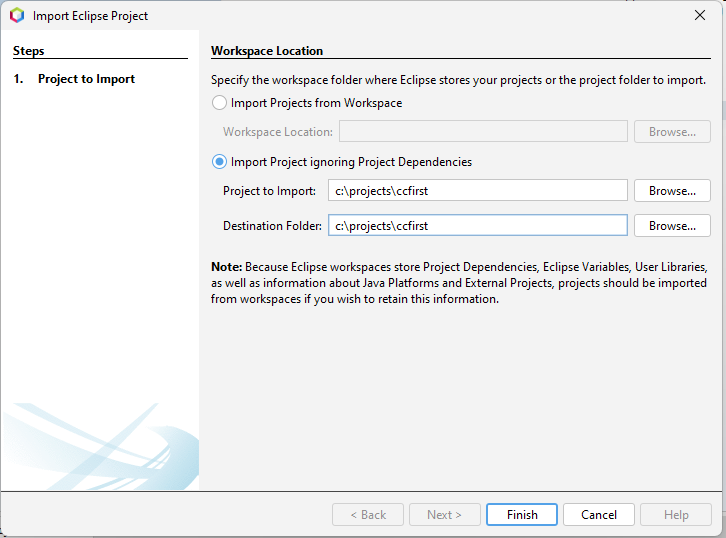
Select the second option “Import Project ignoring Project Dependencies”. Define the project folder where the project is located – and define the same folder as destination folder.
In the project check the settings in file <project>/nbproject/project.properties:
The default compilation is creating the classes in the direcotry “build/classes”:
build.classes.dir=${build.dir}/classes
build.classes.excludes=**/*.java,**/*.form
# This directory is removed when the project is cleaned:
build.dir=build
Update this definition to:
build.classes.dir=webcontentbuild/WEB-INF/classes
build.classes.excludes=**/*.java,**/*.form
# This directory is removed when the project is cleaned:
build.dir=build
(You may also decide to update the more central property “build.dir”.)
Also check the Java compiler's source and destination settings:
javac.source=1.6
javac.target=1.6
By default, Java 1.6 is used... - so you may update to your Java version:
javac.source=11
javac.target=11
Now you can build the project, e.g. by selecting “Clean & Build” from the popup menu, that shows up when you right-click the project in the project tree – or by pressing the key “shift-F11”.
CaptainCasa projects can be easily based on Maven and Gradle structures as well. Please read details here: https://www.captaincasa.com/docu/eclnt_risc_maven.
In the following explanation we will develop a mini address-book. The first thing to do is to define a detail screen for editing an address.
The principle of developing a page is:
A page's layout is kept within a XML file – internally holding pure XML to represent the page layout.
The page's logic is kept by a server side class, which we call the “page bean”.
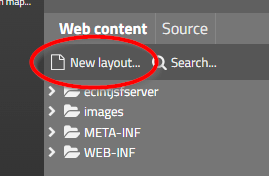
Press the button “Create new layout...” on the bottom left within the CaptainCasa toolset:
A dialog will be opened in which you define the dialog's name and in which you may select a template:
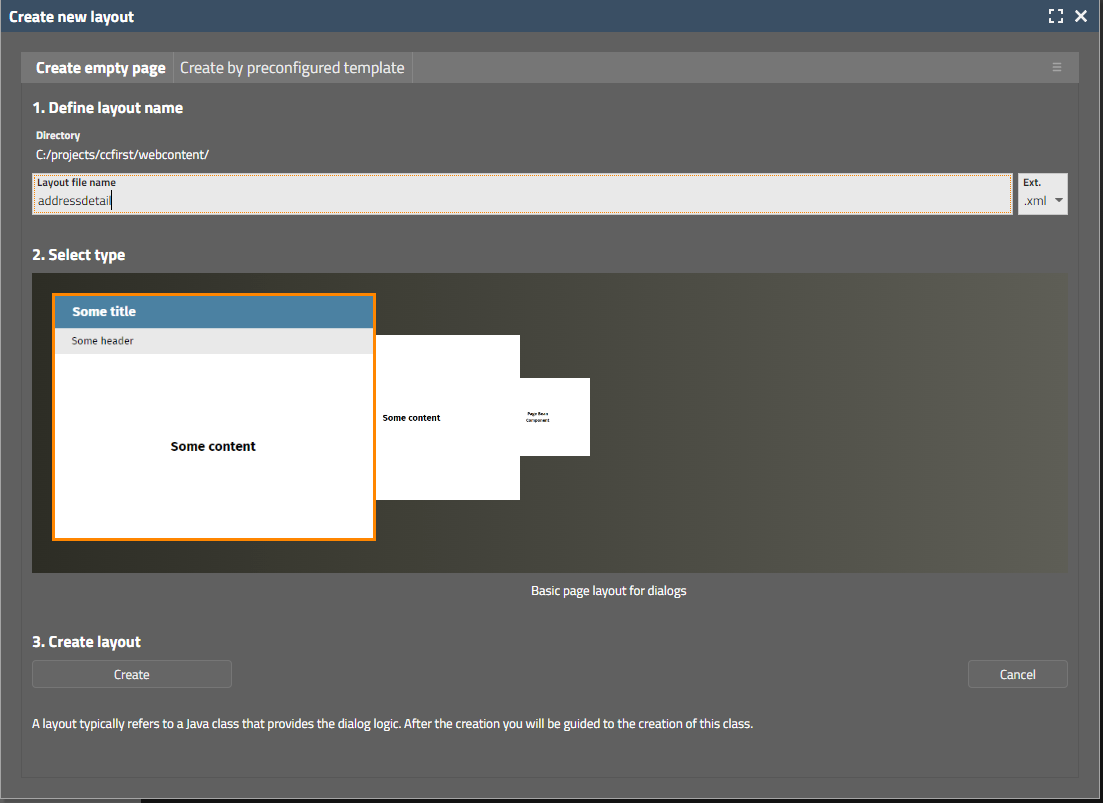
Enter the name “addressdetail” and select the first template, then press the “Create” button. The Layout Editor will be opened – and the dialog is loaded in the center:
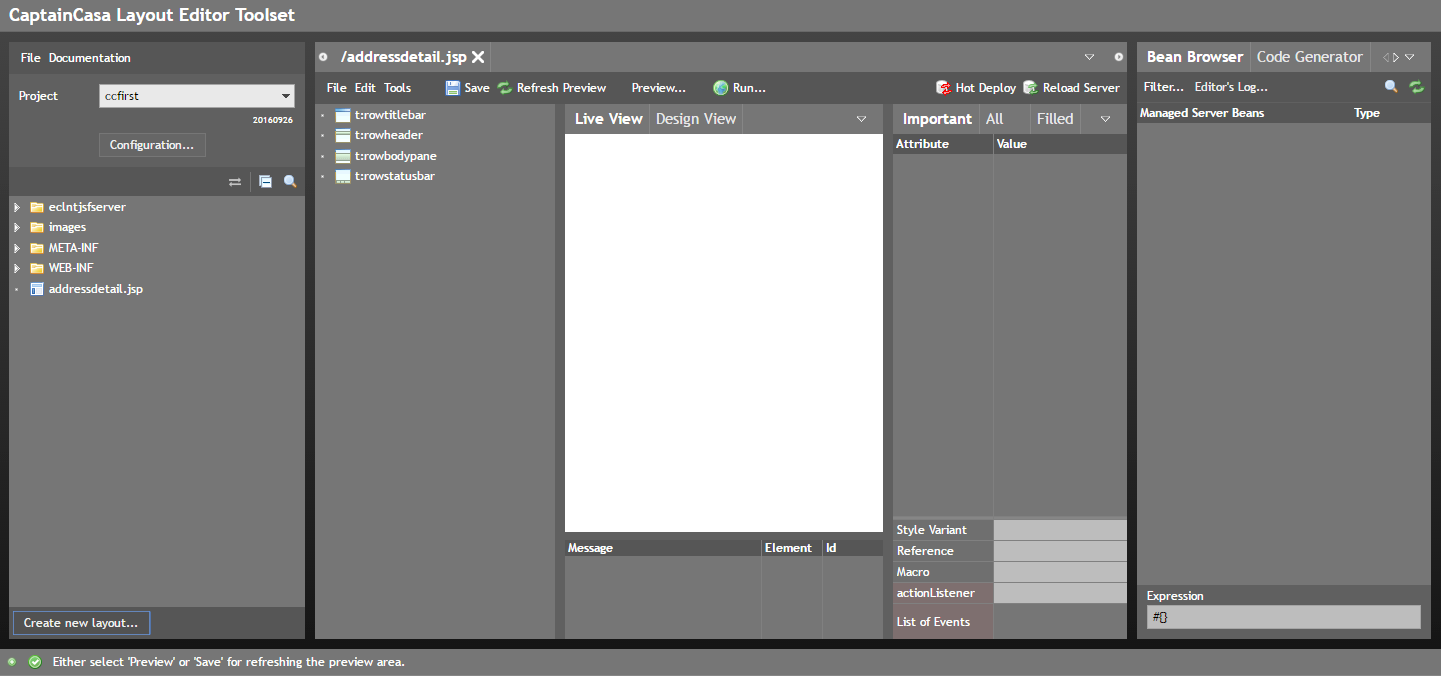
On the left side of the Layout Editor you see the hierarchy of components. The basic layout of the page – containing a title bar, a header. a page body and a status bar – was automatically copied into the new page from a template.
In the Layout Editor you can preview the current page by invoking the “Refresh Preview” (ctrl-p) or the “Save” (ctrl-s) function:
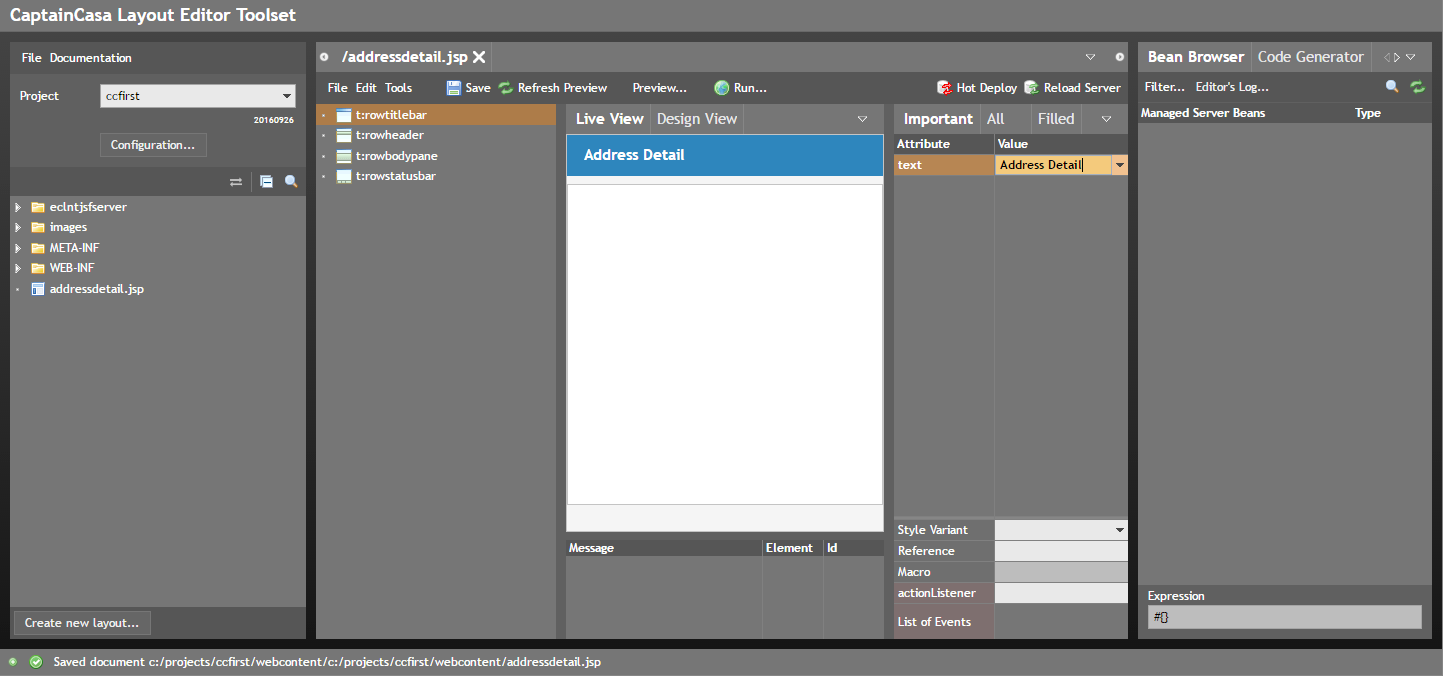
When selecting a component by mouse click – either directly in the preview area or in the hierarchy – then the attributes of the component will be shown on the right. You may click onto the TITLEBAR component and edit the attribute TEXT. After previewing again the page looks like:
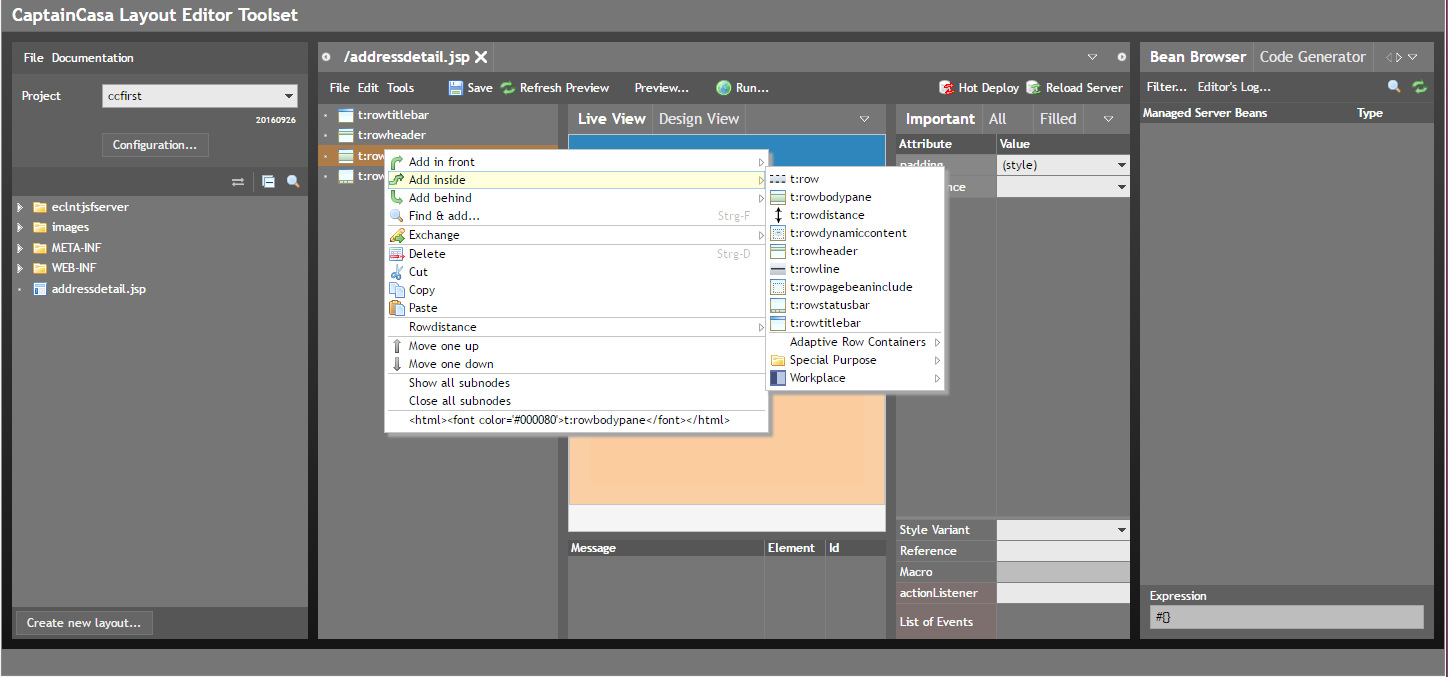
By clicking with the right mouse button onto a component you see which components you can arrange below or aside:
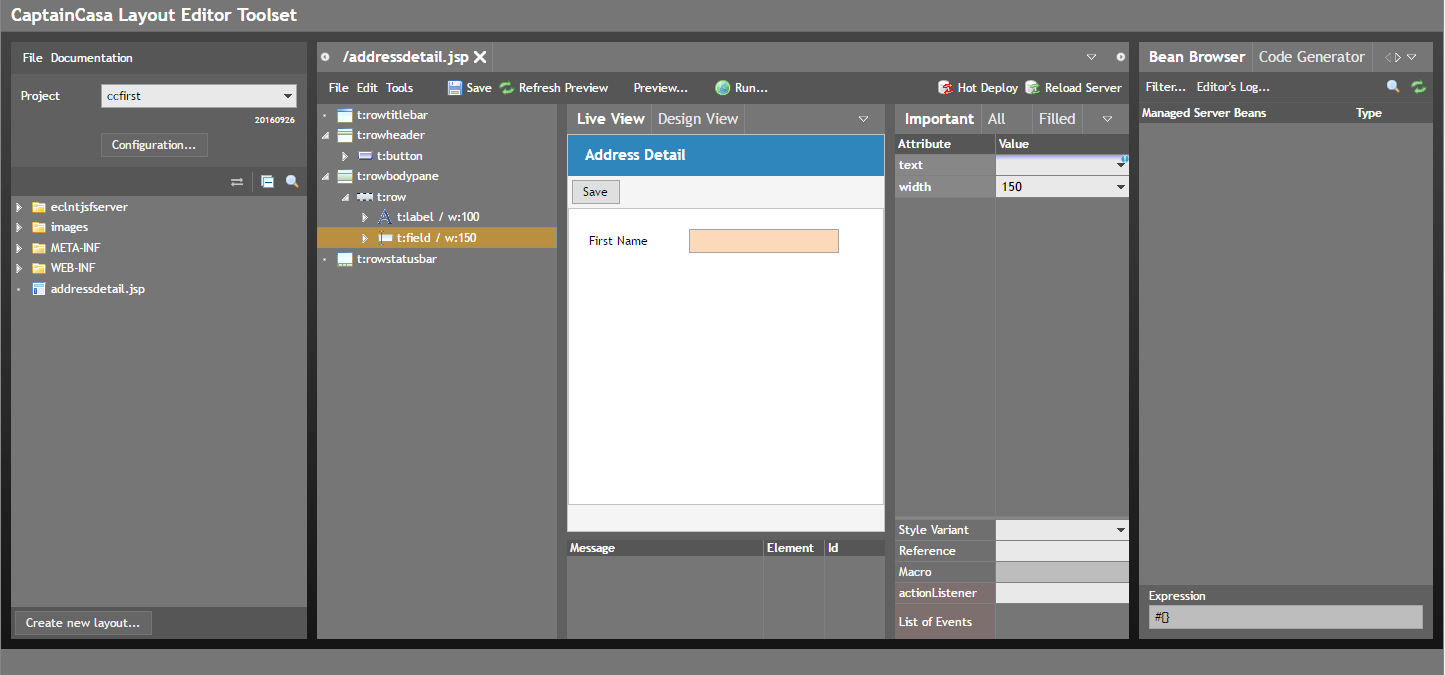
In the following we will add a ROW into the ROWBODYPANE area, and inside the ROW we will add a LABEL and a FIELD. - Inside the HEADER we add a “Save”-BUTTON:
You can rearrange and copy items within the hierarchy of components by drag&drop – keep the ctrl-key pressed for copying. While dragging an item over other items there is some corresponding highlighting that indicates if you want to drop the dragged item in front or behind an other component.
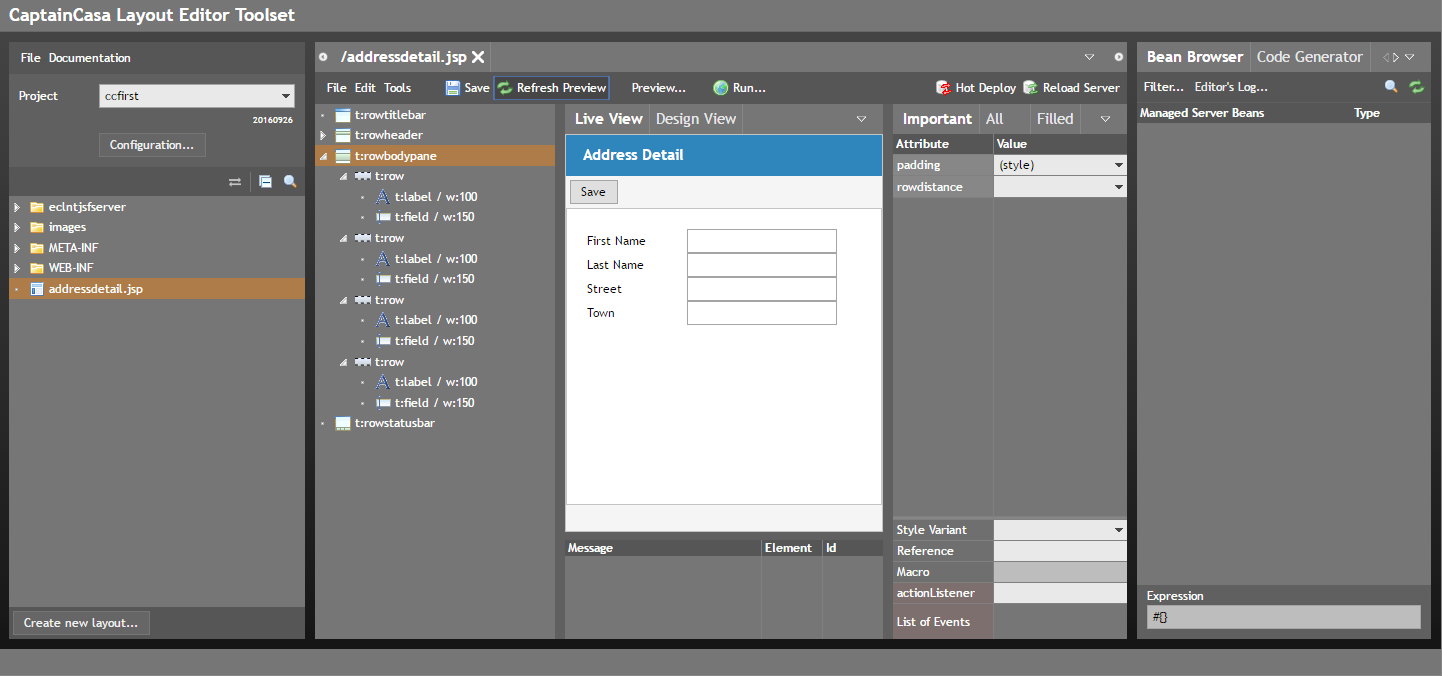
Each container holds rows, inside the rows there are components – a component itself might be a container again. Components are sized either “by pixel” or “by percent”. In a container you may define a general distance between the rows by using the attribute ROWDISTANCE:

Now we have a page in which the user can edit the name and the basic address of a person – and there's a button to save. The next step is to write the code behind the page.
You may directly copy&past the following the XML of this example in the following way:
Copy the following xml:
<t:rowtitlebar id="g_1" text="Address Detail" />
<t:rowheader id="g_2" >
<t:button id="g_3" actionListener="#{d.AddressDetailUI.onSaveAction}" text="Save" />
</t:rowheader>
<t:rowbodypane id="g_4" rowdistance="5" >
<t:row id="g_5" >
<t:label id="g_6" text="First Name" width="100" />
<t:field id="g_7" text="#{d.AddressDetailUI.firstName}" width="150" />
</t:row>
<t:row id="g_8" >
<t:label id="g_9" text="Last Name" width="100" />
<t:field id="g_10" text="#{d.AddressDetailUI.lastName}" width="150" />
</t:row>
<t:row id="g_11" >
<t:label id="g_12" text="Street" width="100" />
<t:field id="g_13" text="#{d.AddressDetailUI.street}" width="150" />
</t:row>
<t:row id="g_14" >
<t:label id="g_15" text="Town" width="100" />
<t:field id="g_16" text="#{d.AddressDetailUI.town}" width="150" />
</t:row>
</t:rowbodypane>
<t:rowstatusbar id="g_17" />
Press the “XML-dialog” icon in the Layout Editor:
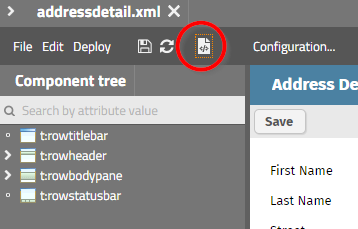
A popup dialog will appear into which you can paste the XML – and take it over into the current layout definition.
A layout is represented by a class (at runtime: object). Inside this class there are properties (set/get-implementation) and special methods (action listeners) – which are bound to component-attributes of the page. Fields are bound to properties, buttons are bound to methods.
For editing the page there is a helper tool, which simplifies the creation of the structure of the page – the Code Generator:

On the right side first click the refresh icon (two green arrows) on the top right. A top level tree node will be shown as “d-Dispatcher”.
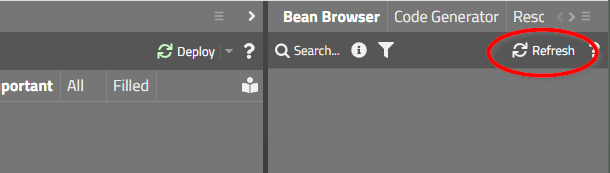
Now the project knows about the classes that are compiled in the project and shows the accordingly in the “Bean Browser” tool.
Press the icon “Create Java” on top of the preview area:
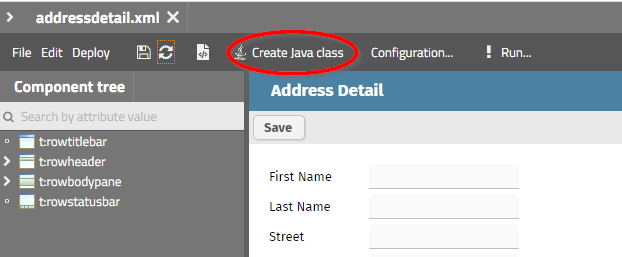
A dialog will be opened in which you can select the package and the type of bean that you want to create as logic part for the current layout:
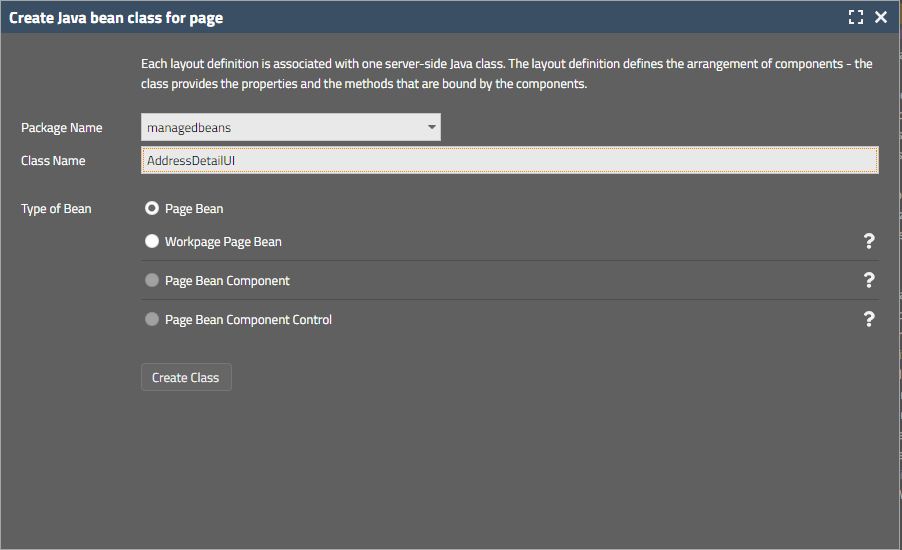
Select name “AddressDetailUI” - pay attention: the default name that is proposed is very similar “AddressdetailUI”, but the “d” of “detail” is lower-case! Class names are case sensitive, of course – so be careful to really define the name “AddressDetailUI”.
The bean is derived from a class “PageBean” by default – which is optimal for writing beans that can be flexibly (re-)used in many ways. Do not change this default.

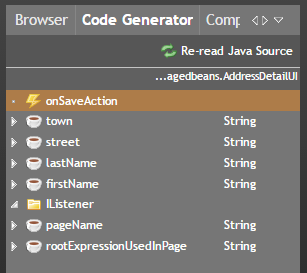
On the right side within the “Code Generator” you now see the structure of the class – already showing two internal properties. You may add properties and methods by using the right mouse button within the Code Generator. When selecting “New Property” then the following screen section will appear:
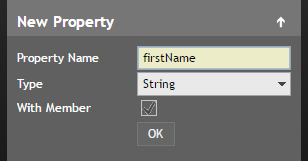
You may now add “firstName”, “lastName”, “street”, “town” as String-properties and you may add the method “onSaveAction”:
Please pay attention: in general names start with a lowercase character: if a property's name is “firstName”, then the corresponding set-/get-methods are “setFirstName/getFirstName”.
In the background the code is generated. Due to the usage of the CaptainCasa plugin the Eclipse project is automatically updated. If you did not install it, then you need to explicitly refresh the content of the project in Eclipse by selecting “Refresh” from the right-mouse-button-menu of the project.
package managedbeans;
import java.io.Serializable;
import org.eclnt.editor.annotations.CCGenClass;
import org.eclnt.jsfserver.pagebean.PageBean;
import javax.faces.event.ActionEvent;
@CCGenClass (expressionBase="#{d.AddressDetailUI}")
public class AddressDetailUI
extends PageBean
implements Serializable
{
public void onSaveAction(ActionEvent event) {}
String m_town;
public String getTown() { return m_town; }
public void setTown(String value) { this.m_town = value; }
String m_street;
public String getStreet() { return m_street; }
public void setStreet(String value) { this.m_street = value; }
String m_lastName;
public String getLastName() { return m_lastName; }
public void setLastName(String value) { this.m_lastName = value; }
String m_firstName;
public String getFirstName() { return m_firstName; }
public void setFirstName(String value) { this.m_firstName = value; }
// ------------------------------------------------------------------------
// constructors & initialization
// ------------------------------------------------------------------------
public AddressDetailUI()
{
}
public String getPageName() { return "/addressdetail.jsp"; }
public String getRootExpressionUsedInPage() { return "#{d.AddressDetailUI}"; }
// ------------------------------------------------------------------------
}
(Please note: there are some more lines of code that you see within your tool environment – we only listed these lines which are relevant for the follow-on processing.)
The class is running on the server side (if using the default delivery then this is the Tomcat-environment). From the class you can access any function of your server side business logic just through normal Java implementation.
For testing the class you may update the onSave-method in the following way:
public void onSaveAction(ActionEvent event)
{
if (m_firstName == null || m_lastName == null)
{
Statusbar.outputError("Please define all name fields.");
return;
}
m_town = m_firstName + "/" + m_lastName;
}
(Of course this does not make any sense at all – this is just for testing purpose!)
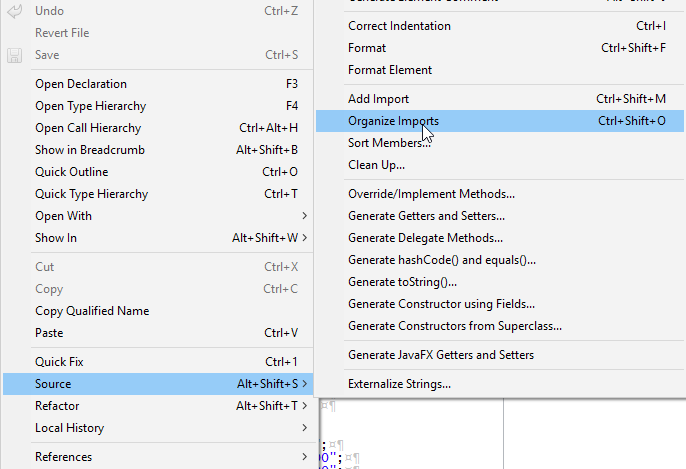
“Statusbar” is a class coming with the CaptainCasa environment (eclntjsfserver.jar). You need to import the corresponding package “org.eclnt.jsfserver.defaultscreens” within your class. The easiest way to do so in Eclipse: select “Source => Organize Imports” from the editor's popup menu – or simply press “ctrl-shift-o”.
Save the code in Eclipse, so that the classes are copied accordingly.
Now go back into the Layout Editor.
In the layout you have some fields and one button. The text of the fields now needs to be bound to the properties of your program – and the button of the layout needs to be bounds to the method (actionListener).
To do so you need to...
...select each field and then drag&drop the property from the Code Generator into the TEXT attribute of the field. You will see an expression being dropped into the attribute's definition
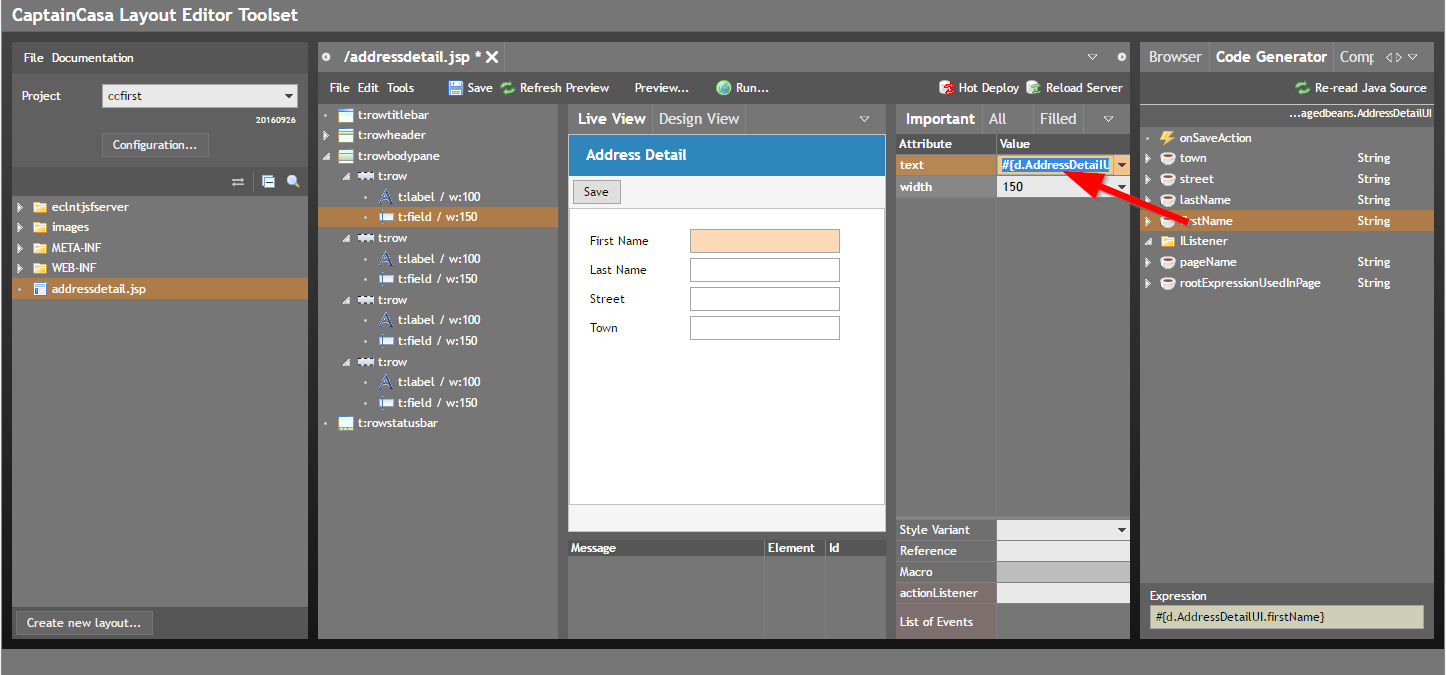
...select the button and then drag&drop the method into the ACTIONLISTENER attribute of the button
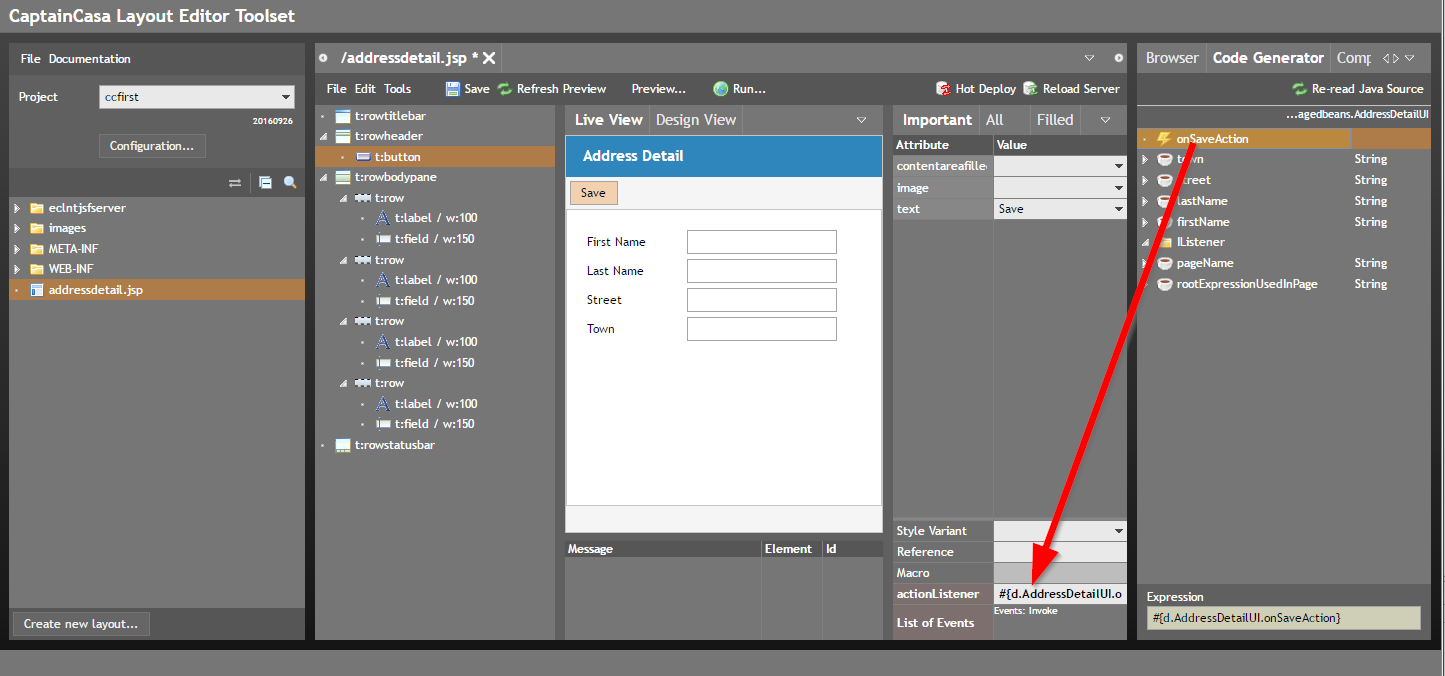
Now save the page.
As result of the drag & drop operations so called expressions were defined as value for the corresponding attributes. You may take a look into the layout file, which is stored in the “/webcontent” directory of your project:
<?xml version="1.0" encoding="utf-8"?>
<t:layoutdefinition
xmlns:t="http://www.CaptainCasa.com/controllibrary/t">
<t:beanprocessing id="g_1"
beanbinding="#{d.AddressDetailUI}" />
<t:rowtitlebar id="g_19" text="Address Detail" />
<t:rowheader id="g_2">
<t:button id="g_3"
actionListener="#{d.AddressDetailUI.onSaveAction}" text="Save" />
</t:rowheader>
<t:rowbodypane id="g_4" rowdistance="5">
<t:row id="g_5">
<t:label id="g_6" text="First Name" width="100" />
<t:field id="g_7" text="#{d.AddressDetailUI.firstName}"
width="150" />
</t:row>
<t:row id="g_8">
<t:label id="g_9" text="Last Name" width="100" />
<t:field id="g_10" text="#{d.AddressDetailUI.lastName}"
width="150" />
</t:row>
<t:row id="g_11">
<t:label id="g_12" text="Street" width="100" />
<t:field id="g_13" text="#{d.AddressDetailUI.street}"
width="150" />
</t:row>
<t:row id="g_14">
<t:label id="g_15" text="Town" width="100" />
<t:field id="g_16" text="#{d.AddressDetailUI.town}"
width="150" />
</t:row>
</t:rowbodypane>
<t:rowstatusbar id="g_17" />
</t:layoutdefinition>
All expressions by default start with a “#{d.AddressDetailUI.” which is the link into the class (at runtime: object) of type “AddressDetailUI”. The name of the property and the name of the method directly follows after, so e.g. “#{d.AddressDetailUI.street}” is addressing the property “street” of a “AddressDetailUI” instance.
For running the page you need to press the “Reload Server”-button one time after having created the project. Any further reload activity then can be performed by pressing the “Hot Deploy” button.
The preview will show the page, now bound to the code on server side.
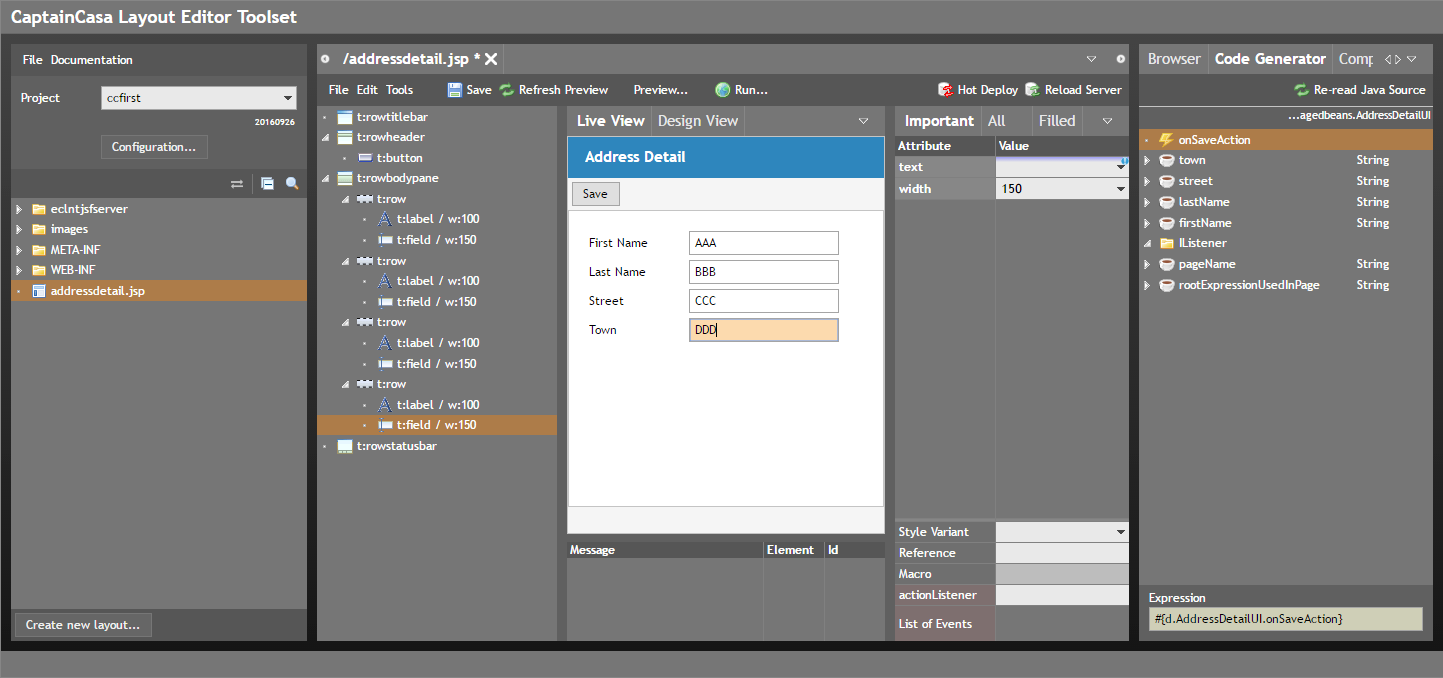
You may edit the fields directly in the preview and press the “Save” button in order to invoke the server side method. After having pressed “Save” the content of the “Town”-field should be updated according to the code in the server side Java program.
m_town = m_firstName + "/" + m_lastName;
You may now continue to...
...edit the layout by using the Layout Editor. For refreshing the preview you only have to press “Refresh Preview” (ctrl-p) oder “Save” (ctrl-s). The changes of the layout will be reflected immediately.
...change the code – either by using the Code Generator or by using Eclipse. After having changed the code you need to press “Hot Deploy” in order to add the new code to the server side processing.
When having defined a layout and a page bean (i.e. class extending PageBean), then both together form a re-usable unit, which you can either embed in other pages or which you can open as modal or modeless dialog.
We will now define a surrounding page, which will embed the page of the previous chapter (/addressdetail.jsp).
First we create the layout “addressouter” in the same way as “addressdetail” was created. When defining the layout press right mouse button on top of the ROWBODYPANE component and add a ROWPAGEBEANINCLUDE into the content of the container:

Now create the Java class “AddressOuterUI” - again in the same way as having created the “AddressDetailUI” before.
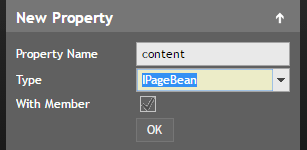
In the Code Generator add the property “content” of type “IpageBean”:
Bind the newly created property to the PAGEBEANBINDING attribute of the ROWPAGEBEANINCLUDE component:
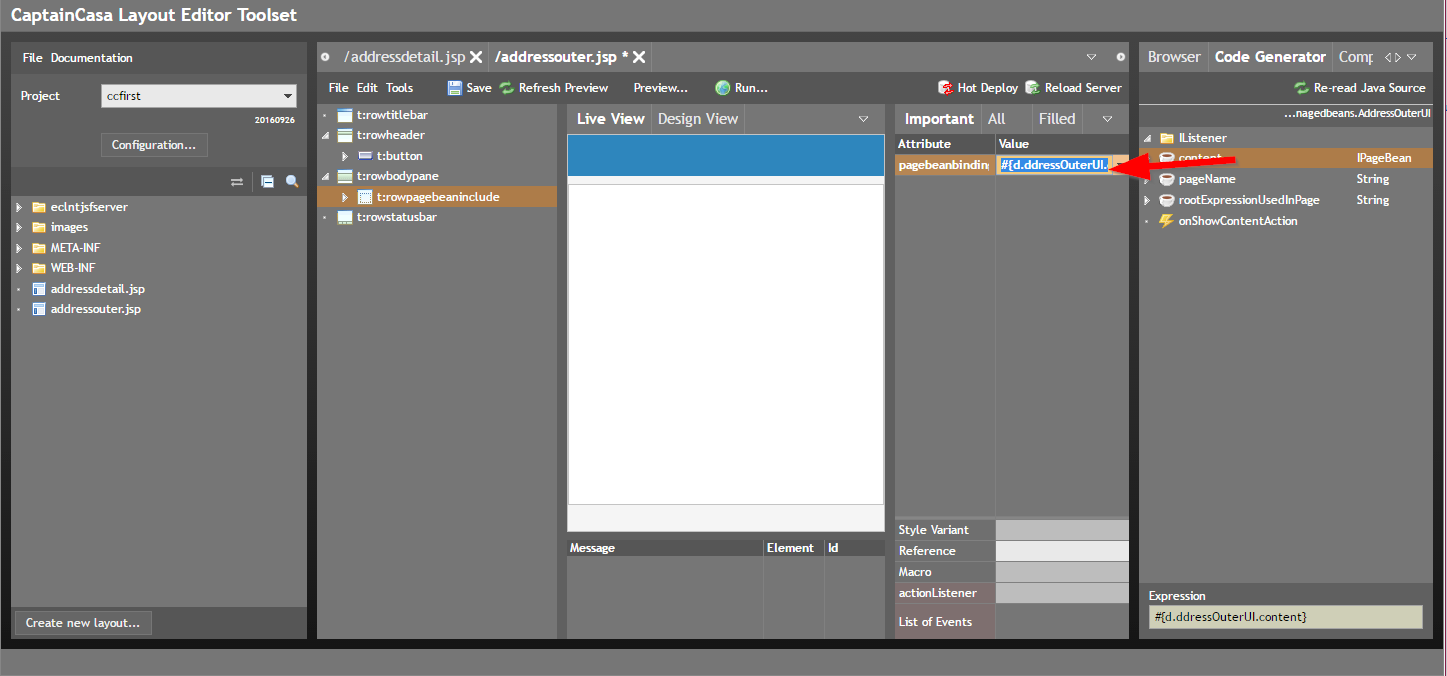
In addition add a button into the header and bind it to a new method “onShowContentAction”.
The layout structure should now look like:
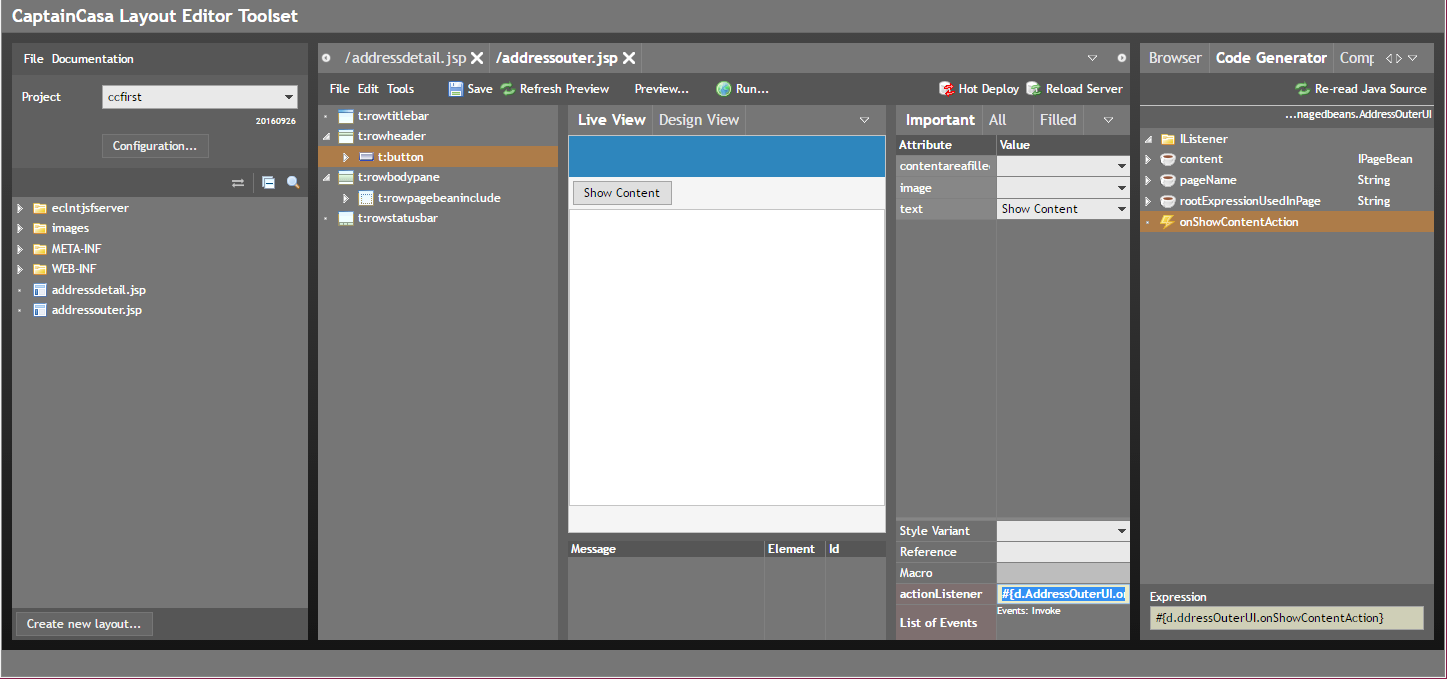
The inner XML structure of the layout is:
<t:rowtitlebar id="g_1" />
<t:rowheader id="g_2">
<t:button id="g_3"
actionListener="#{d.AddressOuter.onShowContentAction}"
text="Show Content" />
</t:rowheader>
<t:rowbodypane id="g_4">
<t:rowpagebeaninclude id="g_5"
pagebeanbinding="#{d.AddressOuter.content}" />
</t:rowbodypane>
<t:rowstatusbar id="g_6" />
Now implement the program in the following way:
package managedbeans;
import java.io.Serializable;
import javax.faces.event.ActionEvent;
import org.eclnt.editor.annotations.CCGenClass;
import org.eclnt.jsfserver.pagebean.IPageBean;
import org.eclnt.jsfserver.pagebean.PageBean;
@CCGenClass (expressionBase="#{d.AddressOuter}")
public class AddressOuter
extends PageBean
implements Serializable
{
public AddressOuter()
{
}
public String getPageName() { return "/addressouter.jsp"; }
public String getRootExpressionUsedInPage() { return "#{d.AddressOuter}"; }
IPageBean m_content;
public IPageBean getContent() { return m_content; }
public void setContent(IPageBean value) { this.m_content = value; }
public void onShowContentAction(ActionEvent event)
{
if (m_content == null)
{
AddressDetailUI aui = new AddressDetailUI();
aui.setFirstName("First");
aui.setLastName("Last");
m_content = aui;
}
}
}
(Please note: the order of the methods in the generated code that you see within your environment is different. We re-ordered the code for better readability.)
When the button is pressed an instance of AddressDetailUI is created and defined as content. Because the ROWPAGEBEANINCLUDE component in the layout is bound to the “content”-property, the page will update accordingly.
After pressing “Hot Deploy” in the Layout Editor you may now test:
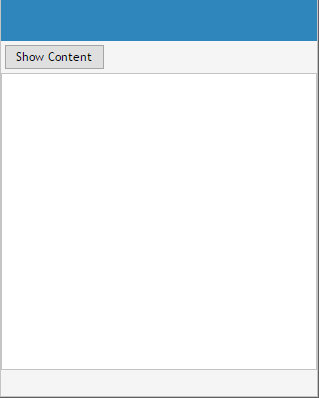 >
> 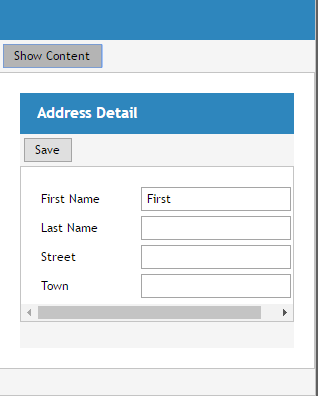
The content of the page is shown after having pressed “Show Content”.
So, this is the basics of page navigation scenarios. An outer page is controlling an inner area (ROWPAGEBEANINCLUDE) which is filled by an inner page. If the inner page changes then the content will be updated accordingly.
The page bean of the outer page creates the page bean of the inner page – you can establish any kind of Java-API between these beans. (For example the inner page may define a listener interface that the outer bean can implement.)
Let's add a new button into the outer page and bind it to a new method of the outer page bean. The page layout now contains the following component structure:
<t:rowheader id="g_2">
<t:button id="g_3"
actionListener="#{d.AddressOuter.onShowContentAction}"
text="Show Content" />
<t:coldistance id="g_4" />
<t:button id="g_5"
actionListener="#{d.AddressOuter.onShowDialogAction}"
text="Show Dialog" />
</t:rowheader>
<t:rowbodypane id="g_6">
<t:rowpagebeaninclude id="g_7"
pagebeanbinding="#{d.AddressOuter.content}" />
</t:rowbodypane>
<t:rowstatusbar id="g_8" />
The code contains a new method onShowDialogAction:
public class AddressOuter
extends PageBean
implements Serializable
{
...
...
public void onShowDialogAction(ActionEvent event)
{
final AddressDetailUI aui = new AddressDetailUI();
aui.setFirstName("First (dialog)");
aui.setLastName("Last (dialog)");
openModalPopup(aui,"My first Dialog",400,400,
new ModalPopup.IModalPopupListener()
{
@Override
public void reactOnPopupClosedByUser()
{
closePopup(aui);
}
});
}
}
One page bean can open another one by simple calling the openModalPopup-method. You need to pass the page bean to be opened, the title, the width and height – and a listener that is called when the user pressed the close icon of the popup (or presses alt-f4).
For closing the popup you call the “closePopup(..)” function of a page bean. Pay attention: the opening and the closing of a popup must be called within the same page bean! You cannot open a popup from one page bean and close it from another one.
You may now create a dialog that contains a grid – and you will see that the same principles of development that you got to know so far are also applied for grids.
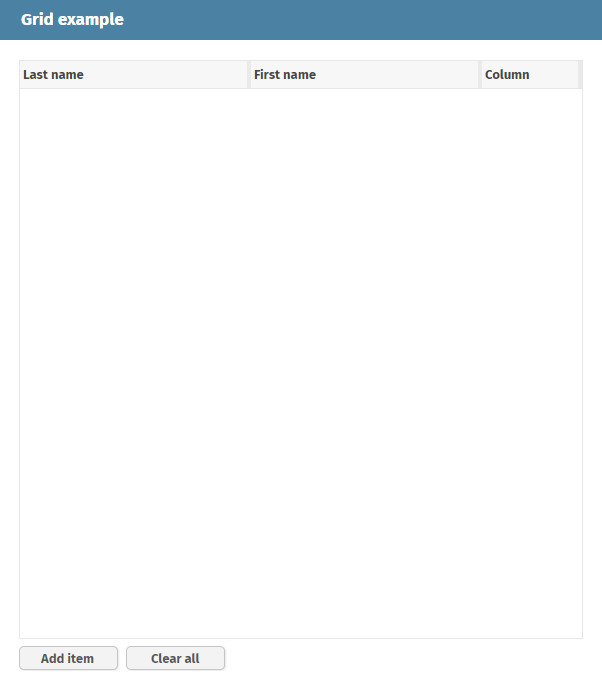
Create a new page with name “listofpersons” in the toolset. The layout XML is:
<t:rowtitlebar id="g_1" text="Grid example" />
<t:rowbodypane id="g_5" rowdistance="7" >
<t:row id="g_6" >
<t:fixgrid id="g_7" height="100%" objectbinding="#{d.ListOfPersonsUI.grid}" width="100%" >
<t:gridcol id="g_8" text="Last name" width="50%" >
<t:label id="g_9" text=".{lastName}" />
</t:gridcol>
<t:gridcol id="g_10" text="First name" width="50%" >
<t:label id="g_11" text=".{firstName}" />
</t:gridcol>
<t:gridcol id="g_14" text="Column" width="100" >
<t:button id="g_15" actionListener=".{onRemoveItemAction}" text="Remove item" />
</t:gridcol>
</t:fixgrid>
</t:row>
<t:row id="g_17" coldistance="7" >
<t:button id="g_18" actionListener="#{d.ListOfPersonsUI.onAddItemAction}" text="Add item" width="100+" />
<t:button id="g_19" actionListener="#{d.ListOfPersonsUI.onClearAction}" text="Clear all" width="100+" />
</t:row>
</t:rowbodypane>
You might either copy the XML content or you may arrange the components within the layout editor manually.
You see: a grid is represented by a component FIXGRID, this internally holds GRIDCOL components and each GRIDCOL holds exactly one component, which is the cell component. You also see: you may potentially use any component as cell component – in the example the first two cells are LABEL components, the last component is a button component.
The Java class is:
package managedbeans;
import java.io.Serializable;
import org.eclnt.editor.annotations.CCGenClass;
import org.eclnt.jsfserver.defaultscreens.Statusbar;
import org.eclnt.jsfserver.elements.impl.FIXGRIDItem;
import org.eclnt.jsfserver.elements.impl.FIXGRIDListBinding;
import org.eclnt.jsfserver.pagebean.PageBean;
@CCGenClass (expressionBase="#{d.ListOfPersonsUI}")
public class ListOfPersonsUI
extends PageBean
implements Serializable
{
// ------------------------------------------------------------------------
// inner classes
// ------------------------------------------------------------------------
public class GridItem extends FIXGRIDItem implements java.io.Serializable
{
String i_firstName;
String i_lastName;
public String getFirstName() { return i_firstName; }
public void setFirstName(String value) { this.i_firstName = value; }
public String getLastName() { return i_lastName; }
public void setLastName(String value) { this.i_lastName = value; }
public void onRemoveItemAction(javax.faces.event.ActionEvent event)
{
m_grid.getItems().remove(this);
}
public void onRowExecute() { Statusbar.outputSuccess("Execute: " + i_lastName); }
public void onRowSelect() { Statusbar.outputSuccess("Select: " + i_lastName); }
}
// ------------------------------------------------------------------------
// members
// ------------------------------------------------------------------------
FIXGRIDListBinding<GridItem> m_grid = new FIXGRIDListBinding<GridItem>();
// ------------------------------------------------------------------------
// constructors & initialization
// ------------------------------------------------------------------------
public ListOfPersonsUI()
{
}
public String getPageName() { return "/listofpersons.jsp"; }
public String getRootExpressionUsedInPage() { return "#{d.ListOfPersonsUI}"; }
// ------------------------------------------------------------------------
// public usage
// ------------------------------------------------------------------------
public FIXGRIDListBinding<GridItem> getGrid() { return m_grid; }
public void onAddItemAction(javax.faces.event.ActionEvent event)
{
GridItem gi = new GridItem();
gi.setFirstName("First " + System.currentTimeMillis());
gi.setLastName("Last " + System.currentTimeMillis());
m_grid.getItems().add(gi);
}
public void onClearAction(javax.faces.event.ActionEvent event)
{
m_grid.getItems().clear();
}
}
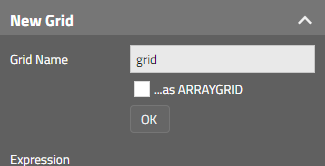
In case you create this class step by step using the Code Generator, you need to proceed in the following way:
Select “New Grid” in the right-mouse-click popup menu:

Then define the property name of the grid (or take over the proposed value “grid”):
After pressing OK there you will see a “grid”-property and a “GridItem”-class that is added to your code:
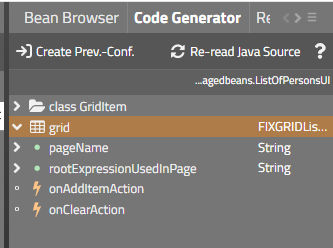
The property “grid” is of type “FIXGRIDListBinding” which internally holds a list (java.util.List) of items (“m_grid.getItems()”) - each item being an instance of class “GridItem”. Properties and methods for the items are added in the GridItem class as consequence. For creating them you need to right-click the class “GridItem” and start the creation from there:

The binding need to be done as follows:
FIXGRID-OBJECTBINDING binds to the “grid” property. The “grid” (type FIXGRIDLisstBinding) holds the list of items – so the whole FIXGRID-component refers to this property.
Each cell component (LABEL, BUTTON) bind to the grid item properties. Because there are many grid items, the binding is done in a relative way. The binding expression “.{firstName}” binds to the item's “set/getFirstName(...)” methods.
There is a tutorial video available: https://www.CaptainCasa.com > “Developers > First steps – Tutorials”. In the video the dialog definition and the Java class are created – so all the right mouse-clicking and menu-selections can be watched there.
In the grid there are a couple of default reactors – in the example there are two methods...
onRowSelect(...)
onRowExecute(...)
...which are executed when the user clicks an item – and when a user double-clicks an item.
So far you have seen the pages that you created only within the context of the Layout Editor. Actually what you see in the Layout Editor is an exact preview of the application – the editor internally opens up a preview area in which a normal instance of the Enterprise Client is started.
To view the page outside the editor open your favorite browser and open URL: http://localhost:50000/ccfirst/addressouter.risc?ccstyle=defaultrisc.
In principle you now know the 20% basics of CaptainCasa that are the most important ones:
A page consist out of a layout definition (XML in .jsp file) and a page bean. Attributes of components are either directly defined or are bound to page bean properties and methods by using expressions.
Pages can be nested in one another by using the component ROWPAGEBEANINCLUDE. Or they can be called as popup by using corresponding PageBean methods.
Now it's “only” a matter of getting to know the individual components that are part of the CaptainCasa component library and it's a matter of structuring the server side code...